window KIA NIRO 2020 Owner's Manual
[x] Cancel search | Manufacturer: KIA, Model Year: 2020, Model line: NIRO, Model: KIA NIRO 2020Pages: 687, PDF Size: 11.43 MB
Page 268 of 687
4131
Features of your vehicle
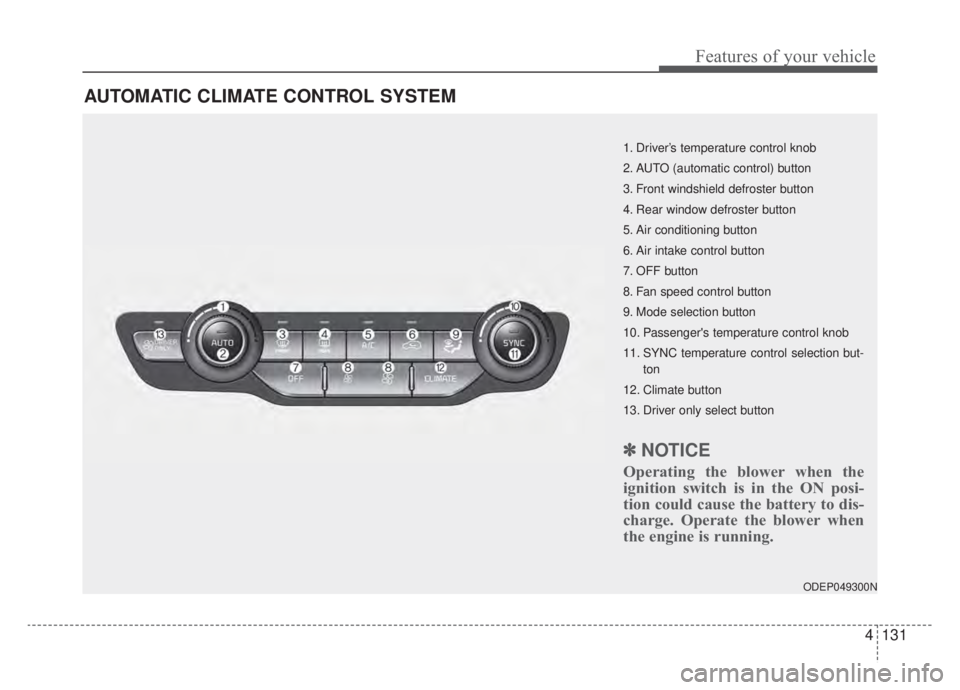
AUTOMATIC CLIMATE CONTROL SYSTEM
ODEP049300N
1. Driver’s temperature control knob
2. AUTO (automatic control) button
3. Front windshield defroster button
4. Rear window defroster button
5. Air conditioning button
6. Air intake control button
7. OFF button
8. Fan speed control button
9. Mode selection button
10. Passenger's temperature control knob
11. SYNC temperature control selection but-ton
12. Climate button
13. Driver only select button
✽ ✽ NOTICE
Operating the blower when the
ignition switch is in the ON posi-
tion could cause the battery to dis-
charge. Operate the blower when
the engine is running.
Page 272 of 687
4135
Features of your vehicle
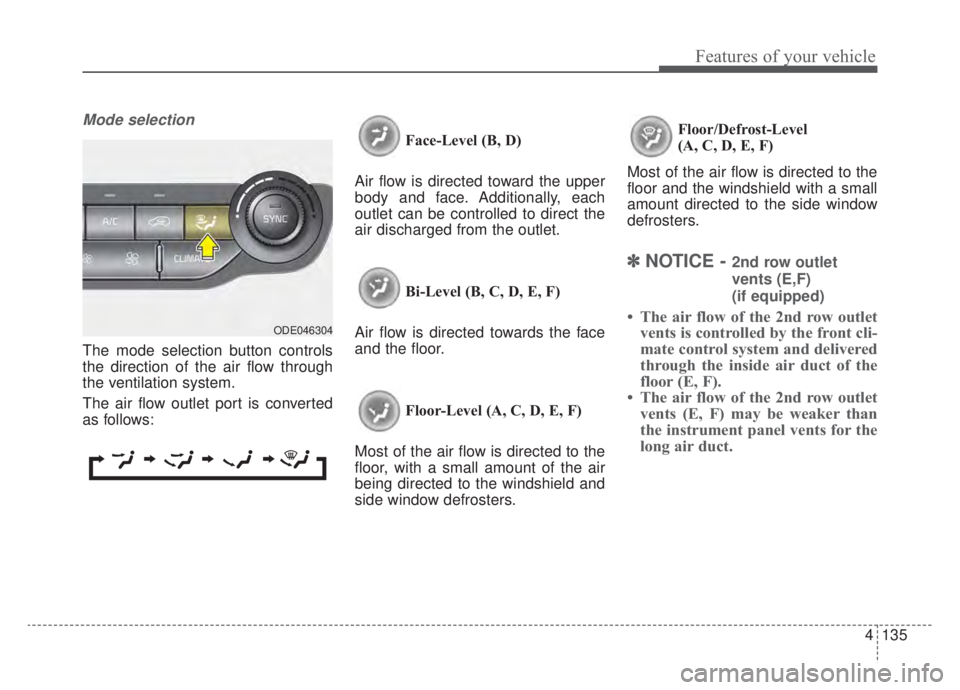
Mode selection
The mode selection button controls
the direction of the air flow through
the ventilation system.
The air flow outlet port is converted
as follows:Face-Level (B, D)
Air flow is directed toward the upper
body and face. Additionally, each
outlet can be controlled to direct the
air discharged from the outlet.
Bi-Level (B, C, D, E, F)
Air flow is directed towards the face
and the floor.
Floor-Level (A, C, D, E, F)
Most of the air flow is directed to the
floor, with a small amount of the air
being directed to the windshield and
side window defrosters. Floor/Defrost-Level
(A, C, D, E, F)
Most of the air flow is directed to the
floor and the windshield with a small
amount directed to the side window
defrosters.
✽ ✽ NOTICE - 2nd row outlet
vents (E,F)
(if equipped)
• The air flow of the 2nd row outlet
vents is controlled by the front cli-
mate control system and delivered
through the inside air duct of the
floor (E, F).
• The air flow of the 2nd row outlet vents (E, F) may be weaker than
the instrument panel vents for the
long air duct.ODE046304
Page 273 of 687
Features of your vehicle
136
4
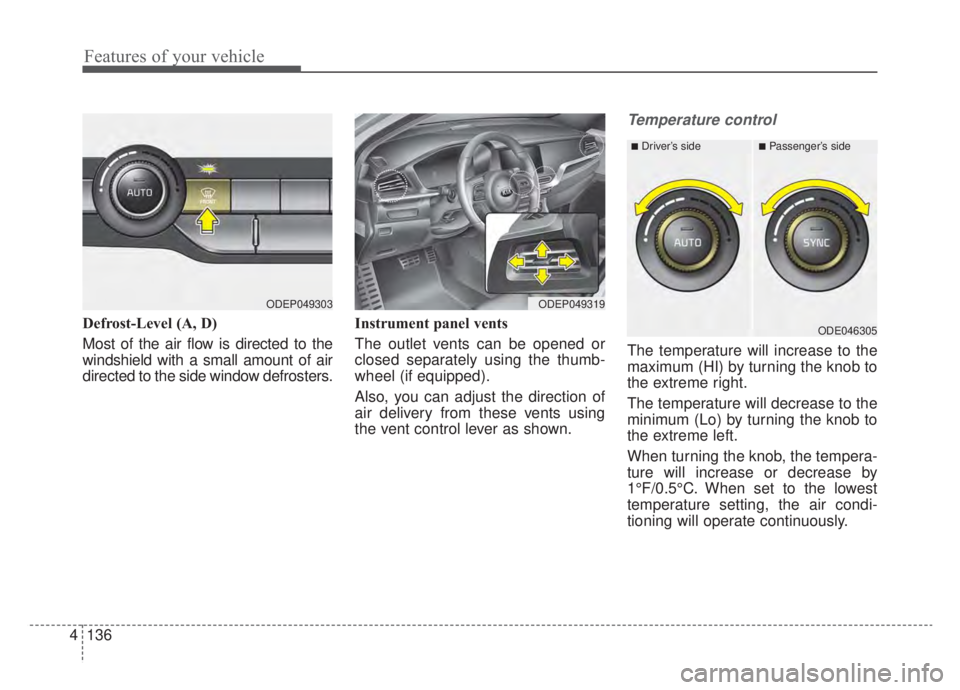
Defrost-Level (A, D)
Most of the air flow is directed to the
windshield with a small amount of air
directed to the side window defrosters. Instrument panel vents
The outlet vents can be opened or
closed separately using the thumb-
wheel (if equipped).
Also, you can adjust the direction of
air delivery from these vents using
the vent control lever as shown.
Temperature control
The temperature will increase to the
maximum (HI) by turning the knob to
the extreme right.
The temperature will decrease to the
minimum (Lo) by turning the knob to
the extreme left.
When turning the knob, the tempera-
ture will increase or decrease by
1°F/0.5°C. When set to the lowest
temperature setting, the air condi-
tioning will operate continuously.
ODEP049319
■Driver’s side■Passenger’s side
ODE046305
ODEP049303
Page 275 of 687
Features of your vehicle
138
4
Outside (fresh) air position
With the outside (fresh)air position selected, air
enters the vehicle from
outside and is heated or
cooled according to the
function selected.
Recirculated air position With the recirculated airposition selected, air
from the passenger com-
partment will be drawn
through the heating sys-
tem and heated or
cooled according to the
function selected. Prolonged operation of the heater in
the recirculated air position (without
air conditioning selected) may cause
fogging of the windshield and side
windows and the air within the pas-
senger compartment may become
stale.
In addition, prolonged use of the air
conditioning with the recirculated air
position selected will result in exces-
sively dry air in the passenger com-
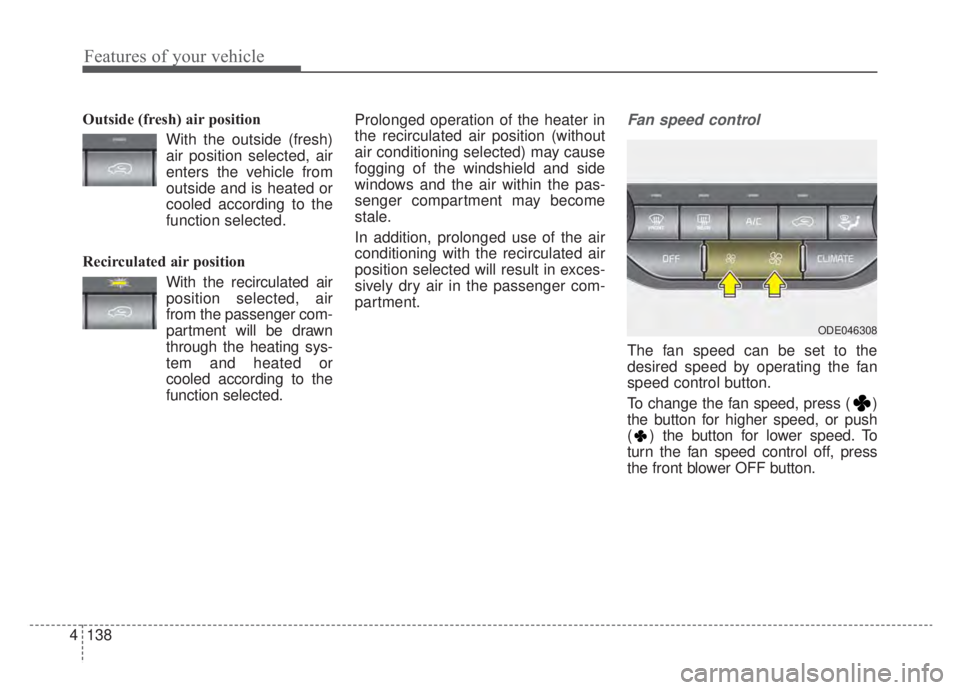
partment.Fan speed control
The fan speed can be set to the
desired speed by operating the fan
speed control button.
To change the fan speed, press ( )
the button for higher speed, or push
( ) the button for lower speed. To
turn the fan speed control off, press
the front blower OFF button.
ODE046308
Page 278 of 687
4141
Features of your vehicle
Operation Tips
To keep dust or unpleasant fumesfrom entering the vehicle through
the ventilation system, temporarily
set the air intake control to the
recirculated air position. Be sure to
return the control to the fresh air
position when the irritation has
passed to keep fresh air in the
vehicle. This will help keep the driv-
er alert and comfortable.
Air for the heating/cooling system is drawn in through the grilles just
ahead of the windshield. Care
should be taken that these are not
blocked by leaves, snow, ice or
other obstructions.
To prevent interior fog on the wind- shield, set the air intake control to
the fresh air position and fan speed
to the desired position, turn on the
air conditioning system, and adjust
the temperature control to desired
temperature.Air conditioning (if equipped)
All Kia Air Conditioning Systems are
filled with R-1234yf refrigerant.
1.Start the engine. Press the air con-ditioning button.
2.Set the mode to the position.
3.Set the air intake control to the out- side air or recirculated air position.
4.Adjust the fan speed control and temperature control to maintain
maximum comfort.
When maximum cooling is desired, set the temperature control to the
extreme left position, set the mode
control to the MAX A/C position,
then set the fan speed control to
the highest speed.CAUTION - Excessive A/C
Use
When using the air conditioningsystem, monitor the tempera-ture gauge closely while drivingup hills or in heavy traffic whenoutside temperatures are high.Air conditioning system opera-tion may cause engine over-heating. Continue to use theblower fan but turn the air con-ditioning system off if the tem-perature gauge indicates engineoverheating.
CAUTION
When opening the windows inhumid weather, air conditioningmay create water dropletsinside the vehicle. Since exces-sive water droplets may causedamage to electrical equipment,air conditioning should only beused with the windows closed.
Page 279 of 687
Features of your vehicle
142
4
Air conditioning system operation tips
If the vehicle has been parked in
direct sunlight during hot weather,
open the windows for a short time
to let the hot air inside the vehicle
escape.
To help reduce moisture inside of the windows on rainy or humid
days, decrease the humidity inside
the vehicle by operating the air
conditioning system.
During air conditioning system operation, you may occasionally
notice a slight change in engine
speed as the air conditioning com-
pressor cycles. This is a normal
system operation characteristic.
Use the air conditioning system every month only for a few minutes
to ensure maximum system per-
formance.
When using the air conditioning system, you may notice clear water
dripping (or even puddling) on the
ground under the passenger side
of the vehicle. This is a normal sys-
tem operation characteristic. Operating the air conditioning sys-
tem in the recirculated air position
provides maximum cooling; howev-
er, continual operation in this mode
may cause the air inside the vehi-
cle to become stale.
During cooling operation, you may occasionally notice a misty air flow
because of rapid cooling and
humid air intake. This is a normal
system operation characteristic.
Automatic ventilation
The system automatically selects the
outside (fresh) air position when the
climate control system operates over
a certain period of time (5 minutes)
in low temperature with the recircu-
lated air position selected. (when
floor mode or bi-level mode) To cancel or reset the Automatic
Ventilation
When the air conditioning system is
on, select Face Level ( ) mode
and while pressing the A/C button,
press the air intake control button 5
times within 3 seconds.
When the automatic ventilation func-
tion is canceled, the indicator light
blinks 3 times at an interval of 0.5
seconds.
The air intake will be automatically
controlled to the fresh air position,
and the flow and air conditioning will
be automatically controlled.
When the automatic ventilation func-
tion is selected, the indicator light
blinks 6 times at an interval of 0.25
seconds.
The air intake will be automatically
controlled to the fresh air position,
and the flow and air conditioning will
be automatically controlled.
After the battery has been dis-
charged or separated, the automatic
ventilation function will be reset, so
please selected, according to you
preference.
Page 284 of 687
4147
Features of your vehicle
For maximum defrosting, set thetemperature control to the extreme
right/hot position and the fan speed
control to the highest speed.
If warm air to the floor is desired while defrosting or defogging, set
the mode to the floor-defrost posi-
tion.
Before driving, clear all snow and ice from the windshield, rear win-
dow, outside rear view mirrors, and
all side windows.
Clear all snow and ice from the hood and air inlet in the cowl grill to
improve heater and defroster effi-
ciency and to reduce the probabili-
ty of fogging up the inside of the
windshield.Automatic climate control
system
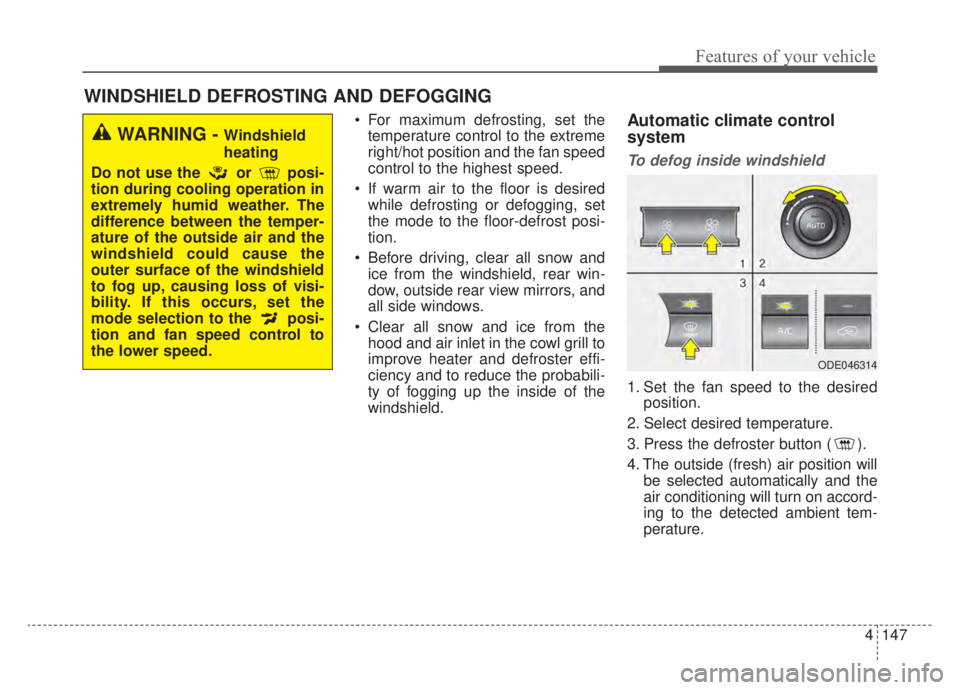
To defog inside windshield
1. Set the fan speed to the desired position.
2. Select desired temperature.
3. Press the defroster button ( ).
4. The outside (fresh) air position will be selected automatically and the
air conditioning will turn on accord-
ing to the detected ambient tem-
perature.
WINDSHIELD DEFROSTING AND DEFOGGING
WARNING - Windshield
heating
Do not use the or posi-
tion during cooling operation in
extremely humid weather. The
difference between the temper-
ature of the outside air and the
windshield could cause the
outer surface of the windshield
to fog up, causing loss of visi-
bility. If this occurs, set the
mode selection to the posi-
tion and fan speed control to
the lower speed.
ODE046314
Page 294 of 687
4157
Features of your vehicle
Sunvisor
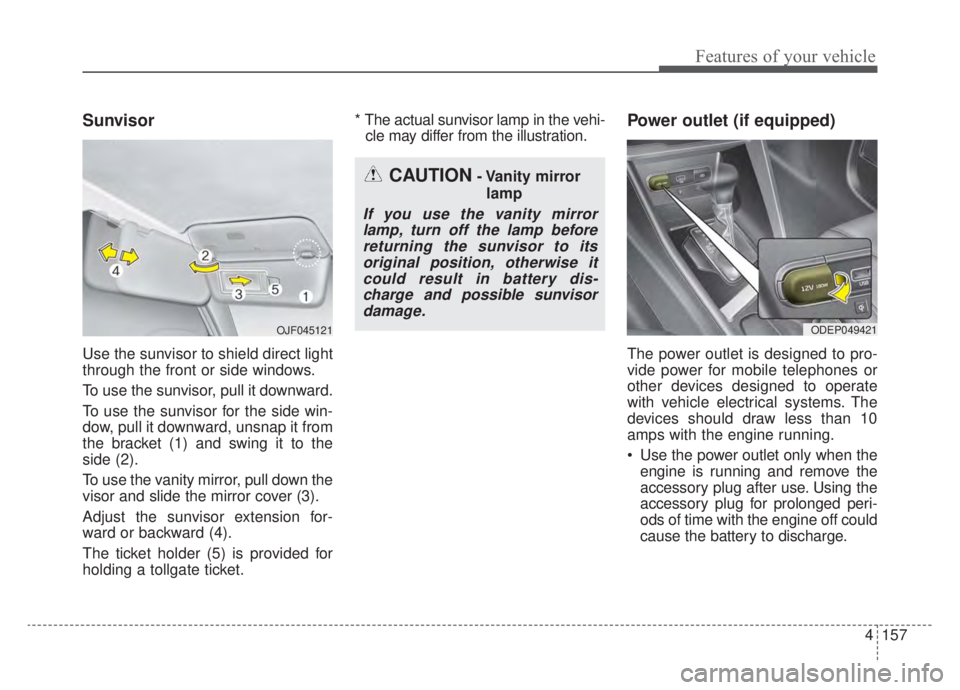
Use the sunvisor to shield direct light
through the front or side windows.
To use the sunvisor, pull it downward.
To use the sunvisor for the side win-
dow, pull it downward, unsnap it from
the bracket (1) and swing it to the
side (2).
To use the vanity mirror, pull down the
visor and slide the mirror cover (3).
Adjust the sunvisor extension for-
ward or backward (4).
The ticket holder (5) is provided for
holding a tollgate ticket.* The actual sunvisor lamp in the vehi-
cle may differ from the illustration.
Power outlet (if equipped)
The power outlet is designed to pro-
vide power for mobile telephones or
other devices designed to operate
with vehicle electrical systems. The
devices should draw less than 10
amps with the engine running.
Use the power outlet only when the engine is running and remove the
accessory plug after use. Using the
accessory plug for prolonged peri-
ods of time with the engine off could
cause the battery to discharge.
CAUTION- Vanity mirror
lamp
If you use the vanity mirrorlamp, turn off the lamp beforereturning the sunvisor to itsoriginal position, otherwise itcould result in battery dis-charge and possible sunvisordamage.
ODEP049421 OJF045121
Page 314 of 687
Driving your vehicle
45
Be sure the exhaust system does
not leak.
The exhaust system should be
checked whenever the vehicle is
raised to change the oil or for any
other purpose. If you hear a change in
the sound of the exhaust or if you drive
over something that strikes the under-
neath side of the vehicle, have the
exhaust system checked as soon as
possible by an authorized Kia dealer.
WARNING- Engineexhaust
Do not inhale exhaust fumes or
leave your engine running in a
enclosed area for a prolonged
time. Exhaust fumes contain
carbon monoxide, a colorless,
odorless gas that can cause
unconsciousness and death by
asphyxiation.WARNING- Open liftgate
Do not drive with the liftgate
open. Poisonous exhaust gases
can enter the passenger com-
partment. If you must drive with
the liftgate open proceed as fol-
lows:
1. Close all windows.
2. Open side vents.
3. Set the air intake control at “Fresh”, the air flow control
at “Floor” or “Face” and the
fan at the highest speed.
Page 315 of 687
55
Driving your vehicle
Before entering vehicle
• Be sure that all windows, outsidemirror(s), and outside lights are
clean.
Check the condition of the tires.
Check under the vehicle for any sign of leaks.
Be sure there are no obstacles behind you if you intend to back up.
Necessary inspections
Fluid levels, such as engine oil,
engine coolant, brake fluid, and
washer fluid should be checked on a
regular basis, at the exact interval
depending on the fluid. Further
details are provided in chapter 7,
“Maintenance”.
Before starting
Close and lock all doors.
Position the seat so that all con-trols are easily reached.
Buckle your seat belt.
Adjust the inside and outside rearview mirrors.
Be sure that all lights work.
Check all gauges.
Check the operation of warning lights when the ignition switch or
ENGINE START/STOP button is in
the ON position.
Release the parking brake and make sure the brake warning light
goes out.
For safe operation, be sure you are
familiar with your vehicle and its
equipment.
BEFORE DRIVING
WARNING - Distracted driving
Focus on the road while driving.
The driver's primary responsi-
bility is in the safe and legal
operation of the vehicle. Any
handled devices, other equip-
ment or vehicle systems that
distract the driver should not be
used during vehicle operation.