mirror KIA NIRO 2021 Owners Manual
[x] Cancel search | Manufacturer: KIA, Model Year: 2021, Model line: NIRO, Model: KIA NIRO 2021Pages: 710, PDF Size: 14.77 MB
Page 63 of 710
Your vehicle at a glance
2 2
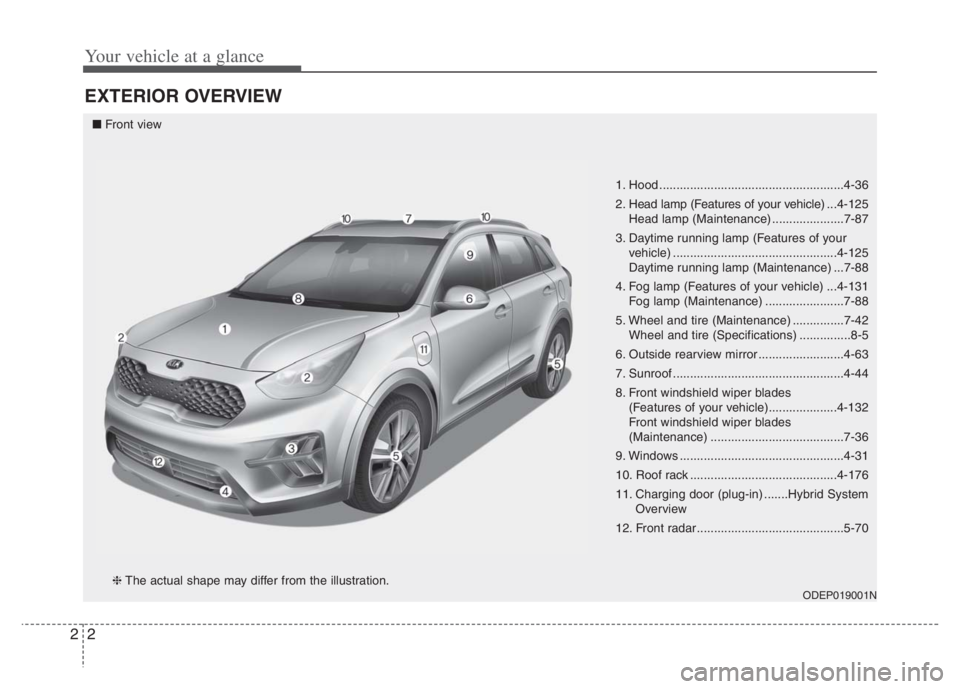
EXTERIOR OVERVIEW
1. Hood ......................................................4-36
2. Head lamp (Features of your vehicle) ...4-125
Head lamp (Maintenance) .....................7-87
3. Daytime running lamp (Features of your
vehicle) ................................................4-125
Daytime running lamp (Maintenance) ...7-88
4. Fog lamp (Features of your vehicle) ...4-131
Fog lamp (Maintenance) .......................7-88
5. Wheel and tire (Maintenance) ...............7-42
Wheel and tire (Specifications) ...............8-5
6. Outside rearview mirror .........................4-63
7. Sunroof ..................................................4-44
8. Front windshield wiper blades
(Features of your vehicle)....................4-132
Front windshield wiper blades
(Maintenance) .......................................7-36
9. Windows ................................................4-31
10. Roof rack ...........................................4-176
11. Charging door (plug-in) .......Hybrid System
Overview
12. Front radar ...........................................5-70
ODEP019001N
■Front view
❈The actual shape may differ from the illustration.
Page 65 of 710
Your vehicle at a glance
4 2
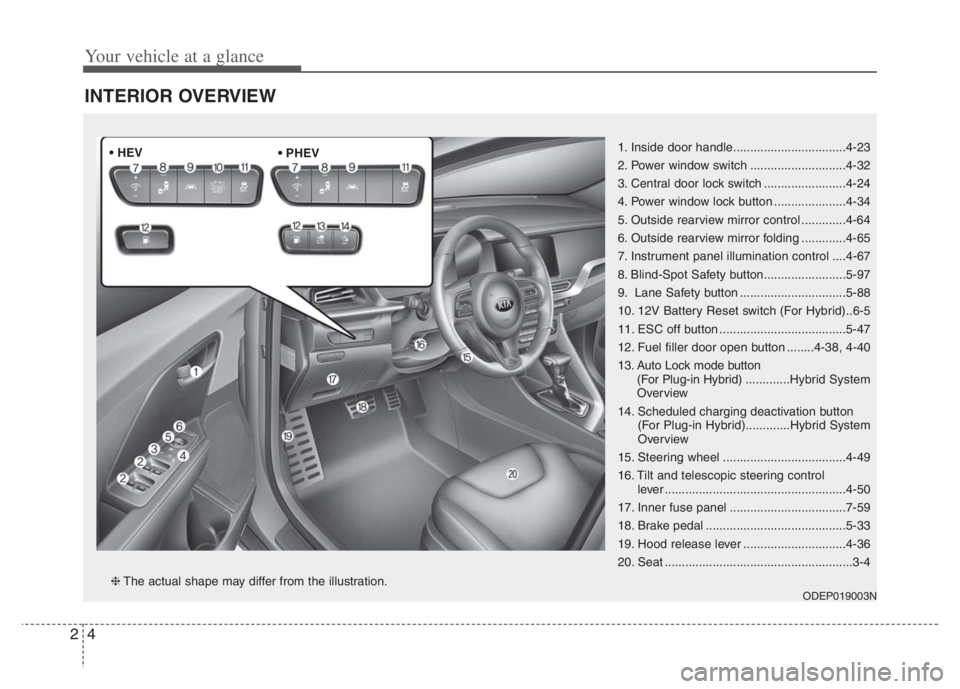
INTERIOR OVERVIEW
1. Inside door handle.................................4-23
2. Power window switch ............................4-32
3. Central door lock switch ........................4-24
4. Power window lock button .....................4-34
5. Outside rearview mirror control .............4-64
6. Outside rearview mirror folding .............4-65
7. Instrument panel illumination control ....4-67
8. Blind-Spot Safety button........................5-97
9. Lane Safety button ...............................5-88
10. 12V Battery Reset switch (For Hybrid)..6-5
11. ESC off button .....................................5-47
12. Fuel filler door open button ........4-38, 4-40
13. Auto Lock mode button
(For Plug-in Hybrid).............Hybrid System
Overview
14. Scheduled charging deactivation button
(For Plug-in Hybrid).............Hybrid System
Overview
15. Steering wheel ....................................4-49
16. Tilt and telescopic steering control
lever .....................................................4-50
17. Inner fuse panel ..................................7-59
18. Brake pedal .........................................5-33
19. Hood release lever ..............................4-36
20. Seat .......................................................3-4
ODEP019003N❈The actual shape may differ from the illustration. • HEV
Page 77 of 710
Safety features of your vehicle
10
3
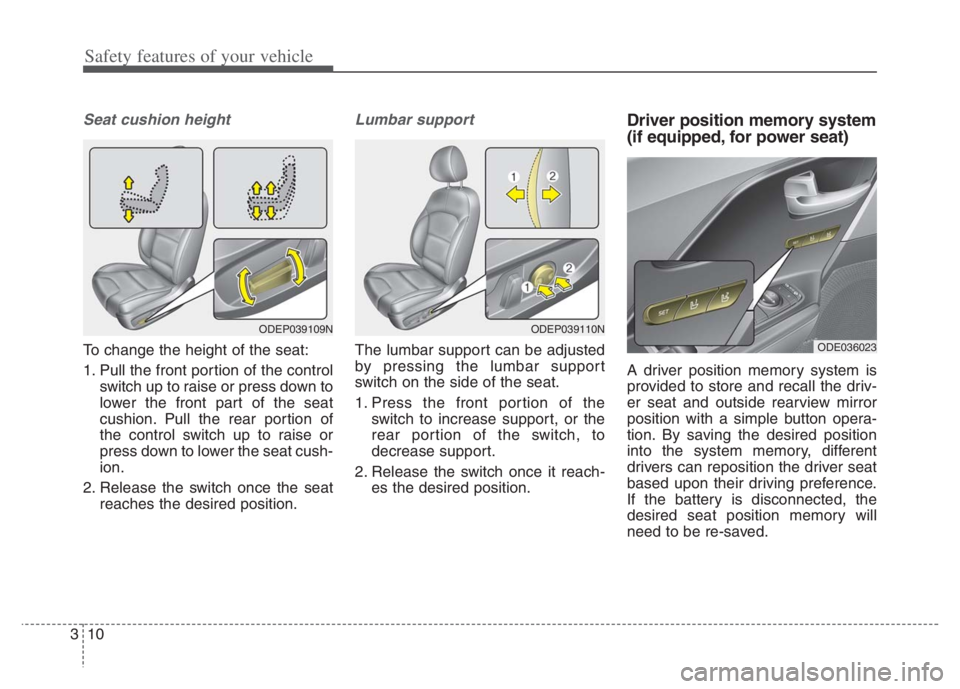
Seat cushion height
To change the height of the seat:
1. Pull the front portion of the control
switch up to raise or press down to
lower the front part of the seat
cushion. Pull the rear portion of
the control switch up to raise or
press down to lower the seat cush-
ion.
2. Release the switch once the seat reaches the desired position.
Lumbar support
The lumbar support can be adjusted
by pressing the lumbar support
switch on the side of the seat.
1. Press the front portion of theswitch to increase support, or the
rear portion of the switch, to
decrease support.
2. Release the switch once it reach- es the desired position.
Driver position memory system
(if equipped, for power seat)
A driver position memory system is
provided to store and recall the driv-
er seat and outside rearview mirror
position with a simple button opera-
tion. By saving the desired position
into the system memory, different
drivers can reposition the driver seat
based upon their driving preference.
If the battery is disconnected, the
desired seat position memory will
need to be re-saved.
ODE036023
ODEP039109NODEP039110N
Page 78 of 710

311
Safety features of your vehicle
Storing positions into memory
using the buttons on the door
Storing driver’s seat positions
1. Shift the shift lever into P while the
engine start/stop button is ON or
ignition switch is ON.
2. Adjust the driver’s seat and out-
side rearview mirror comfortable
for the driver.
3. Press SET button on the control
panel. The system will beep once.
4. Press one of the memory buttons
(1 or 2) within 4 seconds after
pressing the SET button. The sys-
tem will beep twice when memory
has been successfully stored.
When recalling an adjustment mem-
ory button while sitting in the vehicle,
you can be surprised by the setting
chosen if the memory has been
adjusted by someone else. If that
occurs, immediately push the seat
position control knob in the direction
of the desired position to stop further
undesired movement.Recalling positions from memory
1. Shift the shift lever into P.
2. To recall the position in the memo-
ry, press the desired memory but-
ton (1 or 2). The system will beep
once, then the driver’s seat will
automatically adjust to the stored
position.
Adjusting the control switch for the
driver’s seat while the system is
recalling the stored position will
cause the movement to stop and
move in the direction that the control
switch is moved.
WARNING - Driver
Position Memory System
Never attempt to operate the
driver position memory system
while the vehicle is moving.
This could result in loss of con-
trol, and an accident causing
death or serious injury.
Page 142 of 710
Mirrors . . . . . . . . . . . . . . . . . . . . . . . . . . . . . . . . . . 4-53
. . . . . . . . . . . . . . . . . . . . . . . . 4-53
Instrument cluster . . . . . . . . . . . . . . . . . . . . . . . . . 4-67
. . . . . . . . . . . . . . . . . . . . 4-69
. . . . . . . . . . . . . . . . . . . . . . . . . . . . . . . . . . . . . 4-69
. . . . . . . . . . 4-75
LCD Display . . . . . . . . . . . . . . . . . . . . . . . . . . . . . . 4-77
. . . . . . . . . . . . . . . . . . . . . . . . . 4-77
. . . . . . . . . . . . . . . . . . . . . . . . . . 4-78
. . . . . . . . . . . . . . . . . . . . 4-90
. . . . . . . . . . . . . . . . . . . . . . . . . . . . 4-95
Warning and indicator lights . . . . . . . . . . . . . . . 4-106
. . . . . . . . . . . . . . . . . . . . . . . . . . . . . . 4-106
. . . . . . . . . . . . . . . . . . . . . . . . . . . . . 4-115
Rear View Monitor (RVM) . . . . . . . . . . . . . . . . . 4-121
Reverse Parking Distance Warning (PDW) . . . . 4-122
. 4-122
Distance Warning . . . . . . . . . . . . . . . . . . . . . . . . . . 4-123
. . 4-124
. . . . . . . . . . . . . . . . . . . . . . . . . . . . . . . 4-124
Lighting . . . . . . . . . . . . . . . . . . . . . . . . . . . . . . . . . 4-125
. . . . . . . . . . . . . . . . . . . . . 4-125 . . . . . . . . . . . . . . . . . . . . . . . . 4-125
. . . . . . . . . . . . . . . . . . . . . . . . . . . . . 4-126
. . . . . . . . . . . . . . . . . . . . . 4-128
. . . . . . . . . . . 4-130
. . . . . . . . . . . . . . . . . . . . . . . . . . . . 4-131
. . . . . . . . . . . . . . . . . . . . . . . . . . . . . . 4-131
Wipers and washers . . . . . . . . . . . . . . . . . . . . . . . 4-132
. . . . . . . . . . . . . . . . . . . . . . . . . . 4-132
. . . . . . . . . . . . . . . . . . . . . 4-133
. . . . . . . . . 4-134
Interior lights . . . . . . . . . . . . . . . . . . . . . . . . . . . . 4-136
. . . . . . . . . . . . . . . . . . . 4-136
. . . . . . . . . . . . . . . . . . . . . . . . . . . . . . . . . 4-136
. . . . . . . . . . . . . . . . . . . . . . . . . . . . . . . . . 4-137
. . . . . . . . . . . . . . . . . . . . . . . . . . 4-138
. . . . . . . . . . . . . . . . . . . . . . . . . . 4-138
Welcome system . . . . . . . . . . . . . . . . . . . . . . . . . . 4-139
. . . . . . . . . . 4-139
. . . . . . . . . . . . . . . . . . . . . . . . . . . . . . . 4-139
Defroster . . . . . . . . . . . . . . . . . . . . . . . . . . . . . . . . 4-140
. . . . . . . . . . . . . . . . . . . . . . . 4-140
Automatic climate control system. . . . . . . . . . . . 4-141
. . . . . . . . . 4-142
4
Page 193 of 710
453
Features of your vehicle
MIRRORS
Inside rearview mirror
Adjust the rearview mirror so that the
center view through the rear window
is seen. Make this adjustment before
you start driving.
Do not place objects in the rear seat
or cargo area which would interfere
with your vision through the rear win-
dow.
Day/night rearview mirror
(if equipped)
Make this adjustment before you
start driving and while the day/night
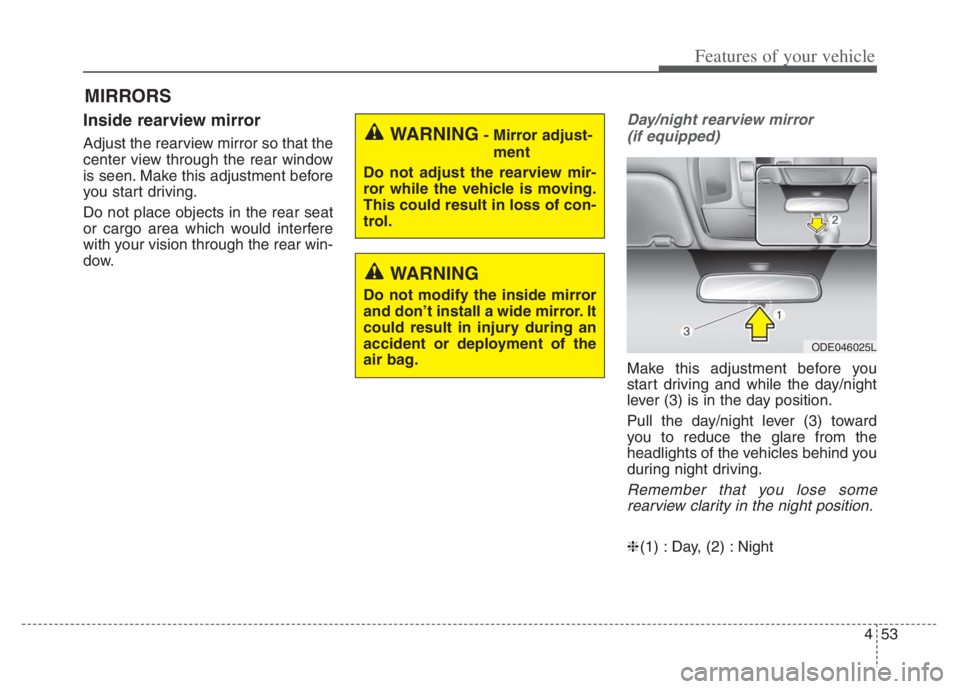
lever (3) is in the day position.
Pull the day/night lever (3) toward
you to reduce the glare from the
headlights of the vehicles behind you
during night driving.
Remember that you lose some
rearview clarity in the night position.
❈(1) : Day, (2) : Night
WARNING- Mirror adjust-
ment
Do not adjust the rearview mir-
ror while the vehicle is moving.
This could result in loss of con-
trol.
WARNING
Do not modify the inside mirror
and don’t install a wide mirror. It
could result in injury during an
accident or deployment of the
air bag.
ODE046025L
Page 194 of 710
Features of your vehicle
54 4
Day/night rearview mirror with
Telematics function (if equipped)
For day and night function:
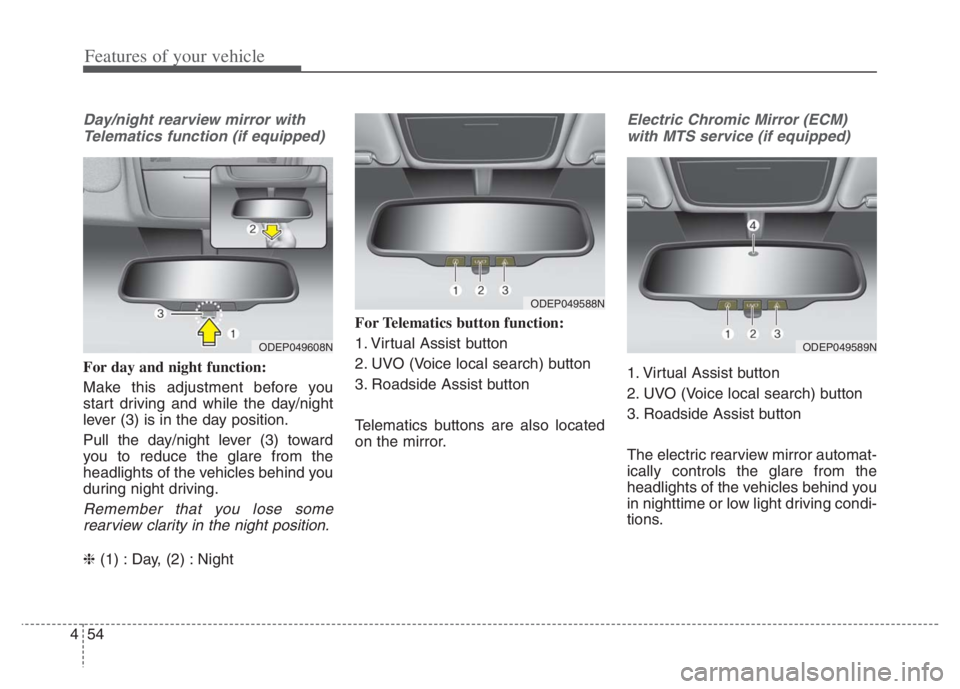
Make this adjustment before you
start driving and while the day/night
lever (3) is in the day position.
Pull the day/night lever (3) toward
you to reduce the glare from the
headlights of the vehicles behind you
during night driving.
Remember that you lose some
rearview clarity in the night position.
❈(1) : Day, (2) : NightFor Telematics button function:
1. Virtual Assist button
2. UVO (Voice local search) button
3. Roadside Assist button
Telematics buttons are also located
on the mirror.
Electric Chromic Mirror (ECM)
with MTS service (if equipped)
1. Virtual Assist button
2. UVO (Voice local search) button
3. Roadside Assist button
The electric rearview mirror automat-
ically controls the glare from the
headlights of the vehicles behind you
in nighttime or low light driving condi-
tions.
ODEP049608N
ODEP049588N
ODEP049589N
Page 195 of 710
455
Features of your vehicle
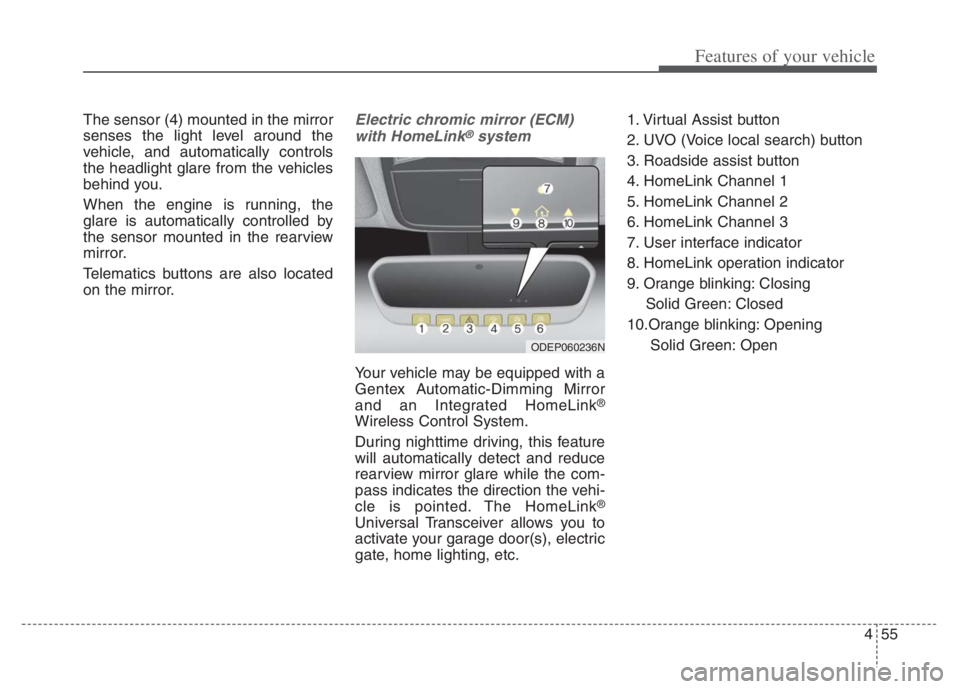
The sensor (4) mounted in the mirror
senses the light level around the
vehicle, and automatically controls
the headlight glare from the vehicles
behind you.
When the engine is running, the
glare is automatically controlled by
the sensor mounted in the rearview
mirror.
Telematics buttons are also located
on the mirror.Electric chromic mirror (ECM)with HomeLink®system
Your vehicle may be equipped with a
Gentex Automatic-Dimming Mirror
and an Integrated HomeLink
®
Wireless Control System.
During nighttime driving, this feature
will automatically detect and reduce
rearview mirror glare while the com-
pass indicates the direction the vehi-
cle is pointed. The HomeLink
®
Universal Transceiver allows you to
activate your garage door(s), electric
gate, home lighting, etc. 1. Virtual Assist button
2. UVO (Voice local search) button
3. Roadside assist button
4. HomeLink Channel 1
5. HomeLink Channel 2
6. HomeLink Channel 3
7. User interface indicator
8. HomeLink operation indicator
9. Orange blinking: Closing
Solid Green: Closed
10.Orange blinking: Opening Solid Green: Open
ODEP060236N
Page 196 of 710
Features of your vehicle
56 4
Automatic-Dimming Night Vision
Safety™ (NVS®) Mirror
The NVS
®Mirror in your vehicle is
designed to reduce annoying glare in
the rearview mirror during any driv-
ing situation. For more information
regarding NVS
®mirrors and other
applications, please refer to the
Gentex website:
www.gentex.com
❈Night Vision Safety™ is a registered
trademark of Gentex Corporation.Automatic-dimming function
Your mirror will automatically dim
upon detecting glare from the vehi-
cles traveling behind you.✽ ✽
NOTICE
The mirror defaults to the ON posi-
tion each time the vehicle is started.
Integrated HomeLink®Wireless
Control System
The HomeLink
®Wireless Control
System provides a convenient way to
replace up to three hand-held radio-
frequency (RF) transmitters with a
single built-in device. This innovative
feature will learn the radio frequency
codes of most current transmitters to
operate devices such as gate opera-
tors, garage door openers, entry
door locks, security systems, even
home lighting. Both standard and
rolling code-equipped transmitters
can be programmed by following the
outlined procedures. Additional
HomeLink
®information can be found
at: www.homelink.com or by calling
1-800-355-3515.
❈HomeLink
®is a registered trade-
mark of Gentex Corporation.
CAUTION
The NVS®Mirror automatically
reduces glare during driving
conditions based upon light lev-
els monitored in front of the
vehicle and from the rear of the
vehicle. These light sensors are
visible through openings in the
front and rear of the mirror case.
Any object that obstructs either
light sensor will degrade the
automatic dimming control fea-
ture.
Page 198 of 710
Features of your vehicle
58
4
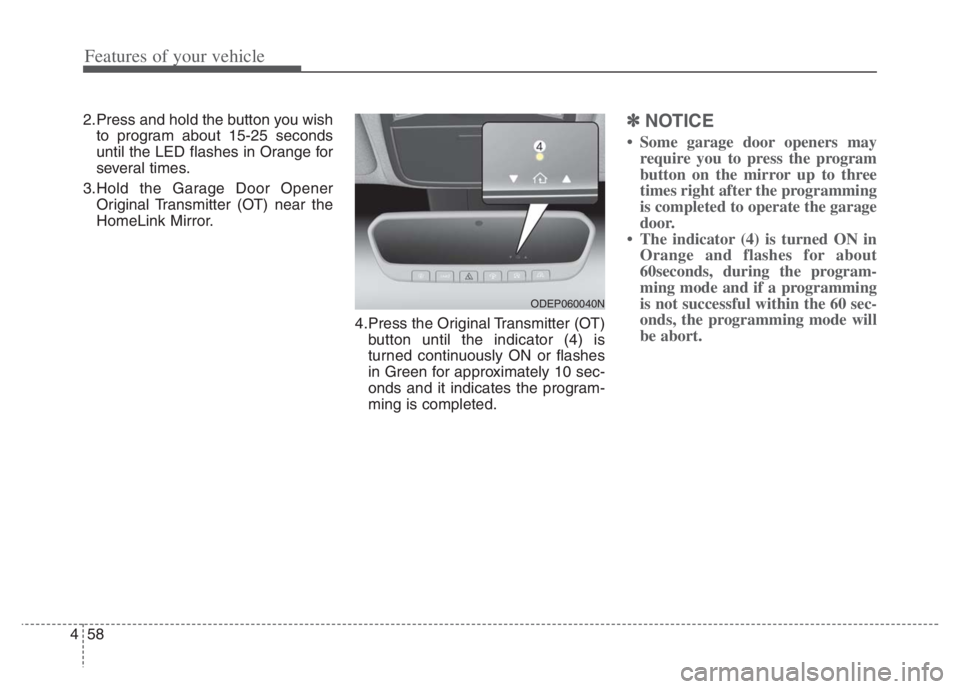
2.Press and hold the button you wish
to program about 15-25 seconds
until the LED flashes in Orange for
several times.
3.Hold the Garage Door Opener Original Transmitter (OT) near the
HomeLink Mirror.
4.Press the Original Transmitter (OT)button until the indicator (4) is
turned continuously ON or flashes
in Green for approximately 10 sec-
onds and it indicates the program-
ming is completed.✽ ✽ NOTICE
• Some garage door openers may
require you to press the program
button on the mirror up to three
times right after the programming
is completed to operate the garage
door.
• The indicator (4) is turned ON in Orange and flashes for about
60seconds, during the program-
ming mode and if a programming
is not successful within the 60 sec-
onds, the programming mode will
be abort.
ODEP060040N