tow KIA NIRO EV 2019 Features and Functions Guide
[x] Cancel search | Manufacturer: KIA, Model Year: 2019, Model line: NIRO EV, Model: KIA NIRO EV 2019Pages: 54, PDF Size: 3.49 MB
Page 10 of 54

8*IF EQUIPPED NIRO EV FEATURES & FUNCTIONS GUIDE
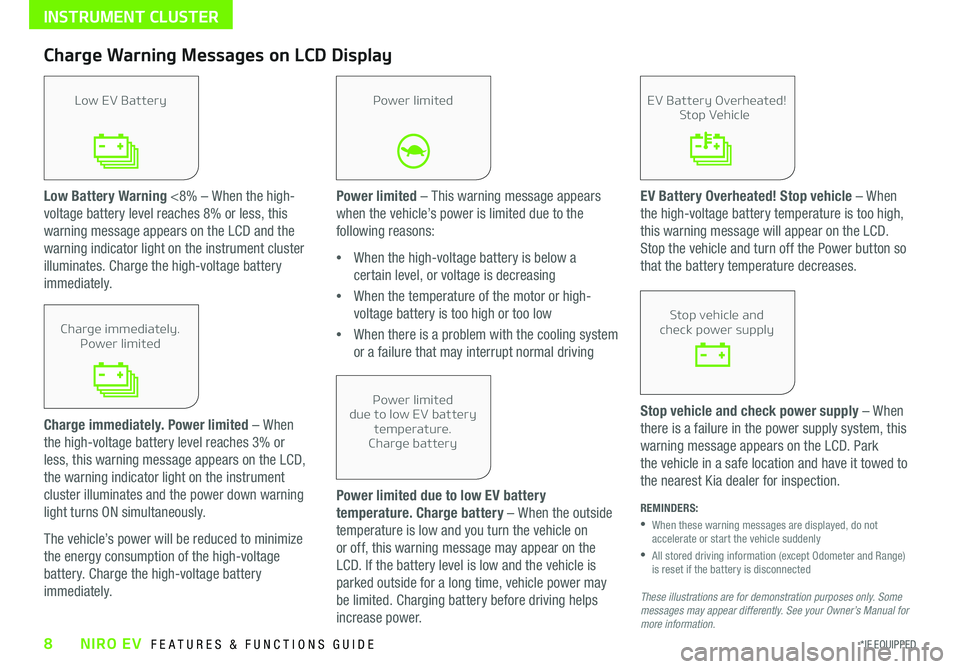
Low Battery Warning <8% – When the high-
voltage battery level reaches 8% or less, this
warning message appears on the LCD and the
warning indicator light on the instrument cluster
illuminates . Charge the high-voltage battery
immediately .
Power limited due to low EV battery
temperature. Charge battery – When the outside
temperature is low and you turn the vehicle on
or off, this warning message may appear on the
LCD . If the battery level is low and the vehicle is
parked outside for a long time, vehicle power may
be limited . Charging battery before driving helps
increase power .
Stop vehicle and check power supply – When
there is a failure in the power supply system, this
warning message appears on the LCD . Park
the vehicle in a safe location and have it towed to
the nearest Kia dealer for inspection .
EV Battery Overheated! Stop vehicle – When
the high-voltage battery temperature is too high,
this warning message will appear on the LCD .
Stop the vehicle and turn off the Power button so
that the battery temperature decreases .
Charge immediately. Power limited – When
the high-voltage battery level reaches 3% or
less, this warning message appears on the LCD,
the warning indicator light on the instrument
cluster illuminates and the power down warning
light turns ON simultaneously .
The vehicle’s power will be reduced to minimize
the energy consumption of the high-voltage
battery . Charge the high-voltage battery
immediately .
Power limited – This warning message appears
when the vehicle’s power is limited due to the
following reasons:
•When the high-voltage battery is below a
certain level, or voltage is decreasing
•When the temperature of the motor or high-
voltage battery is too high or too low
•When there is a problem with the cooling system
or a failure that may interrupt normal driving
Charge Warning Messages on LCD Display
REMINDERS:
•
When these warning messages are displayed, do not accelerate or start the vehicle suddenly
•
All stored driving information (except Odometer and Range) is reset if the battery is disconnected
Low EV BatteryEV Battery Overheated!Stop Vehicle
Power limiteddue to low EV batterytemperature.Charge battery
Stop vehicle andcheck power supplyCharge immediately.Power limited
Power limited
These illustrations are for demonstration purposes only. Some messages may appear differently. See your Owner’s Manual for more information.
INSTRUMENT CLUSTER
Page 15 of 54

13*IF EQUIPPED ALWAYS CHECK THE OWNER’S MANUAL FOR COMPLETE OPER ATING INFORMATION AND SAFET Y WARNINGS .
EV Mode - UVO link with Navigation
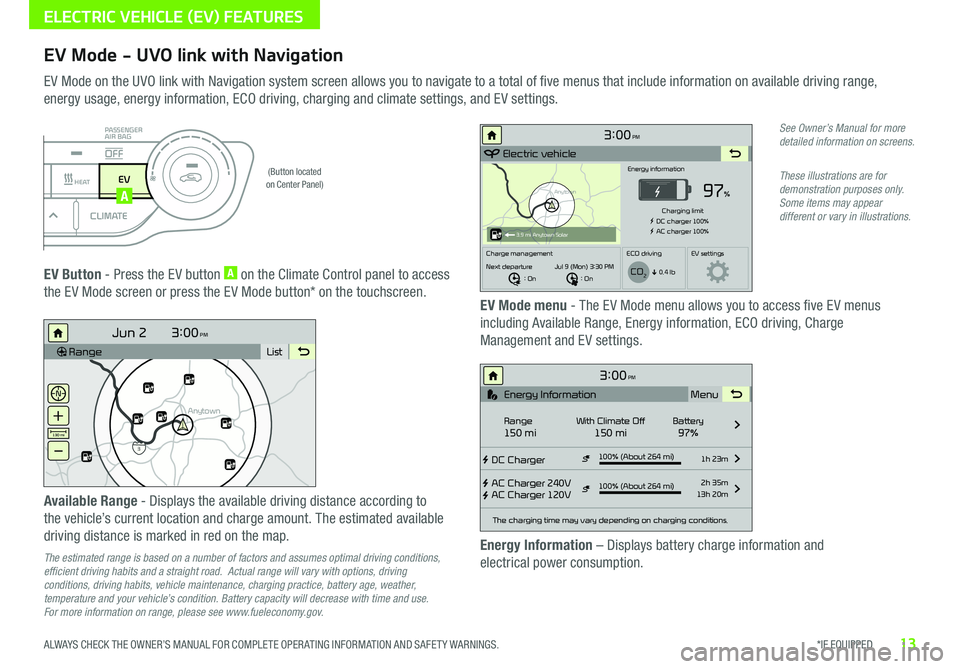
EV Mode on the UVO link with Navigation system screen allows you to navigate to a total of five menus that include information on available driving range,
energy usage, energy information, ECO driving, charging and climate settings, and EV settings .
(Button located on Center Panel)
EV Button - Press the EV button A on the Climate Control panel to access
the EV Mode screen or press the EV Mode button* on the touchscreen .EV Mode menu - The EV Mode menu allows you to access five EV menus
including Available Range, Energy information, ECO driving, Charge
Management and EV settings .
Available Range - Displays the available driving distance according to
the vehicle’s current location and charge amount . The estimated available
driving distance is marked in red on the map .
The estimated range is based on a number of factors and assumes optimal driving conditions, efficient driving habits and a straight road. Actual range will vary with options, driving conditions, driving habits, vehicle maintenance, charging practice, battery age, weather, temperature and your vehicle’s condition. Battery capacity will decrease with time and use. For more information on range, please see www.fueleconomy.gov.
Energy Information – Displays battery charge information and
electrical power consumption .
See Owner’s Manual for more detailed information on screens.
These illustrations are for demonstration purposes only. Some items may appear different or vary in illustrations.
3:00PM
Range List
Anytown
3
Jun 2
+
–
130 mi
Anytown
3:00PM
Electric vehicle
97%
Energy information
Charging limit
DC charger 100% AC charger 100%
Charge management ECO drivingEV settings
Next departure : On : On
Jul 9 (Mon) 3:30 PM
0.4 lb
3.9 mi Anytown Solar
CO2
3:00PM
DC Charger
AC Charger 240V
AC Charger 120V100% (About 264 mi) 1h 23m
2h 35m
13h 20m
The charging time may vary depending on charging conditions.
Range150 miWith Climate Off150 miBattery97% Menu
Energy Information
100% (About 264 mi)
i
DRIVERAUTOACHEAT
CLIMATEOFF
ONLYEV
PASSENGER
AIR BAG
OFF
ELECTRIC VEHICLE (EV) FEATURES
A
Page 32 of 54

B
C
A
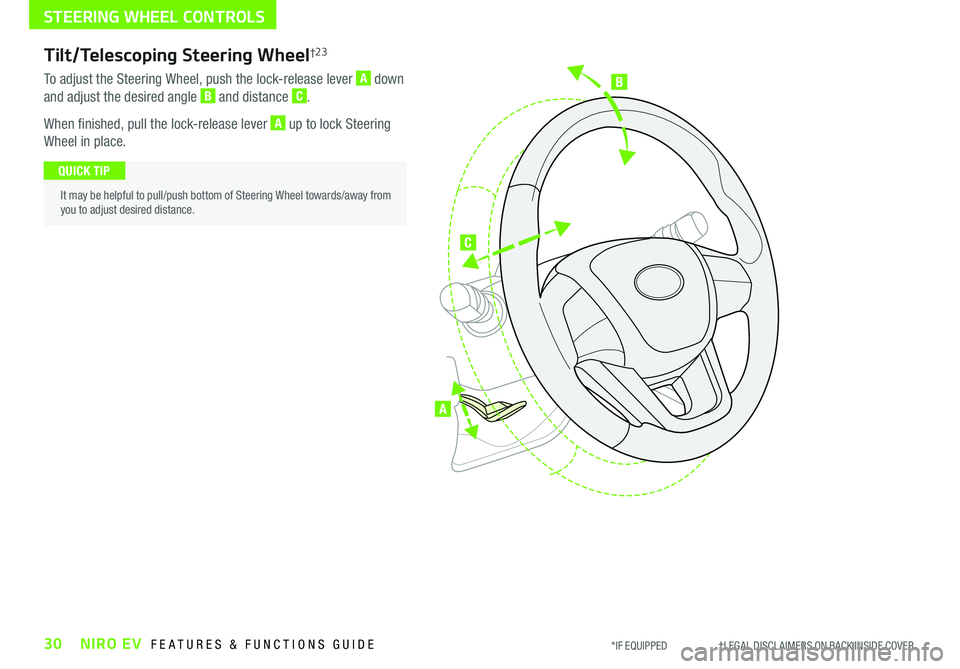
Tilt/Telescoping Steering Wheel†2 3
To adjust the Steering Wheel, push the lock-release lever A down
and adjust the desired angle B and distance C .
When finished, pull the lock-release lever A up to lock Steering
Wheel in place .
It may be helpful to pull/push bottom of Steering Wheel towards/away from you to adjust desired distance .
QUICK TIP
30NIRO EV FEATURES & FUNCTIONS GUIDE*IF EQUIPPED †LEGAL DISCL AIMERS ON BACK INSIDE COVER
STEERING WHEEL CONTROLS
Page 44 of 54

42NIRO EV FEATURES & FUNCTIONS GUIDE*IF EQUIPPED †LEGAL DISCL AIMERS ON BACK INSIDE COVER
SEATING / OTHER KEY FEATURES
•It may be necessary to adjust the front seatbacks to fully lower rear seats
•Ensure seat is locked by pressing down on Seatback and ensuring red line is NOT visible on bottom of Folder Lever
QUICK TIPS
Folding Rear Seats
To F o l d :
1 . Ensure the belt strap is out of way of the Seatback folding A .
Insert the metal seat belt tab into the holder B
2 . Adjust the Front Seatback to the upright position and lower
the rear headrest to the lowest position
3 . Pull on the Rear Seatback lock release lever C, then fold
the seat toward the front
To U n f o l d :
1 . Pull the lock release lever C and lift the Seatback backward until it
clicks firmly in place
2 . Return the rear seat belt to the proper position
REMINDERS:
•
Before unfolding Seatback, ensure the seat belt is placed into the holder
•
Always make sure the seatback is locked in place when unfoldedFor illustration purposes only. Actual vehicle might be slightly different.
A
B
C
Hood Release Lever and Latch
Opening the Hood:
1 . Pull the Hood Release Lever A to unlatch the Hood
2 . In the front of the vehicle, lift the Hood slightly, pull the secondary
Latch B inside of the Hood’s center to the left and lift the Hood
Closing the Hood: Lower the Hood about halfway and then press down
to securely lock in place .
(Located on Driver side kick panel)(Latch located inside hood)
AB
REMINDERS:
•Sunvisor may not shield all direct light
•
Do not operate the vehicle if Sunvisor is impairing your visibility
•
Be aware of your seating position when adjusting or swinging Sunvisor around from the front or side windows
Sunvisor†2 2
Use the Sunvisor to shield direct light through the front or side windows .
Slide the Sunvisor out and adjust as needed .