battery KIA NIRO EV 2022 Navigation System Quick Reference Guide
[x] Cancel search | Manufacturer: KIA, Model Year: 2022, Model line: NIRO EV, Model: KIA NIRO EV 2022Pages: 332, PDF Size: 11.18 MB
Page 5 of 332
3
Safety Precautions
Be sure to keep the following instructions. Otherwise, it may cause minor injury or system
damage.
\334\334Operation
Use the system with the vehicle started.
\225
When you use the system for a long time with the vehicle stopped, it may\
cause battery discharge.
Do NOT arbitrarily install an unauthorised aftermarket product in your vehicle.
\225Using unapproved products may cause an error while using the system.
\225System errors caused by installing unapproved products are not covered under the warranty.
\334\334System handling
Do NOT apply excessive force to the system.
\225When you apply excessive pressure to the screen, the LCD panel or touch panel may get damaged.
To clean the screen or button panel, first turn off the vehicle and then use a dry, soft
cloth to wipe it.
\225Do not wipe using a rough or hard cloth, chemical fibre, organic solvent (e.g. alcohol, benzene, thinner), or air
freshener. The panel surface may become scratched or damaged due to a chemical reaction.
When you install an air freshener on the air conditioner vent, the surface may be
deformed due to leakage.
0000
A
If you experience any problems with the system, contact your place of purchase or dealer.
Page 9 of 332
7
Turning on/off the system
Turning on the system
1 Turn on the vehicle.
2 When a safety warning message appears, read it and press Confirm.
0000
A
To change the display language, press Language.
Turning off the system
To turn off the system while driving, press and hold the Power button on
the panel.
The screen and sound will be turned off.
0000
A
To use the system again, press the Power button.
0000
A
When a specified period of time elapses after turning off the vehicle, the system
automatically shuts down. When you open the driver's door, the system immediately
shuts down.
\335Warning
\225Driving while distracted can result in a loss of vehicle control that may lead to an accident,
severe bodily injury, or death. The driver's primary responsibility is the safe and legal
operation of the vehicle, and the use of any vehicle systems, including the \
touch screen
and steering wheel controls, which take the driver's eyes, attention, and focus away from
the safe operation of the vehicle, or which are not permissible by law, should never be
used during the operation of the vehicle.
\225Some functions may not be active while driving to ensure safety. Those functions run only
when the vehicle is stationary. In order to use them, first stop the vehicle.
\225When the screen is not displayed, the volume is muted, or other system failures occur,
immediately stop using the system. When you use the faulty system contin\
uously, it may
cause fire, electric shock, or fatal system failure.
\334\334Caution
\225The system can be turned on even when the ignition switch is in "ACC" or "ON." However,
when you use the system without turning on the vehicle for a long time, \
it may cause
battery discharge. To use the system for a long time, be sure to turn on the vehicle.
\225When you use the system with the vehicle turned off, the battery warning message
appears. The warning message disappears as soon as you turn on the vehic\
le.
Page 18 of 332
6
Safety Precautions
Be sure to keep the following instructions. Otherwise, it may cause minor injury or system
damage.
\334\334Operation
Use the system with the vehicle started.
\225 When you use the system for a long time with the vehicle stopped, it may cause battery discharge.
Do NOT arbitrarily install an unauthorized aftermarket product in your vehicle.
\225Using unapproved products may cause an error while using the system.
\225System errors caused by installing unapproved products are not covered under the warranty.
\334\334System handling
Do NOT apply excessive force to the system.
\225 When you apply excessive pressure to the screen, the LCD panel or touch panel may get damaged.
To clean the screen or button panel, first turn off the vehicle and then use a dry, soft
cloth to wipe it.
\225Do not wipe using a rough or hard cloth, chemical fiber, organic solvent (e.g. alcohol, benzene, thinner), or air
freshener. The panel surface may become scratched or damaged due to a chemical reaction.
When you install an air freshener on the air conditioner vent, the surface may be
deformed due to leakage.
0000
A
If you experience any problems with the system, contact your place of purchase or dealer.
Page 29 of 332
1-7
\335Warning
\225Driving while distracted can result in a loss of vehicle control that may lead to an accident,
severe bodily injury, or death. The driver's primary responsibility is the safe and legal
operation of the vehicle, and the use of any vehicle systems, including the touch screen
and steering wheel controls, which take the driver's eyes, attention, and focus away from
the safe operation of the vehicle, or which are not permissible by law, should never be
used during the operation of the vehicle.
\225Some functions may not be active while driving to ensure safety. Those functions run only
when the vehicle is stationary. In order to use them, first stop the vehicle.
\225When the screen is not displayed, the volume is muted, or other system failures occur,
immediately stop using the system. When you use the faulty system continuously, it may
cause fire, electric shock, or fatal system failure.
\334\334Caution
\225The system can be turned on even when the ignition switch is in "ACC" or "ON." However,
when you use the system without turning on the vehicle for a long time, it may cause
battery discharge. To use the system for a long time, be sure to turn on the vehicle.
\225When you use the system with the vehicle turned off, the battery warning message
appears. The warning message disappears as soon as you turn on the vehicle.
0000A
The screen may differ depending on the vehicle model and specifications.
0000
A
When you turn off and on the vehicle, the system is turned on with the mode and settings
used when the vehicle was turned off.
0000
A
To prevent audio from playing loud when you turn on the vehicle, adjust the system
volume to an adequate level.
0000
A
To automatically decrease the system volume, move to the All Menus screen and press
Setup >
Sound >
Premium Sound >
Start-up Volume Limit to set the function.
Page 66 of 332
2-28
Using the Electric Vehicle menu (EV only)
You can use various features for electric vehicles, such as seeing the driving or energy
information, scheduling a charging, or searching for charging stations.
On the All Menus screen, press EV.
Electric Vehicle screen (EV only)
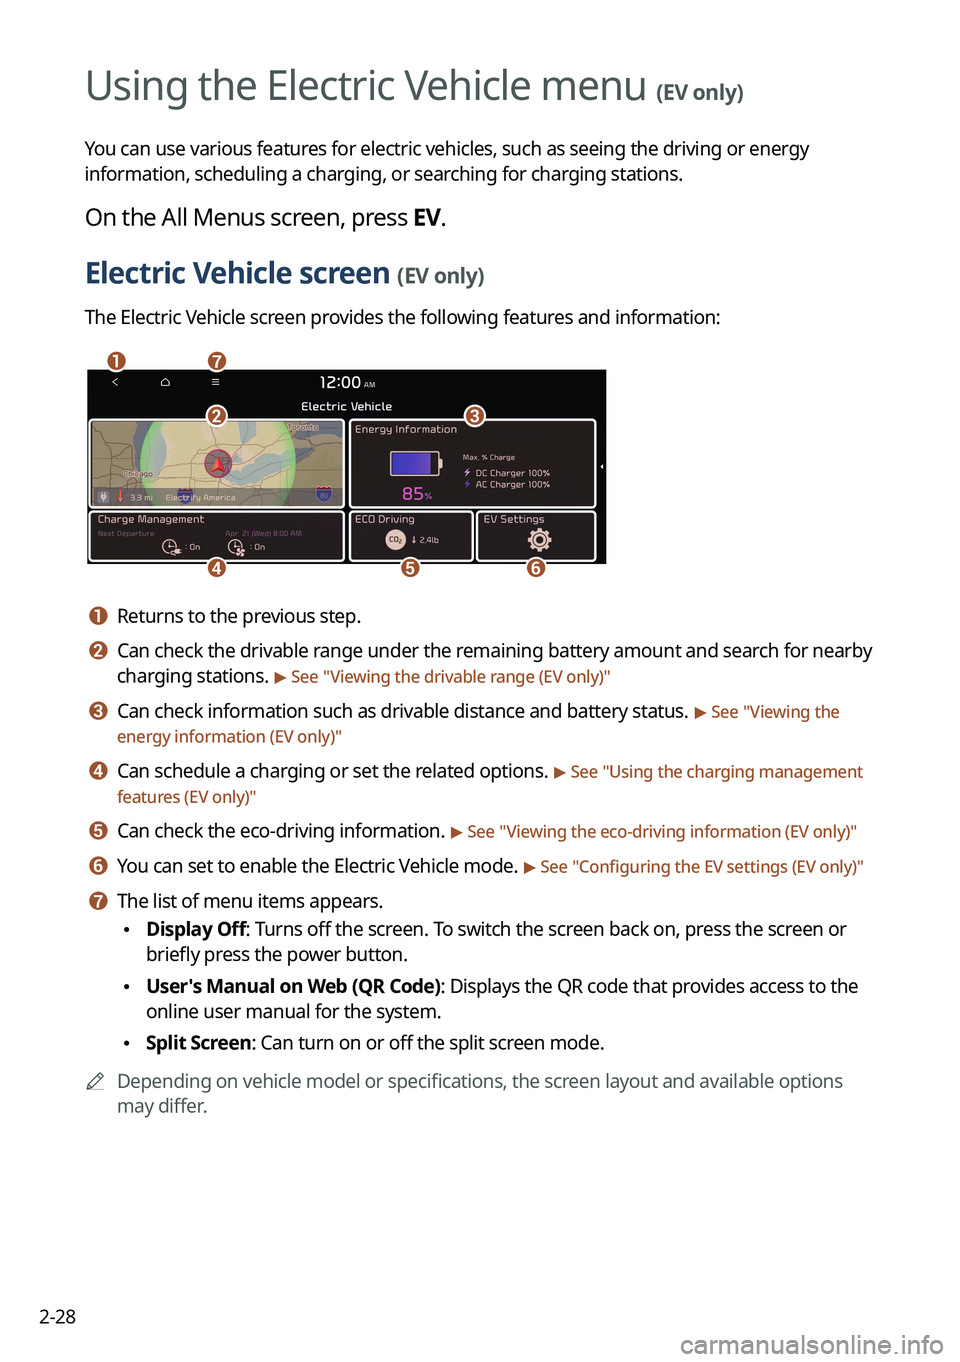
The Electric Vehicle screen provides the following features and information:
\037\036
\035
\034\033
\032\031
a a Returns to the previous step.
b b Can check the drivable range under the remaining battery amount and search for nearby
charging stations.
> See "Viewing the drivable range (EV only)"
c c Can check information such as drivable distance and battery status. > See "Viewing the
energy information (EV only)"
d d Can schedule a charging or set the related options. > See " Using the charging management
features (EV only)"
e e Can check the eco-driving information. > See " Viewing the eco-driving information (EV only)"
f f You can set to enable the Electric Vehicle mode. > See "Configuring the EV settings (EV only)"
g g The list of menu items appears.
\225 Display Off: Turns off the screen. To switch the screen back on, press the screen or
briefly press the power button.
\225User's Manual on Web (QR Code): Displays the QR code that provides access to the
online user manual for the system.
\225Split Screen: Can turn on or off the split screen mode.
0000
A
Depending on vehicle model or specifications, the screen layout and available options
may differ.
Electric Vehicle
Page 67 of 332
2-29
Viewing the drivable range (EV only)
You can check the drivable range under the remaining battery amount. You can also find the
routes to nearby charging stations if necessary.
1 On the Electric Vehicle screen, press the map area.
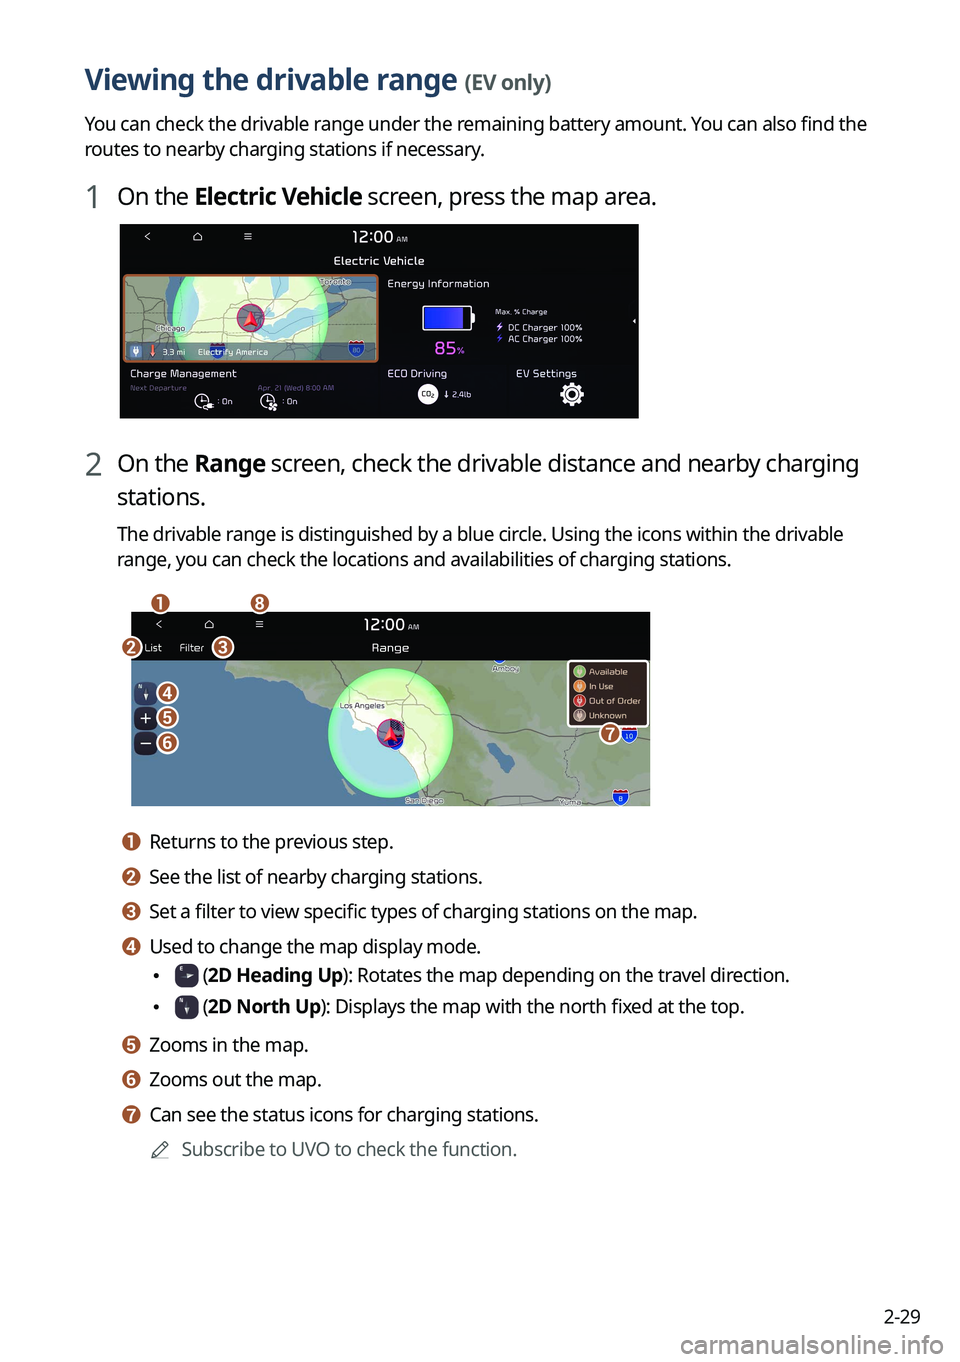
2 On the Range screen, check the drivable distance and nearby charging
stations.
The drivable range is distinguished by a blue circle. Using the icons within the drivable
range, you can check the locations and availabilities of charging stations.
\037
\036
\035\034
\033
\032
\031
\030
a a Returns to the previous step.
b b See the list of nearby charging stations.
c c Set a filter to view specific types of charging stations on the map.
d d Used to change the map display mode.
\225 (2D Heading Up): Rotates the map depending on the travel direction.
\225 (2D North Up): Displays the map with the north fixed at the top.
e e Zooms in the map.
f f Zooms out the map.
g g Can see the status icons for charging stations.0000
A
Subscribe to UVO to check the function.
Page 69 of 332
2-31
Viewing the energy information (EV only)
You can see the drivable distance and the estimated charging time.
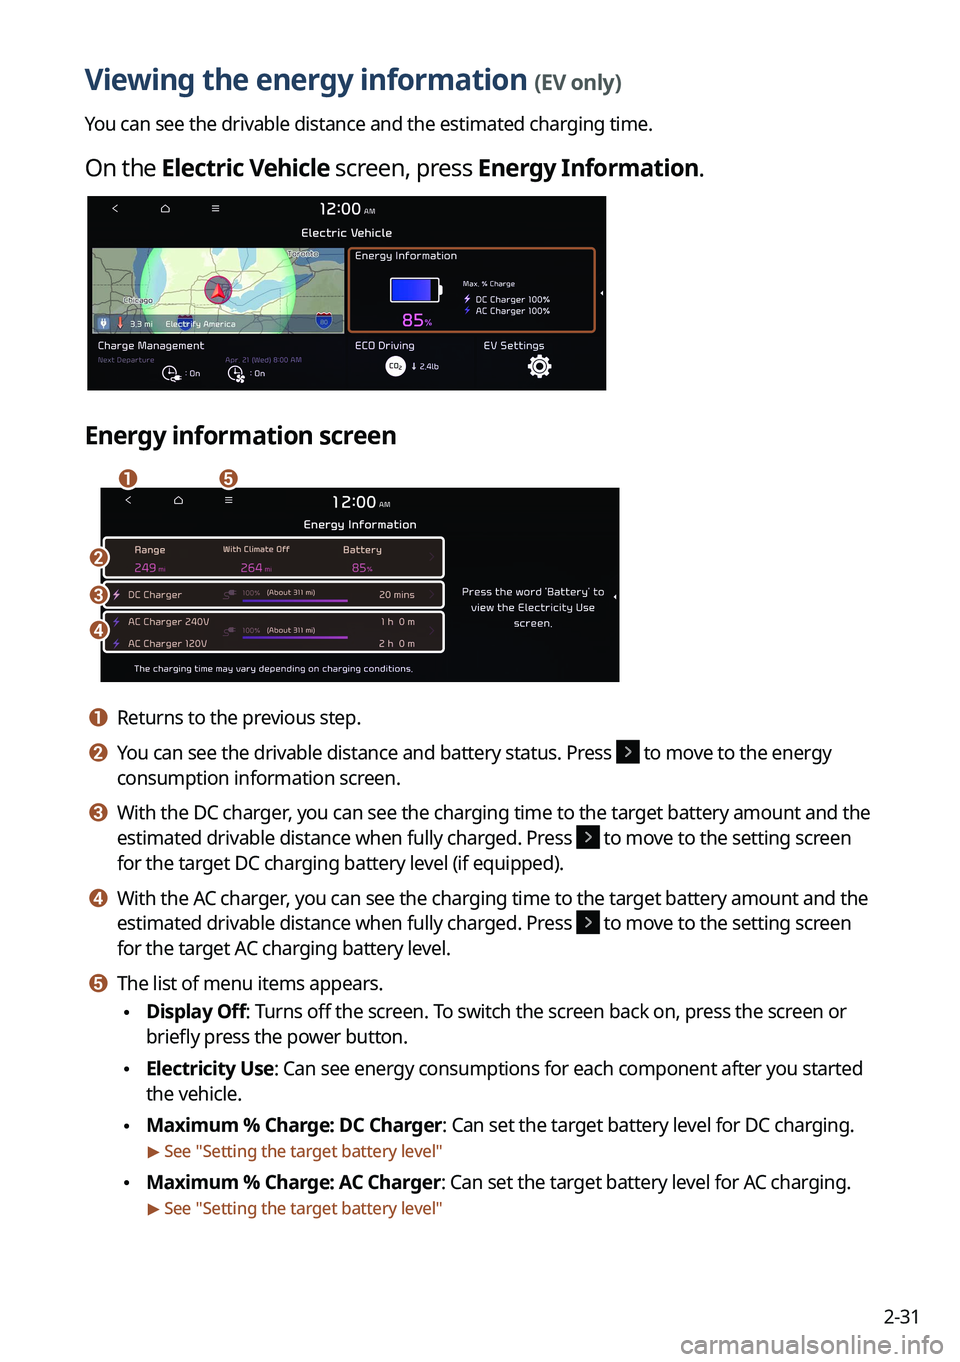
On the Electric Vehicle screen, press Energy Information.
Energy information screen
\037\036
\035
\034
\033
a a Returns to the previous step.
b b You can see the drivable distance and battery status. Press to move to the energy
consumption information screen.
c c With the DC charger, you can see the charging time to the target battery amount and the
estimated drivable distance when fully charged. Press
to move to the setting screen
for the target DC charging battery level (if equipped).
d d With the AC charger, you can see the charging time to the target battery amount and the
estimated drivable distance when fully charged. Press
to move to the setting screen
for the target AC charging battery level.
e e The list of menu items appears.
\225Display Off: Turns off the screen. To switch the screen back on, press the screen or
briefly press the power button.
\225Electricity Use: Can see energy consumptions for each component after you started
the vehicle.
\225Maximum % Charge: DC Charger: Can set the target battery level for DC charging.
> See "
Setting the target battery level"
\225 Maximum % Charge: AC Charger: Can set the target battery level for AC charging.
> See "
Setting the target battery level"
Page 70 of 332
2-32
\225User's Manual on Web (QR Code): Displays the QR code that provides access to the
online user manual for the system.
\225Split Screen: Can turn on or off the split screen mode.
0000
A
The drivable distance is an estimate based on the real-time fuel economy. When your
driving pattern changes, the drivable distance may differ.
0000
A
Depending on the driving pattern, the estimated drivable distance may differ even when
the same target battery level.
Using the charging management features (EV only)
You can configure various features such as scheduling battery charge and climate controls
according to the preset departure time.
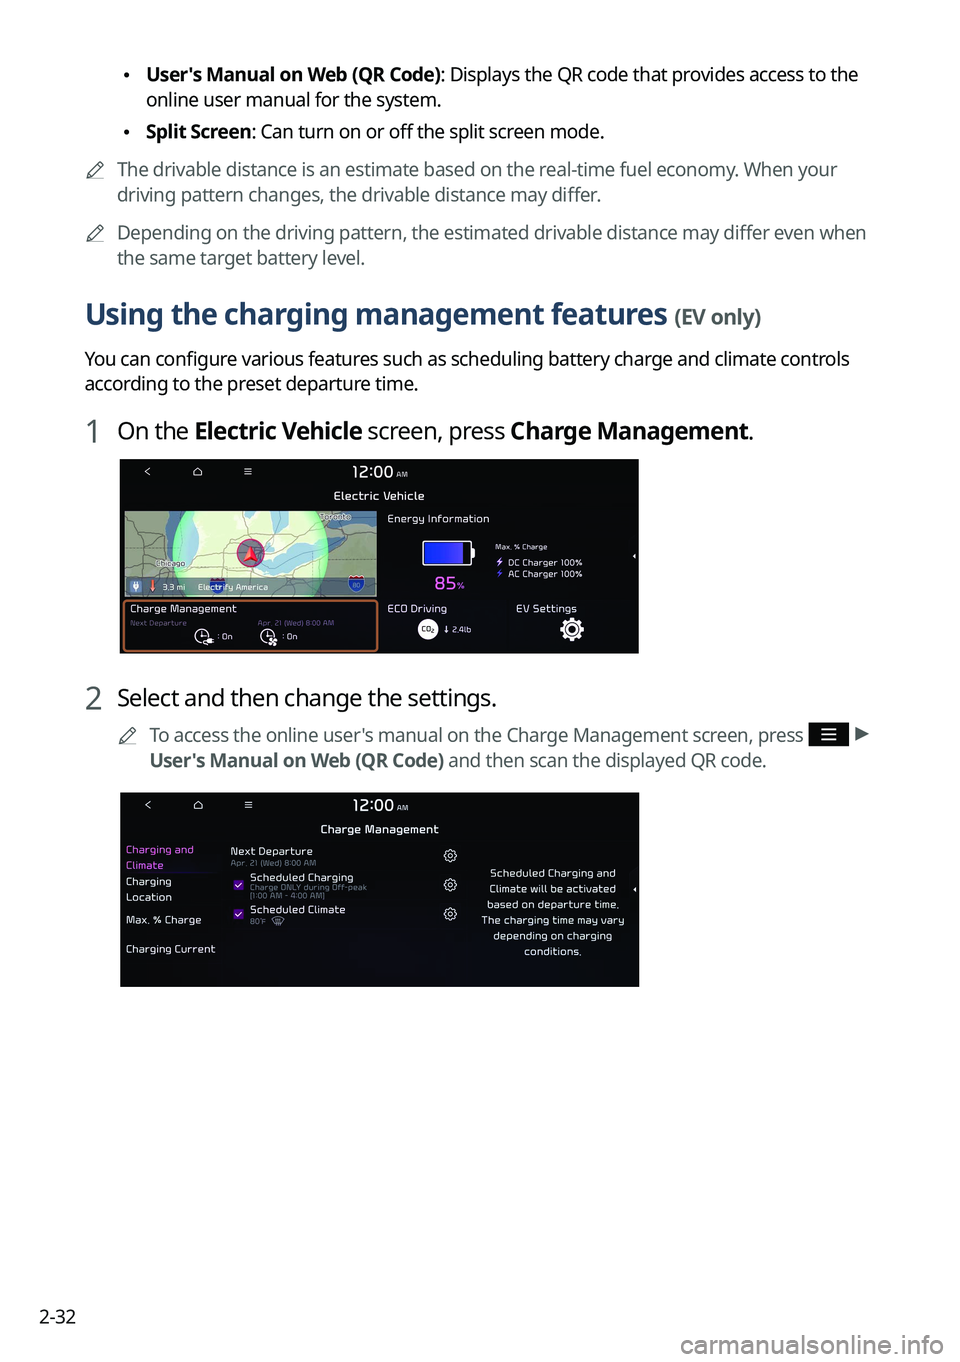
1 On the Electric Vehicle screen, press Charge Management.
2 Select and then change the settings.
0000
A
To access the online user's manual on the Charge Management screen, press >
User's Manual on Web (QR Code) and then scan the displayed QR code.
Page 72 of 332
2-34
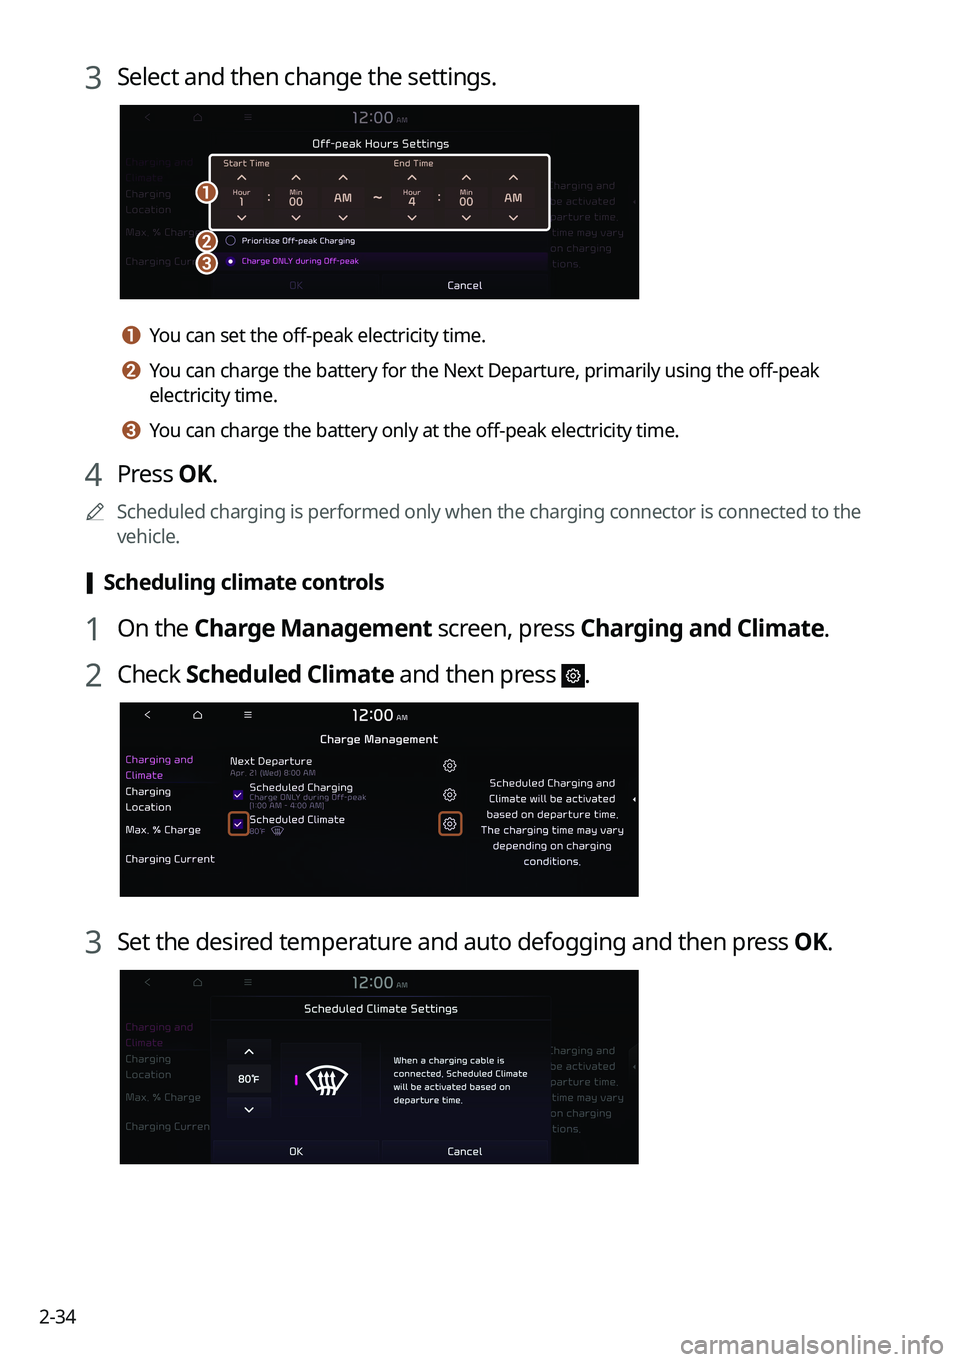
3 Select and then change the settings.
\037
\036\035
a a You can set the off-peak electricity time.
b b You can charge the battery for the Next Departure, primarily using the off-peak
electricity time.
c c You can charge the battery only at the off-peak electricity time.
4 Press OK.
0000
A
Scheduled charging is performed only when the charging connector is connected to the
vehicle.
[Scheduling climate controls
1 On the Charge Management screen, press Charging and Climate.
2 Check
Scheduled Climate and then press .
3 Set the desired temperature and auto defogging and then press OK.
Page 73 of 332
2-35
Setting for location-based charging
You can set to use the scheduled charging and climate controls only in specific locations and
select the current type to use while charging.
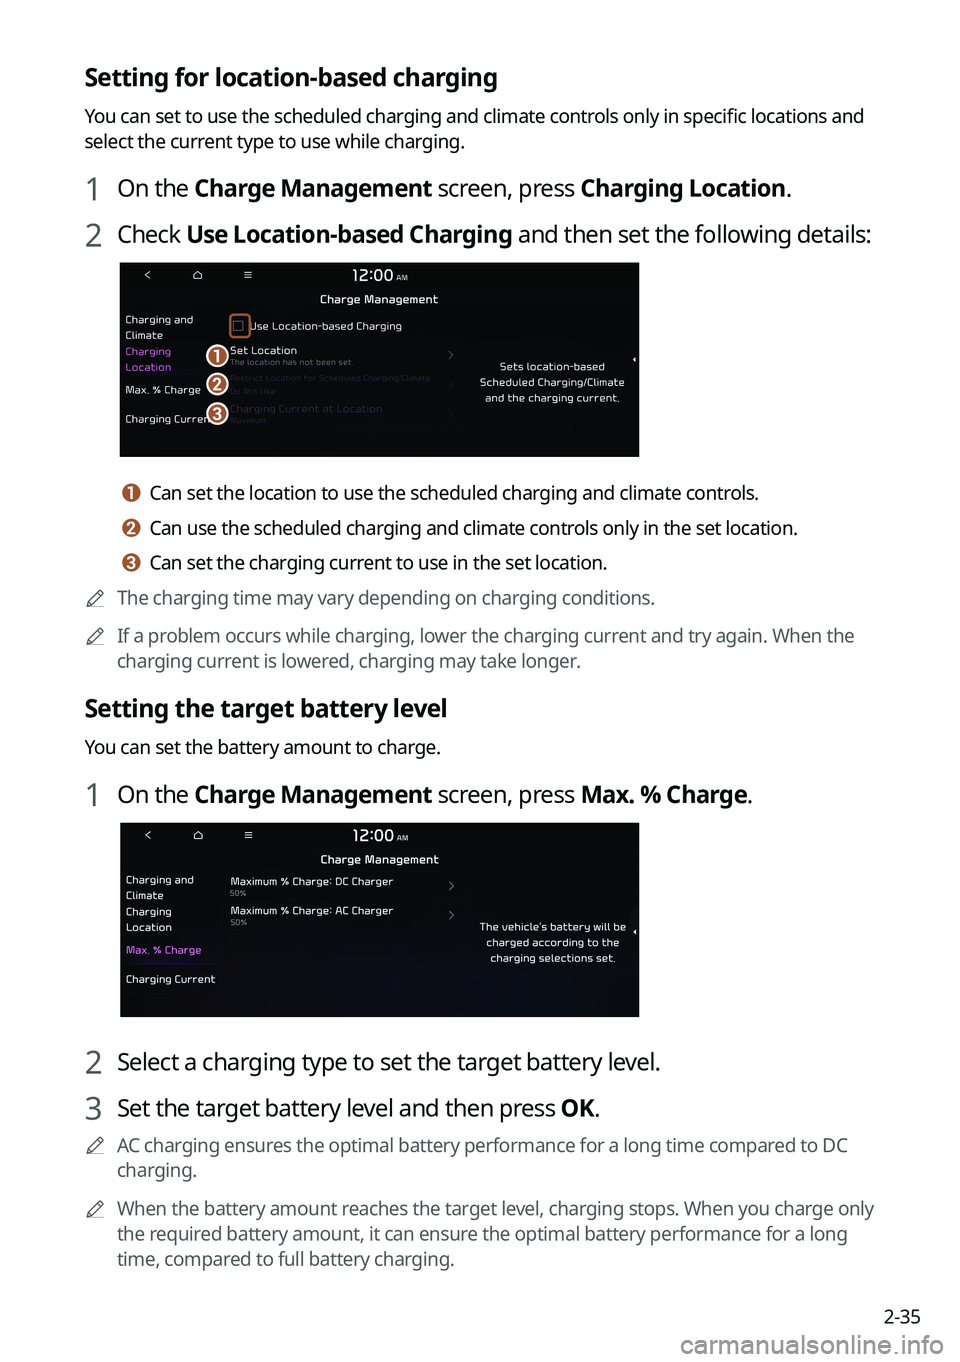
1 On the Charge Management screen, press Charging Location.
2 Check Use Location-based Charging and then set the following details:
\037
\036
\035
a a Can set the location to use the scheduled charging and climate controls.
b b Can use the scheduled charging and climate controls only in the set location.
c c Can set the charging current to use in the set location.
0000
A
The charging time may vary depending on charging conditions.
0000
A
If a problem occurs while charging, lower the charging current and try again. When the
charging current is lowered, charging may take longer.
Setting the target battery level
You can set the battery amount to charge.
1 On the Charge Management screen, press Max. % Charge.
2 Select a charging type to set the target battery level.
3 Set the target battery level and then press OK.
0000
A
AC charging ensures the optimal battery performance for a long time compared to DC
charging.
0000
A
When the battery amount reaches the target level, charging stops. When you charge only
the required battery amount, it can ensure the optimal battery performance for a long
time, compared to full battery charging.