climate control KIA NIRO HYBRID EV 2022 User Guide
[x] Cancel search | Manufacturer: KIA, Model Year: 2022, Model line: NIRO HYBRID EV, Model: KIA NIRO HYBRID EV 2022Pages: 684, PDF Size: 9.67 MB
Page 301 of 684
4163
Features of your vehicle
For maximum defrosting, set the
temperature control to the extreme
right/hot position and the fan speed
control to the highest speed.
If warm air to the floor is desired
while defrosting or defogging, set
the mode to the floor-defrost posi-
tion.
Before driving, clear all snow and
ice from the windshield, rear win-
dow, outside rear view mirrors, and
all side windows.
Clear all snow and ice from the
hood and air inlet in the cowl grill to
improve heater and defroster effi-
ciency and to reduce the probabili-
ty of fogging up the inside of the
windshield.Automatic climate control
system
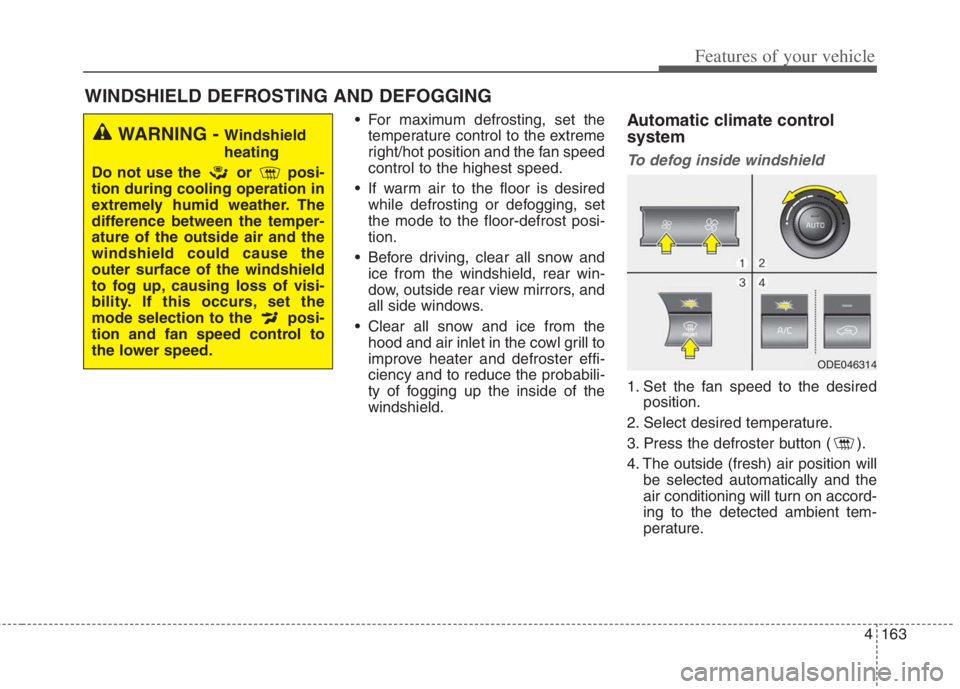
To defog inside windshield
1. Set the fan speed to the desired
position.
2. Select desired temperature.
3. Press the defroster button ( ).
4. The outside (fresh) air position will
be selected automatically and the
air conditioning will turn on accord-
ing to the detected ambient tem-
perature.
WINDSHIELD DEFROSTING AND DEFOGGING
WARNING - Windshield
heating
Do not use the or posi-
tion during cooling operation in
extremely humid weather. The
difference between the temper-
ature of the outside air and the
windshield could cause the
outer surface of the windshield
to fog up, causing loss of visi-
bility. If this occurs, set the
mode selection to the posi-
tion and fan speed control to
the lower speed.
ODE046314
Page 303 of 684
4165
Features of your vehicle
Automatic climate control system
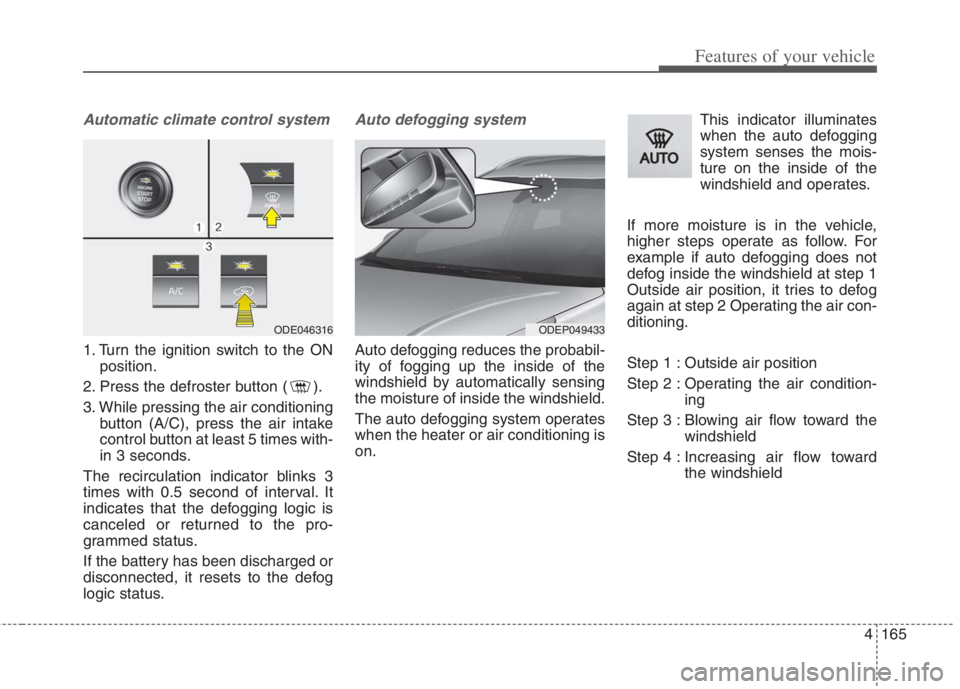
1. Turn the ignition switch to the ON
position.
2. Press the defroster button ( ).
3. While pressing the air conditioning
button (A/C), press the air intake
control button at least 5 times with-
in 3 seconds.
The recirculation indicator blinks 3
times with 0.5 second of interval. It
indicates that the defogging logic is
canceled or returned to the pro-
grammed status.
If the battery has been discharged or
disconnected, it resets to the defog
logic status.
Auto defogging system
Auto defogging reduces the probabil-
ity of fogging up the inside of the
windshield by automatically sensing
the moisture of inside the windshield.
The auto defogging system operates
when the heater or air conditioning is
on.This indicator illuminates
when the auto defogging
system senses the mois-
ture on the inside of the
windshield and operates.
If more moisture is in the vehicle,
higher steps operate as follow. For
example if auto defogging does not
defog inside the windshield at step 1
Outside air position, it tries to defog
again at step 2 Operating the air con-
ditioning.
Step 1 : Outside air position
Step 2 : Operating the air condition-
ing
Step 3 : Blowing air flow toward the
windshield
Step 4 : Increasing air flow toward
the windshield
ODEP049433 ODE046316
Page 359 of 684
Driving your vehicle
32 5
Wet brakes may impair the vehicle’s
ability to safely slow down; the vehi-
cle may also pull to one side when
the brakes are applied. Applying the
brakes lightly will indicate whether
they have been affected in this way.
Always test your brakes in this fash-
ion after driving through deep water.
To dry the brakes, apply them lightly
while maintaining a safe forward
speed until brake performance
returns to normal.
✽ ✽
NOTICE
Do not depress the brake pedal con-
tinuously without the “ ” indica-
tor ON. The battery may be dis-
charged.
In the event of brake failure
If service brakes fail to operate while
the vehicle is in motion, you can
make an emergency stop with the
parking brake. The stopping dis-
tance, however, will be much greater
than normal.
Disc brakes wear indicator
When your brake pads are worn and
new pads are required, you will hear
a high-pitched warning sound from
your front brakes or rear brakes. You
may hear this sound come and go or
it may occur whenever you depress
the brake pedal.
Please remember that some driving
conditions or climates may cause a
brake squeal when you first apply (or
lightly apply) the brakes. This is nor-
mal and does not indicate a problem
with your brakes.
Always replace the front or rear
brake pads as pairs.
WARNING- Parking
brake
Avoid applying the parking
brake to stop the vehicle while it
is moving except in an emer-
gency situation. Applying the
parking brake while the vehicle
is moving at normal speeds can
cause a sudden loss of control
of the vehicle. If you must use
the parking brake to stop the
vehicle, use great caution in
applying the brake.
CAUTION- Replace brake
pads
Do not continue to drive with
worn brake pads. Continuing to
drive with worn brake pads can
damage the braking system and
result in costly brake repairs.
Page 504 of 684

What to do in an emergency
6 6
The following items should be reset
after the battery has been discharged
or the battery has been disconnected.
Auto up/down window
Sunroof
Trip computer
Climate control system
Driver position Memory System
Audio
As explained above, if the vehicle
cannot be started after pressing the
“12V Batt Reset” switch (1) due to
over discharge, try to jump-start
(refer to Jump-starting).Charging method for 12V battery
(A) It is recommended to charge the
12V battery by starting and run-
ning the vehicle (HEV Ready
Mode) for a minimum of 30 min-
utes if a 12V reset, or jump start
has been used.
(B) If you cannot start the vehicle :
After connecting the jumper cables
at the recommended locations, you
should press “12V batt Reset”
switch (1) to charge the battery.
The voltage range of the charger
should be 13.3~14V and its current
range should be less than 60A.
(13.8V is recommended).CAUTION
• The use of an improper charg-
er with a voltage and current
range higher than specified
may cause overheating and
damage to the 12V battery.
The use of an incorrect charg-
er will lead to a power shut-off
to save the 12V battery. Stop
using the incorrect charger
once the power of the vehicle
is shut off.
Page 543 of 684
Maintenance
7
Engine compartment . . . . . . . . . . . . . . . . . . . . . . . . 7-4
Maintenance services . . . . . . . . . . . . . . . . . . . . . . . . 7-5
• Owner’s responsibility . . . . . . . . . . . . . . . . . . . . . . . . . 7-5
• Owner maintenance precautions . . . . . . . . . . . . . . . . . 7-6
Owner maintenance . . . . . . . . . . . . . . . . . . . . . . . . . 7-7
• Owner maintenance schedule . . . . . . . . . . . . . . . . . . . 7-7
Scheduled maintenance service . . . . . . . . . . . . . . 7-9
Explanation of scheduled maintenance items . . . 7-15
Checking fluid levels . . . . . . . . . . . . . . . . . . . . . . . 7-18
Engine oil. . . . . . . . . . . . . . . . . . . . . . . . . . . . . . . . . 7-19
• Checking the engine oil level . . . . . . . . . . . . . . . . . . . 7-19
• Changing the engine oil and filter . . . . . . . . . . . . . . . 7-20
Coolant . . . . . . . . . . . . . . . . . . . . . . . . . . . . . . . . . . 7-22
• Checking the coolant level . . . . . . . . . . . . . . . . . . . . . 7-22
• Engine coolant . . . . . . . . . . . . . . . . . . . . . . . . . . . . . . 7-23
• Inverter coolant . . . . . . . . . . . . . . . . . . . . . . . . . . . . . 7-23
• Recommended coolant . . . . . . . . . . . . . . . . . . . . . . . . 7-24
• Changing the coolant . . . . . . . . . . . . . . . . . . . . . . . . . 7-26
Brake fluid . . . . . . . . . . . . . . . . . . . . . . . . . . . . . . . 7-27
• Checking the brake fluid level . . . . . . . . . . . . . . . . . 7-27
Engine clutch actuator fluid . . . . . . . . . . . . . . . . . 7-29
• Checking the engine clutch actuator fluid level . . . . 7-29
Washer fluid . . . . . . . . . . . . . . . . . . . . . . . . . . . . . . 7-31
• Checking the washer fluid level . . . . . . . . . . . . . . . . 7-31
Parking brake . . . . . . . . . . . . . . . . . . . . . . . . . . . . . 7-32
• Checking the parking brake. . . . . . . . . . . . . . . . . . . . 7-32
Air cleaner. . . . . . . . . . . . . . . . . . . . . . . . . . . . . . . . 7-33
• Filter replacement . . . . . . . . . . . . . . . . . . . . . . . . . . . 7-33
Climate control air filter . . . . . . . . . . . . . . . . . . . . 7-35
• Filter inspection . . . . . . . . . . . . . . . . . . . . . . . . . . . . . . 7-35
Wiper blades . . . . . . . . . . . . . . . . . . . . . . . . . . . . . . 7-37
• Blade inspection . . . . . . . . . . . . . . . . . . . . . . . . . . . . . . 7-37
• Blade replacement . . . . . . . . . . . . . . . . . . . . . . . . . . . 7-37
Battery (Plug-in Hybrid) . . . . . . . . . . . . . . . . . . . . 7-40
• For best battery service . . . . . . . . . . . . . . . . . . . . . . . 7-40
• Recharging the battery . . . . . . . . . . . . . . . . . . . . . . . . 7-41
• Reset items . . . . . . . . . . . . . . . . . . . . . . . . . . . . . . . . . . 7-42
Tires and wheels . . . . . . . . . . . . . . . . . . . . . . . . . . . 7-43
• Tire care . . . . . . . . . . . . . . . . . . . . . . . . . . . . . . . . . . . 7-43
• Recommended cold tire inflation pressures . . . . . . 7-43
• Tire pressure . . . . . . . . . . . . . . . . . . . . . . . . . . . . . . . . 7-44
• Checking tire inflation pressure. . . . . . . . . . . . . . . . . 7-44
• Tire rotation . . . . . . . . . . . . . . . . . . . . . . . . . . . . . . . . 7-45
• Wheel alignment and tire balance . . . . . . . . . . . . . . 7-46
• Tire replacement . . . . . . . . . . . . . . . . . . . . . . . . . . . . . 7-47
• Wheel replacement . . . . . . . . . . . . . . . . . . . . . . . . . . . 7-47
Page 552 of 684

Maintenance
10 7
Normal Maintenance Schedule - Non Turbo Models
The following maintenance services must be performed to ensure good emission control and performance.
Keep receipts for all vehicle services to protect your warranty. Where both mileage and date are shown, the frequen-
cy of service is determined by whichever occurs first.
Number of months or driving distance, whichever comes first
Months1224364860728496108120132144156168180
Miles×1,0007.51522.530 37.5 45 52.5 60 67.5 75 82.5 90 97.5 105 112.5
Km×1,00012 24 36 48 60 72 84 96 108 120 132 144 156 168 180
Rotate tiresRotate every 12,000 km (7,500 miles)
Fuel additives *1Add every 12,000 km (7,500 miles) or 12 months
Engine oil and engine oil
filter *2(Gasoline) 1.6 GDiRRRRRRRRRRRRRRR
Climate control air filter-R-R-R-R-R-R-R-
Engine clutch actuator fluidIRIRIRIRIRIRIRI
Air cleaner filterIIIRIIIRIIIRIII
Coolant (Engine)At first, replace at 192,000 km (120,000 miles) or 10 years, after that,
replace every 48,000 km (30,000 miles) or 24 months
Brake fluidInspect every 12,000 km (7,500 miles) or 12 months,
Replace every 48,000 km (30,000 miles) or 48 months
HSG belt *3Inspect every 12,000 km (7,500 miles) or 12months,
Replace every 96,000 km (60,000 miles) or 48 months
Spark plugs(Gasoline) 1.6 GDiReplace every 150,000 km (100,000 miles) or 120 months
MAINTENANCE
INTERVALS
MAINTENANCE
ITEM
Page 555 of 684
713
Maintenance
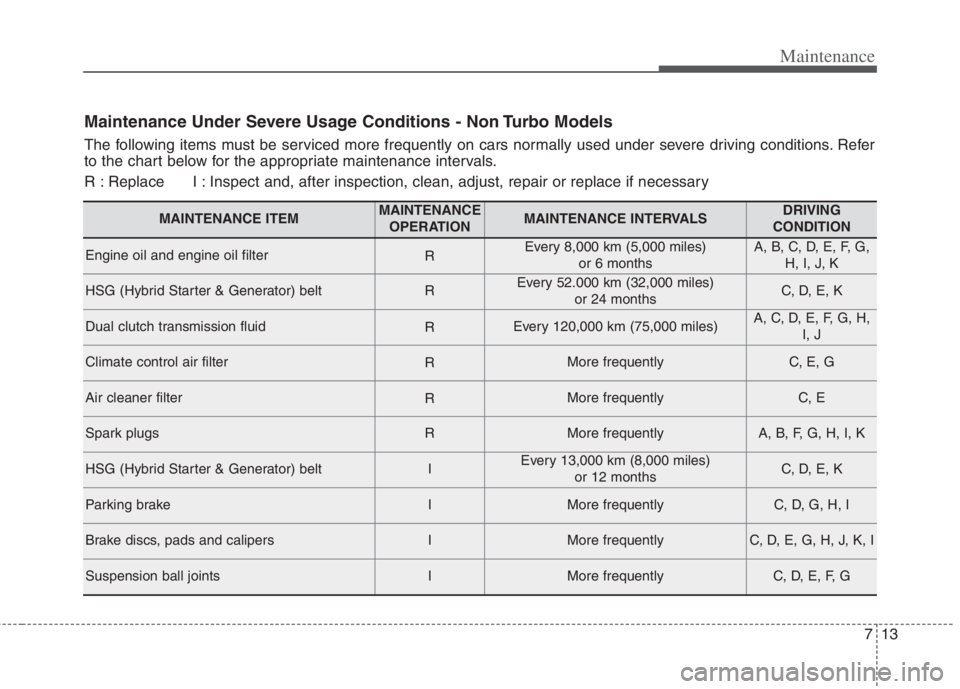
Maintenance Under Severe Usage Conditions - Non Turbo Models
The following items must be serviced more frequently on cars normally used under severe driving conditions. Refer
to the chart below for the appropriate maintenance intervals.
R : Replace I : Inspect and, after inspection, clean, adjust, repair or replace if necessary
MAINTENANCE ITEMMAINTENANCE
OPERATIONMAINTENANCE INTERVALSDRIVING
CONDITION
Engine oil and engine oil filterREvery 8,000 km (5,000 miles)
or 6 monthsA, B, C, D, E, F, G,
H, I, J, K
HSG (Hybrid Starter & Generator) beltREvery 52.000 km (32,000 miles)
or 24 monthsC, D, E, K
Dual clutch transmission fluidREvery 120,000 km (75,000 miles)A, C, D, E, F, G, H,
I, J
Climate control air filterRMore frequentlyC, E, G
Air cleaner filterRMore frequentlyC, E
Spark plugsRMore frequentlyA, B, F, G, H, I, K
HSG (Hybrid Starter & Generator) beltIEvery 13,000 km (8,000 miles)
or 12 monthsC, D, E, K
Parking brakeIMore frequentlyC, D, G, H, I
Brake discs, pads and calipersIMore frequentlyC, D, E, G, H, J, K, I
Suspension ball jointsIMore frequentlyC, D, E, F, G
Page 577 of 684
735
Maintenance
CLIMATE CONTROL AIR FILTER (IF EQUIPPED)
Filter inspection
The climate control air filter should
be replaced according to the
Maintenance Schedule. If the vehicle
is operated in severely air-polluted
cities or on dusty rough roads for a
long period, it should be inspected
more frequently and replaced earlier.
When you replace the climate control
air filter, replace it performing the fol-
lowing procedure, and be careful to
avoid damaging other components.
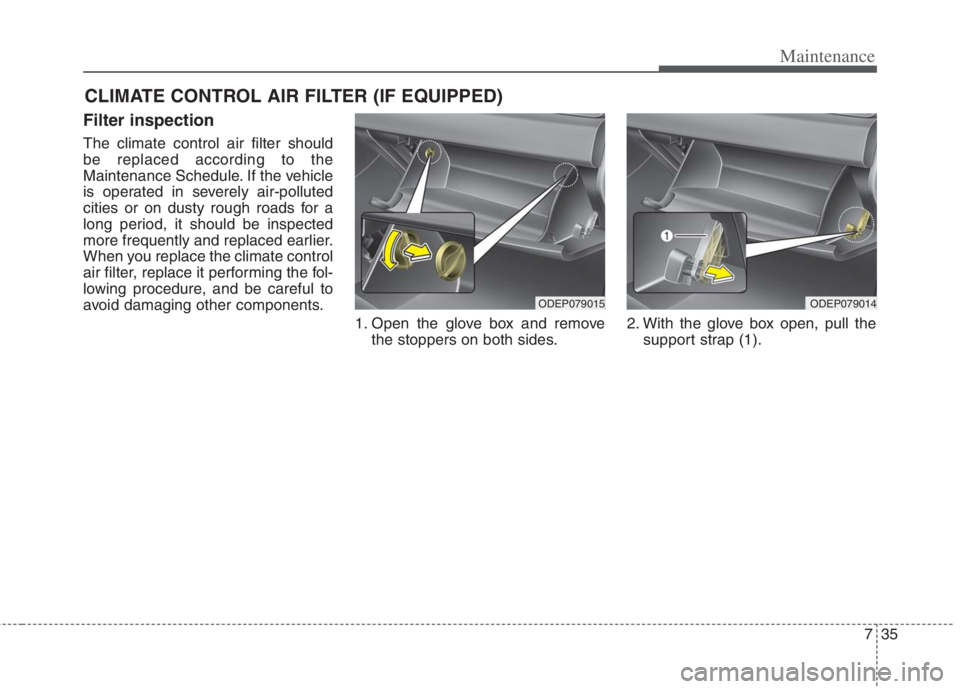
1. Open the glove box and remove
the stoppers on both sides.2. With the glove box open, pull the
support strap (1).
ODEP079014ODEP079015
Page 578 of 684
Maintenance
36 7
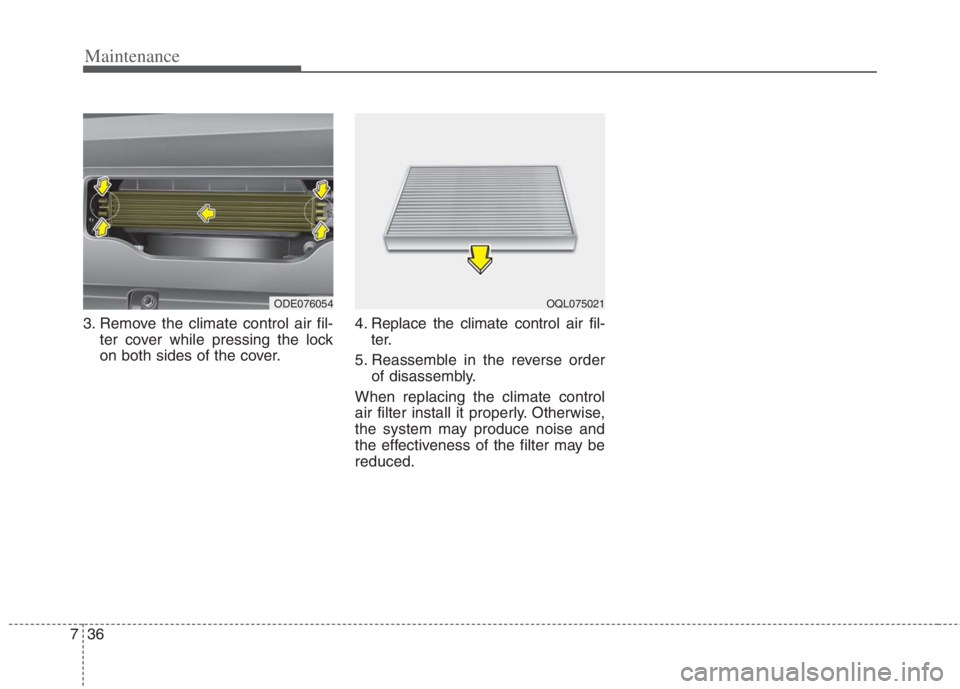
3. Remove the climate control air fil-
ter cover while pressing the lock
on both sides of the cover.4. Replace the climate control air fil-
ter.
5. Reassemble in the reverse order
of disassembly.
When replacing the climate control
air filter install it properly. Otherwise,
the system may produce noise and
the effectiveness of the filter may be
reduced.
ODE076054OQL075021
Page 584 of 684

Maintenance
42 7
When recharging the battery,
observe the following precautions:
The battery must be removed from
the vehicle and placed in an area
with good ventilation.
Do not allow cigarettes, sparks, or
flame near the battery.
Watch the battery during charging,
and stop or reduce the charging
rate if the battery cells begin
gassing (boiling) violently or if the
temperature of the electrolyte of
any cell exceeds 49°C (120°F).
Wear eye protection when check-
ing the battery during charging.
Disconnect the battery charger in
the following order.
1. Turn off the battery charger main
switch.
2. Unhook the negative clamp from
the negative battery terminal.
3. Unhook the positive clamp from
the positive battery terminal. Before performing maintenance or
recharging the battery, turn off all
accessories and stop the engine.
The negative battery cable must be
removed first and installed last
when the battery is disconnected.Reset items
The following items should be reset
after the battery has been dis-
charged or the battery has been dis-
connected.
Auto up/down window
Sunroof
Trip computer
Climate control system
Driver position memory system
Audio