lights KIA NIRO HYBRID EV 2022 Workshop Manual
[x] Cancel search | Manufacturer: KIA, Model Year: 2022, Model line: NIRO HYBRID EV, Model: KIA NIRO HYBRID EV 2022Pages: 684, PDF Size: 9.67 MB
Page 484 of 684
5157
Driving your vehicle
Your vehicle's fuel economy depends
mainly on your style of driving, where
you drive and when you drive.
Each of these factors affects how
many kilometers (miles) you can get
from a liter (gallon) of fuel. To operate
your vehicle as economically as pos-
sible, use the following driving sug-
gestions to help save money in both
fuel and repairs:
Drive smoothly. Accelerate at a
moderate rate. Don't make "jack-
rabbit" starts or full-throttle shifts
and maintain a steady cruising
speed. Don't race between stop-
lights. Try to adjust your speed to
the traffic so you don't have to
change speeds unnecessarily.
Avoid heavy traffic whenever pos-
sible. Always maintain a safe dis-
tance from other vehicles so you
can avoid unnecessary braking.
This also reduces brake wear.
Drive at a moderate speed. The
faster you drive, the more fuel your
vehicle uses. Driving at a moderate
speed, especially on the highway,
is one of the most effective ways to
reduce fuel consumption. Don't "ride" the brake pedal. This
can increase fuel consumption and
also increase wear on these com-
ponents. In addition, driving with
your foot resting on the brake pedal
may cause the brakes to overheat,
which reduces their effectiveness
and may lead to more serious con-
sequences.
Take care of your tires. Keep them
inflated to the recommended pres-
sure. Incorrect inflation, either too
much or too little, results in unnec-
essary tire wear. Check the tire
pressures at least once a month.
Be sure that the wheels are
aligned correctly. Improper align-
ment can result from hitting curbs
or driving too fast over irregular
surfaces. Poor alignment causes
faster tire wear and may also result
in other problems as well as
greater fuel consumption. Keep your vehicle in good condi-
tion. For better fuel economy and
reduced maintenance costs, main-
tain your vehicle in accordance
with the maintenance schedule in
chapter 8. If you drive your vehicle
in severe conditions, more frequent
maintenance is required (see
chapter 8 for details).
Keep your vehicle clean. For maxi-
mum service, your vehicle should
be kept clean and free of corrosive
materials. It is especially important
that mud, dirt, ice, etc. not be
allowed to accumulate on the
underside of the vehicle. This extra
weight can result in increased fuel
consumption and also contribute to
corrosion.
Travel lightly. Don't carry unneces-
sary weight in your vehicle. Weight
reduces fuel economy.
Don't let the engine idle longer
than necessary. If you are waiting
(and not in traffic), turn off your
engine and restart only when
you're ready to go.
ECONOMICAL OPERATION
Page 489 of 684
Driving your vehicle
162 5
Driving at night
Because night driving presents more
hazards than driving in the daylight,
here are some important tips to
remember:
Slow down and keep more dis-
tance between you and other vehi-
cles, as it may be more difficult to
see at night, especially in areas
where there may not be any street
lights.
Adjust your mirrors to reduce the
glare from other driver's head-
lights.
Keep your headlights clean and
properly aimed. (On vehicles not
equipped with the automatic head-
light aiming feature.) Dirty or
improperly aimed headlights will
make it much more difficult to see
at night.
Avoid staring directly at the head-
lights of oncoming vehicles. You
could be temporarily blinded, and it
will take several seconds for your
eyes to readjust to the darkness.
Driving in the rain
Rain and wet roads can make driving
dangerous, especially if you’re not
prepared for the slick pavement.
Here are a few things to consider
when driving in the rain: A heavy rainfall will make it harder
to see and will increase the dis-
tance needed to stop your vehicle,
so slow down.
Keep your windshield wiping
equipment in good shape. Replace
your windshield wiper blades when
they show signs of streaking or
missing areas on the windshield.
If your tires are not in good condi-
tion, making a quick stop on wet
pavement can cause a skid and
possibly lead to an accident. Be
sure your tires are in good shape.
Turn on your headlights to make it
easier for others to see you.
Driving too fast through large pud-
dles can affect your brakes. If you
must go through puddles, try to
drive through them slowly.
If you believe you may have gotten
your brakes wet, apply them lightly
while driving until normal braking
operation returns.
Page 500 of 684
What to do in an emergency
2 6
ROAD WARNING
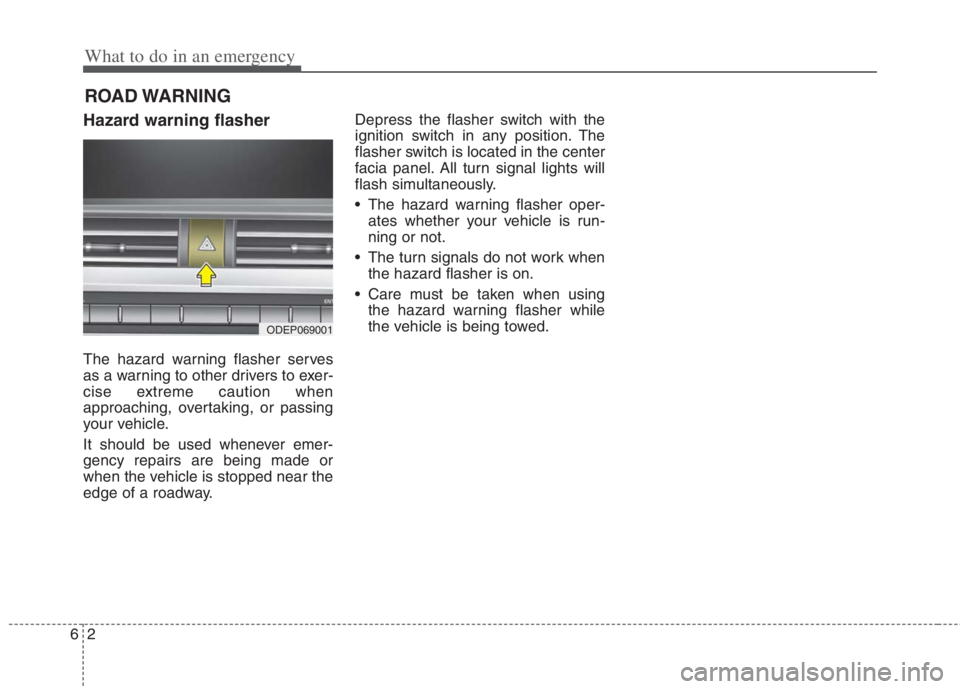
Hazard warning flasher
The hazard warning flasher serves
as a warning to other drivers to exer-
cise extreme caution when
approaching, overtaking, or passing
your vehicle.
It should be used whenever emer-
gency repairs are being made or
when the vehicle is stopped near the
edge of a roadway.Depress the flasher switch with the
ignition switch in any position. The
flasher switch is located in the center
facia panel. All turn signal lights will
flash simultaneously.
• The hazard warning flasher oper-
ates whether your vehicle is run-
ning or not.
The turn signals do not work when
the hazard flasher is on.
Care must be taken when using
the hazard warning flasher while
the vehicle is being towed.
ODEP069001
Page 550 of 684
Maintenance
8 7
At least monthly:
Check the coolant level in the
engine coolant reservoir.
Check the operation of all exterior
lights, including the stoplights, turn
signals and hazard warning flash-
ers.
Check the inflation pressures of all
tires including the spare for tires
that are worn, show uneven wear,
or are damaged.
Check for loose wheel lug nuts.
At least twice a year
(i.e., every Spring and Fall) :
Check the radiator, heater and air
conditioning hoses for leaks or
damage.
Check the windshield washer
spray and wiper operation. Clean
the wiper blades with clean cloth
dampened with washer fluid.
Check the headlight alignment.
Check the muffler, exhaust pipes,
shields and clamps.
Check the lap/shoulder belts for
wear and function.
At least once a year :
Clean the body and door drain
holes.
Lubricate the door hinges and
check the hood hinges.
Lubricate the door and hood locks
and latches.
Lubricate the door rubber weather-
strips.
Check the air conditioning system.
Inspect and lubricate dual clutch
transmission linkage and controls.
Clean the battery and terminals.
Check the brake fluid level.
Page 601 of 684
759
Maintenance
FUSES
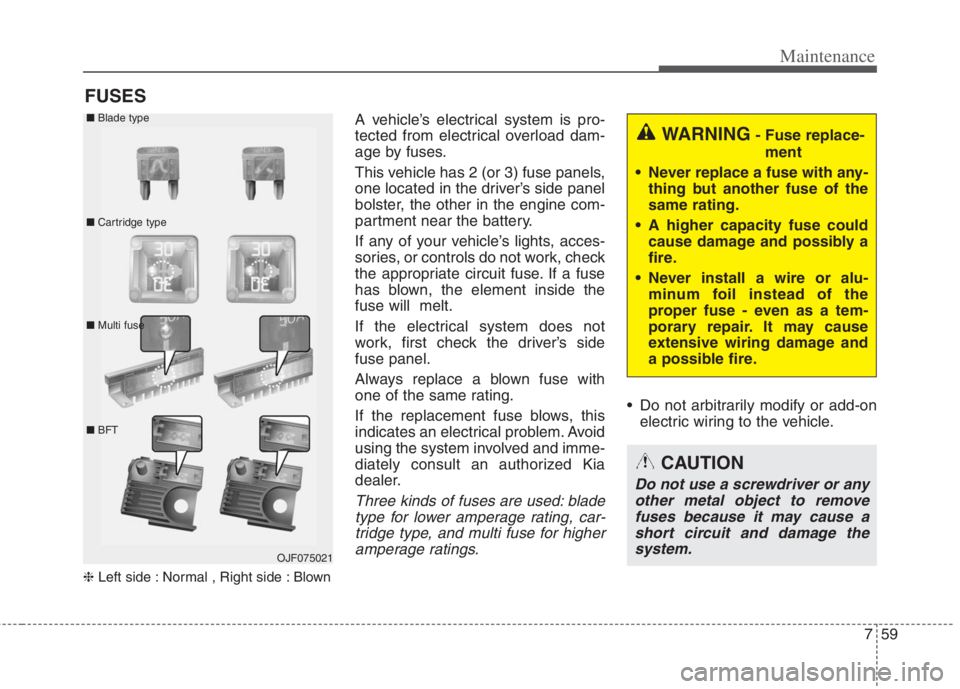
❈Left side : Normal , Right side : Blown
A vehicle’s electrical system is pro-
tected from electrical overload dam-
age by fuses.
This vehicle has 2 (or 3) fuse panels,
one located in the driver’s side panel
bolster, the other in the engine com-
partment near the battery.
If any of your vehicle’s lights, acces-
sories, or controls do not work, check
the appropriate circuit fuse. If a fuse
has blown, the element inside the
fuse will melt.
If the electrical system does not
work, first check the driver’s side
fuse panel.
Always replace a blown fuse with
one of the same rating.
If the replacement fuse blows, this
indicates an electrical problem. Avoid
using the system involved and imme-
diately consult an authorized Kia
dealer.
Three kinds of fuses are used: blade
type for lower amperage rating, car-
tridge type, and multi fuse for higher
amperage ratings.
Do not arbitrarily modify or add-on
electric wiring to the vehicle.
WARNING- Fuse replace-
ment
Never replace a fuse with any-
thing but another fuse of the
same rating.
A higher capacity fuse could
cause damage and possibly a
fire.
Never install a wire or alu-
minum foil instead of the
proper fuse - even as a tem-
porary repair. It may cause
extensive wiring damage and
a possible fire.
CAUTION
Do not use a screwdriver or any
other metal object to remove
fuses because it may cause a
short circuit and damage the
system.
OJF075021 ■Blade type
■Cartridge type
■Multi fuse
■BFT
Page 629 of 684
787
Maintenance
LIGHT BULBS
Bulb replacement precaution
Please keep extra bulbs on hand
with appropriate wattage ratings in
case of emergencies.
Refer to “Bulb Wattage” in chapter 8.
When changing lamps, first turn off
the engine at a safe place, firmly
apply the parking brake and detach
the battery’s negative (-) terminal.
Use only bulbs of the specified
wattage.✽ ✽
NOTICE
• If the light bulb or lamp connector
is removed while the lamp is still
on, the fuse box's electronic sys-
tem may log it as a malfunction.
Therefore, a lamp malfunction
incident may be recorded as a
Diagnostic Trouble Code (DTC) in
the fuse box.
• It is normal for an operating lamp
to flicker momentarily. This is due
to a stabilization function of the
vehicle’s electronic control device.
If the lamp lights up normally
after momentarily blinking, then
it is functioning as normal.
However, if the lamp continues to
flicker several times or turns off
completely, there may be an error
in the vehicle’s electronic control
device. Please have the vehicle
checked by an authorized Kia
dealer immediately.
✽ ✽
NOTICE
We recommend that the headlight
aiming be adjusted by an authorized
Kia dealer after an accident or after
the headlight assembly is reinstalled.
WARNING- Working on
the lights
Prior to working on the light,
firmly apply the parking brake,
ensure that the engine
start/stop button is in OFF posi-
tion and turn off the lights to
avoid sudden movement of the
vehicle and burning your fingers
or receiving an electric shock.
CAUTION -Light replace-
ment
Be sure to replace the burned-
out bulb with one of the same
wattage rating. Otherwise, it
may cause damage to the fuse
or electric wiring system.
CAUTION -Headlamp
Lens
To prevent damage, do not
clean the headlamp lens with
chemical solvents or strong
detergents.
Page 630 of 684
Maintenance
88 7
✽
✽
NOTICE
You can find moisture inside the lens
of lamps after a car wash or driving
in the rain. It is a natural event
caused by the temperature differ-
ence between the inside and the out-
side of the lamp and does not mean a
problem with its functions. The
moisture inside the lamp would dis-
appear if you drive the vehicle with
the headlamp turned on, however,
the level at which the moisture is
removed may differ depending on
the size/location/condition of the
lamp. If the moisture continues to
stay inside the lamp, we recommend
that you have the vehicle checked by
an authorized Kia dealer.
If you don’t have the necessary tools,
the correct bulbs and the expertise,
consult an authorized Kia dealer. In
many cases, it is difficult to replace
vehicle light bulbs because other
parts of the vehicle must be removed
before you can get to the bulb. This is
especially true if you have to remove
the headlamp assembly to get to the
bulb(s).
Removing/installing the headlamp
assembly can result in damage to
the vehicle.
If non-genuine parts or substandard
bulbs are used, it may lead to blow-
ing a fuse or other wiring damages.
Do not install extra lamps or LEDs to
the vehicle. If additional lights are
installed, it may lead to lamp mal-
functions and flickering. Additionally,
the fuse box and other writing may
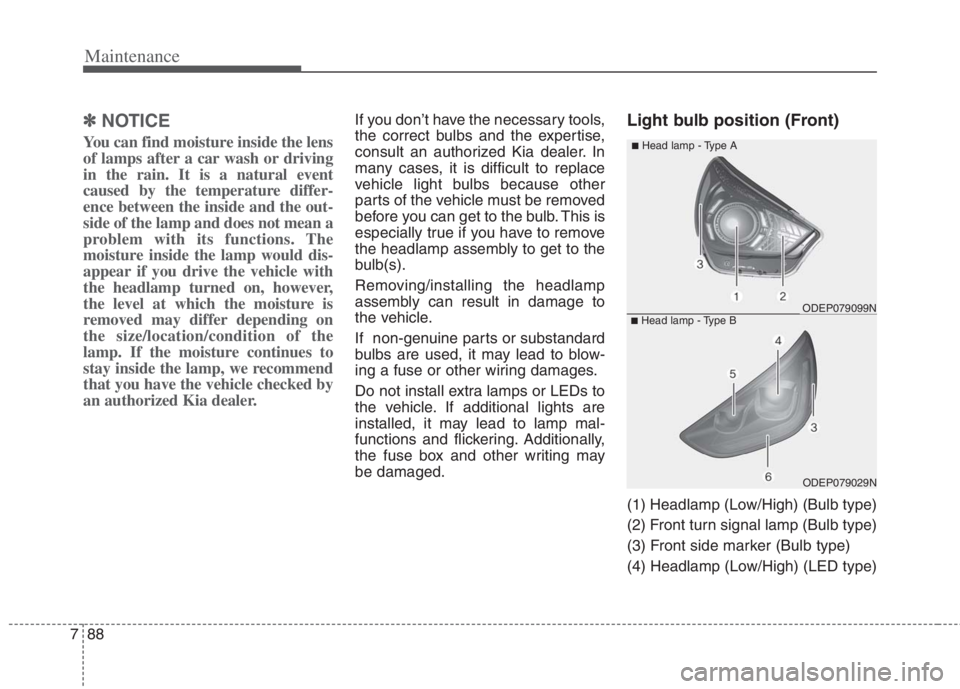
be damaged.Light bulb position (Front)
(1) Headlamp (Low/High) (Bulb type)
(2) Front turn signal lamp (Bulb type)
(3) Front side marker (Bulb type)
(4) Headlamp (Low/High) (LED type)
ODEP079029N
ODEP079099N
■Head lamp - Type A
■Head lamp - Type B
Page 679 of 684

Index
6I
If the engine stalls while driving. . . . . . . . . . . . . . . . 6-3
If you have a flat tire while driving . . . . . . . . . . . . . 6-3
Infotainment system . . . . . . . . . . . . . . . . . . . . . . . . . . 4-185
Antenna . . . . . . . . . . . . . . . . . . . . . . . . . . . . . . . . . 4-185
How vehicle radio works . . . . . . . . . . . . . . . . . . . . 4-186
USB port. . . . . . . . . . . . . . . . . . . . . . . . . . . . . . . . . 4-185
Instrument cluster . . . . . . . . . . . . . . . . . . . . . . . . . . . . . 4-68
Dual clutch transmission shift indicator . . . . . . . . . 4-76
Gauges . . . . . . . . . . . . . . . . . . . . . . . . . . . . . . . . . . . 4-70
Instrument Cluster Control. . . . . . . . . . . . . . . . . . . . 4-70
Instrument panel overview . . . . . . . . . . . . . . . . . . . . . . . 2-5
Interior features. . . . . . . . . . . . . . . . . . . . . . . . . . . . . . 4-170
AC inverter . . . . . . . . . . . . . . . . . . . . . . . . . . . . . . . 4-175
Air ventilation seat . . . . . . . . . . . . . . . . . . . . . . . . . 4-172
Cargo security screen . . . . . . . . . . . . . . . . . . . . . . . 4-182
Clothes hanger . . . . . . . . . . . . . . . . . . . . . . . . . . . . 4-180
Cup holder . . . . . . . . . . . . . . . . . . . . . . . . . . . . . . . 4-170
Floor mat anchor(s) . . . . . . . . . . . . . . . . . . . . . . . . 4-180
Luggage net holder. . . . . . . . . . . . . . . . . . . . . . . . . 4-181
Power outlet . . . . . . . . . . . . . . . . . . . . . . . . . . . . . . 4-173
Seat warmer . . . . . . . . . . . . . . . . . . . . . . . . . . . . . . 4-170
Sun visor. . . . . . . . . . . . . . . . . . . . . . . . . . . . . . . . . 4-173
USB charger . . . . . . . . . . . . . . . . . . . . . . . . . . . . . . 4-174
Wireless smart phone charging system . . . . . . . . . 4-176
Interior lights . . . . . . . . . . . . . . . . . . . . . . . . . . . . . . . 4-143
Automatic turn off function . . . . . . . . . . . . . . . . . . 4-143
Liftgate room lamp. . . . . . . . . . . . . . . . . . . . . . . . . 4-145
Map lamp . . . . . . . . . . . . . . . . . . . . . . . . . . . . . . . 4-143Room lamp . . . . . . . . . . . . . . . . . . . . . . . . . . . . . . . 4-144
Vanity mirror lamp . . . . . . . . . . . . . . . . . . . . . . . . . 4-145
Interior overview. . . . . . . . . . . . . . . . . . . . . . . . . . . . . . . 2-4
Key positions . . . . . . . . . . . . . . . . . . . . . . . . . . . . . . . . . 5-7
Ignition switch position . . . . . . . . . . . . . . . . . . . . . . . 5-7
Illuminated ignition switch . . . . . . . . . . . . . . . . . . . . 5-7
Starting the hybrid system . . . . . . . . . . . . . . . . . . . . . 5-9
Lane Following Assist (LFA) . . . . . . . . . . . . . . . . . . . 5-132
Lane Following Assist malfunction . . . . . . . . . . . . 5-136
Lane Following Assist operation . . . . . . . . . . . . . . 5-133
Limitation of Lane Following Assist . . . . . . . . . . . 5-136
Lane Keeping Assist (LKA) . . . . . . . . . . . . . . . . . . . . . 5-71
Lane Keeping Assist activation . . . . . . . . . . . . . . . . 5-74
Lane Keeping Assist malfunction . . . . . . . . . . . . . . 5-77
Lane Keeping Assist operation . . . . . . . . . . . . . . . . 5-72
Lane Keeping Assist setting . . . . . . . . . . . . . . . . . . . 5-73
LCD Display . . . . . . . . . . . . . . . . . . . . . . . . . . . . . . . . . 4-78
LCD Display Control . . . . . . . . . . . . . . . . . . . . . . . . 4-78
LCD Display Modes . . . . . . . . . . . . . . . . . . . . . . . . 4-79
Trip modes (Trip computer) . . . . . . . . . . . . . . . . . . . 4-91
Warning messages . . . . . . . . . . . . . . . . . . . . . . . . . . 4-96
K
L
Page 684 of 684
I11
Index
Warning and indicator lights. . . . . . . . . . . . . . . . . . . . 4-107
Indicator Lights . . . . . . . . . . . . . . . . . . . . . . . . . . . 4-116
Warning lights . . . . . . . . . . . . . . . . . . . . . . . . . . . . 4-107
Washer fluid . . . . . . . . . . . . . . . . . . . . . . . . . . . . . . . . . 7-31
Checking the washer fluid level . . . . . . . . . . . . . . . 7-31
Welcome system . . . . . . . . . . . . . . . . . . . . . . . . . . . . 4-146
Headlight (Headlamp) escort function . . . . . . . . . . 4-146
Interior light . . . . . . . . . . . . . . . . . . . . . . . . . . . . . 4-146
Pocket lamp . . . . . . . . . . . . . . . . . . . . . . . . . . . . . . 4-146
Windows . . . . . . . . . . . . . . . . . . . . . . . . . . . . . . . . . . . . 4-31
Power windows . . . . . . . . . . . . . . . . . . . . . . . . . . . . 4-32
Windshield defrosting and defogging. . . . . . . . . . . . . 4-163
Automatic climate control system . . . . . . . . . . . . . 4-163
Defogging logic . . . . . . . . . . . . . . . . . . . . . . . . . . . 4-164
Winter driving . . . . . . . . . . . . . . . . . . . . . . . . . . . . . . . 5-164
Carry emergency equipment . . . . . . . . . . . . . . . . . . 2-21
Change to "winter weight" oil if necessary . . . . . . 5-165
Check battery and cables . . . . . . . . . . . . . . . . . . . . 5-165
Check spark plugs and ignition system . . . . . . . . . 5-165
Don’t let your parking brake freeze . . . . . . . . . . . . 5-166
Don't let ice and snow accumulate underneath . . . 5-166
Snowy or icy conditions . . . . . . . . . . . . . . . . . . . . . 5-164
To keep locks from freezing. . . . . . . . . . . . . . . . . . 5-165
Use approved window washer anti-freeze in system5-165
Use high quality ethylene glycol coolant. . . . . . . . 5-165Wiper blades . . . . . . . . . . . . . . . . . . . . . . . . . . . . . . . . . 7-37
Blade inspection . . . . . . . . . . . . . . . . . . . . . . . . . . . . 7-37
Blade replacement . . . . . . . . . . . . . . . . . . . . . . . . . 7-37
Wipers and washers . . . . . . . . . . . . . . . . . . . . . . . . . . 4-139
Front windshield washers. . . . . . . . . . . . . . . . . . . . 4-140
Rear window wiper and washer switch . . . . . . . . . 4-141
Windshield wipers . . . . . . . . . . . . . . . . . . . . . . . . . 4-139
W