display KIA NIRO PHEV 2019 Workshop Manual
[x] Cancel search | Manufacturer: KIA, Model Year: 2019, Model line: NIRO PHEV, Model: KIA NIRO PHEV 2019Pages: 611, PDF Size: 15.28 MB
Page 327 of 611
Audio system
526
Pairing a Bluetooth®Wireless
Technology device
Information on pairing Bluetooth®
Wireless Technology devices
Pairing refers to the process of pair-
ing
Bluetooth®Wireless Technology
cell phones or devices with the
system prior to connection. This is
a necessary procedure for
Bluetooth®
Wireless Technology connection
and usage.
Up to five devices can be paired.
Pairing
Bluetooth®Wireless Technology
device is not allowed while vehicle
is moving.
Pairing the first Bluetooth
®Wireless
Technology device
Press the [PHONE] button on the
audio system or the [CALL] button
on the steering wheel remote control
➟ Search for the vehicle from the
Bluetooth®Wireless Technology
device, and pair ➟ Enter the passkey
on the
Bluetooth®Wireless Technology
device or approve passkey ➟
Bluetooth®Wireless Technology pair-
ing completed. 1. When the [PHONE]
button on the
audio system or the [CALL] button
on the steering wheel remote con-
trol is pressed, the following screen
is displayed. Devices can now be
paired.
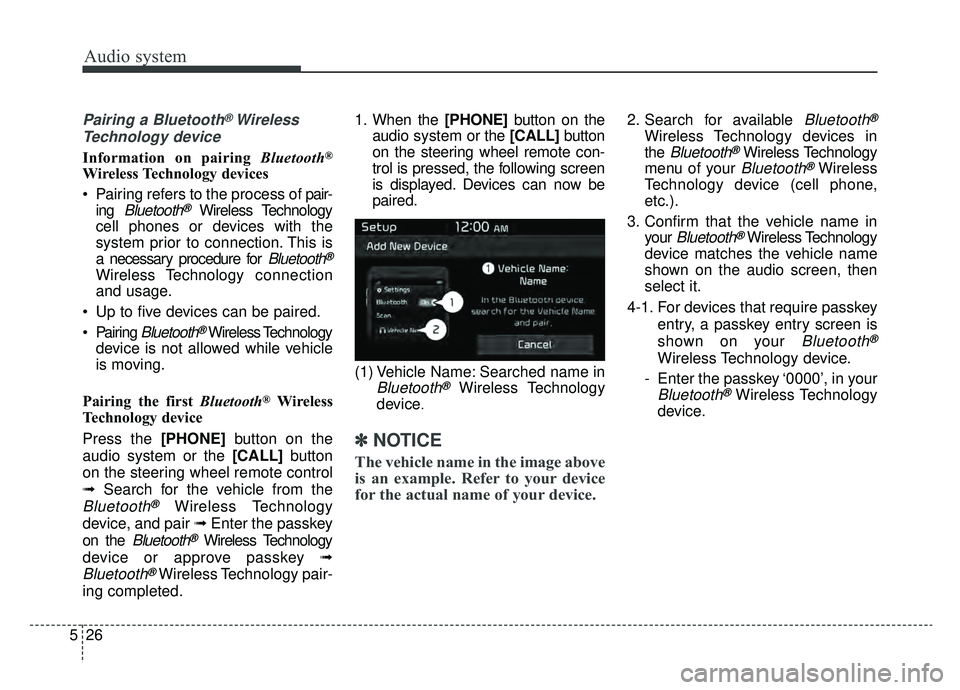
(1) Vehicle Name: Searched name in
Bluetooth®Wireless Technology
device
.
✽ ✽ NOTICE
The vehicle name in the image above
is an example. Refer to your device
for the actual name of your device.
2. Search for available Bluetooth®
Wireless Technology devices in
the
Bluetooth®Wireless Technology
menu of your
Bluetooth®Wireless
Technology device (cell phone,
etc.).
3. Confirm that the vehicle name in your
Bluetooth®Wireless Technology
device matches the vehicle name
shown on the audio screen, then
select it.
4-1. For devices that require passkey entry, a passkey entry screen is
shown on your
Bluetooth®
Wireless Technology device.
- Enter the passkey ‘0000’, in your
Bluetooth®Wireless Technology
device.
Page 329 of 611
![KIA NIRO PHEV 2019 Workshop Manual Audio system
528
Connecting Bluetooth®Wireless
Technology devices
If there are no connected devices
Press the [PHONE] button on the
audio system or the [CALL] button in
the steering wheel remote cont KIA NIRO PHEV 2019 Workshop Manual Audio system
528
Connecting Bluetooth®Wireless
Technology devices
If there are no connected devices
Press the [PHONE] button on the
audio system or the [CALL] button in
the steering wheel remote cont](/img/2/54762/w960_54762-328.png)
Audio system
528
Connecting Bluetooth®Wireless
Technology devices
If there are no connected devices
Press the [PHONE] button on the
audio system or the [CALL] button in
the steering wheel remote control ➟
List of paired
Bluetooth®Wireless
Technology devices ➟Select the
desired
Bluetooth®Wireless Technology
device from the list ➟ Connect
Bluetooth®
Wireless Technology. If there are connected devices
Press the [PHONE]
button on the
audio system ➟ Select [Settings] ➟
Select [Connections] ➟Select
Bluetooth®Wireless Technology device
to connect ➟ Select [Connect] ➟
Connect
Bluetooth®Wireless Technology.
✽ ✽ NOTICE
• Only one Bluetooth®Wireless
Technology device can be connected
at a time.
• When a Bluetooth
®Wireless
Technology device is connected,
other devices cannot be paired.
Accepting/rejecting phone calls
Receiving phone calls with
Bluetooth®Wireless Technology con-
nected.
(1) Caller name: If the caller number is in your contacts, the correspon-
ding name is displayed.
(2) Incoming phone number: Incoming phone number is displayed.
(3) Accept: Accept call.
(4) Reject: Reject call.
Page 330 of 611
Audio system
29
5
✽ ✽
NOTICE
• When the incoming call screen is
displayed, audio mode and the set-
tings screen cannot be shown.
Only call volume control is sup-
ported.
• Some Bluetooth
®Wireless Technology
devices may not support the call
reject function.
• Some Bluetooth
®Wireless Technology
devices may not support the phone
number display function.
Operation during calls
Incoming call with Bluetooth®
Wireless Technology connected ➟
Select [Accept].
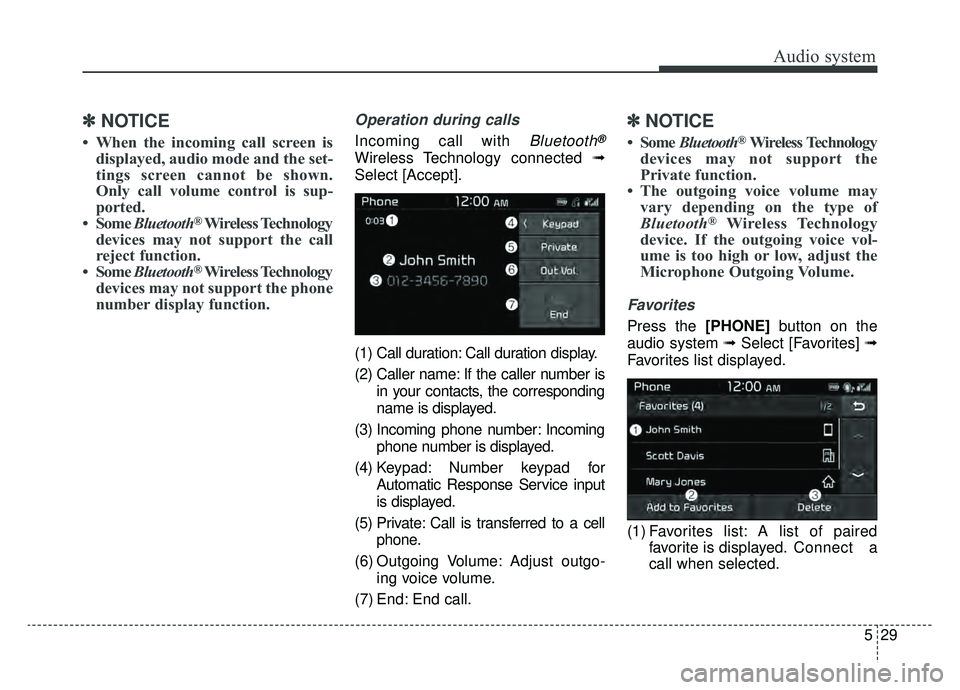
(1) Call duration: Call duration display.
(2) Caller name: If the caller number is in your contacts, the corresponding
name is displayed.
(3) Incoming phone number: Incoming phone number is displayed.
(4) Keypad: Number keypad for Automatic Response Service input
is displayed.
(5) Private: Call is transferred to a cell phone.
(6) Outgoing Volume: Adjust outgo- ing voice volume.
(7) End: End call.
✽ ✽ NOTICE
• Some Bluetooth®Wireless Technology
devices may not support the
Private function.
• The outgoing voice volume may vary depending on the type of
Bluetooth
®Wireless Technology
device. If the outgoing voice vol-
ume is too high or low, adjust the
Microphone Outgoing Volume.
Favorites
Press the [PHONE] button on the
audio system ➟ Select [Favorites] ➟
Favorites list displayed.
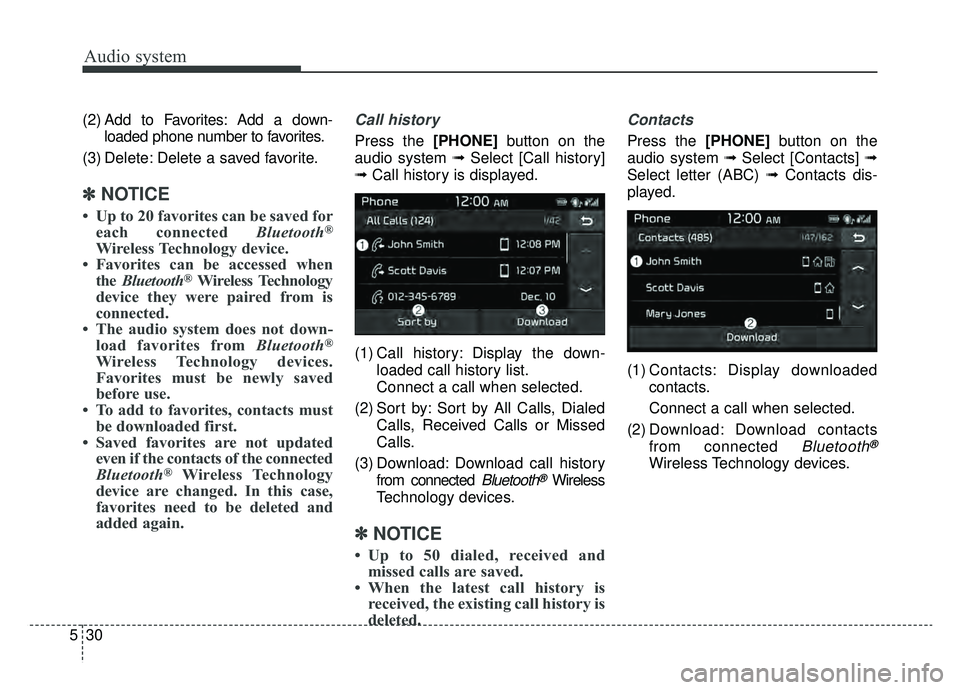
(1) Favorites list: A list of paired favorite is displayed. Connect a
call when selected.
Page 331 of 611
Audio system
530(2) Add to Favorites: Add a down-
loaded phone number to favorites.
(3) Delete: Delete a saved favorite.
✽ ✽ NOTICE
• Up to 20 favorites can be saved for
each connected Bluetooth®
Wireless Technology device.
• Favorites can be accessed when the Bluetooth
®Wireless Technology
device they were paired from is
connected.
• The audio system does not down- load favorites from Bluetooth
®
Wireless Technology devices.
Favorites must be newly saved
before use.
• To add to favorites, contacts must be downloaded first.
• Saved favorites are not updated even if the contacts of the connected
Bluetooth
®Wireless Technology
device are changed. In this case,
favorites need to be deleted and
added again.
Call history
Press the [PHONE] button on the
audio system ➟ Select [Call history]
➟ Call history is displayed.
(1) Call history: Display the down- loaded call history list.
Connect a call when selected.
(2) Sort by: Sort by All Calls, Dialed Calls, Received Calls or Missed
Calls.
(3) Download: Download call history from connected
Bluetooth®Wireless
Technology devices.
✽ ✽ NOTICE
• Up to 50 dialed, received and
missed calls are saved.
• When the latest call history is received, the existing call history is
deleted.
Contacts
Press the [PHONE] button on the
audio system ➟ Select [Contacts] ➟
Select letter (ABC) ➟ Contacts dis-
played.
(1) Contacts: Display downloaded contacts.
Connect a call when selected.
(2) Download: Download contacts from connected
Bluetooth®
Wireless Technology devices.
Page 332 of 611
Audio system
31
5
✽ ✽
NOTICE
• Only supported contacts format
can be downloaded and displayed
from the Bluetooth
®Wireless
Technology device, contacts from
some applications will not be
included.
• Up to 2,000 contacts can be saved.
• In some cases, additional confir- mation from your Bluetooth
®
Wireless Technology device is nec-
essary when downloading con-
tacts. If downloading of contacts
unsuccessful, consult your
Bluetooth
®Wireless Technology
device’s settings or the audio
screen to approve the download.
• Contacts without phone numbers are not displayed.
Dial
Press the [PHONE] button on the
audio system ➟ Select [Dial].
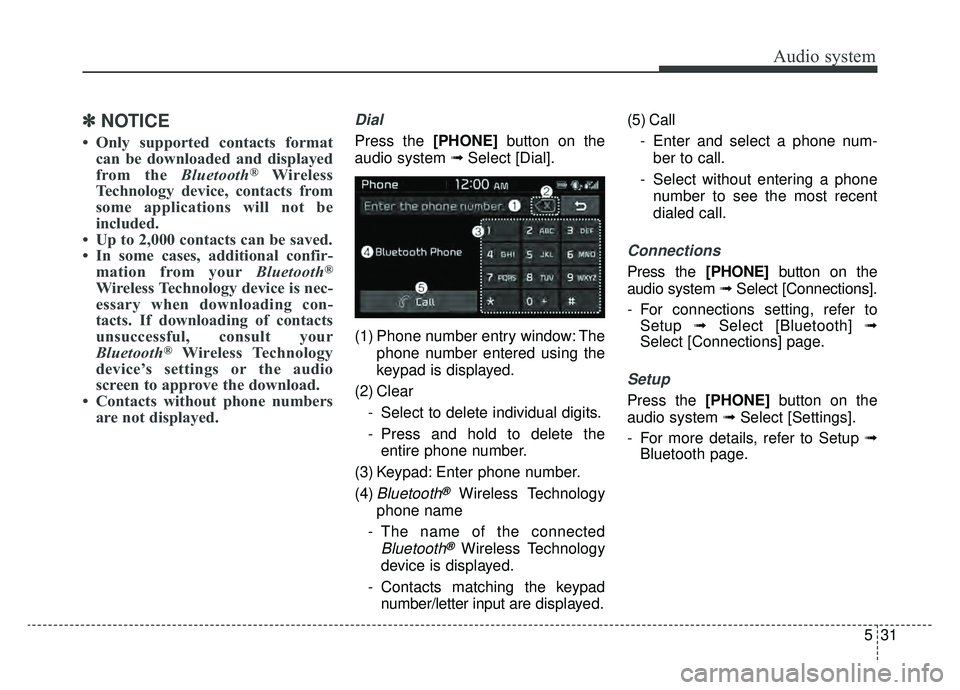
(1) Phone number entry window: The phone number entered using the
keypad is displayed.
(2) Clear - Select to delete individual digits.
- Press and hold to delete theentire phone number.
(3) Keypad: Enter phone number.
(4)
Bluetooth®Wireless Technology
phone name
- The name of the connected
Bluetooth®Wireless Technology
device is displayed.
- Contacts matching the keypad number/letter input are displayed.(5) Call
- Enter and select a phone num-ber to call.
- Select without entering a phone number to see the most recent
dialed call.
Connections
Press the [PHONE] button on the
audio system ➟ Select [Connections].
- For connections setting, refer to Setup ➟Select [Bluetooth] ➟
Select [Connections] page.
Setup
Press the [PHONE] button on the
audio system ➟ Select [Settings].
- For more details, refer to Setup ➟ Bluetooth page.
Page 333 of 611
![KIA NIRO PHEV 2019 Workshop Manual Audio system
532
Setup
Access Display, Sound, Date/Time,
Bluetooth, System, Screen Saver
and Display Off settings.
Press the [SETUP]button on the
audio system.
Display
Press the [SETUP] button on the KIA NIRO PHEV 2019 Workshop Manual Audio system
532
Setup
Access Display, Sound, Date/Time,
Bluetooth, System, Screen Saver
and Display Off settings.
Press the [SETUP]button on the
audio system.
Display
Press the [SETUP] button on the](/img/2/54762/w960_54762-332.png)
Audio system
532
Setup
Access Display, Sound, Date/Time,
Bluetooth, System, Screen Saver
and Display Off settings.
Press the [SETUP]button on the
audio system.
Display
Press the [SETUP] button on the
audio system ➟ Select [Display].
Mode - Adjusts the brightness automati-cally according to surrounding
brightness.
- Brightness is automatically adjust- ed according to the headlight
use.
Illumination: The brightness of the audio screen can be changed.
✽ ✽ NOTICE
Mode display settings may differ
according to vehicle model.
Sound
Press the [SETUP] button on the
audio system ➟ Select [Sound].
Position: Sound balance and fader can be adjusted.
Tone: Sound tone color can be adjusted.
Speed Dependent Volume: Automatically adjust volume based
on vehicle speed.
Beep: Select whether to play a beep sound when the screen is
touched.
Date/Time
Press the [SETUP] button on the
audio system ➟ Select [Date/Time].
Set Time: Set the time displayed on the audio screen.
Time Format: Choose between 12- hour and 24-hour time formats.
Set Date: Set the date displayed on the audio screen.
Page 335 of 611
![KIA NIRO PHEV 2019 Workshop Manual Audio system
534
System
Press the [SETUP]button on the
audio system ➟ Select [System].
• Memory Information: View My Music memory usage.
Language: Change the user lan- guage.
System Information: KIA NIRO PHEV 2019 Workshop Manual Audio system
534
System
Press the [SETUP]button on the
audio system ➟ Select [System].
• Memory Information: View My Music memory usage.
Language: Change the user lan- guage.
System Information:](/img/2/54762/w960_54762-334.png)
Audio system
534
System
Press the [SETUP]button on the
audio system ➟ Select [System].
• Memory Information: View My Music memory usage.
Language: Change the user lan- guage.
System Information: At the System Information screen, Software version
information, updates are available.
- System Update: At the SystemInformation screen, insert the
USB memory with the latest file
downloaded, and then select the
[Update] to begin updating. The
system with then reboot auto-
matically.
✽ ✽ NOTICE
• This product needs supplemented
software updates and additional
functions, which collectively may
take some time to complete,
depending on the amount of data.
• If the Power is disconnected or the USB is removed during an update,
the data might be damaged. Please
wait until the update is complete
while engine is on.
Screen Saver
Set the information displayed when
the audio system is switched off or
the screen is turned off.
Press the [SETUP] button on the
audio system ➟ Select [Screen
Saver].
Analog: An analog clock is dis- played.
Digital: A digital clock is displayed.
None: No information is displayed.
Display Off
To prevent glare, the screen can be
turned off with the audio system in
operation.
Press the [SETUP] button on the
audio system ➟ Select [Display Off].
✽ ✽
NOTICE
Use ‘Screen Saver’ to set the Notice
to be displayed when the screen is
turned off.
Page 352 of 611
Driving your vehicle
16
6
To hold the vehicle on a hill use the
foot brake or the parking brake. If
the vehicle is held by applying the
accelerator pedal on a hill the
clutch and transmission will be
overheated resulting in damage.
At this time, a warning message
(“Steep grade! Press brake pedal”)
will appear on the LCD display.
If the clutch becomes overheated by excessive use of the clutch to
hold on a hill, you may notice a
shudder feeling and a blinking dis-
play on the instrument cluster.
When this occurs, the clutch is dis-
abled until the clutch cools to nor-
mal temperatures. If this occurs,
pull over to a safe location, shift
into P (Park) and apply the foot
brake for a certain time on the LCD
warning until it disappears.
If the LCD warning is active, the foot brake must be applied.
Ignoring the warnings can lead to damage to the transmission. If the display continues to blink, for
your safety, we recommend that you
contact an authorized Kia dealer.
Under certain conditions such as repeated launch on steep grades,
the clutch in the transmission could
overheat.
When the clutch is overheated, the
safe protection mode engages. If
the safe protection mode engages,
the gear position indicator on the
cluster blinks with a chime sound.
At this time, a warning message
(“Transmission temp. is high! Stop
safely”, “Trans hot! Park with engine
on”, “Trans Cooling. Remain parked
for 00 min.”, “Trans Cooled. Resume
driving”) will appear on the LCD dis-
play and driving may not be smooth.
If you ignore this warning, the driv-
ing condition may become worse.
To return the normal driving condi-
tion, stop the vehicle and apply the
foot brake for a few minutes before
driving off. Gear shifts may be more notice-
able than a conventional automatic
transmission. This is a normal
characteristic of this type of dual
clutch transmission.
During the first 1,500 km (1,000 miles), you may feel that the vehi-
cle may not be smooth when accel-
erating at low speed. During this
break-in period, the shift quality
and performance of your new vehi-
cle is continuously optimized.
Always come to a complete stop before shifting into D (Drive) or R
(Reverse).
Do not put the shift lever in N (Neutral) while driving.
CAUTION
To avoid damage to your transaxle, do not try to accel-erate in R (Reverse) or any for-ward gear position with thebrakes on.
When stopped on slope, do not hold the vehicle withaccelerator pedal. Use theservice brake or the parkingbrake.
Page 353 of 611
617
Driving your vehicle
The indicator in the instrument clus-
ter displays the shift lever position
when the ignition switch is in the ON
position.
P (Park)
Always come to a complete stop
before shifting into P (Park).
To shift from P (Park), you must
depress firmly on the brake pedal
and make sure your foot is off the
accelerator pedal.
The shift lever must be in P (Park)
before turning the engine off.R (Reverse)
Use this position to drive the vehicle
backward.
WARNING
Shifting into P (Park) while the
vehicle is in motion may
cause you to lose control of
the vehicle.
After the vehicle has stopped, always make sure the shift
lever is in P (Park), apply the
parking brake, and turn the
engine off.
Do not use the P (Park) position in place of the parking brake.
CAUTION
Always come to a complete stopbefore shifting into or out of R(Reverse); you may damage thetransmission if you shift into R(Reverse) while the vehicle is inmotion.
Page 373 of 611
637
Driving your vehicle
The warning light illumi-
nates on the LCD display,
when you cancel the AEB
system. The driver can
monitor the AEB ON/OFF status on
the LCD display. When the warning
light remains ON with the AEB acti-
vated, have your vehicle inspected
by an authorized Kia dealer.
The driver can select the initial warn-
ing activation time in the User
Settings in the instrument cluster
LCD display. The options for the ini-
tial Forward Collision Warning
include the following:
When this setting is select-
ed, the initial Forward
Collision Warning is acti-
vated earlier than normal.
This setting maximizes the
amount of distance
between the vehicle or
pedestrian ahead before
the initial warning occurs. If
the driver feels this setting
is too sensitive to activate
than expectation, change it
to Normal. If the vehicle in
front stops abruptly, the
driver can notice the warn-
ing alarm is late even
though the early option is
selected.
selected, the initial
Forward Collision
Warning is activated nor-
mally. This setting allows
for a smaller amount of
distance between the
vehicle or pedestrian
ahead before the initial
warning occurs com-
pared to the EARLY set-
ting.
ed, the initial Forward
Collision Warning is activat-
ed later than normal. This
setting reduces the amount
of distance between the
vehicle or pedestrian ahead
before the initial warning
occurs. The driver can use it
when the traffic is not busy
on the road and driving
speed is lower.