KIA NIRO PHEV 2022 Quick Start Guide Base Audio
Manufacturer: KIA, Model Year: 2022, Model line: NIRO PHEV, Model: KIA NIRO PHEV 2022Pages: 164, PDF Size: 4.55 MB
Page 71 of 164
4-5
Saving radio stations
You can save your favorite radio stations
and listen to them by selecting from the
preset list.
Press the star icon next to the
current radio station information.
\225Alternatively, press and hold an empty
slot on the preset list (if equipped).
\225You can also press Menu > Station List
and save radio stations from the list of
available radio stations.
\333 Note
\225You can save up to 40 radio stations.
\225If you select a slot that is already filled,
the station will be replaced by the
station you are listening to (if equipped).
Listening to saved radio
stations
On the radio screen, select one of
the radio stations from the preset
list.
\225Alternatively, use the Search lever/
button on the steering wheel to scroll
through the radio stations on the preset
list.
Rearranging the preset list
(if equipped)
1 On the radio screen, press
Menu > Reorder Presets .
2 Press next to the radio
station you want to move and
drag it to a desired location.
\225Your changes will be applied to the
preset list immediately.
3 Press to finish.
Deleting saved radio
stations
1 On the radio screen, press
Menu > Delete Presets.
2 Select the radio station you
want to delete and press
Delete > Yes .
\225The selected radio station will be
deleted from the preset list.
\333 Note
If you are listening to one of the saved
radio stations, press the red star icon next
to the current radio station information to
delete the radio station.
Page 72 of 164
4-6
Changing the number
of radio stations on the
preset list
(if equipped)
1 On the radio screen, press
Menu > Set Number of
Presets.
2 Select the number of radio
stations and press OK.
\225 The selected number of the radio
stations will be displayed on the
preset list.
\333 Note
If you set a number lower than the
previously set number, only the selected
number of radio stations will be displayed
and the rest will be deleted.
Listening to HD
Radio™
(if equipped)
By enabling HD Radio reception, you can
listen to HD Radio stations in areas where
they are available.
1 Press All Menus > Radio on
the Home screen, or press the
Radio button on the control
panel.
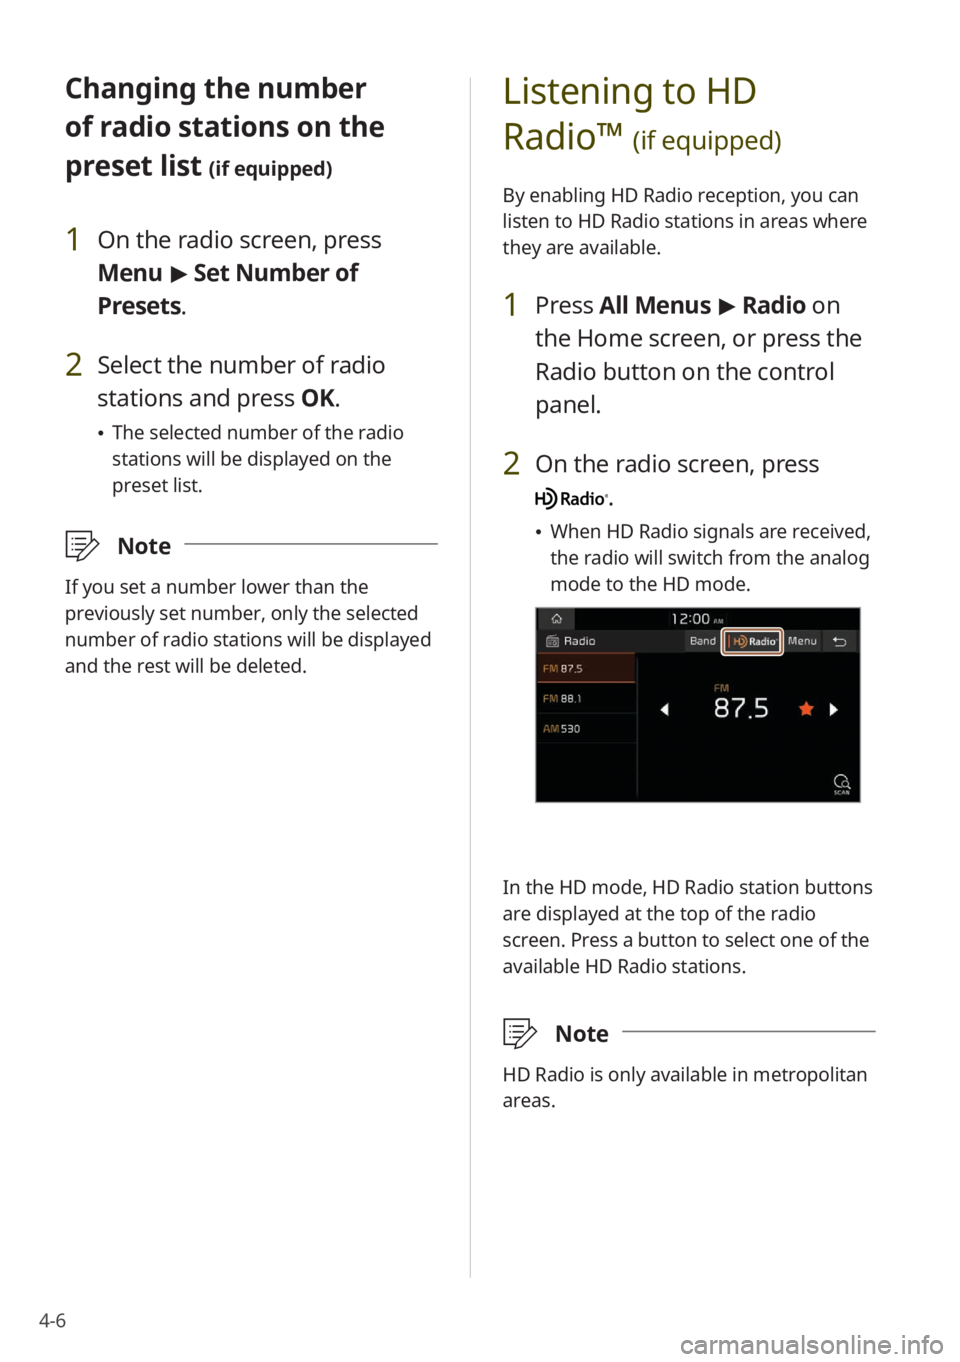
2 On the radio screen, press
.
\225 When HD Radio signals are received,
the radio will switch from the analog
mode to the HD mode.
In the HD mode, HD Radio station buttons
are displayed at the top of the radio
screen. Press a button to select one of the
available HD Radio stations.
\333 Note
HD Radio is only available in metropolitan
areas.
Page 73 of 164
4-7
Listening to SiriusXM™
radio
(if equipped)
You can listen to radio channels provided
by SiriusXM, a satellite radio service.
Various kinds of channels, such as music,
sports, and news, are available via
streaming or live broadcast.
Starting SiriusXM radio
1 Press All Menus > Radio on
the Home screen, or press the
Radio button on the control
panel.
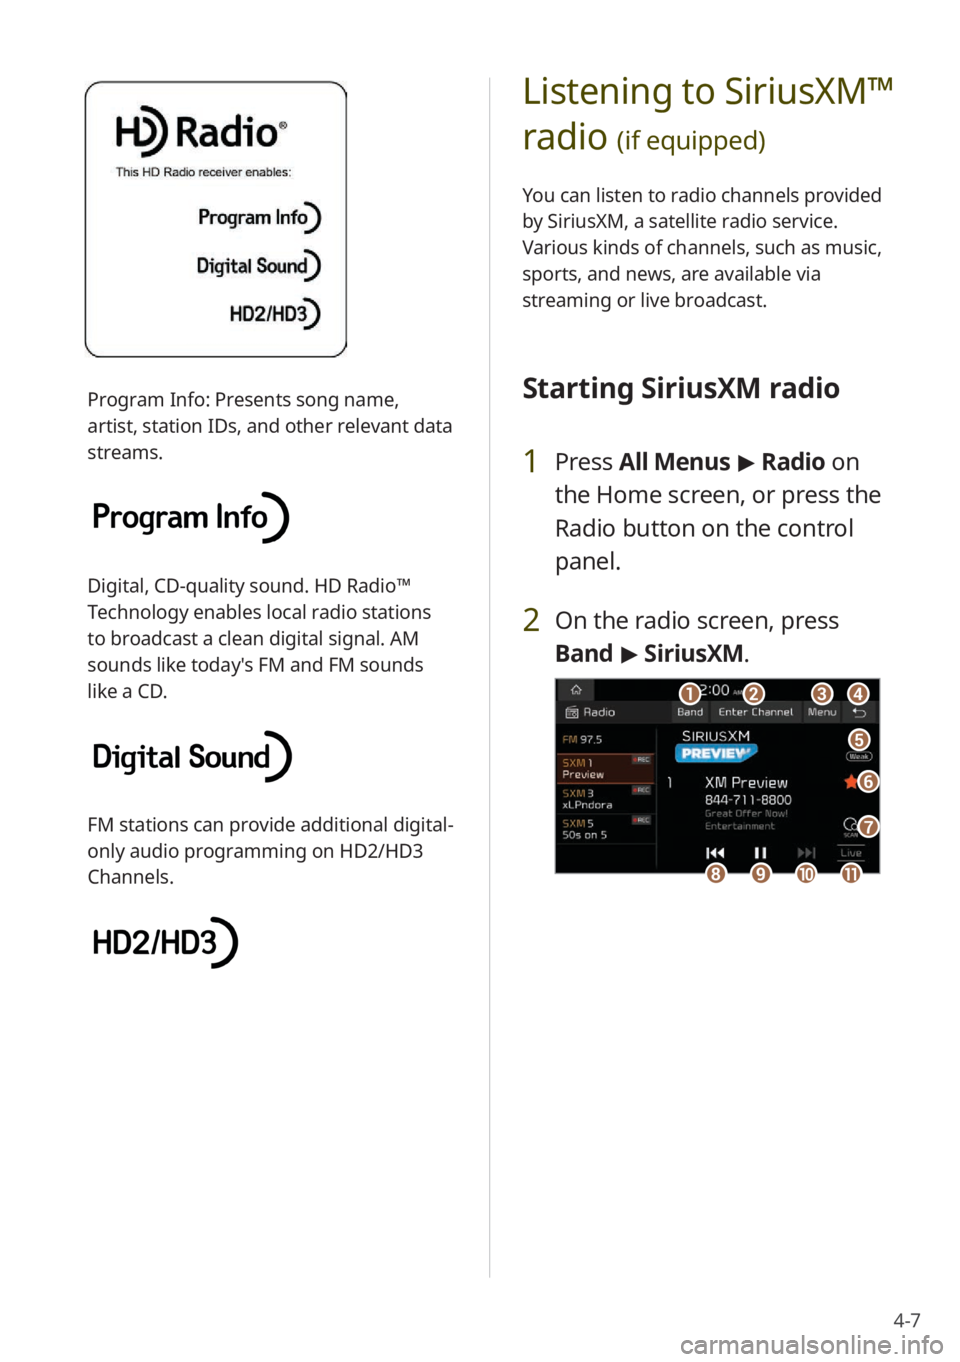
2 On the radio screen, press
Band > SiriusXM.
dd
ff
ee
gg
aabbcc
iijjkkhh
Program Info: Presents song name,
artist, station IDs, and other relevant data
streams.
Digital, CD-quality sound. HD Radio™
Technology enables local radio stations
to broadcast a clean digital signal. AM
sounds like today′s FM and FM sounds
like a CD.
FM stations can provide additional digital-
only audio programming on HD2/HD3
Channels.
Page 74 of 164
4-8
d d Return to the previous level.
e e Weak reception indicator
f f Save the current radio channel to
the preset list, or delete it from the
list.
g g Scan through all available SiriusXM
radio channels.
h h Move to the previous segment.
Press and hold to rewind.
i i Pause or resume the broadcast.
j j Move to the next segment. Press
and hold to fast forward.
k k Switch to the live broadcast mode.
This button is activated only when
a live broadcast is available on the
selected channel.
\333Note
The icon will be shown next to the
first 10 SiriusXM channels saved. Once
preset channels are saved, broadcasts
from these channels will be buffered
automatically for your convenience each
time you start your vehicle.
a a Select a radio mode.
b b Change the radio channel by
entering a channel number
manually.
c c Display the options list.
\225Display Off (if equipped): Turn
off the screen. Press the screen
to turn it back on.
\225Channel List : Access the list
of available SiriusXM radio
channels.
\225 What is on My Presets?: View
broadcast schedule of the
radio channels on your preset
list.
> See ″Viewing the program
schedule.″
\225 Featured Favorites: Listen to
groups of channels provided
by SiriusXM.
> See ″Listening to
Featured Favorites channels.″
\225 Reorder Presets (if equipped):
Rearrange saved radio stations
on the preset list.
> See
″ Rearranging the preset list (if
equipped) .″
\225Delete Presets: Delete saved
radio stations from the preset
list.
> See ″Deleting saved radio
stations.″
\225 Set Number of Presets (if
equipped): Set the number of
radio stations to display on the
preset list.
> See ″Changing the
number of radio stations on the
preset list (if equipped).″
\225 Sound Settings: Customize the
system sound settings.
> See
″ Configuring the sound settings.″
\225 User′s Manual on Web (QR
Code): Access the web manual
via the QR code. For safety
reasons, you can access the QR
code only when your vehicle is
stationary.
Page 75 of 164
4-9
Selecting radio channels
by using channel numbers
If you know the exact channel number,
you can enter it to select the radio channel
directly.
1 On the radio screen, press
Band > SiriusXM.
2 On the SiriusXM radio screen,
press Enter Channel .
3 Enter a channel number and
press OK.
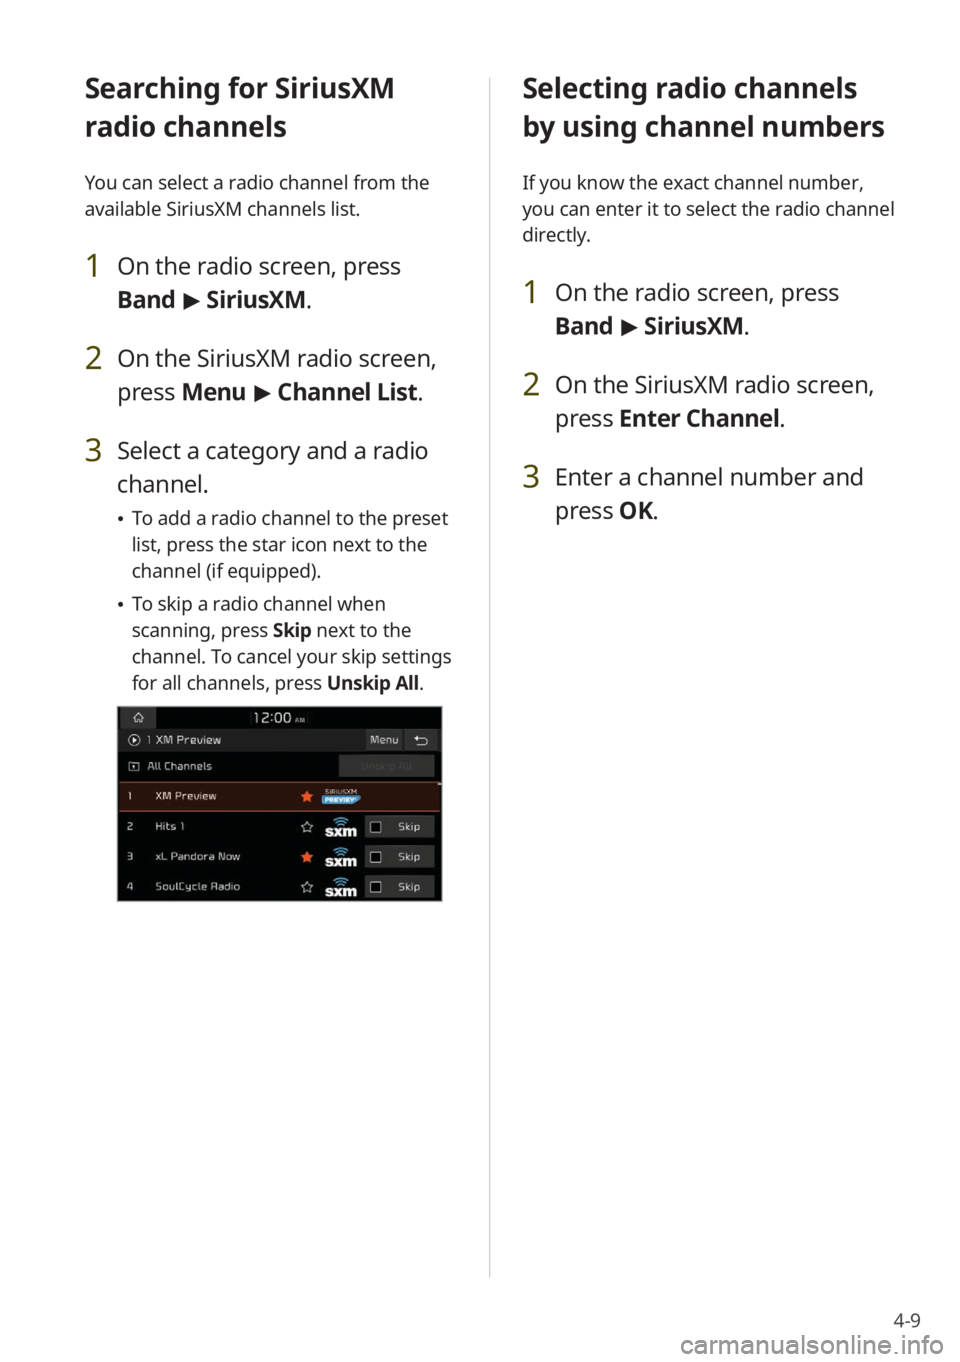
Searching for SiriusXM
radio channels
You can select a radio channel from the
available SiriusXM channels list.
1 On the radio screen, press
Band > SiriusXM.
2 On the SiriusXM radio screen,
press Menu > Channel List .
3 Select a category and a radio
channel.
\225To add a radio channel to the preset
list, press the star icon next to the
channel (if equipped).
\225To skip a radio channel when
scanning, press Skip next to the
channel. To cancel your skip settings
for all channels, press Unskip All.
Page 76 of 164
4-10
Listening to Featured
Favorites channels
You can listen to Featured Favorites
channels on SiriusXM radio. Multiple sets
of channels can be broadcast and can be
changed by SiriusXM.
1 On the radio screen, press
Band > SiriusXM.
2 On the SiriusXM radio screen,
press Menu > Featured
Favorites.
3 Select a radio channel.
Viewing the program
schedule
You can view the program schedule and
information for the radio channels on
your preset list.
1 On the radio screen, press
Band > SiriusXM.
2 On the SiriusXM radio screen,
press Menu > What is on My
Presets?.
3 Set a date and time on the top
line of the screen.
\225 To select a date, press the date
display field above the preset list and
select a date and time zone.
\225To select a time, press the left or
right arrow.
4 Select a radio channel and a
program to view its detailed
information.
\333 Note
If there are multiple programs in one time
slot, arrows will appear in the time slot
next to the first program. Press the arrows
to view information about the previous or
next program.
Page 77 of 164
Using the media
Media
5
Page 78 of 164
5-2
Using the media
\334Warning
Driving while distracted can result in a
loss of vehicle control that may lead to an
accident, severe bodily injury, or death.
The driver′s primary responsibility is the
safe and legal operation of the vehicle,
and the use of any vehicle systems,
including the touch screen and steering
wheel controls, which take the driver′s
eyes, attention, and focus away from the
safe operation of the vehicle, or which are
not permissible by law, should never be
used during the operation of the vehicle.
Listening to music from a
USB device
You can play media files stored in portable
devices, such as USB storage devices
and MP3 players. Check compatible USB
storage devices and file specifications
before using the USB mode.
> See ″USB
mode.″
\333 Note
Depending on the vehicle model or
specifications, available buttons or the
appearance and layout of the USB port in
your vehicle may vary.
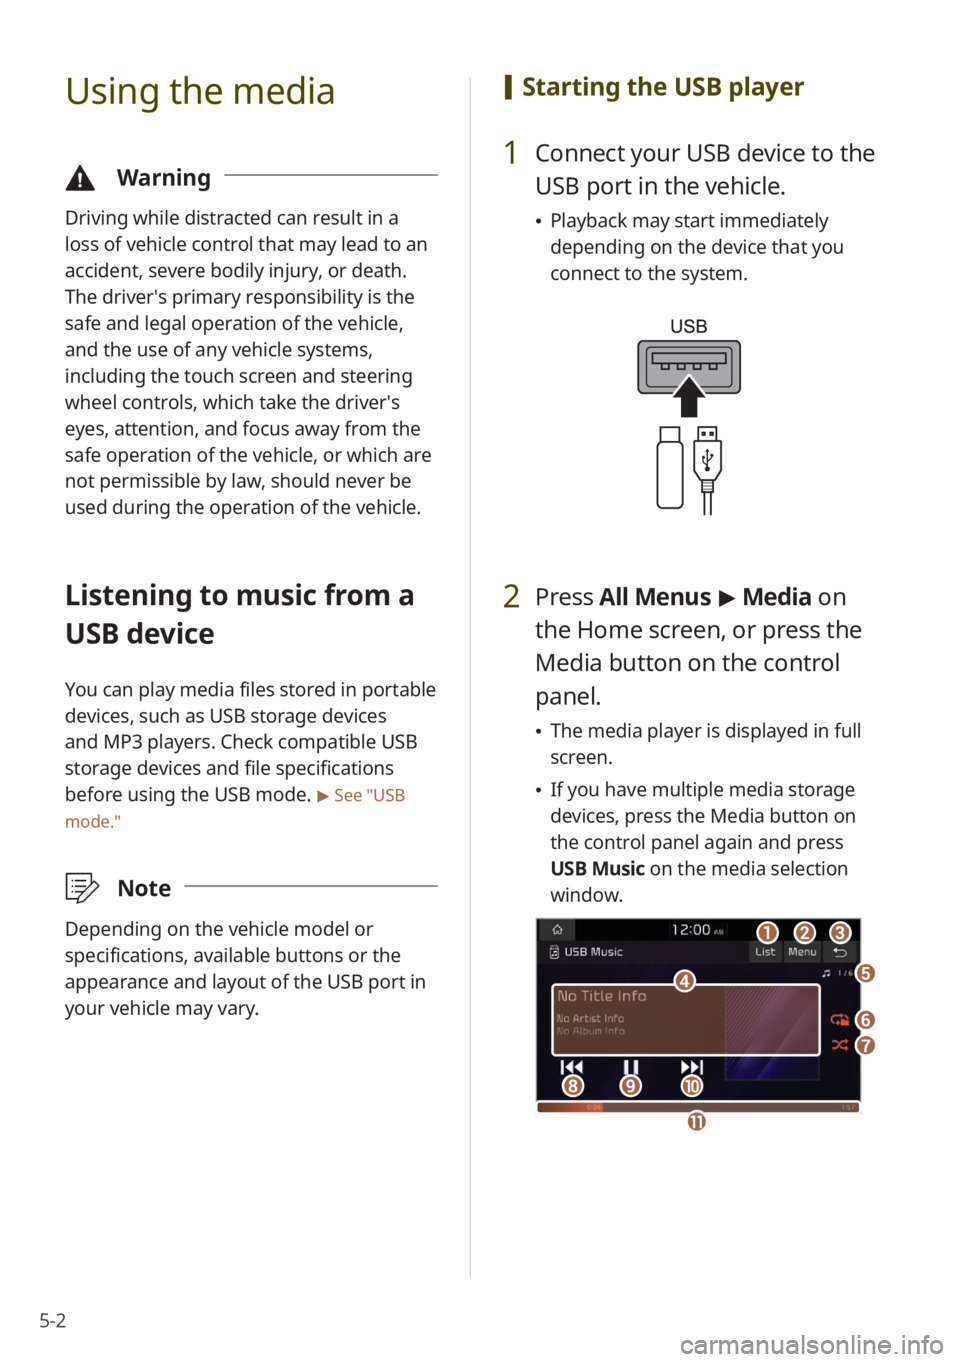
[Starting the USB player
1 Connect your USB device to the
USB port in the vehicle.
\225Playback may start immediately
depending on the device that you
connect to the system.
2 Press All Menus > Media on
the Home screen, or press the
Media button on the control
panel.
\225 The media player is displayed in full
screen.
\225If you have multiple media storage
devices, press the Media button on
the control panel again and press
USB Music on the media selection
window.
aa
dd
bbcc
ff
gg
hhiijj
ee
kk
Page 79 of 164
5-3
a a Access the files list.
b b Display the options list.
\225Display Off (if equipped): Turn
off the screen. Press the screen
to turn it back on.
\225Media Sources: Select a media
storage device you want to use.
\225Songs by this Artist: Move to
the list of songs by the artist
currently playing.
\225Songs from this Album: Move to
the list of songs from the album
currently playing.
\225Hide Current File: Hide the
current file.
\225Sound Settings: Customize the
system sound settings.
> See
″ Configuring the sound settings.″
\225 User′s Manual on Web (QR
Code): Access the web manual
via the QR code. For safety
reasons, you can access the QR
code only when your vehicle is
stationary.
c c Return to the previous level.
d d Information about the song
currently playing. Press a song′s
artist or album information to
access a list of songs by the artist
or from the album playing.
e e Current file number and total
number of files
f f Change the repeat play mode.
g g Activate or deactivate the shuffle
play mode.
h h Restart the current playback or
play the previous file. Press and
hold to rewind.
i i Pause or resume playback.
j j Play the next file. Press and hold to
fast forward.
k k Playback time and playback
position
\335 Caution
\225Start the engine of your vehicle before
connecting a USB device to your system.
Starting the engine with a USB device
connected to the system may damage
the USB device.
\225Be careful of static electricity when
connecting or disconnecting a USB
device. A static discharge may cause a
system malfunction.
\225Be careful not to let your body or
external objects contact the USB port.
Doing so may cause an accident or a
system malfunction.
\225Do not connect and disconnect a USB
connector repeatedly in a short time.
Doing so may cause an error in the
device or a system malfunction.
\225Do not use a USB device for purposes
other than playing files. Using USB
accessories for charging or heating may
cause poor performance or a system
malfunction.
Page 80 of 164
5-4
\333Note
\225Depending on the vehicle model or
specifications, displayed screens and
available functions may vary.
\225When connecting a USB storage device,
do not use an extension cable. If you use
a USB hub or an extension cable, the
device may not be recognized.
\225Fully insert a USB connector into the
USB port. Failure to do so may cause a
communication error.
\225When you disconnect a USB device, a
distorted noise may occur.
\225The system can play only files encoded
in a standard format.
\225The following types of USB devices may
not be recognized or work correctly:
- Encrypted MP3 players
-USB devices not recognized as
removable disks
\225A USB device may not be recognized
depending on its condition.
\225Some USB devices may be incompatible
with your system.
\225Depending on the USB device's type,
capacity, or the format of files, USB
recognition time may be longer.
\225Depending on the specification, some
USB devices may not support charging
via a USB connection.
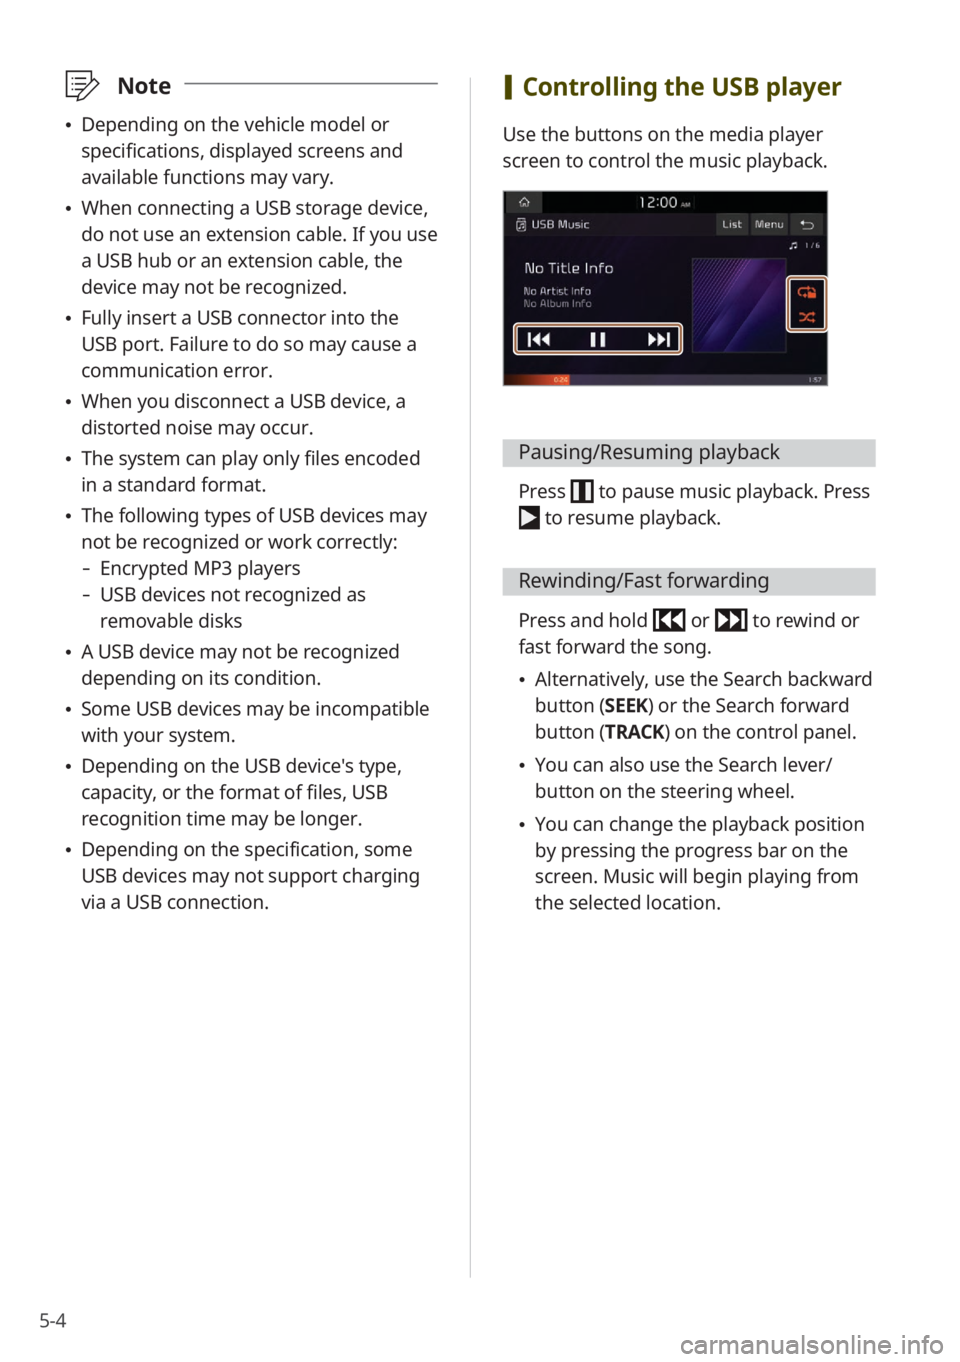
[Controlling the USB player
Use the buttons on the media player
screen to control the music playback.
Pausing/Resuming playback
Press to pause music playback. Press
to resume playback.
Rewinding/Fast forwarding
Press and hold or to rewind or
fast forward the song.
\225 Alternatively, use the Search backward
button (SEEK) or the Search forward
button (TRACK) on the control panel.
\225You can also use the Search lever/
button on the steering wheel.
\225You can change the playback position
by pressing the progress bar on the
screen. Music will begin playing from
the selected location.