engine KIA Optima 2016 4.G Owner's Guide
[x] Cancel search | Manufacturer: KIA, Model Year: 2016, Model line: Optima, Model: KIA Optima 2016 4.GPages: 623, PDF Size: 15.4 MB
Page 99 of 623
413
Features of your vehicle
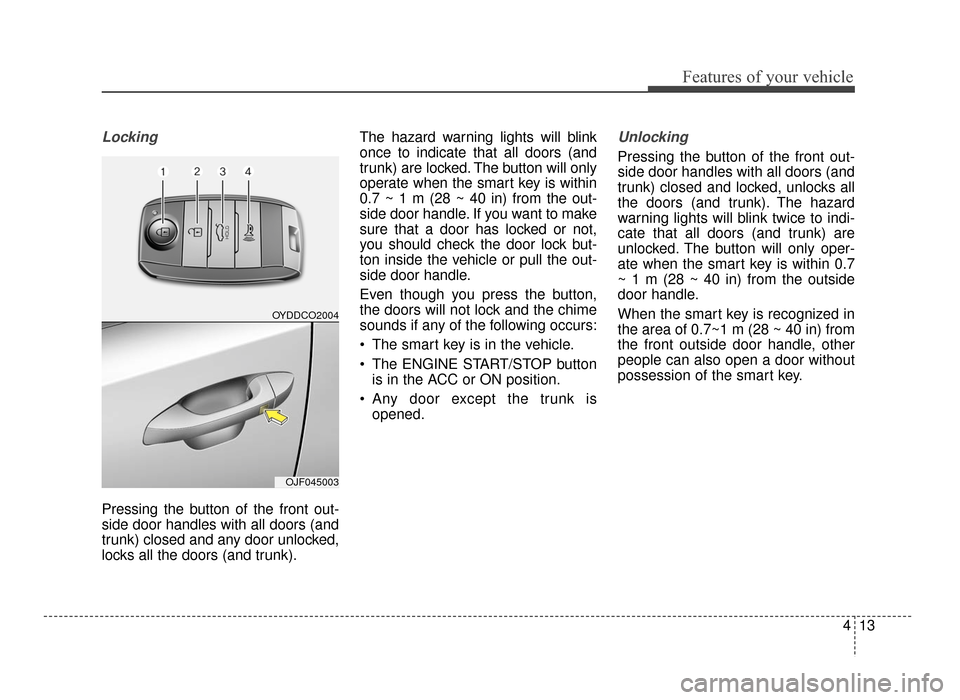
Locking
Pressing the button of the front out-
side door handles with all doors (and
trunk) closed and any door unlocked,
locks all the doors (and trunk).The hazard warning lights will blink
once to indicate that all doors (and
trunk) are locked. The button will only
operate when the smart key is within
0.7 ~ 1 m (28 ~ 40 in) from the out-
side door handle. If you want to make
sure that a door has locked or not,
you should check the door lock but-
ton inside the vehicle or pull the out-
side door handle.
Even though you press the button,
the doors will not lock and the chime
sounds if any of the following occurs:
The smart key is in the vehicle.
The ENGINE START/STOP button
is in the ACC or ON position.
Any door except the trunk is opened.
Unlocking
Pressing the button of the front out-
side door handles with all doors (and
trunk) closed and locked, unlocks all
the doors (and trunk). The hazard
warning lights will blink twice to indi-
cate that all doors (and trunk) are
unlocked. The button will only oper-
ate when the smart key is within 0.7
~ 1 m (28 ~ 40 in) from the outside
door handle.
When the smart key is recognized in
the area of 0.7~1 m (28 ~ 40 in) from
the front outside door handle, other
people can also open a door without
possession of the smart key.
OYDDCO2004
OJF045003
JF CAN (ENG) 4.qxp 11/5/2015 3:50 PM Page 13
Page 100 of 623
Features of your vehicle
14
4
Trunk unlocking
If you are within 0.7 ~ 1 m (28 ~ 40 in)
from the outside trunk handle, with
your smart key in possession, the
trunk will unlock and open when you
press the trunk handle switch.
The hazard warning lights will blink
twice to indicate that the trunk is
unlocked.
Panic
1. Press the panic button (4) for more
than 1 second.
2. The horn sounds and hazard warning light flash for about 27
seconds.
✽ ✽NOTICE
To stop the horn and lights, press
any button on the smart key.
Start-up
You can start the engine without
inserting the key. For detailed infor-
mation refer to the “Engine start/stop
button” in chapter 6.
Loss of the smart key
A maximum of 2 smart keys can be
registered to a single vehicle.
If you happen to lose your smart key,
you will not be able to start the
engine. You should immediately take
the vehicle and remaining key to your
authorized Kia dealer (tow the vehi-
cle, if necessary) to protect it from
potential theft.
JF CAN (ENG) 4.qxp 11/5/2015 3:50 PM Page 14
Page 102 of 623
Features of your vehicle
16
4
4. Install the battery in the reverse
order of removal.
you years of trouble-free use, how-
ever it can malfunction if exposed
to moisture or static electricity. If
you are unsure how to use or
replace the battery, contact an
authorized Kia dealer.
the smart key to malfunction. Be
sure to use the correct battery.
don't drop it, get it wet, or expose it
to heat or sunlight.
An inappropriately dis- posed battery can be harm-
ful to the environment and
human health. Dispose the
battery according to your
local law(s) or regulations.Smart key immobilizer system
Your vehicle is equipped with an
electronic engine immobilizer system
to reduce the risk of unauthorized
vehicle use.
Your immobilizer system is com-
prised of a small transponder in the
smart key and electronic devices
inside the vehicle.
With the immobilizer system, when-
ever you turn the engine start/stop
button to the ON position by pressing
the button while carrying the smart
key, it verifies if the smart key is valid.
If the key is determined to be valid,
the engine will start.
If the key is determined to be invalid,
the engine will not start.CAUTION - Smart key
damage
Do not drop, get wet or expose
the smart key to heat or sun-light, or it will be damaged.
IC WARNING
This device complies with
Industry Canada licence-
exempt RSS standard(s).
Operation is subject to the fol-
lowing two conditions: (1) this
device may not cause interfer-
ence, and (2) this device must
accept any interference, includ-
ing interference that may cause
undesired operation of the
device.
JF CAN (ENG) 4.qxp 11/5/2015 3:50 PM Page 16
Page 103 of 623
417
Features of your vehicle
To deactivate the immobilizersystem:
Turn the engine start/stop button to
the ON position by pressing the but-
ton while carrying the smart key.
In order to prevent theft of your vehi-
cle, do not leave spare keys any-
where in your vehicle.
To activate the immobilizer system:
Turn the engine start/stop button to
the OFF position. The immobilizer
system activates automatically.
Without a valid smart key for your
vehicle, the engine will not start.
✽ ✽ NOTICE
When starting the engine, do not use
the key with other immobilizer keys
around. Otherwise the engine may
not start or may stop soon after it
starts. Keep each key separate in
order to avoid a starting malfunction.
✽ ✽NOTICE
If you need additional keys or lose
your keys, contact an authorized
Kia dealer.
This device complies with
Industry Canada licence-exempt
RSS standard(s).
Operation is subject to the following
two conditions:
(1) This device may not cause inter-
ference, and
(2) This device must accept any
interference, including interfer-
ence that may cause undesired
operation of the device.
✽ ✽ NOTICE
Changes or modifications not
expressly approved by the party
responsible for compliance could
void the user’s authority to operate
the equipment. If the keyless entry
system is inoperative due to changes
or modifications not expressly
approved by the party responsible
for compliance, it will not be cov-
ered by your manufacturer’s vehicle
warranty.
JF CAN (ENG) 4.qxp 11/5/2015 3:50 PM Page 17
Page 104 of 623
Features of your vehicle
18
4
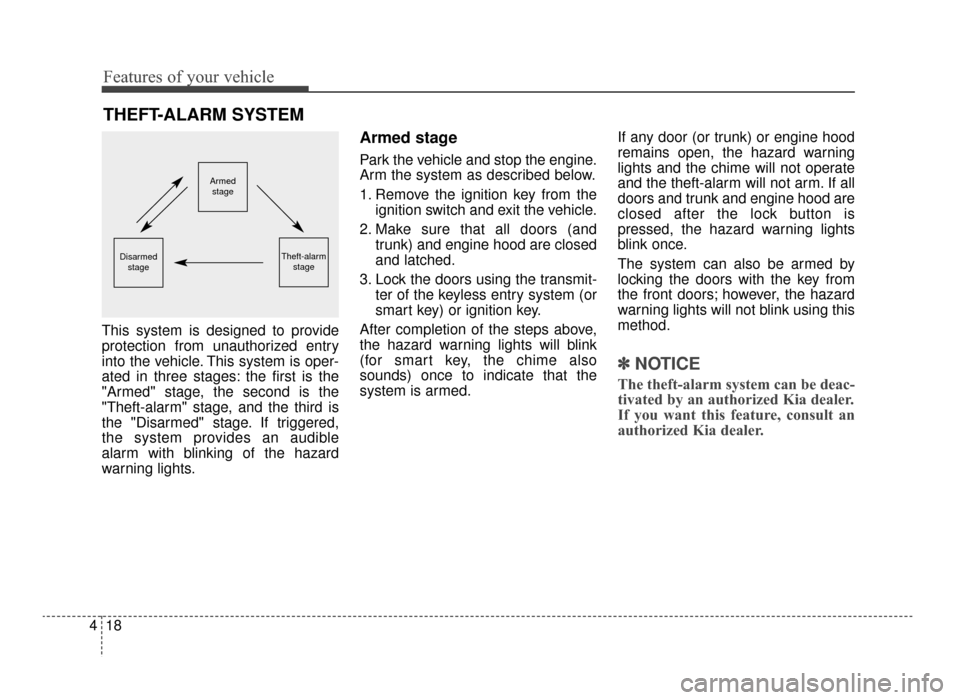
This system is designed to provide
protection from unauthorized entry
into the vehicle. This system is oper-
ated in three stages: the first is the
"Armed" stage, the second is the
"Theft-alarm" stage, and the third is
the "Disarmed" stage. If triggered,
the system provides an audible
alarm with blinking of the hazard
warning lights.
Armed stage
Park the vehicle and stop the engine.
Arm the system as described below.
1. Remove the ignition key from the
ignition switch and exit the vehicle.
2. Make sure that all doors (and trunk) and engine hood are closed
and latched.
3. Lock the doors using the transmit- ter of the keyless entry system (or
smart key) or ignition key.
After completion of the steps above,
the hazard warning lights will blink
(for smart key, the chime also
sounds) once to indicate that the
system is armed. If any door (or trunk) or engine hood
remains open, the hazard warning
lights and the chime will not operate
and the theft-alarm will not arm. If all
doors and trunk and engine hood are
closed after the lock button is
pressed, the hazard warning lights
blink once.
The system can also be armed by
locking the doors with the key from
the front doors; however, the hazard
warning lights will not blink using this
method.
✽ ✽
NOTICE
The theft-alarm system can be deac-
tivated by an authorized Kia dealer.
If you want this feature, consult an
authorized Kia dealer.
THEFT-ALARM SYSTEM
Armed
stage
Theft-alarm stageDisarmedstage
JF CAN (ENG) 4.qxp 11/5/2015 3:50 PM Page 18
Page 105 of 623
419
Features of your vehicle
Do not arm the system until all
passengers have left the vehicle. If
the system is armed while a pas-
senger(s) remains in the vehicle,
the alarm may be activated when
the remaining passenger(s) leave
the vehicle. If any door (or trunk)
or engine hood is opened within
30 seconds after the system
enters the armed stage, the sys-
tem is disarmed to prevent an
unnecessary alarm.Theft-alarm stage
The alarm will be activated if any of
the following occurs while the system
is armed.
A front or rear door is opened with-out using the ignition key or trans-
mitter (or smart key).
The trunk is opened without using the transmitter (or smart key).
The engine hood is opened.
The horn will sound and the hazard
warning lights will blink continuously
for approximately 27 seconds, and
repeat the horn 3 times unless the
system is disarmed. To turn off the
system, unlock the doors with the igni-
tion key or transmitter (or smart key).
Disarmed stage
The system will be disarmed when
The doors (and trunk) are unlocked with the transmitter (or smart key)
or the ignition key.
After depressing the unlock button,
the hazard warning lights will blink
and the chime will sound twice (in
smart key) to indicate that the sys-
tem is disarmed.
After depressing the unlock button, if
any door (or trunk) is not opened
within 30 seconds, the system will be
rearmed.
JF CAN (ENG) 4.qxp 11/5/2015 3:50 PM Page 19
Page 106 of 623
Features of your vehicle
20
4
✽
✽
NOTICE
• Avoid trying to start the engine
while the alarm is activated. The
vehicle starting motor is disabled
during the theft-alarm stage.
- If the system is not disarmed withthe transmitter, insert the key
into the ignition switch, turn the
ignition switch to the ON position
and wait for 30 seconds. Then,
the system will be disarmed.
- If the system is not disarmed with the smart key, press the engine
start/stop button with the smart
key. The side with the lock button
should contact the engine
start/stop button directly.
• If you lose your keys, consult your authorized Kia dealer.
✽ ✽ NOTICE
Malfunctions caused by improper
alterations, adjustments or modifi-
cations to the theft-alarm system are
not covered by your vehicle manu-
facturer warranty.
CAUTION - Adjusting
alarm system
Do not change, alter or adjust
the theft-alarm system becauseit could cause the theft-alarmsystem to malfunction andshould only be serviced by anauthorized Kia dealer.
JF CAN (ENG) 4.qxp 11/5/2015 3:50 PM Page 20
Page 121 of 623
435
Features of your vehicle
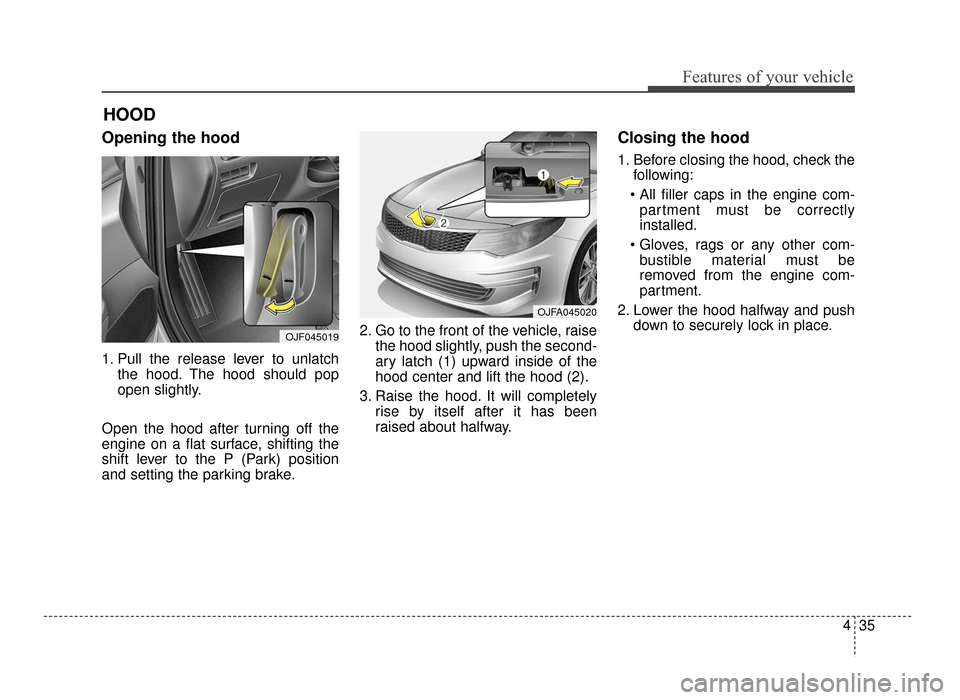
Opening the hood
1. Pull the release lever to unlatchthe hood. The hood should pop
open slightly.
Open the hood after turning off the
engine on a flat surface, shifting the
shift lever to the P (Park) position
and setting the parking brake. 2. Go to the front of the vehicle, raise
the hood slightly, push the second-
ary latch (1) upward inside of the
hood center and lift the hood (2).
3. Raise the hood. It will completely rise by itself after it has been
raised about halfway.
Closing the hood
1. Before closing the hood, check thefollowing:
partment must be correctly
installed.
bustible material must be
removed from the engine com-
partment.
2. Lower the hood halfway and push down to securely lock in place.
HOOD
OJF045019
OJFA045020
JF CAN (ENG) 4.qxp 11/5/2015 3:50 PM Page 35
Page 122 of 623

Features of your vehicle
36
4
WARNING - Fire risk
Do not leave gloves, rags or any
other combustible material in the
engine compartment. Doing so
may cause a heat-induced fire.
WARNING - Unsecured
engine hood
Always double check to be sure
that the hood is firmly latched
before driving away. If it is not
latched, the hood could fly open
while the vehicle is being driv-
en, causing a total loss of visi-
bility, which might result in an
accident.CAUTION - Hood obstruc-
tion
Before closing the hood, ensure that all obstructions are removedfrom the hood opening. Closingthe hood with an obstructionpresent in the hood opening mayresult in property damage orsevere personal injury.
JF CAN (ENG) 4.qxp 11/5/2015 3:50 PM Page 36
Page 123 of 623
437
Features of your vehicle
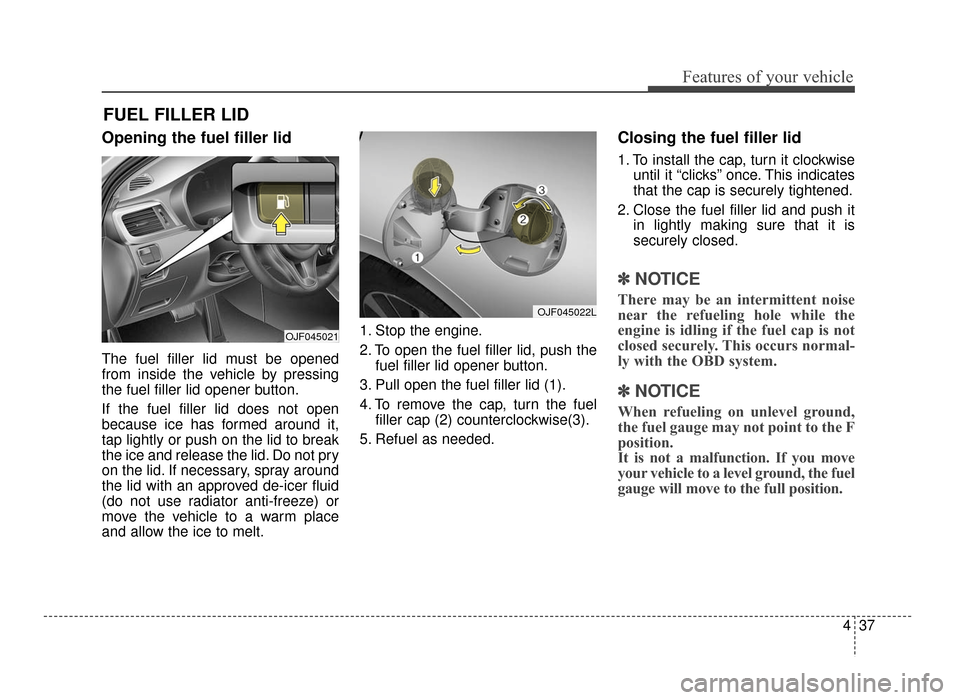
Opening the fuel filler lid
The fuel filler lid must be opened
from inside the vehicle by pressing
the fuel filler lid opener button.
If the fuel filler lid does not open
because ice has formed around it,
tap lightly or push on the lid to break
the ice and release the lid. Do not pry
on the lid. If necessary, spray around
the lid with an approved de-icer fluid
(do not use radiator anti-freeze) or
move the vehicle to a warm place
and allow the ice to melt.1. Stop the engine.
2. To open the fuel filler lid, push the
fuel filler lid opener button.
3. Pull open the fuel filler lid (1).
4. To remove the cap, turn the fuel filler cap (2) counterclockwise(3).
5. Refuel as needed.
Closing the fuel filler lid
1. To install the cap, turn it clockwise until it “clicks” once. This indicates
that the cap is securely tightened.
2. Close the fuel filler lid and push it in lightly making sure that it is
securely closed.
✽ ✽NOTICE
There may be an intermittent noise
near the refueling hole while the
engine is idling if the fuel cap is not
closed securely. This occurs normal-
ly with the OBD system.
✽ ✽NOTICE
When refueling on unlevel ground,
the fuel gauge may not point to the F
position.
It is not a malfunction. If you move
your vehicle to a level ground, the fuel
gauge will move to the full position.
FUEL FILLER LID
OJF045021
OJF045022L
JF CAN (ENG) 4.qxp 11/5/2015 3:50 PM Page 37