service KIA Optima 2016 4.G Owner's Manual
[x] Cancel search | Manufacturer: KIA, Model Year: 2016, Model line: Optima, Model: KIA Optima 2016 4.GPages: 623, PDF Size: 15.4 MB
Page 1 of 623
Kia, THE COMPANY
Thank you for becoming the owner of a new Kia vehicle.
As a global car manufacturer focused on building high-quality vehi-
cles with exceptional value, Kia Motors is dedicated to providing you
with a customer service experience that exceeds your expectations.
All information contained in this Owner’s Manual was accurate at the
time of publication. However, Kia reserves the right to make changes
at any time so that our policy of continual product improvement can
be carried out.
This manual applies to all models of this vehicle and includes descrip-
tions and explanations of optional as well as standard equipment. As a
result, you may encounter material in this manual that is not applica-
ble to your specific Kia vehicle.Drive safely and enjoy your Kia!
JF CAN (ENG) FOREWORD.qxp 9/22/2015 7:53 PM Page 1
Page 2 of 623
i
Thank you for choosing a Kia vehicle.
When you require service, remember that your Kia dealer
knows your vehicle best. Your dealer has factory-trained tech-
nicians, recommended special tools and genuine Kia replace-
ment parts. It is dedicated to your complete customer satisfac-
tion.
Because subsequent owners require this important information
as well, this publication should remain with the vehicle if it is
sold.
This manual will familiarize you with operational, mainte-
nance and safety information about your new vehicle. It is sup-
plemented by a Warranty and Consumer Information manual
that provides important information on all warranties regarding
your vehicle.
We urge you to read these publications carefully and follow the
recommendations to help assure enjoyable and safe operation
of your new vehicle.
Kia offers a great variety of options, components and features
for its various models. Therefore, some of the equipment
described in this manual, along with the various illustrations,
may not be applicable to your particular vehicle.
The information and specifications provided in this manual
were accurate at the time of printing. Kia reserves the right to
discontinue or change specifications or design at any time
without notice and without incurring any obligation. If you
have questions, always check with your Kia dealer.
We assure you of our continuing interest in your motoring
pleasure and satisfaction in your Kia vehicle.
© 2015 Kia Canada Inc.
All rights reserved. Reproduction by any means, electronic or
mechanical, including photocopying, recording, or by any
information storage and retrieval system or translation in
whole or part is not permitted without written authorization
from Kia Canada Inc..
Printed in U.S.A
Foreword
JF CAN (ENG) FOREWORD.qxp 9/22/2015 7:53 PM Page 2
Page 45 of 623
329
Safety features of your vehicle
If the pre-tensioner seat belt system
is not working properly, this warning
light will illuminate even if there is not
a malfunction with the SRS air bag. If
the SRS air bag warning light does
not illuminate when the ignition
switch is turned ON, or if it remains
illuminated after illuminating for
approximately 6 seconds, or if it illu-
minates while the vehicle is being
driven, have an authorized Kia dealer
inspect the pre-tensioner seat belt
and SRS air bag system as soon as
possible.
✽ ✽NOTICE
Do not attempt to service or repair
the pre-tensioner seat belt system in
any manner. Do not attempt to
inspect or replace the pre-tensioner
seat belts yourself. This must be
done by an authorized Kia dealer.
Pre-tensioners are designed to oper-
ate only one time. After activation,
pre-tensioner seat belts must be
replaced. If the pre-tensioner must
be replaced, contact an authorized
Kia dealer.
Seat belt precautions
Infant or small child
You should be aware of the specific
requirements in your country. Child
and/or infant seats must be properly
placed and installed in the rear seat.
For more information about the use of
these restraints, refer to “Child
restraint system” in this section.
✽ ✽NOTICE
Small children are best protected
from injury in an accident when
properly restrained in the rear seat
by a child restraint system that meets
the requirements of the Safety
Standards of your country. Before
buying any child restraint system,
make sure that it has a label certify-
ing that it meets the Safety Standards
of your country. The restraint must
be appropriate for your child's height
and weight. Check the label on the
child restraint for this information.
Refer to “Child restraint system” in
this section.
WARNING- Hot preten-
sioner
Do not touch the pre-tensioner
seat belt assemblies for several
minutes after they have been
activated. When the pre-ten-
sioner seat belt mechanism
fires during a collision the pre-
tensioner becomes hot and can
burn you.
JF CAN (ENG) 3.qxp 9/22/2015 7:05 PM Page 29
Page 69 of 623
353
Safety features of your vehicle
✽
✽NOTICE
When the “PASS AIR BAG “OFF””
symbol is illuminated, the passenger
air bag system will not operate. The
passenger air bag system will oper-
ate when necessary if the symbol is
not illuminated.
✽ ✽NOTICE
Do not modify or replace the front
passenger seat. Don't place anything
on or attach anything such as a blan-
ket, front seat cover or after market
seat heater to the front passenger
seat. This can adversely affect the
occupant detection system.
WARNING
When the passenger is not sit-
ting properly in the passenger
seat, or some items are placed
on or under the passenger seat,
it may interfere with normal
operation of the ODS (Occupant
Detection System) . In order for
the driver and all passengers to
receive maximum benefit from
the airbag and seat belt system,
all persons should seat and
wear the seat belt properly.
(Continued)
After conducting car interior cleaning using steam or deter-gent, the seat should be driedproperly. Afterward, check fornormal operation of the “PASSAIR BAG “OFF”” and air bagwarning lights.
Any service related to the pas- senger seat and the ODS mustbe done at Kia service center.
JF CAN (ENG) 3.qxp 9/22/2015 7:05 PM Page 53
Page 85 of 623
369
Safety features of your vehicle
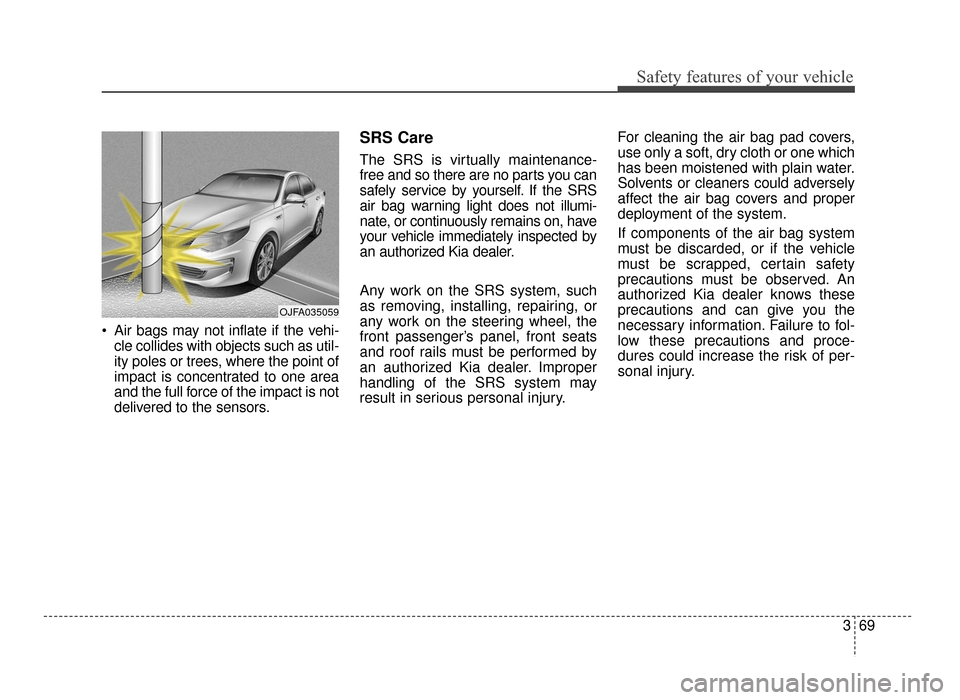
Air bags may not inflate if the vehi-cle collides with objects such as util-
ity poles or trees, where the point of
impact is concentrated to one area
and the full force of the impact is not
delivered to the sensors.
SRS Care
The SRS is virtually maintenance-
free and so there are no parts you can
safely service by yourself. If the SRS
air bag warning light does not illumi-
nate, or continuously remains on, have
your vehicle immediately inspected by
an authorized Kia dealer.
Any work on the SRS system, such
as removing, installing, repairing, or
any work on the steering wheel, the
front passenger’s panel, front seats
and roof rails must be performed by
an authorized Kia dealer. Improper
handling of the SRS system may
result in serious personal injury. For cleaning the air bag pad covers,
use only a soft, dry cloth or one which
has been moistened with plain water.
Solvents or cleaners could adversely
affect the air bag covers and proper
deployment of the system.
If components of the air bag system
must be discarded, or if the vehicle
must be scrapped, certain safety
precautions must be observed. An
authorized Kia dealer knows these
precautions and can give you the
necessary information. Failure to fol-
low these precautions and proce-
dures could increase the risk of per-
sonal injury.
OJFA035059
JF CAN (ENG) 3.qxp 9/22/2015 7:06 PM Page 69
Page 88 of 623
Steering wheel . . . . . . . . . . . . . . . . . . . . . . . . . . . . . 4-47
• Electric power steering (EPS) . . . . . . . . . . . . . . . . . . 4-47
• Tilt and telescopic steering . . . . . . . . . . . . . . . . . . . . 4-48
• Heated steering wheel . . . . . . . . . . . . . . . . . . . . . . . . . 4-49
• Horn . . . . . . . . . . . . . . . . . . . . . . . . . . . . . . . . . . . . \
. . . 4-50
Mirrors . . . . . . . . . . . . . . . . . . . . . . . . . . . . . . . . . . 4-51\
• Inside rearview mirror . . . . . . . . . . . . . . . . . . . . . . . . 4-51
• Outside rearview mirror. . . . . . . . . . . . . . . . . . . . . . . 4-53
Instrument cluster . . . . . . . . . . . . . . . . . . . . . . . . . 4-56
• Instrument Cluster Control . . . . . . . . . . . . . . . . . . . . 4-57
• LCD Display Control . . . . . . . . . . . . . . . . . . . . . . . . . 4-57
• Gauges . . . . . . . . . . . . . . . . . . . . . . . . . . . . . . . . . . . . \
. 4-58
• Transaxle Shift Indicator . . . . . . . . . . . . . . . . . . . . . . 4-61
• Dual clutch transmission shift indicator . . . . . . . . . . 4-62
LCD display . . . . . . . . . . . . . . . . . . . . . . . . . . . . . . 4-63
• LCD Modes . . . . . . . . . . . . . . . . . . . . . . . . . . . . . . . . . 4-63
• Service Mode . . . . . . . . . . . . . . . . . . . . . . . . . . . . . . . . 4-64
• User Settings Mode . . . . . . . . . . . . . . . . . . . . . . . . . . . 4-66
Trip modes (Trip computer) . . . . . . . . . . . . . . . . . 4-72
• Trip Modes . . . . . . . . . . . . . . . . . . . . . . . . . . . . . . . . . . 4-72\
• Fuel Economy . . . . . . . . . . . . . . . . . . . . . . . . . . . . . . . 4-72
• Trip A/B . . . . . . . . . . . . . . . . . . . . . . . . . . . . . . . . . . . . \
4-74
• Digital speedometer . . . . . . . . . . . . . . . . . . . . . . . . . . . 4-75
• One time driving information mode . . . . . . . . . . . . . 4-75
• Turn By Turn Mode . . . . . . . . . . . . . . . . . . . . . . . . . . 4-76
• ASCC/LDWS Mode. . . . . . . . . . . . . . . . . . . . . . . . . . . 4-76
• A/V Mode . . . . . . . . . . . . . . . . . . . . . . . . . . . . . . . . . . . 4-\
76
• Warning Messages . . . . . . . . . . . . . . . . . . . . . . . . . . . . 4-77
Warning and indicator lights . . . . . . . . . . . . . . . . 4-85
• Warning lights . . . . . . . . . . . . . . . . . . . . . . . . . . . . . . . 4-85
• Indicator Lights . . . . . . . . . . . . . . . . . . . . . . . . . . . . . . 4-92
Rear parking assist system . . . . . . . . . . . . . . . . . . 4-97
• Operation of the rear parking assist system . . . . . . . 4-97
• Non-operational conditions of rear parkingassist system . . . . . . . . . . . . . . . . . . . . . . . . . . . . . . . . 4-98
• Rear parking assist system precautions . . . . . . . . . . 4-99
• Self-diagnosis . . . . . . . . . . . . . . . . . . . . . . . . . . . . . . . 4-100
Rearview camera . . . . . . . . . . . . . . . . . . . . . . . . . 4-101
Around View Monitoring system (AVM) . . . . . . 4-102
4
JF CAN (ENG) 4.qxp 11/5/2015 3:50 PM Page 2
Page 106 of 623
Features of your vehicle
20
4
✽
✽
NOTICE
• Avoid trying to start the engine
while the alarm is activated. The
vehicle starting motor is disabled
during the theft-alarm stage.
- If the system is not disarmed withthe transmitter, insert the key
into the ignition switch, turn the
ignition switch to the ON position
and wait for 30 seconds. Then,
the system will be disarmed.
- If the system is not disarmed with the smart key, press the engine
start/stop button with the smart
key. The side with the lock button
should contact the engine
start/stop button directly.
• If you lose your keys, consult your authorized Kia dealer.
✽ ✽ NOTICE
Malfunctions caused by improper
alterations, adjustments or modifi-
cations to the theft-alarm system are
not covered by your vehicle manu-
facturer warranty.
CAUTION - Adjusting
alarm system
Do not change, alter or adjust
the theft-alarm system becauseit could cause the theft-alarmsystem to malfunction andshould only be serviced by anauthorized Kia dealer.
JF CAN (ENG) 4.qxp 11/5/2015 3:50 PM Page 20
Page 149 of 623
463
Features of your vehicle
LCD DISPLAY
❈For controlling the LCD modes, refer to "LCD Display Control" in this chapter.
LCD Modes
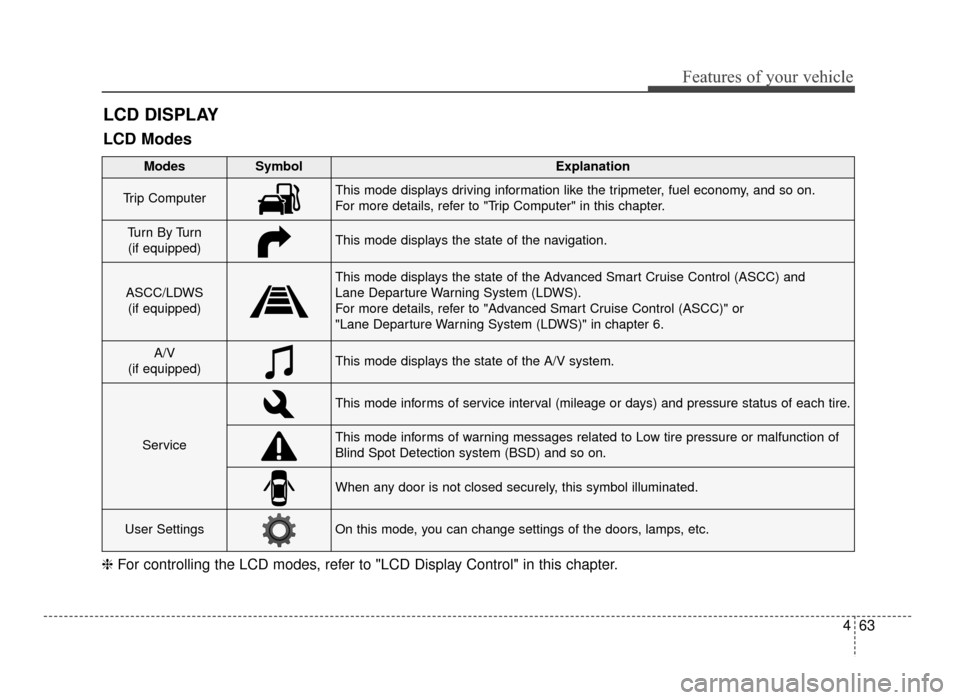
Modes SymbolExplanation
Trip ComputerThis mode displays driving information like the tripmeter, fuel economy, and so on.
For more details, refer to "Trip Computer" in this chapter.
Tu r n B y Tu r n
(if equipped)This mode displays the state of the navigation.
ASCC/LDWS (if equipped)
This mode displays the state of the Advanced Smart Cruise Control (ASCC) and
Lane Departure Warning System (LDWS).
For more details, refer to "Advanced Smart Cruise Control (ASCC)" or
"Lane Departure Warning System (LDWS)" in chapter 6.
A/V
(if equipped)This mode displays the state of the A/V system.
Service
This mode informs of service interval (mileage or days) and pressure status of each tire.
This mode informs of warning messages related to Low tire pressure or malfunction of
Blind Spot Detection system (BSD) and so on.
When any door is not closed securely, this symbol illuminated.
User SettingsOn this mode, you can change settings of the doors, lamps, etc.
JF CAN (ENG) 4.qxp 11/5/2015 3:50 PM Page 63
Page 150 of 623
Features of your vehicle
64
4
Service Mode
Tire Pressure (if equipped)
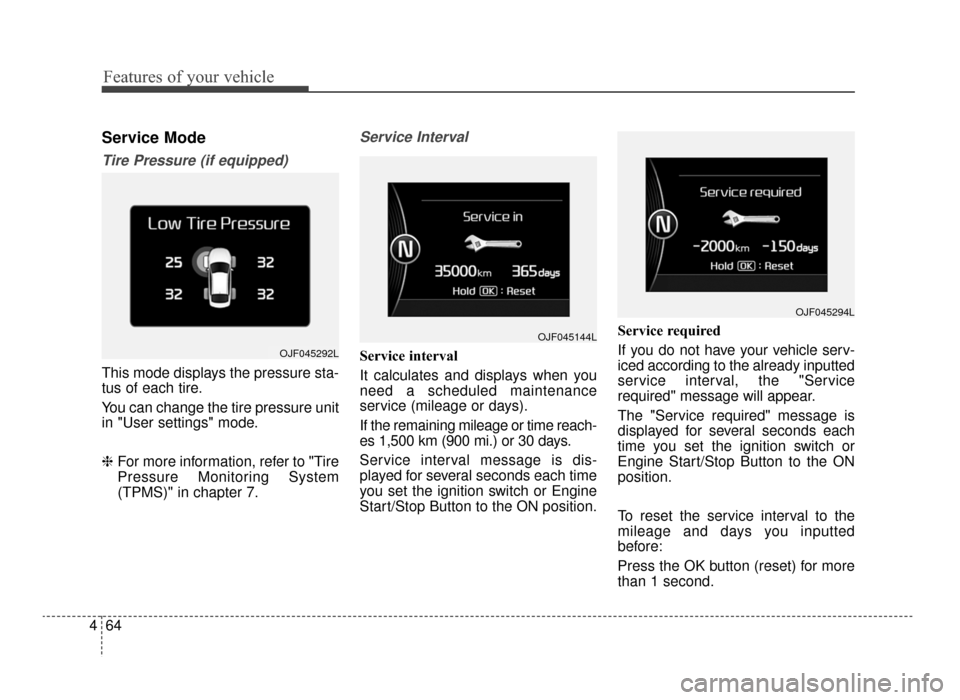
This mode displays the pressure sta-
tus of each tire.
You can change the tire pressure unit
in "User settings" mode.
❈ For more information, refer to "Tire
Pressure Monitoring System
(TPMS)" in chapter 7.
Service Interval
Service interval
It calculates and displays when you
need a scheduled maintenance
service (mileage or days).
If the remaining mileage or time reach-
es 1,500 km (900 mi.) or 30 days.
Service interval message is dis-
played for several seconds each time
you set the ignition switch or Engine
Start/Stop Button to the ON position. Service required
If you do not have your vehicle serv-
iced according to the already inputted
service interval, the "Service
required" message will appear.
The "Service required" message is
displayed for several seconds each
time you set the ignition switch or
Engine Start/Stop Button to the ON
position.
To reset the service interval to the
mileage and days you inputted
before:
Press the OK button (reset) for more
than 1 second.
OJF045144L
OJF045294L
OJF045292L
JF CAN (ENG) 4.qxp 11/5/2015 3:51 PM Page 64
Page 151 of 623
465
Features of your vehicle
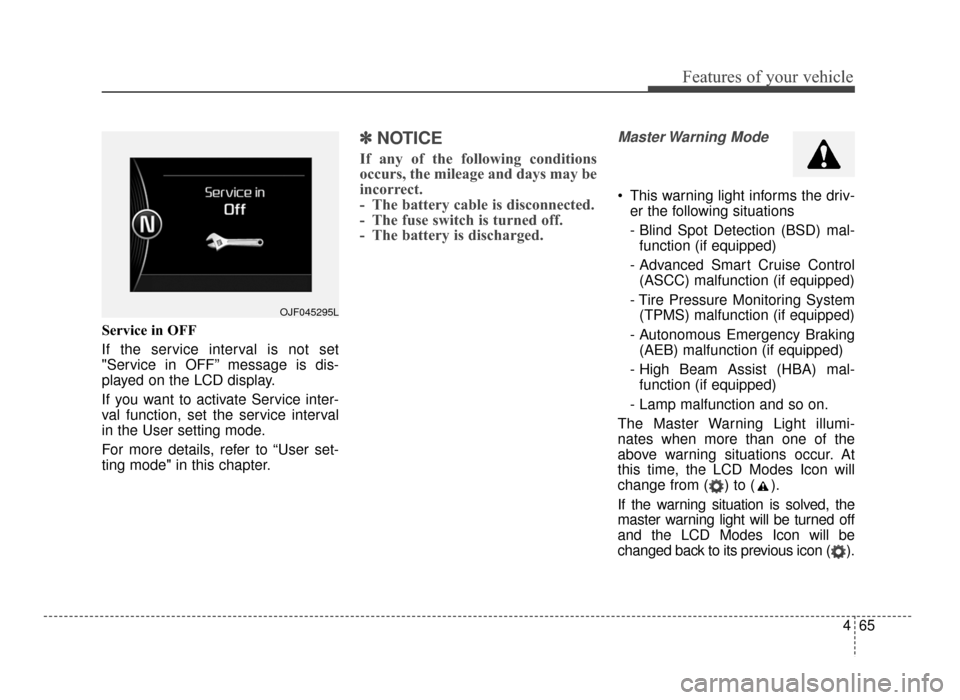
Service in OFF
If the service interval is not set
"Service in OFF” message is dis-
played on the LCD display.
If you want to activate Service inter-
val function, set the service interval
in the User setting mode.
For more details, refer to “User set-
ting mode" in this chapter.
✽ ✽NOTICE
If any of the following conditions
occurs, the mileage and days may be
incorrect.
- The battery cable is disconnected.
- The fuse switch is turned off.
- The battery is discharged.
Master Warning Mode
This warning light informs the driv-
er the following situations
- Blind Spot Detection (BSD) mal-function (if equipped)
- Advanced Smart Cruise Control (ASCC) malfunction (if equipped)
- Tire Pressure Monitoring System (TPMS) malfunction (if equipped)
- Autonomous Emergency Braking (AEB) malfunction (if equipped)
- High Beam Assist (HBA) mal- function (if equipped)
- Lamp malfunction and so on.
The Master Warning Light illumi-
nates when more than one of the
above warning situations occur. At
this time, the LCD Modes Icon will
change from ( ) to ( ).
If the warning situation is solved, the
master warning light will be turned off
and the LCD Modes Icon will be
changed back to its previous icon ( ).
OJF045295L
JF CAN (ENG) 4.qxp 11/5/2015 3:51 PM Page 65