KIA OPTIMA 2020 Advanced Driving Assistance System
Manufacturer: KIA, Model Year: 2020, Model line: OPTIMA, Model: KIA OPTIMA 2020Pages: 24, PDF Size: 3.14 MB
Page 11 of 24
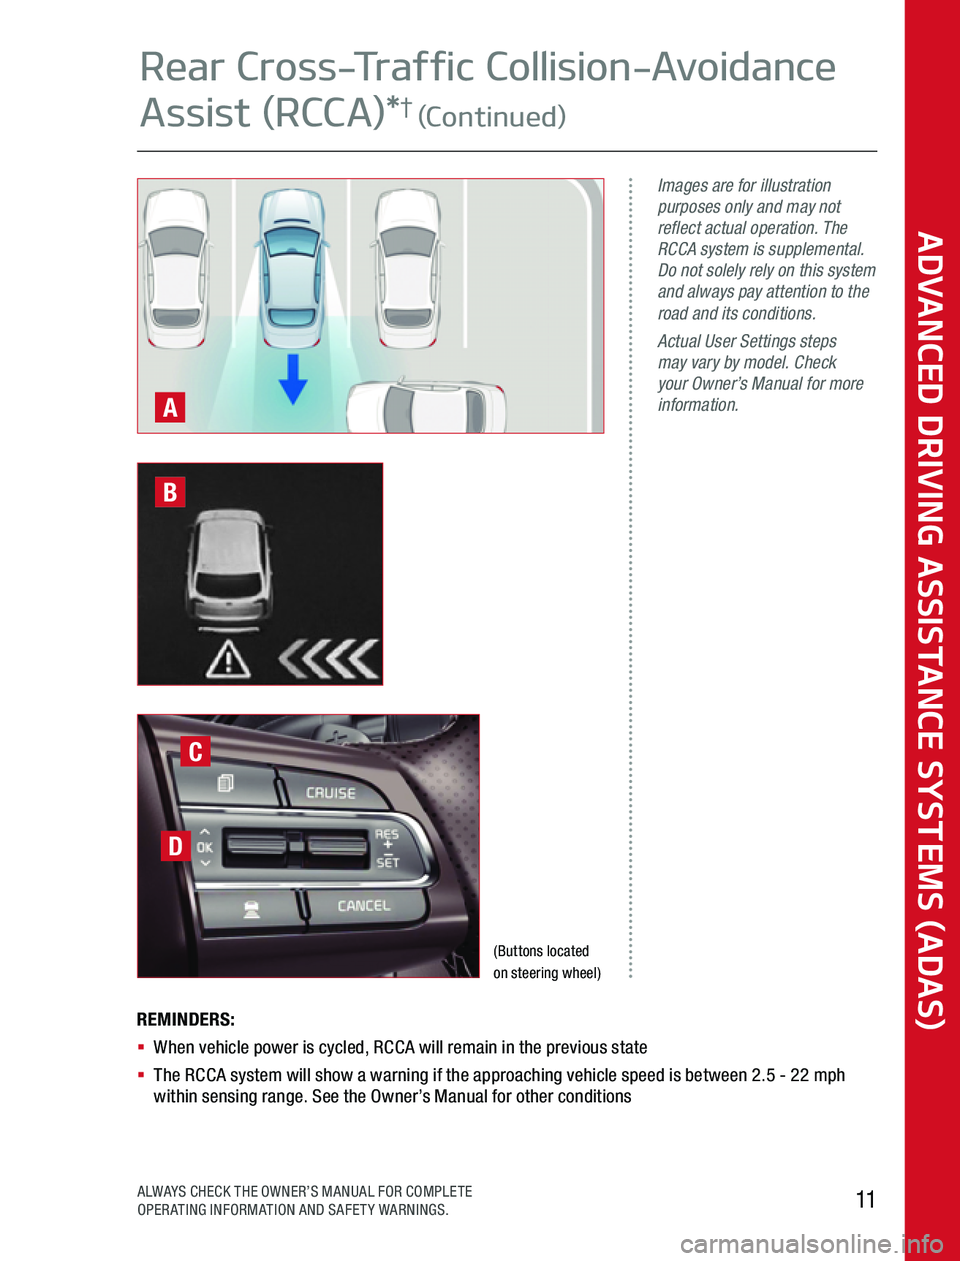
REMINDERS:§ When vehicle power is cycled, RCCA will remain in the previous state§ The RCCA system will show a warning if the approaching vehicle speed is between 2 5 - 22 mph within sensing range See the Owner’s Manual for other conditions
Images are for illustration purposes only and may not reflect actual operation. The RCCA system is supplemental. Do not solely rely on this system and always pay attention to the road and its conditions. Actual User Settings steps may vary by model. Check your Owner’s Manual for more information.A
(Buttons located on steering wheel)
D
C
B
ADVANCED DRIVING ASSISTANCE SYSTEMS (ADAS)
11ALWAYS CHECK THE OWNER’S MANUAL FOR COMPLETE OPERATING INFORMATION AND SAFETY WARNINGS
Rear Cross-Traffic Collision-Avoidance
Assist (RCCA)*† (Continued)
Page 12 of 24

The Blind-Spot View Monitor (BVM) System is designed to display the rear and side of the vehicle blind spot areas in the Instrument Cluster LCD A when the system is activated
The BVM System will operate when turned on in User Settings, the Engine Start/Stop button is on and the turn signal is activated
The BVM System will not operate when the Engine Start/Stop button is off, a turn signal is deactivated or another warning screen comes up on the Instrument Cluster LCD
BVM User Settings:
To turn the BVM System on, go to User Settings in the Instrument Cluster by pressing the Mode button B on the Steering Wheel Select Driver Assistance > Blind-Spot Safety > Blind-Spot View and press the OK button C
ADVANCED DRIVING ASSISTANCE SYSTEMS (ADAS)
ADAS Guide12*IF EQUIPPED†LEGAL DISCLAIMERS ON BACK INSIDE COVER
Blind-Spot View Monitor (BVM)
System*†
Page 13 of 24
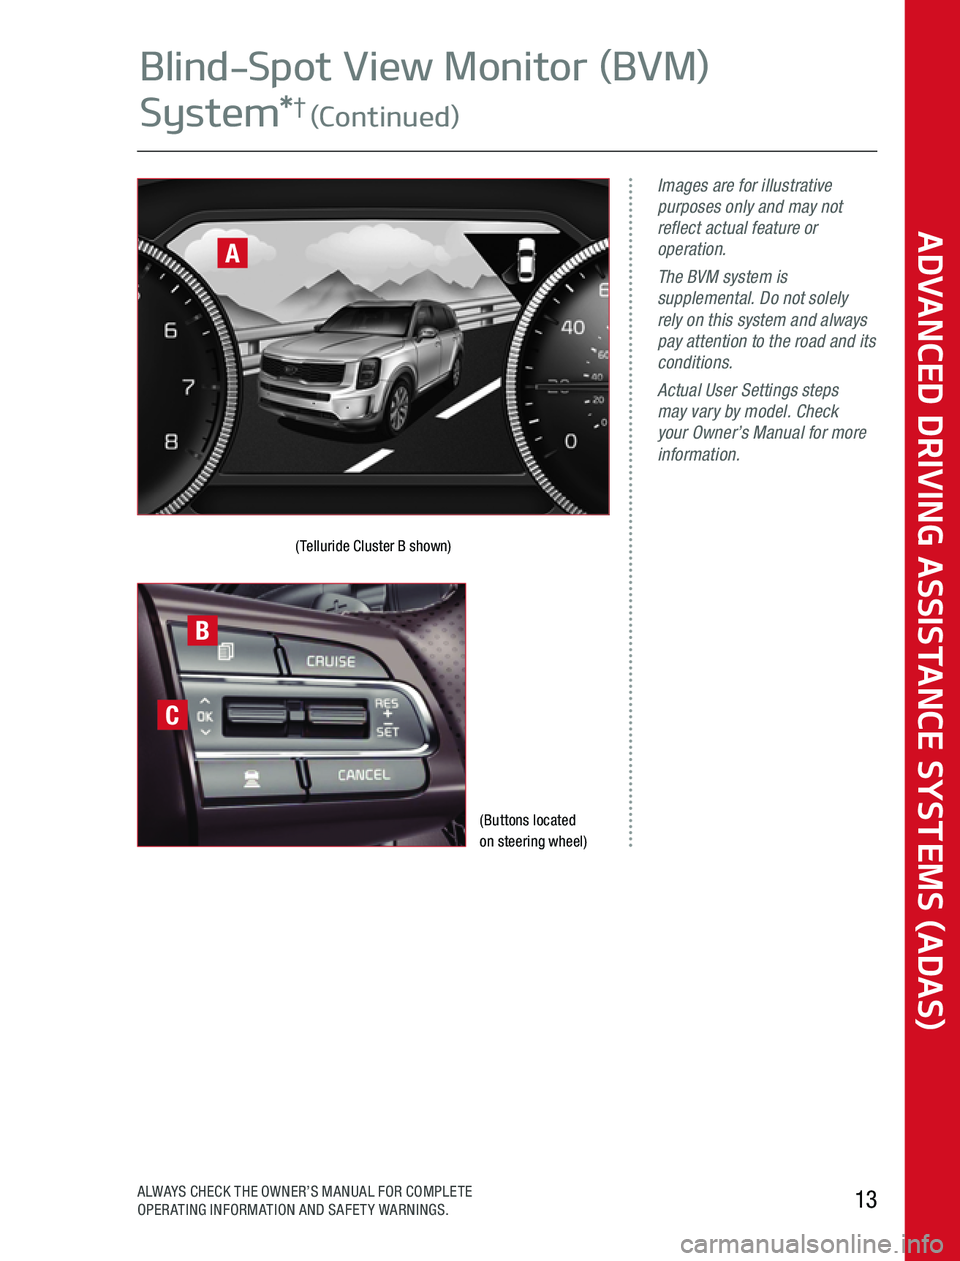
(Buttons located on steering wheel)
(Telluride Cluster B shown)
Images are for illustrative purposes only and may not reflect actual feature or operation.The BVM system is supplemental. Do not solely rely on this system and always pay attention to the road and its conditions.Actual User Settings steps may vary by model. Check your Owner’s Manual for more information.
A
B
C
ADVANCED DRIVING ASSISTANCE SYSTEMS (ADAS)
13ALWAYS CHECK THE OWNER’S MANUAL FOR COMPLETE OPERATING INFORMATION AND SAFETY WARNINGS
Blind-Spot View Monitor (BVM)
System*† (Continued)
Page 14 of 24
The Lane Keeping Assist (LKA) is designed to detect the lane markers on the road with a front view camera on the windshield, and may assist the driver’s steering to potentially help keep the vehicle in the lane The instrument cluster indicator will initially illuminate white when turned ON It will remain white when the vehicle is traveling slower than 40 mph or when the system does not detect the lane markers When the system detects the lane markers and can assist the steering, the LKA icon will illuminate green
If the LKA detects that you are moving outside of your lane, the system may give an audible warning and display an LDW (Lane Departure Warning) alert on the instrument cluster If the vehicle continues to move outside of the lane, LKA will apply a slight adjustment to the steering, trying to prevent the vehicle from moving outside its lane
LKA is the operating mode by default when the LKA button is depressed to ON
All systems will operate under the following conditions:
§ The vehicle speed exceeds approximately 40 mph
§ The LKA system recognizes both sides of the lane markers the vehicle is traveling in
§ The vehicle is between the lane markers
LKA User Settings:
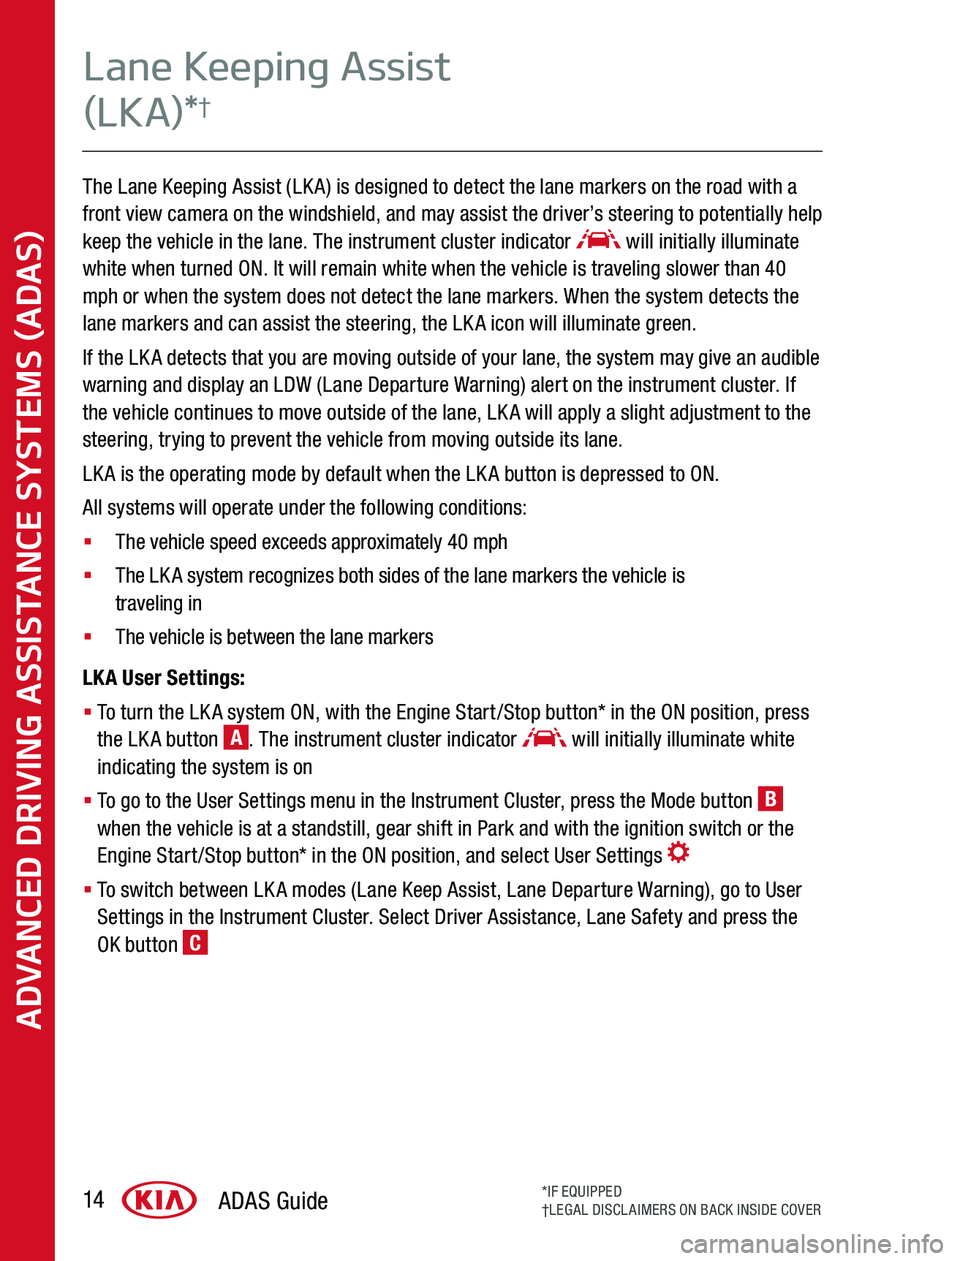
§ To turn the LKA system ON, with the Engine Start/Stop button* in the ON position, press the LKA button A The instrument cluster indicator will initially illuminate white indicating the system is on
§ To go to the User Settings menu in the Instrument Cluster, press the Mode button B when the vehicle is at a standstill, gear shift in Park and with the ignition switch or the Engine Start/Stop button* in the ON position, and select User Settings
§ To switch between LKA modes (Lane Keep Assist, Lane Departure Warning), go to User Settings in the Instrument Cluster Select Driver Assistance, Lane Safety and press the OK button C
ADVANCED DRIVING ASSISTANCE SYSTEMS (ADAS)
ADAS Guide14*IF EQUIPPED†LEGAL DISCLAIMERS ON BACK INSIDE COVER
Lane Keeping Assist
(LKA)*†
Page 15 of 24
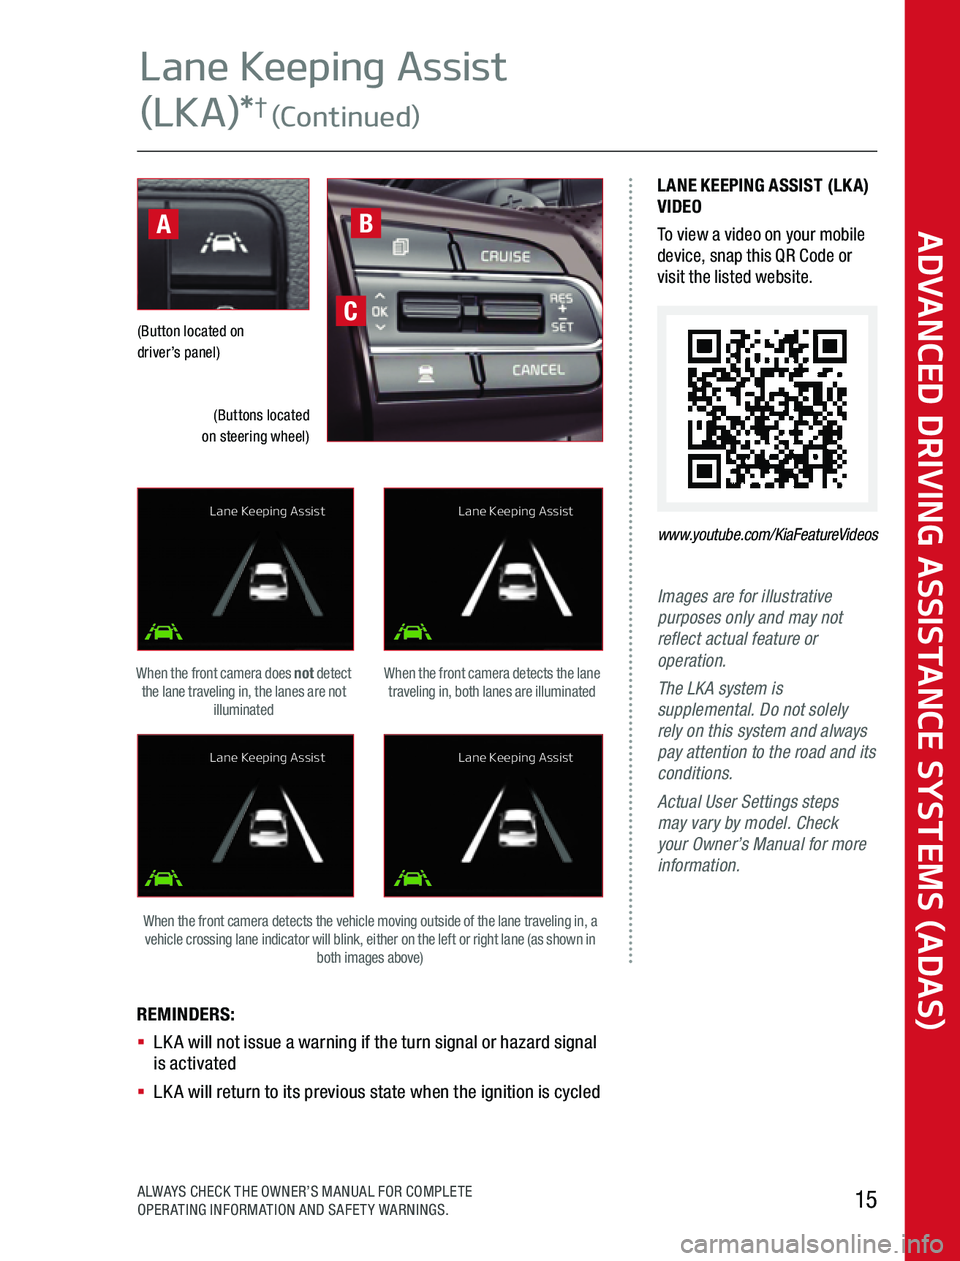
Images are for illustrative purposes only and may not reflect actual feature or operation.The LKA system is supplemental. Do not solely rely on this system and always pay attention to the road and its conditions.Actual User Settings steps may vary by model. Check your Owner’s Manual for more information.
REMINDERS: § LKA will not issue a warning if the turn signal or hazard signal is activated§ LKA will return to its previous state when the ignition is cycled
(Button located on driver’s panel)
When the front camera detects the lane traveling in, both lanes are illuminated
When the front camera detects the vehicle moving outside of the lane traveling in, a vehicle crossing lane indicator will blink, either on the left or right lane (as shown in both images above)
When the front camera does not detect the lane traveling in, the lanes are not illuminated
LANE KEEPING ASSIST (LKA)VIDEOTo view a video on your mobile device, snap this QR Code or visit the listed website
www.youtube.com/KiaFeatureVideos
C
B
(Buttons located on steering wheel)
A
Lane Keeping Assist
Lane Keeping Assist
Lane Keeping Assist
Lane Keeping Assist
ADVANCED DRIVING ASSISTANCE SYSTEMS (ADAS)
15ALWAYS CHECK THE OWNER’S MANUAL FOR COMPLETE OPERATING INFORMATION AND SAFETY WARNINGS
Lane Keeping Assist
(LKA)*† (Continued)
Page 16 of 24
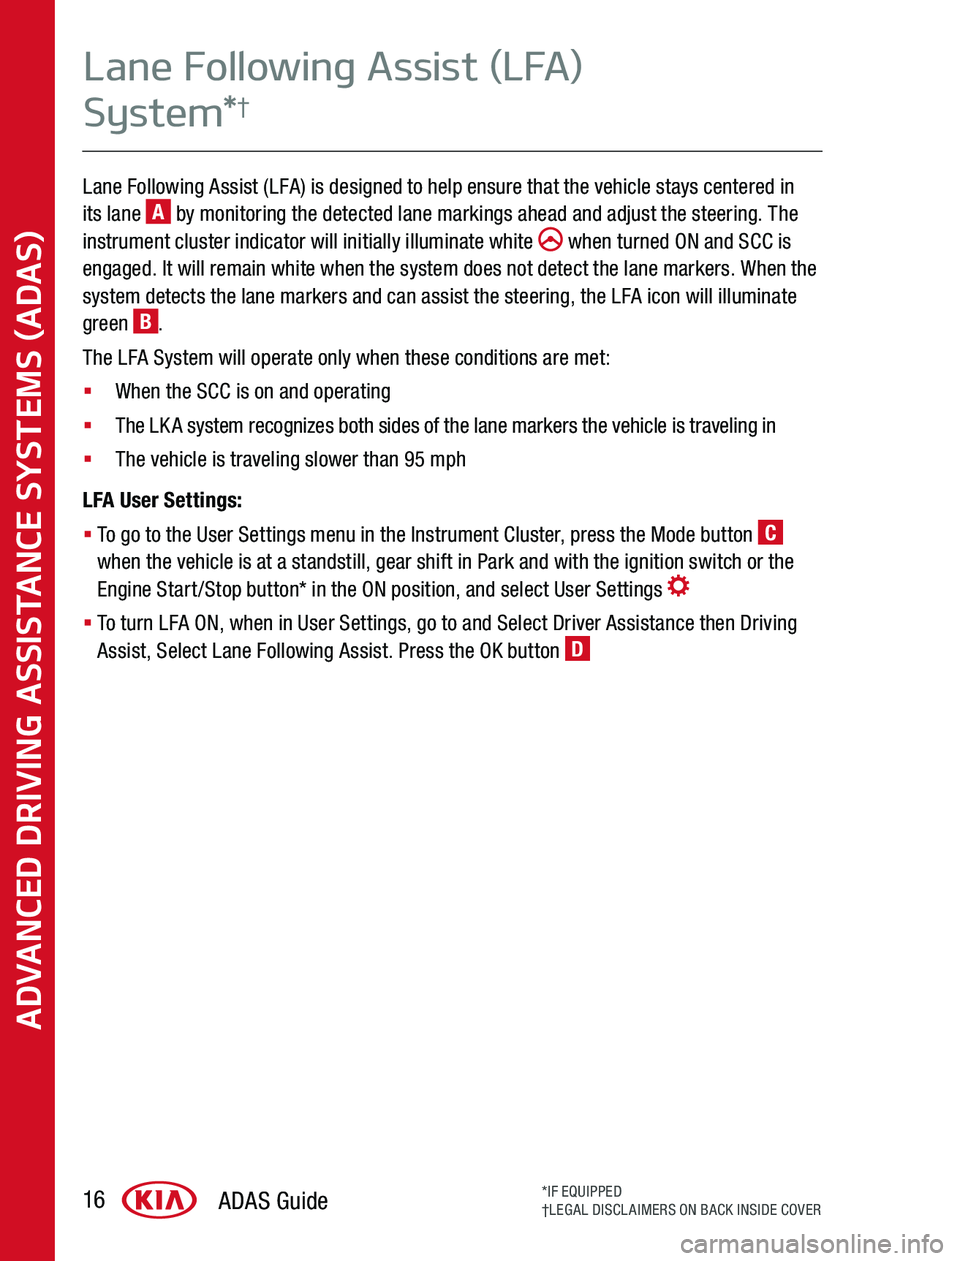
Lane Following Assist (LFA) is designed to help ensure that the vehicle stays centered in its lane A by monitoring the detected lane markings ahead and adjust the steering The instrument cluster indicator will initially illuminate white when turned ON and SCC is engaged It will remain white when the system does not detect the lane markers When the system detects the lane markers and can assist the steering, the LFA icon will illuminate green B
The LFA System will operate only when these conditions are met:
§ When the SCC is on and operating
§ The LKA system recognizes both sides of the lane markers the vehicle is traveling in
§ The vehicle is traveling slower than 95 mph
LFA User Settings:
§ To go to the User Settings menu in the Instrument Cluster, press the Mode button C when the vehicle is at a standstill, gear shift in Park and with the ignition switch or the Engine Start/Stop button* in the ON position, and select User Settings
§ To turn LFA ON, when in User Settings, go to and Select Driver Assistance then Driving Assist, Select Lane Following Assist Press the OK button D
ADVANCED DRIVING ASSISTANCE SYSTEMS (ADAS)
ADAS Guide16*IF EQUIPPED†LEGAL DISCLAIMERS ON BACK INSIDE COVER
Lane Following Assist (LFA)
System*†
Page 17 of 24
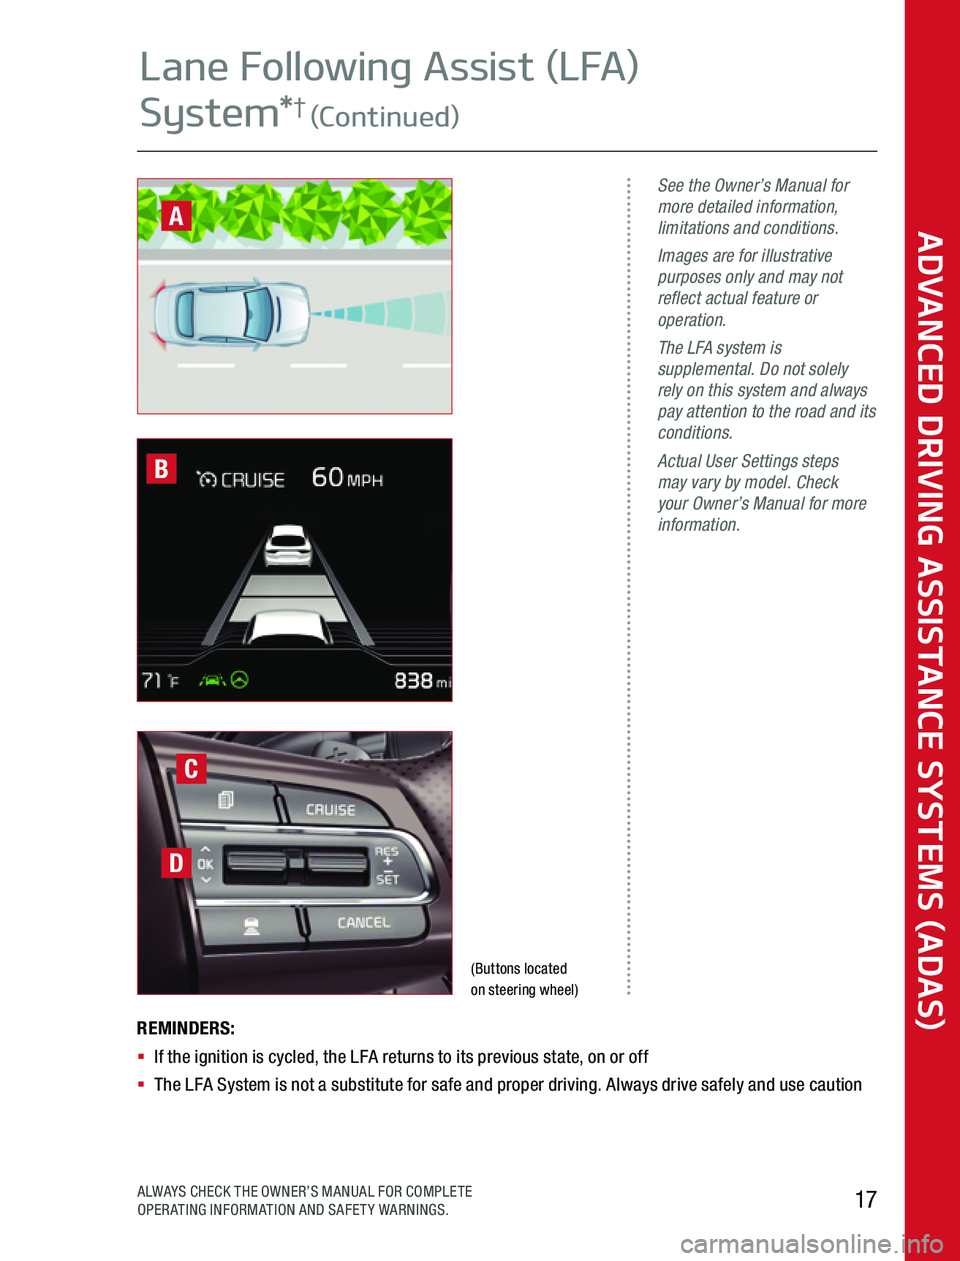
(Buttons located on steering wheel)
See the Owner’s Manual for more detailed information, limitations and conditions.Images are for illustrative purposes only and may not reflect actual feature or operation. The LFA system is supplemental. Do not solely rely on this system and always pay attention to the road and its conditions.Actual User Settings steps may vary by model. Check your Owner’s Manual for more information.
REMINDERS: § If the ignition is cycled, the LFA returns to its previous state, on or off§ The LFA System is not a substitute for safe and proper driving Always drive safely and use caution
C
D
B
ADVANCED DRIVING ASSISTANCE SYSTEMS (ADAS)
17ALWAYS CHECK THE OWNER’S MANUAL FOR COMPLETE OPERATING INFORMATION AND SAFETY WARNINGS
Lane Following Assist (LFA)
System*† (Continued)
A
Page 18 of 24
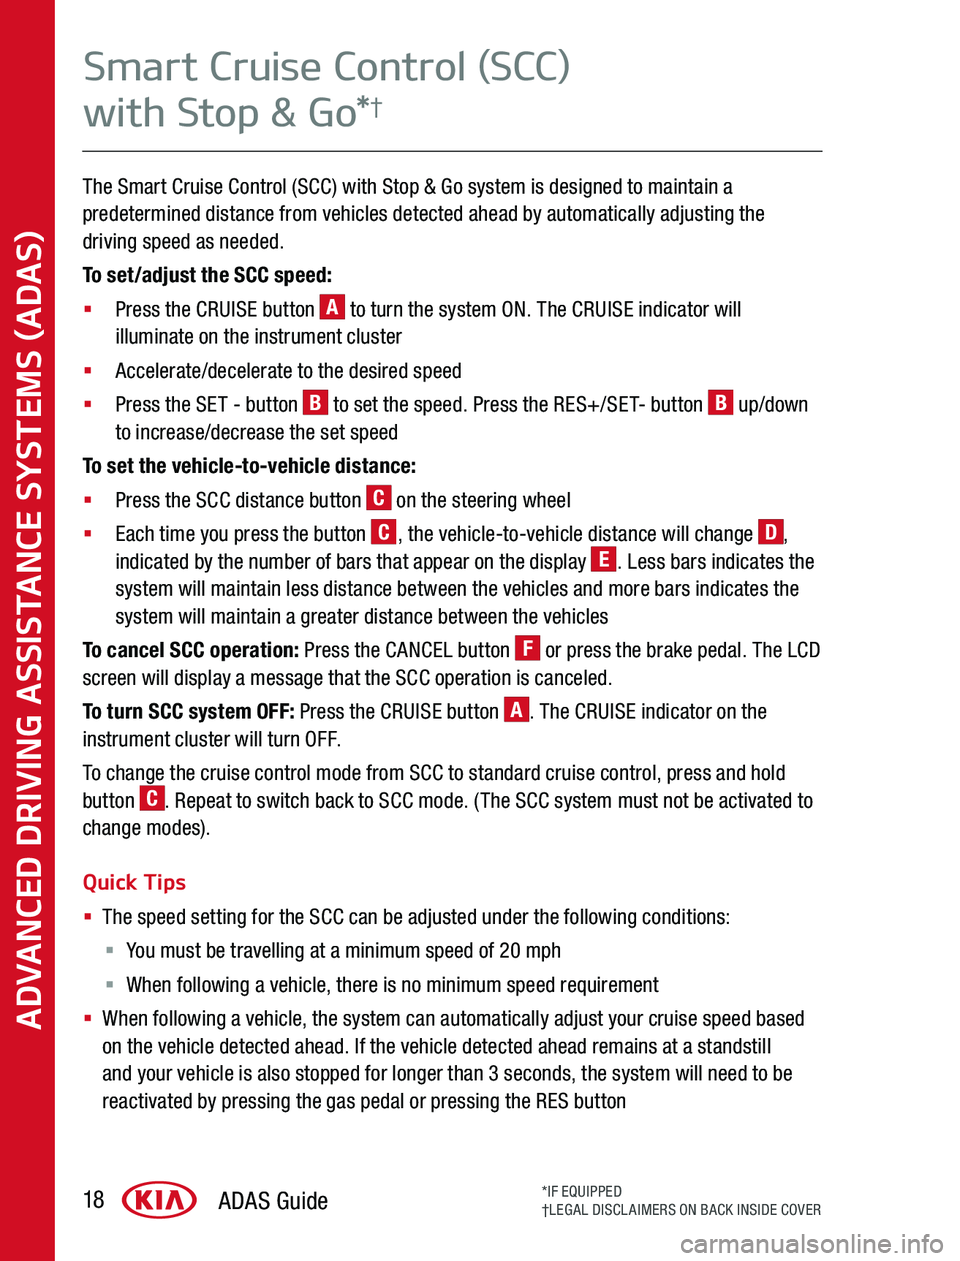
The Smart Cruise Control (SCC) with Stop & Go system is designed to maintain a predetermined distance from vehicles detected ahead by automatically adjusting the driving speed as needed
To set/adjust the SCC speed:
§ Press the CRUISE button A to turn the system ON The CRUISE indicator will illuminate on the instrument cluster
§ Accelerate/decelerate to the desired speed
§ Press the SET - button B to set the speed Press the RES+/SET- button B up/down to increase/decrease the set speed
To set the vehicle-to-vehicle distance:
§ Press the SCC distance button C on the steering wheel
§ Each time you press the button C, the vehicle-to-vehicle distance will change D, indicated by the number of bars that appear on the display E Less bars indicates the system will maintain less distance between the vehicles and more bars indicates the system will maintain a greater distance between the vehicles
To cancel SCC operation: Press the CANCEL button F or press the brake pedal The LCD screen will display a message that the SCC operation is canceled
To turn SCC system OFF: Press the CRUISE button A The CRUISE indicator on the instrument cluster will turn OFF
To change the cruise control mode from SCC to standard cruise control, press and hold button C Repeat to switch back to SCC mode (The SCC system must not be activated to change modes)
Quick Tips
§ The speed setting for the SCC can be adjusted under the following conditions:
§ You must be travelling at a minimum speed of 20 mph
§ When following a vehicle, there is no minimum speed requirement
§ When following a vehicle, the system can automatically adjust your cruise speed based on the vehicle detected ahead If the vehicle detected ahead remains at a standstill and your vehicle is also stopped for longer than 3 seconds, the system will need to be reactivated by pressing the gas pedal or pressing the RES button
ADVANCED DRIVING ASSISTANCE SYSTEMS (ADAS)
ADAS Guide18*IF EQUIPPED†LEGAL DISCLAIMERS ON BACK INSIDE COVER
Smart Cruise Control (SCC)
with Stop & Go*†
Page 19 of 24
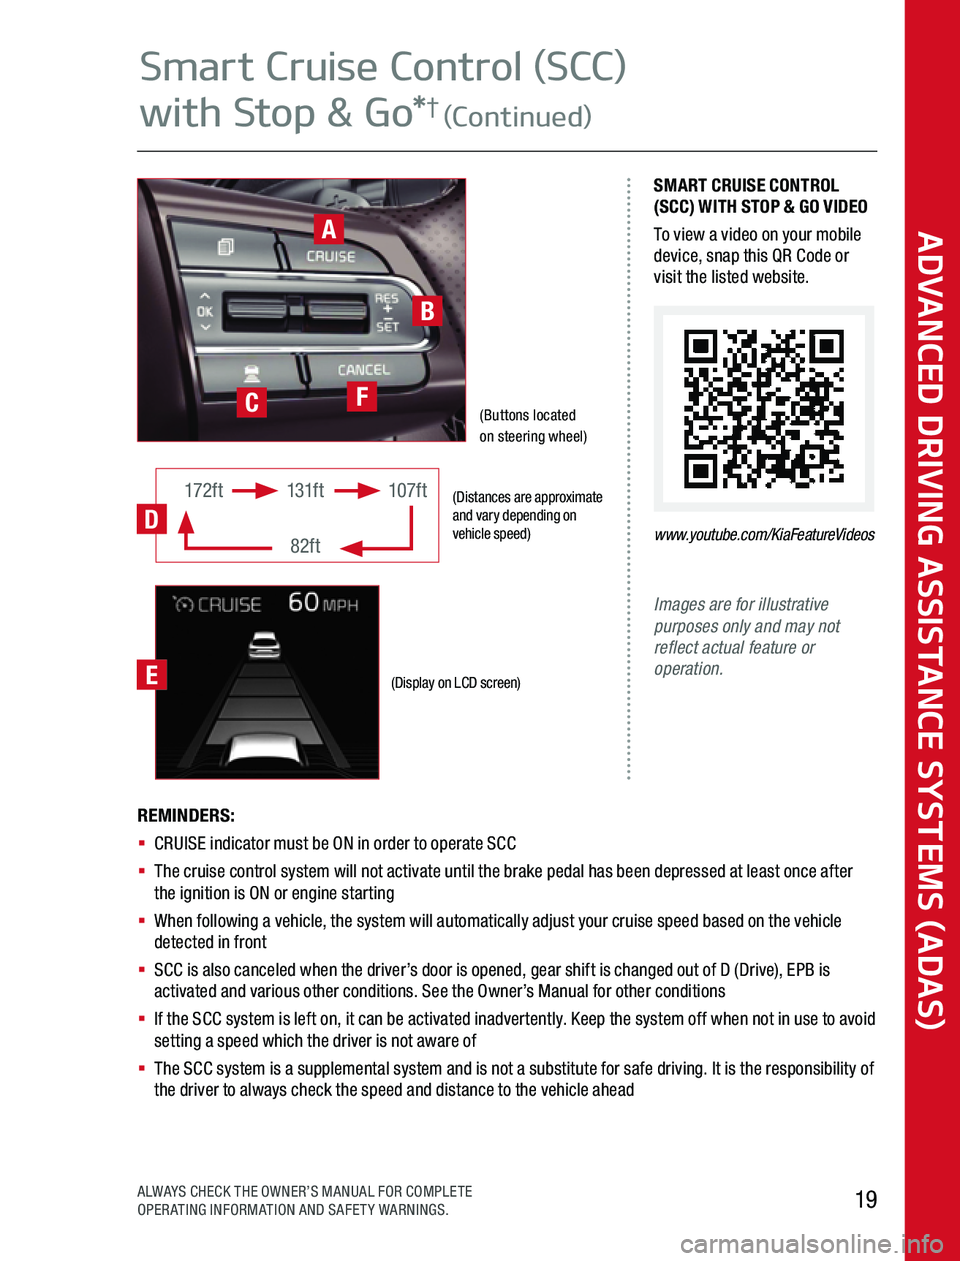
(Distances are approximate and vary depending on vehicle speed)
(Display on LCD screen)
172ft131ft
82ft
107ft
D
Images are for illustrative purposes only and may not reflect actual feature or operation.
SMART CRUISE CONTROL (SCC) WITH STOP & GO VIDEOTo view a video on your mobile device, snap this QR Code or visit the listed website
www.youtube.com/KiaFeatureVideos
REMINDERS: § CRUISE indicator must be ON in order to operate SCC§ The cruise control system will not activate until the brake pedal has been depressed at least once after the ignition is ON or engine starting§ When following a vehicle, the system will automatically adjust your cruise speed based on the vehicle detected in front§ SCC is also canceled when the driver’s door is opened, gear shift is changed out of D (Drive), EPB is activated and various other conditions See the Owner’s Manual for other conditions§ If the SCC system is left on, it can be activated inadvertently Keep the system off when not in use to avoid setting a speed which the driver is not aware of§ The SCC system is a supplemental system and is not a substitute for safe driving It is the responsibility of the driver to always check the speed and distance to the vehicle ahead
A
B
(Buttons located on steering wheel)CF
E
ADVANCED DRIVING ASSISTANCE SYSTEMS (ADAS)
19ALWAYS CHECK THE OWNER’S MANUAL FOR COMPLETE OPERATING INFORMATION AND SAFETY WARNINGS
Smart Cruise Control (SCC)
with Stop & Go*† (Continued)
Page 20 of 24
Standard Cruise Control Settings
A Cruise Control ON/OFF button: Press to turn the cruise control ON/OFF
B Resume Cruising Speed button: Press up to resume or increase cruising speed
B Set Cruising Speed button: Press down to set or decrease cruising speed
C Cruise Control Cancel button: To cancel cruise control setting, do one of the following:
§ Press the brake pedal
§ Press the CANCEL button
Quick Tips
§ The standard cruise control system is designed to function above approximately 20 mph only
§ The Cruise Control system will not activate until the brake pedal has been depressed at least once after ignition ON or engine start
ADAS Guide20*IF EQUIPPED†LEGAL DISCLAIMERS ON BACK INSIDE COVER
ADVANCED DRIVING ASSISTANCE SYSTEMS (ADAS)
Smart Cruise Control (SCC)
with Stop & Go*†