KIA OPTIMA 2020 Features and Functions Guide
Manufacturer: KIA, Model Year: 2020, Model line: OPTIMA, Model: KIA OPTIMA 2020Pages: 591, PDF Size: 14.1 MB
Page 141 of 591

451
Features of your vehicle
Heated steering wheel
(if equipped)
With the ignition switch in the ON
position, pressing the heated steer-
ing wheel button warms the steering
wheel. The indicator on the button
will illuminate.
To turn the heated steering wheel off,
press the button once again. The
indicator on the button will turn off.
✽ ✽NOTICE
The heated steering wheel will turn
off automatically approximately 30
minutes after the heated steering
wheel is turned on.
CAUTION
Do not install any type of grip
cover for the steering wheel, itmay impair the function of theheated steering wheel system.
When cleaning the heated steering wheel, do not use anorganic solvent such as paintthinner, benzene, alcohol andgasoline. Doing so may dam-age the surface of the steeringwheel.
If the surface of the steering wheel is damaged by a sharpobject, damage to the heatedsteering wheel componentscould occur.
OJFA045029
WARNING
If the steering wheel becomes
too warm, turn the system off.
The heated steering wheel may
cause burns even at low tem-
peratures, especially if used for
long periods of time.
JFa PE USA 4.qxp 5/15/2019 3:18 PM Page 51
Page 142 of 591

Features of your vehicle
52
4
Horn
To sound the horn, press the horn
symbols on your steering wheel.
Check the horn regularly to be sure it
operates properly.
✽ ✽
NOTICE
To sound the horn, press the area
indicated by the horn symbol on
your steering wheel (see illustra-
tion). The horn will operate only
when this area is pressed.
OJFA048383
JFa PE USA 4.qxp 5/15/2019 3:18 PM Page 52
Page 143 of 591

453
Features of your vehicle
MIRRORS
Inside rearview mirror
Adjust the rearview mirror so that the
center view through the rear window
is seen. Make this adjustment before
you start driving.
Do not place objects in the rear seat
or cargo area which would interfere
with your vision through the rear win-
dow.
Day/night rearview mirror (if equipped)
Make this adjustment before you
start driving and while the day/night
lever (3) is in the day position.
Pull the day/night lever (3) toward
you to reduce the glare from the
headlights of the vehicles behind you
during night driving.
Remember that you lose somerearview clarity in the night position.
❈ (1) : Day, (2) : Night
WARNING- Mirror adjust-
ment
Do not adjust the rearview mir-
ror while the vehicle is moving.
This could result in loss of con-
trol.
WARNING
Do not modify the inside mirror
and don’t install a wide mirror. It
could result in injury during an
accident or deployment of the
air bag.
OJF045031L
JFa PE USA 4.qxp 5/15/2019 3:18 PM Page 53
Page 144 of 591
Features of your vehicle
54
4
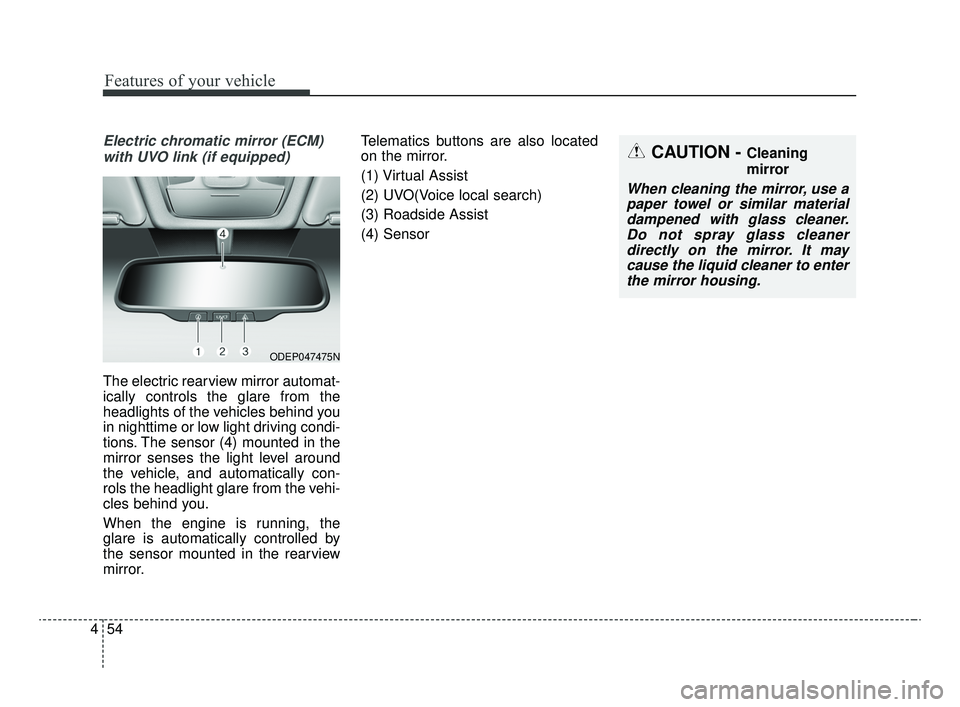
Electric chromatic mirror (ECM)
with UVO link (if equipped)
The electric rearview mirror automat-
ically controls the glare from the
headlights of the vehicles behind you
in nighttime or low light driving condi-
tions. The sensor (4) mounted in the
mirror senses the light level around
the vehicle, and automatically con-
rols the headlight glare from the vehi-
cles behind you.
When the engine is running, the
glare is automatically controlled by
the sensor mounted in the rearview
mirror. Telematics buttons are also located
on the mirror.
(1) Virtual Assist
(2) UVO(Voice local search)
(3) Roadside Assist
(4) Sensor
CAUTION - Cleaning
mirror
When cleaning the mirror, use a
paper towel or similar materialdampened with glass cleaner.Do not spray glass cleanerdirectly on the mirror. It maycause the liquid cleaner to enterthe mirror housing.
ODEP047475N
JFa PE USA 4.qxp 5/15/2019 3:29 PM Page 54
Page 145 of 591
455
Features of your vehicle
Outside rearview mirror
Be sure to adjust the mirror angles
before driving.
Your vehicle is equipped with both
left-hand and right-hand outside
rearview mirrors. The mirrors can be
adjusted remotely with the remote
switch. The mirror heads can be fold-
ed back to prevent damage during an
automatic vehicle wash or when
passing through a narrow street.
The right outside rearview mirror is
convex. Objects seen in the mirror
are closer than they appear.
Use your interior rearview mirror or
direct observation to determine the
actual distance of following vehicles
when changing lanes.If the mirror is jammed with ice, do
not adjust the mirror by force. Use an
approved spray de-icer (not radiator
antifreeze) to release the frozen
mechanism or move the vehicle to a
warm place and allow the ice to melt.
WARNING- Mirror
adjustment
Do not adjust or fold the outside
rearview mirrors while the vehi-
cle is moving. This could result
in loss of control.
CAUTION - Rearview
mirror
Do not scrape ice off the mirror face; this may damage the sur-face of the glass. If ice shouldrestrict the movement of the mir-ror, do not force the mirror foradjustment. To remove ice, use adeicer spray, a sponge or softcloth with very warm water.
JFa PE USA 4.qxp 5/15/2019 3:19 PM Page 55
Page 146 of 591
Features of your vehicle
56
4
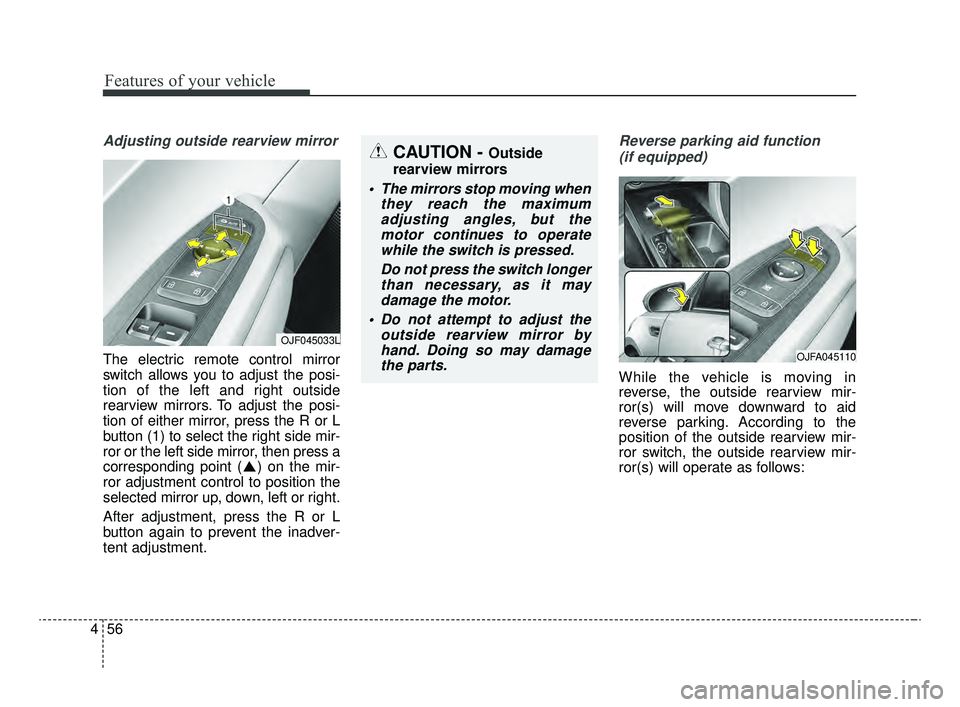
Adjusting outside rearview mirror
The electric remote control mirror
switch allows you to adjust the posi-
tion of the left and right outside
rearview mirrors. To adjust the posi-
tion of either mirror, press the R or L
button (1) to select the right side mir-
ror or the left side mirror, then press a
corresponding point ( ) on the mir-
ror adjustment control to position the
selected mirror up, down, left or right.
After adjustment, press the R or L
button again to prevent the inadver-
tent adjustment.
Reverse parking aid function
(if equipped)
While the vehicle is moving in
reverse, the outside rearview mir-
ror(s) will move downward to aid
reverse parking. According to the
position of the outside rearview mir-
ror switch, the outside rearview mir-
ror(s) will operate as follows:
CAUTION - Outside
rearview mirrors
The mirrors stop moving when they reach the maximumadjusting angles, but themotor continues to operatewhile the switch is pressed.
Do not press the switch longerthan necessary, as it maydamage the motor.
Do not attempt to adjust the outside rearview mirror byhand. Doing so may damagethe parts.
OJFA045110
OJF045033L
JFa PE USA 4.qxp 5/15/2019 3:19 PM Page 56
Page 147 of 591
457
Features of your vehicle
L/R: When the remote control outside
rearview mirror switch is select-
ed to the L (left) or R (right) posi-
tion, both outside rearview mir-
rors will move downward.
Neutral : When the remote control
outside rearview mirror
switch is placed in the mid-
dle position, the outside
rearview mirrors will not
operate while the vehicle is
moving rearward.
The outside rearview mirrors will auto-
matically revert to their original posi-
tions under the following conditions:
1. The ignition switch is in the OFF position.
2. Shift lever is moved to any position except R (Reverse).
3. Remote control outside rearview mirror switch is placed in the middle
position.Folding the outside rearview mirror
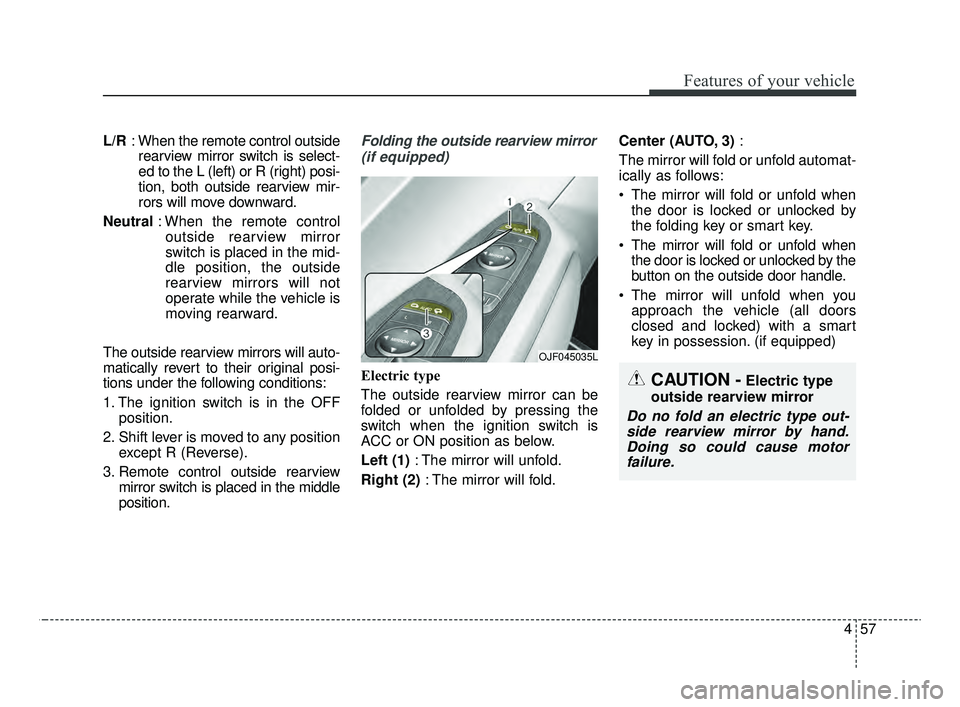
(if equipped)
Electric type
The outside rearview mirror can be
folded or unfolded by pressing the
switch when the ignition switch is
ACC or ON position as below.
Left (1) : The mirror will unfold.
Right (2) : The mirror will fold. Center (AUTO, 3)
:
The mirror will fold or unfold automat-
ically as follows:
The mirror will fold or unfold when the door is locked or unlocked by
the folding key or smart key.
The mirror will fold or unfold when the door is locked or unlocked by the
button on the outside door handle.
The mirror will unfold when you approach the vehicle (all doors
closed and locked) with a smart
key in possession. (if equipped)
OJF045035L
CAUTION -Electric type
outside rearview mirror
Do no fold an electric type out- side rearview mirror by hand.Doing so could cause motorfailure.
JFa PE USA 4.qxp 5/15/2019 3:19 PM Page 57
Page 148 of 591
Features of your vehicle
58
4
✽ ✽
NOTICE - Electric type out-
side rearview mirror
The electric type outside rearview
mirror operates even though the
engine start/stop button is in the
OFF position. However, to prevent
unnecessary battery discharge, do
not adjust the mirrors longer than
necessary while the engine is not
running. Do not fold an electric type
outside rearview mirror by hand.
This could cause motor failure.
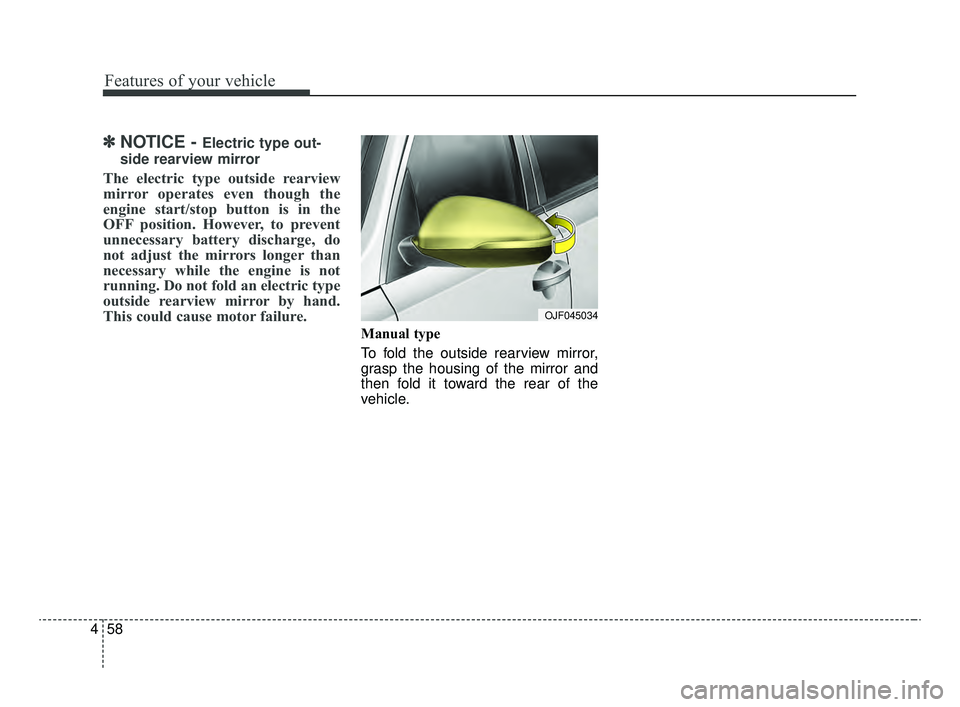
Manual type
To fold the outside rearview mirror,
grasp the housing of the mirror and
then fold it toward the rear of the
vehicle.
OJF045034
JFa PE USA 4.qxp 5/15/2019 3:19 PM Page 58
Page 149 of 591

459
Features of your vehicle
INSTRUMENT CLUSTER
1. Tachometer
2. Speedometer
3. Engine coolant temperature gauge
4. Fuel gauge
5. Warning and indicator lights
6. LCD display
OJFA048100/OJFA048101
■ ■Type A
❈The actual cluster in the vehicle may differ
from the illustration.
For more details, refer to the "Gauges" in
this chapter.
■ ■ Type B
JFa PE USA 4.qxp 5/15/2019 3:19 PM Page 59
Page 150 of 591
Features of your vehicle
60
4
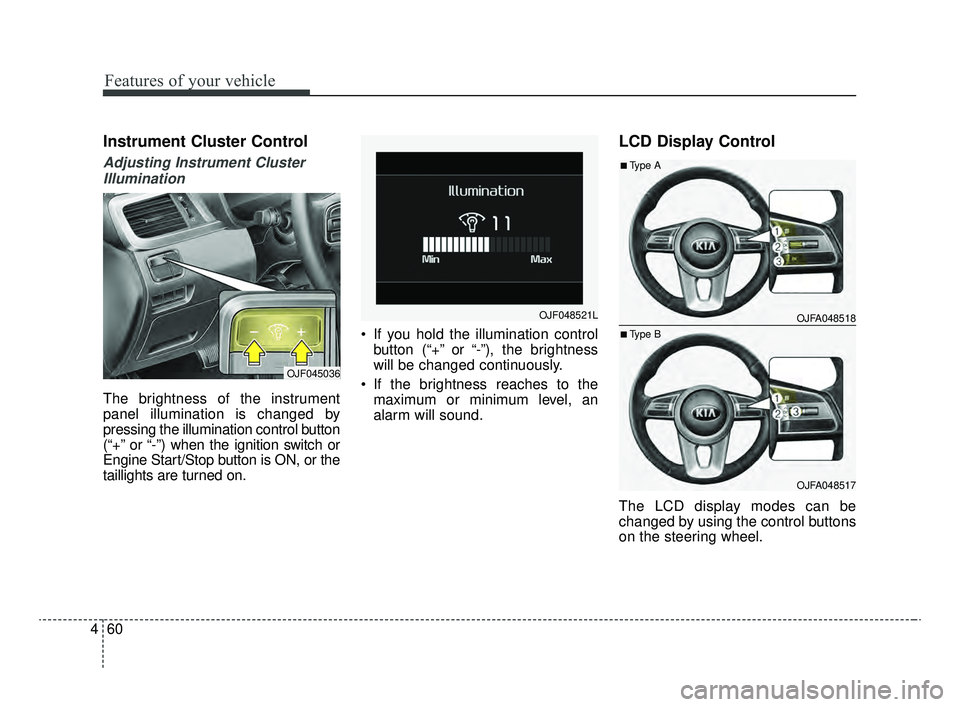
Instrument Cluster Control
Adjusting Instrument Cluster
Illumination
The brightness of the instrument
panel illumination is changed by
pressing the illumination control button
(“+” or “-”) when the ignition switch or
Engine Start/Stop button is ON, or the
taillights are turned on. If you hold the illumination control
button (“+” or “-”), the brightness
will be changed continuously.
If the brightness reaches to the maximum or minimum level, an
alarm will sound.
LCD Display Control
The LCD display modes can be
changed by using the control buttons
on the steering wheel.
OJF045036
OJF048521LOJFA048518
OJFA048517
■Type A
■Type B
JFa PE USA 4.qxp 5/15/2019 3:19 PM Page 60