window KIA OPTIMA 2020 Features and Functions Guide
[x] Cancel search | Manufacturer: KIA, Model Year: 2020, Model line: OPTIMA, Model: KIA OPTIMA 2020Pages: 591, PDF Size: 14.1 MB
Page 121 of 591
431
Features of your vehicle
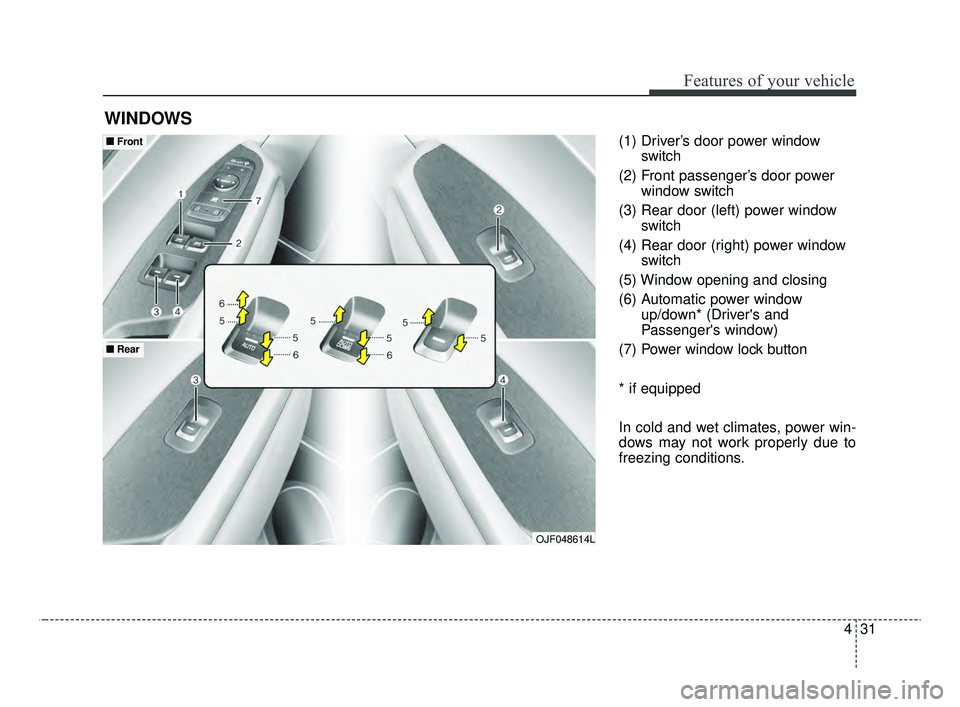
(1) Driver’s door power windowswitch
(2) Front passenger’s door power window switch
(3) Rear door (left) power window switch
(4) Rear door (right) power window switch
(5) Window opening and closing
(6) Automatic power window up/down* (Driver's and
Passenger's window)
(7) Power window lock button
* if equipped
In cold and wet climates, power win-
dows may not work properly due to
freezing conditions.
WINDOWS
OJF048614L
■ ■ Front
■ ■Rear
JFa PE USA 4.qxp 5/15/2019 3:17 PM Page 31
Page 122 of 591
Features of your vehicle
32
4
Power windows
The ignition switch must be in the ON
position for power windows to operate.
Each door has a power window
switch that controls the door's win-
dow. The driver has a power window
lock button which can block the oper-
ation of passenger windows. The
power windows can be operated for
approximately 30 seconds after the
ignition key is removed or is set to
the ACC or LOCK (or OFF) position.
If the front doors are opened; howev-
er, the power windows cannot be
operated even within the 30 second
period.
If the window cannot be closed
because it is blocked by objects,
remove the objects and close the
window.
✽ ✽
NOTICE
While driving with the rear windows
down or with the sunroof (if
equipped) in an open (or partially
open) position, your vehicle may
demonstrate a wind buffeting or
pulsation noise. This noise is a nor-
mal occurrence and can be reduced
or eliminated by taking the follow-
ing actions. If the noise occurs with
one or both of the rear windows
down, partially lower both front
windows approximately one inch. If
you experience the noise with the
sunroof open, slightly reduce the
size of the sunroof opening.
CAUTION
Do not install any accessories
in the area of windows. It mayimpact jam protection.
WARNING- Power
Windows
Do not extend your face or arms
outside of the window opening
while the vehicle is in motion.
Doing so could result in serious
injuries.
JFa PE USA 4.qxp 5/15/2019 3:17 PM Page 32
Page 123 of 591
433
Features of your vehicle
Window opening and closing
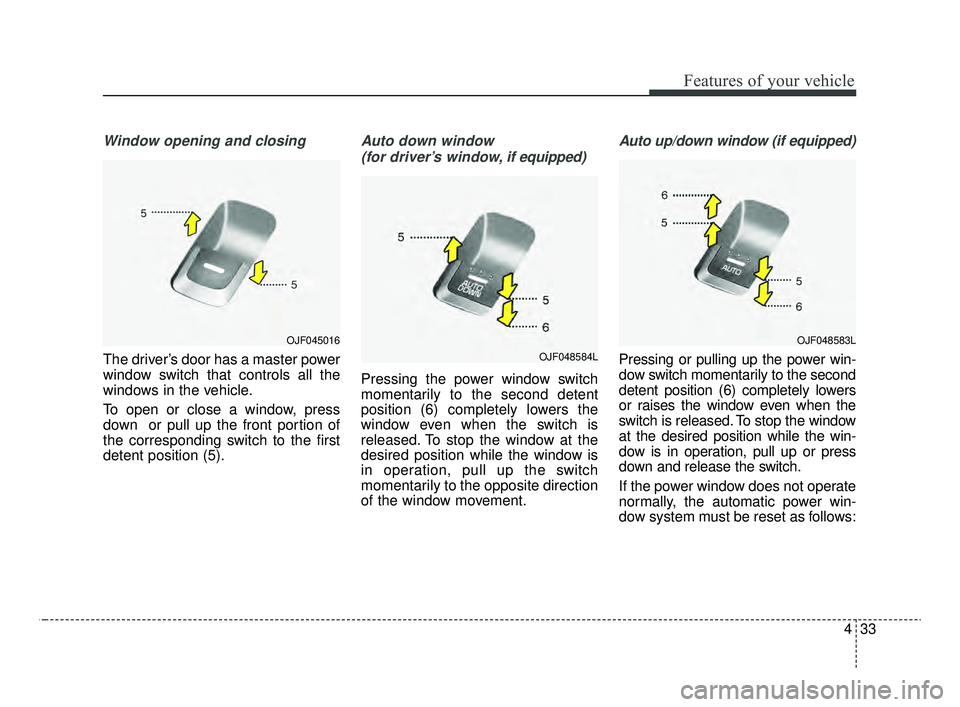
The driver’s door has a master power
window switch that controls all the
windows in the vehicle.
To open or close a window, press
down or pull up the front portion of
the corresponding switch to the first
detent position (5).
Auto down window (for driver’s window, if equipped)
Pressing the power window switch
momentarily to the second detent
position (6) completely lowers the
window even when the switch is
released. To stop the window at the
desired position while the window is
in operation, pull up the switch
momentarily to the opposite direction
of the window movement.
Auto up/down window (if equipped)
Pressing or pulling up the power win-
dow switch momentarily to the second
detent position (6) completely lowers
or raises the window even when the
switch is released. To stop the window
at the desired position while the win-
dow is in operation, pull up or press
down and release the switch.
If the power window does not operate
normally, the automatic power win-
dow system must be reset as follows:
OJF048583LOJF045016
OJF048584L
JFa PE USA 4.qxp 5/15/2019 3:18 PM Page 33
Page 124 of 591
Features of your vehicle
34
4
1. Turn the ignition switch to the ON
position.
2. Close the driver's and passenger's window and continue pulling up
the driver’s power window switch
for at least 1 second after the win-
dow is completely closed.
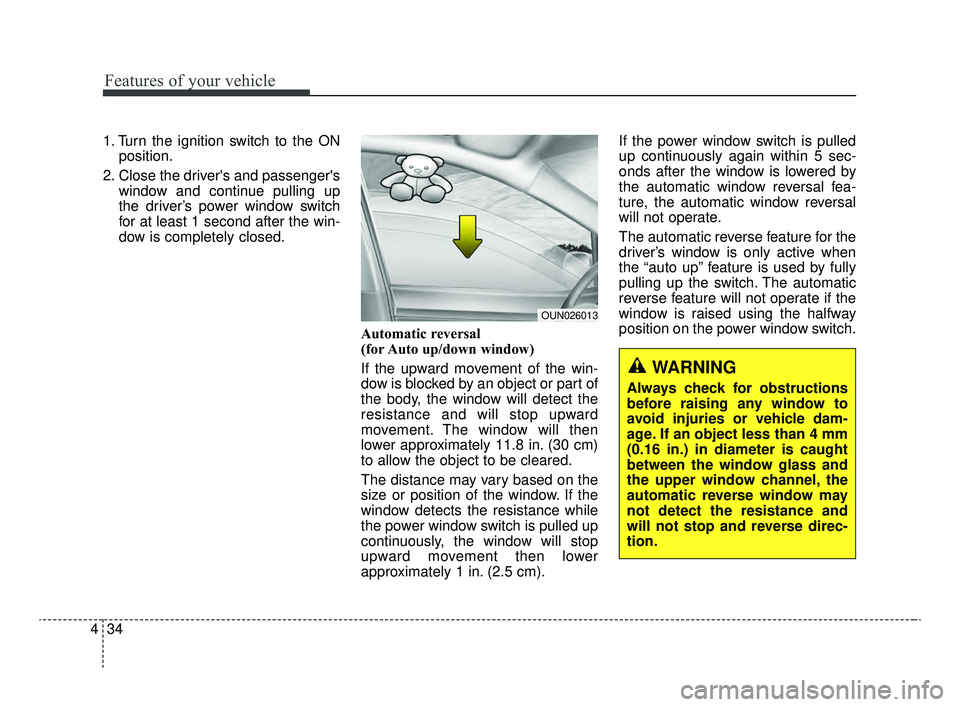
Automatic reversal
(for Auto up/down window)
If the upward movement of the win-
dow is blocked by an object or part of
the body, the window will detect the
resistance and will stop upward
movement. The window will then
lower approximately 11.8 in. (30 cm)
to allow the object to be cleared.
The distance may vary based on the
size or position of the window. If the
window detects the resistance while
the power window switch is pulled up
continuously, the window will stop
upward movement then lower
approximately 1 in. (2.5 cm). If the power window switch is pulled
up continuously again within 5 sec-
onds after the window is lowered by
the automatic window reversal fea-
ture, the automatic window reversal
will not operate.
The automatic reverse feature for the
driver’s window is only active when
the “auto up” feature is used by fully
pulling up the switch. The automatic
reverse feature will not operate if the
window is raised using the halfway
position on the power window switch.
WARNING
Always check for obstructions
before raising any window to
avoid injuries or vehicle dam-
age. If an object less than 4 mm
(0.16 in.) in diameter is caught
between the window glass and
the upper window channel, the
automatic reverse window may
not detect the resistance and
will not stop and reverse direc-
tion.
OUN026013
JFa PE USA 4.qxp 5/15/2019 3:18 PM Page 34
Page 125 of 591
435
Features of your vehicle
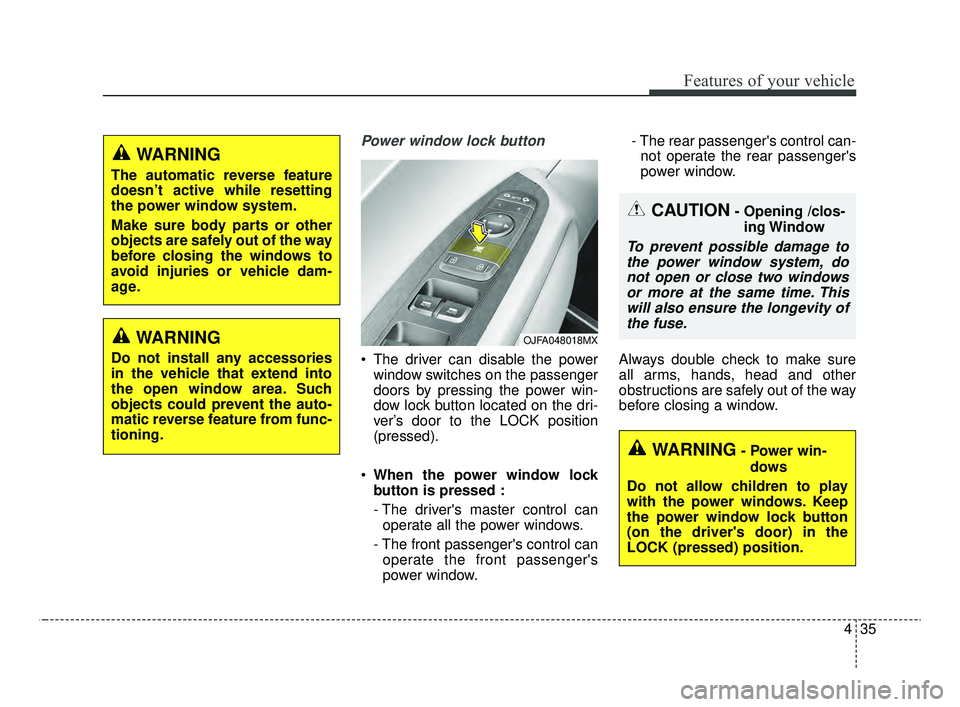
Power window lock button
The driver can disable the powerwindow switches on the passenger
doors by pressing the power win-
dow lock button located on the dri-
ver’s door to the LOCK position
(pressed).
When the power window lock
button is pressed :
- The driver's master control can
operate all the power windows.
- The front passenger's control can operate the front passenger's
power window. - The rear passenger's control can-
not operate the rear passenger's
power window.
Always double check to make sure
all arms, hands, head and other
obstructions are safely out of the way
before closing a window.
OJFA048018MX
WARNING
The automatic reverse feature
doesn’t active while resetting
the power window system.
Make sure body parts or other
objects are safely out of the way
before closing the windows to
avoid injuries or vehicle dam-
age.
CAUTION- Opening /clos- ing Window
To prevent possible damage tothe power window system, donot open or close two windowsor more at the same time. Thiswill also ensure the longevity ofthe fuse.
WARNING- Power win-
dows
Do not allow children to play
with the power windows. Keep
the power window lock button
(on the driver's door) in the
LOCK (pressed) position.
WARNING
Do not install any accessories
in the vehicle that extend into
the open window area. Such
objects could prevent the auto-
matic reverse feature from func-
tioning.
JFa PE USA 4.qxp 5/15/2019 3:18 PM Page 35
Page 143 of 591

453
Features of your vehicle
MIRRORS
Inside rearview mirror
Adjust the rearview mirror so that the
center view through the rear window
is seen. Make this adjustment before
you start driving.
Do not place objects in the rear seat
or cargo area which would interfere
with your vision through the rear win-
dow.
Day/night rearview mirror (if equipped)
Make this adjustment before you
start driving and while the day/night
lever (3) is in the day position.
Pull the day/night lever (3) toward
you to reduce the glare from the
headlights of the vehicles behind you
during night driving.
Remember that you lose somerearview clarity in the night position.
❈ (1) : Day, (2) : Night
WARNING- Mirror adjust-
ment
Do not adjust the rearview mir-
ror while the vehicle is moving.
This could result in loss of con-
trol.
WARNING
Do not modify the inside mirror
and don’t install a wide mirror. It
could result in injury during an
accident or deployment of the
air bag.
OJF045031L
JFa PE USA 4.qxp 5/15/2019 3:18 PM Page 53
Page 171 of 591
481
Features of your vehicle
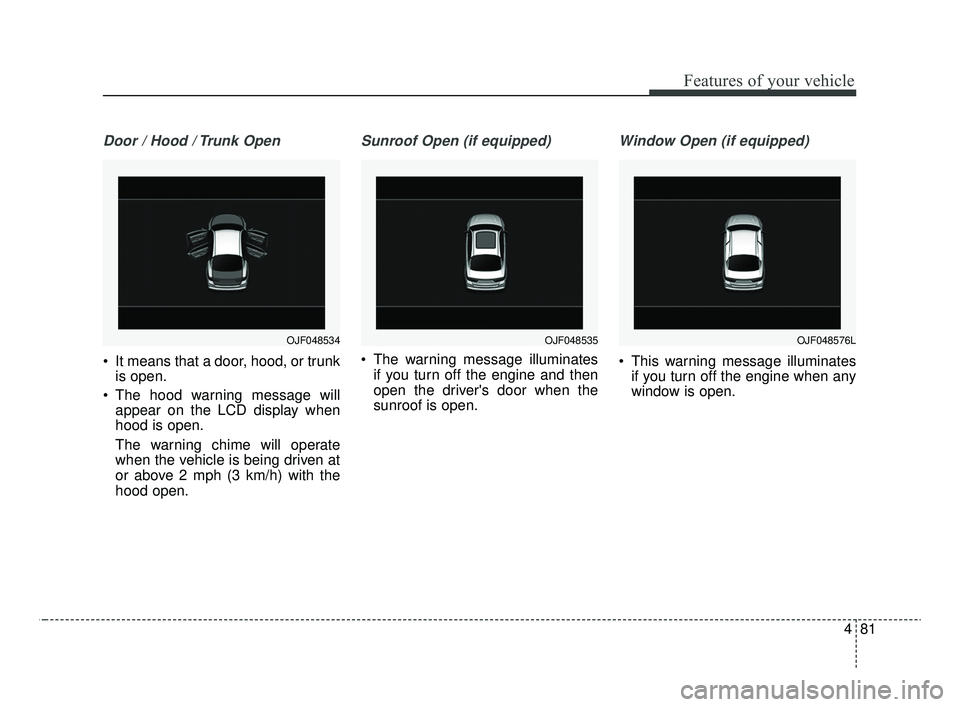
Door / Hood / Trunk Open
It means that a door, hood, or trunkis open.
The hood warning message will appear on the LCD display when
hood is open.
The warning chime will operate
when the vehicle is being driven at
or above 2 mph (3 km/h) with the
hood open.
Sunroof Open (if equipped)
The warning message illuminates
if you turn off the engine and then
open the driver's door when the
sunroof is open.
Window Open (if equipped)
This warning message illuminatesif you turn off the engine when any
window is open.
OJF048535OJF048576LOJF048534
JFa PE USA 4.qxp 5/15/2019 3:20 PM Page 81
Page 195 of 591

4105
Features of your vehicle
High beam operation
To turn on the high beam headlamp,
push the lever away from you. The
lever will return to its original position.
To turn off the high beam headlamps,
pull the lever towards you. It will return
to the normal (low beam) position
when released.
The high beam indicator will light
when the headlight high beams are
switched on. To prevent the battery
from being discharged, do not leave
the lights on for a prolonged time while
the engine is not running.
WARNING - High beams
Do not use high beam when
there are other vehicles in front
of your vehicle. Using high
beam could obstruct the other
driver’s vision.
OJF045054
CAUTION
Never put anything over the light sensor (1). This willimpede operation of the auto-light system control.
Do not clean the sensor using a window cleaner as the clean-er may leave a light film whichcould interfere with the sen-sor's operation.
If your vehicle has window tint or other types of metallic coat-ing on the front windshield,the Auto light system may notwork properly.
JFa PE USA 4.qxp 5/15/2019 3:21 PM Page 105
Page 198 of 591

Features of your vehicle
108
4
(Continued)
When front visibility is poor - When the lamp of the on-com-ing or front vehicle is coveredwith dust, snow or water.
- When the light from the on- coming or front vehicle is notdetected because of exhaustfume, smoke, fog, snow, etc.
- When the front window is cov- ered with foreign matters.
- When it is hard to see because of fog, heavy rain or snow andetc.(Continued)
- When headlamp aiming is notproperly adjusted.
- When driving on a narrow curved road, rough road,downhill or uphill.
- When only part of the vehicle in front is visible on a cross-road or curved road.
- When there is a traffic light, reflecting sign, flashing signor mirror ahead.
- When there is a temporary reflector or flash ahead (con-struction area).
- When the road conditions are bad such as being wet, iced orcovered with snow.
- When a vehicle suddenly appears from a curve.
- When the vehicle is tilted from a flat tire or being towed.
(Continued)CAUTION
The High Beam Assist systemmay not work properly in the fol-lowing situations:
When the light from on-coming or front vehicle is poor
- When the light from the on- coming or front vehicle is notdetected because of lampdamage, hidden from sight,etc.
- When the lamp of the on-com- ing or front vehicle is coveredwith dust, snow or water.
- When the front vehicle's head- lamps are off but the foglamps on and etc.
When external condition is intervened
- When there is a similar shape lamp with the front vehicle'slamps.
- When the headlamp is not repaired or replaced at anauthorized dealer.
(Continued)
JFa PE USA 4.qxp 5/15/2019 3:21 PM Page 108
Page 199 of 591

4109
Features of your vehicle
✽ ✽NOTICE
• Do not disassemble a front view
camera temporarily for tinted
window or attaching any types of
coatings and accessories. If you
disassemble the camera and
assemble it again, take your vehi-
cle to an authorized Kia dealer
and have the system checked to
need a calibration.
• When you replace or reinstall the windshield glass or front view
camera, take your vehicle to an
authorized Kia dealer and have
the system checked.
• Be careful that water doesn't get into the High Beam Assist unit and
do not remove or damage parts of
the High Beam Assist system.
• Do not place objects on the dash board that reflect light such as
mirrors, white paper, etc. The sys-
tem may not be able to function if
sunlight is reflected. (Continued)(Continued)
• At times, the High Beam Assist
may not operate due to system
limitations. The system is for your
convenience only.
It is the responsibility of the driv-
er to drive safely and always check
the road conditions.
• When the system does not operate normally, change the lamp posi-
tion manually between the high
beam and low beam.
Turn signals and lane change
signals
The ignition switch must be on for the
turn signals to function. To turn on
the turn signals, move the lever up or
down (A). The green arrow indicators
on the instrument panel indicate
which turn signal is operating.
They will self-cancel after a turn is
completed. If the indicator continues
to flash after a turn, manually return
the lever to the OFF position.
To signal a lane change, move the
turn signal lever slightly and hold it in
position (B). The lever will return to
the OFF position when released.
OUM044060
JFa PE USA 4.qxp 5/15/2019 3:21 PM Page 109