service KIA OPTIMA 2020 Features and Functions Guide
[x] Cancel search | Manufacturer: KIA, Model Year: 2020, Model line: OPTIMA, Model: KIA OPTIMA 2020Pages: 591, PDF Size: 14.1 MB
Page 404 of 591
Driving your vehicle
148
5
Your vehicle's fuel economy depends
mainly on your style of driving, where
you drive and when you drive.
Each of these factors affects how
many miles (kilometers) you can get
from a gallon (liter) of fuel. To operate
your vehicle as economically as pos-
sible, use the following driving sug-
gestions to help save money in both
fuel and repairs:
Drive smoothly. Accelerate at a
moderate rate. Don't make "jack-
rabbit" starts or full-throttle shifts
and maintain a steady cruising
speed. Don't race between stop-
lights. Try to adjust your speed to
the traffic so you don't have to
change speeds unnecessarily.
Avoid heavy traffic whenever pos-
sible. Always maintain a safe dis-
tance from other vehicles so you
can avoid unnecessary braking.
This also reduces brake wear.
Drive at a moderate speed. The faster you drive, the more fuel your
vehicle uses. Driving at a moderate
speed, especially on the highway,
is one of the most effective ways to
reduce fuel consumption. Don't "ride" the brake pedal. This
can increase fuel consumption and
also increase wear on these com-
ponents. In addition, driving with
your foot resting on the brake pedal
may cause the brakes to overheat,
which reduces their effectiveness
and may lead to more serious con-
sequences.
Take care of your tires. Keep them inflated to the recommended pres-
sure. Incorrect inflation, either too
much or too little, results in unnec-
essary tire wear. Check the tire
pressures at least once a month.
Be sure that the wheels are aligned correctly. Improper align-
ment can result from hitting curbs
or driving too fast over irregular
surfaces. Poor alignment causes
faster tire wear and may also result
in other problems as well as
greater fuel consumption. Keep your vehicle in good condi-
tion. For better fuel economy and
reduced maintenance costs, main-
tain your vehicle in accordance
with the maintenance schedule in
chapter 7. If you drive your vehicle
in severe conditions, more frequent
maintenance is required (see
chapter 7 for details).
Keep your vehicle clean. For maxi- mum service, your vehicle should
be kept clean and free of corrosive
materials. It is especially important
that mud, dirt, ice, etc. not be
allowed to accumulate on the
underside of the vehicle. This extra
weight can result in increased fuel
consumption and also contribute to
corrosion.
Travel lightly. Don't carry unneces- sary weight in your vehicle. Weight
reduces fuel economy.
Don't let the engine idle longer than necessary. If you are waiting
(and not in traffic), turn off your
engine and restart only when
you're ready to go.
ECONOMICAL OPERATION
JFa PE USA 5.QXP 5/15/2019 3:28 PM Page 148
Page 412 of 591
Driving your vehicle
156
5
The use of chains may adversely
affect vehicle handling.
Do not exceed 20 mph (30 km/h) or the chain manufacturer’s recom-
mended speed limit, whichever is
lower.
Drive carefully and avoid bumps, holes, sharp turns, and other road
hazards, which may cause the
vehicle to bounce.
Avoid sharp turns or locked-wheel braking.Use high quality ethylene gly-
col coolant
Your vehicle is delivered with high
quality ethylene glycol coolant in the
cooling system. It is the only type of
coolant that should be used because
it helps prevent corrosion in the cool-
ing system, lubricates the water
pump and prevents freezing. Be sure
to replace or replenish your coolant
in accordance with the maintenance
schedule in chapter 7. Before winter,
have your coolant tested to assure
that its freezing point is sufficient for
the temperatures anticipated during
the winter.
Check battery and cables
Winter puts additional burdens on
the battery system. Visually inspect
the battery and cables as described
in chapter 7. The level of charge in
your battery can be checked by an
authorized Kia dealer or a service
station.
Change to "winter weight" oil
if necessary
In some climates it is recommended
that a lower viscosity "winter weight"
oil be used during cold weather. See
chapter 8 for recommendations. If
you aren't sure what weight oil you
should use, consult an authorized
Kia dealer.
Check spark plugs and ignition
system
Inspect your spark plugs as
described in chapter 7 and replace
them if necessary. Also check all
ignition wiring and components to be
sure they are not cracked, worn or
damaged in any way.CAUTION- Snow chains
Chains that are the wrong size or improperly installed candamage your vehicle's brakelines, suspension, body andwheels.
Stop driving and retighten the chains any time you hear themhitting the vehicle.
JFa PE USA 5.QXP 5/15/2019 3:28 PM Page 156
Page 420 of 591
What to do in an emergency
Road warning . . . . . . . . . . . . . . . . . . . . . . . . . . . . . . 6-2
• Hazard warning flasher . . . . . . . . . . . . . . . . . . . . . . . . 6-2
In case of an emergency while driving . . . . . . . . . . 6-3
• If the engine stalls at a crossroad or crossing. . . . . . . 6-3
• If you have a flat tire while driving . . . . . . . . . . . . . . . 6-3
• If the engine stalls while driving . . . . . . . . . . . . . . . . . 6-3
If the engine will not start . . . . . . . . . . . . . . . . . . . . 6-4
• If engine doesn't turn over or turns over slowly . . . . 6-4
• If engine turns over normally but does not start . . . . 6-4
Emergency starting . . . . . . . . . . . . . . . . . . . . . . . . . 6-5
• Jump starting . . . . . . . . . . . . . . . . . . . . . . . . . . . . . . . . . 6-5
• Push-starting . . . . . . . . . . . . . . . . . . . . . . . . . . . . . . . . . 6-6
If the engine overheats . . . . . . . . . . . . . . . . . . . . . . . 6-7
Tire Pressure Monitoring System (TPMS) . . . . . . 6-8
• Check tire pressure . . . . . . . . . . . . . . . . . . . . . . . . . . . . 6-8
• Low tire pressure telltale . . . . . . . . . . . . . . . . . . . . . . 6-10
• Low tire pressure position telltale . . . . . . . . . . . . . . . 6-10
• Changing a tire with TPMS . . . . . . . . . . . . . . . . . . . . 6-12
If you have a flat tire . . . . . . . . . . . . . . . . . . . . . . . 6-14
• Jack and tools . . . . . . . . . . . . . . . . . . . . . . . . . . . . . . . 6-14
• Removing and storing the spare tire . . . . . . . . . . . . . 6-15
• Changing tires . . . . . . . . . . . . . . . . . . . . . . . . . . . . . . . 6-16
If you have a flat tire (with Tire Mobility Kit) . . 6-23
• Introduction . . . . . . . . . . . . . . . . . . . . . . . . . . . . . . . . . 6-24
• Notes on the safe use of the Tire Mobility Kit . . . . . 6-25
• Components of the Tire MobilityKit . . . . . . . . . . . . . 6-27
• Using the Tire Mobility Kit . . . . . . . . . . . . . . . . . . . . 6-28
• Distributing the sealant. . . . . . . . . . . . . . . . . . . . . . . . 6-31
• Checking the tire inflation pressure . . . . . . . . . . . . . 6-31
• Technical Data . . . . . . . . . . . . . . . . . . . . . . . . . . . . . . . 6-32
Towing . . . . . . . . . . . . . . . . . . . . . . . . . . . . . . . . . . . 6-\
33
• Towing service . . . . . . . . . . . . . . . . . . . . . . . . . . . . . . . 6-33
6
JFa PE USA 6.qxp 5/15/2019 3:17 PM Page 1
Page 429 of 591
What to do in an emergency
10
6
✽ ✽
NOTICE
If the TPMS, Low Tire Pressure
indicator does not illuminate for 3
seconds when the ignition switch is
turned to the ON position, or if they
remain illuminated after coming on
for approximately 3 seconds, take
your vehicle to your nearest author-
ized Kia dealer and have the system
checked.
Low tire pressure
telltale
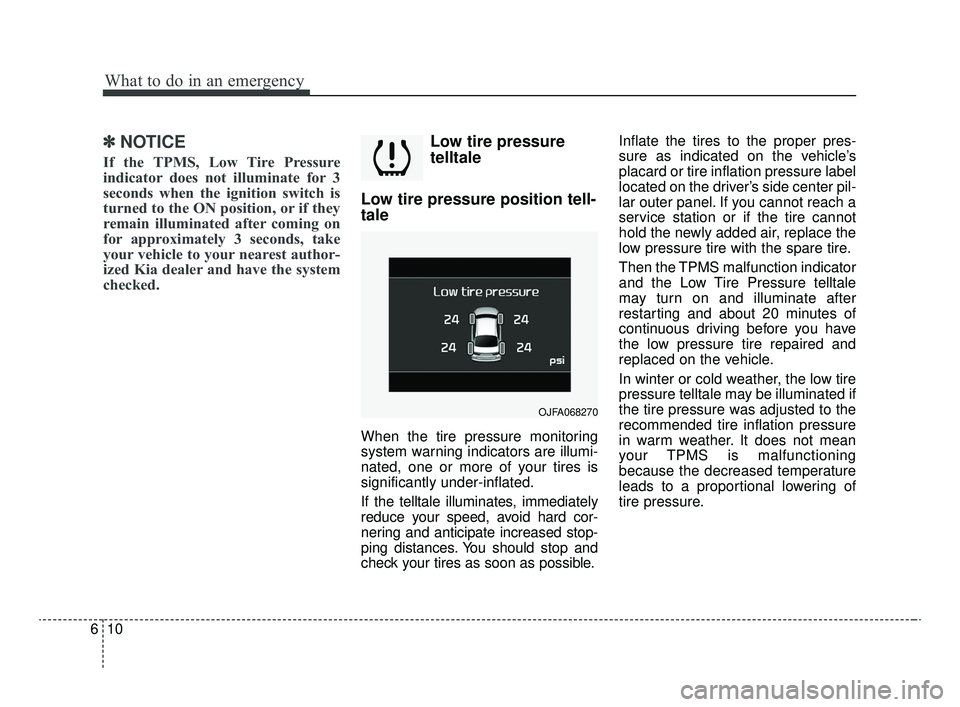
Low tire pressure position tell-
tale
When the tire pressure monitoring
system warning indicators are illumi-
nated, one or more of your tires is
significantly under-inflated.
If the telltale illuminates, immediately
reduce your speed, avoid hard cor-
nering and anticipate increased stop-
ping distances. You should stop and
check your tires as soon as possible. Inflate the tires to the proper pres-
sure as indicated on the vehicle’s
placard or tire inflation pressure label
located on the driver’s side center pil-
lar outer panel. If you cannot reach a
service station or if the tire cannot
hold the newly added air, replace the
low pressure tire with the spare tire.
Then the TPMS malfunction indicator
and the Low Tire Pressure telltale
may turn on and illuminate after
restarting and about 20 minutes of
continuous driving before you have
the low pressure tire repaired and
replaced on the vehicle.
In winter or cold weather, the low tire
pressure telltale may be illuminated if
the tire pressure was adjusted to the
recommended tire inflation pressure
in warm weather. It does not mean
your TPMS is malfunctioning
because the decreased temperature
leads to a proportional lowering of
tire pressure.
OJFA068270
JFa PE USA 6.qxp 5/15/2019 3:17 PM Page 10
Page 431 of 591

What to do in an emergency
12
6
Changing a tire with TPMS
If you have a flat tire, the Low Tire
Pressure telltale will come on. Have
the flat tire repaired by an authorized
Kia dealer as soon as possible or
replace the flat tire with the spare
tire.
Each wheel is equipped with a tire
pressure sensor mounted inside the
tire behind the valve stem. You must
use TPMS specific wheels. It is rec-
ommended that you always have
your tires serviced by an authorized
Kia dealer. Even if you replace the low pressure
tire with the spare tire, the Low Tire
Pressure telltale will remain on until
the low pressure tire is repaired and
placed on the vehicle.
After you replace the low pressure
tire with the spare tire, the TPMS
malfunction indicator may illuminate
after a few minutes because the
TPMS sensor mounted on the spare
wheel is not initiated.
Once the low pressure tire is inflated
again to the recommended pressure
and installed on the vehicle or the
TPMS sensor mounted on the
replaced spare wheel is initiated by
an authorized Kia dealer, the TPMS
malfunction indicator and the low tire
pressure telltale will turn off within a
few minutes of driving.
If the indicator has not disappeared
after a few minutes of driving, please
visit an authorized Kia dealer.
If an original mounted tire is replaced
with the spare tire, the TPMS sensor
on the replaced spare wheel should
be initiated and the TPMS sensor on
the original mounted wheel should be
deactivated. If the TPMS sensor on
the original mounted wheel located in
the spare tire carrier still activates,
the tire pressure monitoring system
may not operate properly. Have the
tire with TPMS serviced or replaced
by an authorized Kia dealer.
CAUTION- Repair Agents
Never use a puncture-repairing
agent not approved by Kia torepair and/or inflate a low pres-sure tire. The sealant notapproved by Kia may damagethe tire pressure sensor.
JFa PE USA 6.qxp 5/15/2019 3:17 PM Page 12
Page 433 of 591
What to do in an emergency
14
6
IF YOU HAVE A FLAT TIRE
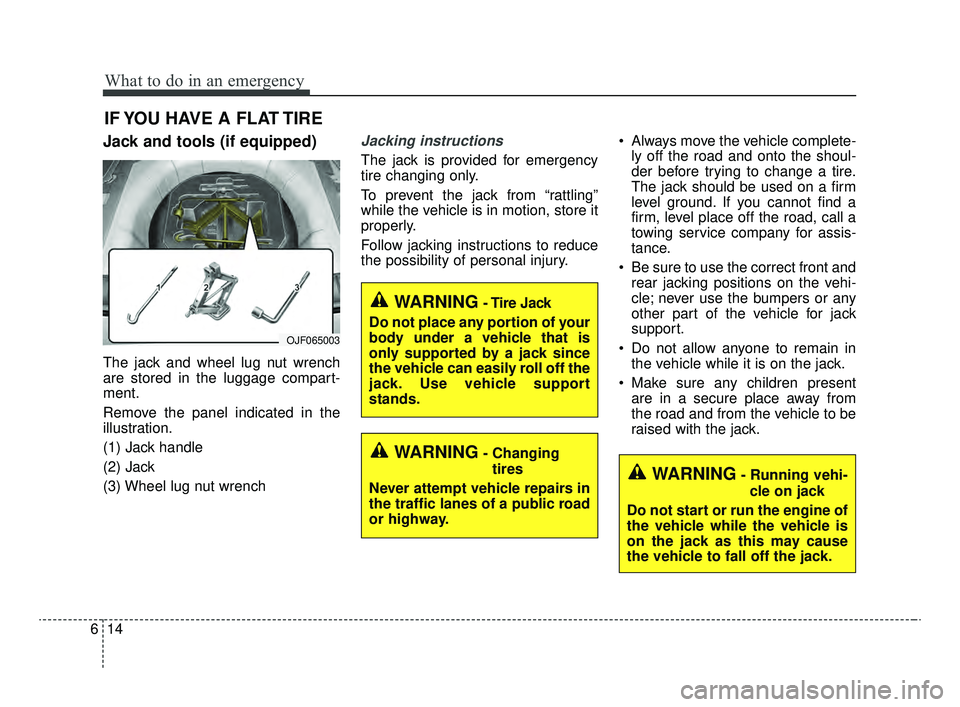
Jack and tools (if equipped)
The jack and wheel lug nut wrench
are stored in the luggage compart-
ment.
Remove the panel indicated in the
illustration.
(1) Jack handle
(2) Jack
(3) Wheel lug nut wrench
Jacking instructions
The jack is provided for emergency
tire changing only.
To prevent the jack from “rattling”
while the vehicle is in motion, store it
properly.
Follow jacking instructions to reduce
the possibility of personal injury. Always move the vehicle complete-
ly off the road and onto the shoul-
der before trying to change a tire.
The jack should be used on a firm
level ground. If you cannot find a
firm, level place off the road, call a
towing service company for assis-
tance.
Be sure to use the correct front and rear jacking positions on the vehi-
cle; never use the bumpers or any
other part of the vehicle for jack
support.
Do not allow anyone to remain in the vehicle while it is on the jack.
Make sure any children present are in a secure place away from
the road and from the vehicle to be
raised with the jack.
WARNING- Changing
tires
Never attempt vehicle repairs in
the traffic lanes of a public road
or highway.
OJF065003
WARNING- Tire Jack
Do not place any portion of your
body under a vehicle that is
only supported by a jack since
the vehicle can easily roll off the
jack. Use vehicle support
stands.
WARNING- Running vehi- cle on jack
Do not start or run the engine of
the vehicle while the vehicle is
on the jack as this may cause
the vehicle to fall off the jack.
JFa PE USA 6.qxp 5/15/2019 3:17 PM Page 14
Page 438 of 591

619
What to do in an emergency
Position the wrench as shown in the
drawing and tighten the wheel nuts.
Be sure the socket is seated com-
pletely over the nut. Do not stand on
the wrench handle or use an exten-
sion pipe over the wrench handle. Go
around the wheel, tightening every
nut following the numerical sequence
shown in the image until they are all
tight. Double-check each nut for
tightness. After changing wheels,
have an authorized Kia dealer tight-
en the wheel nuts to their proper
torque as soon as possible.
Wheel nut tightening torque:
79~94 lbf·ft (11~13 kgf·m)If you have a tire gauge, remove the
valve cap and check the air pressure.
If the pressure is lower than recom-
mended, drive slowly to the nearest
service station and inflate to the cor-
rect pressure. If it is too high, adjust
it until it is correct. Always reinstall
the valve cap after checking or
adjusting the tire pressure. If the cap
is not replaced, dust and dirt may get
into the tire valve and air may leak
from the tire. If you lose a valve cap,
buy another and install it as soon as
possible.
After you have changed the wheels,
always secure the flat tire in its place
and return the jack and tools to their
proper storage locations.
Note that most lug nuts do not have
metric threads. Be sure to use
extreme care in checking for thread
style before installing aftermarket lug
nuts or wheels. If in doubt, consult an
authorized Kia dealer.
CAUTION- Reusing lug
nuts
Make certain during wheelremoval that the same nuts thatwere removed are reinstalled -or, if replaced, that nuts withmetric threads and the samechamfer configuration are used.Your vehicle has metric threadson the wheel studs and nuts.Installation of a non-metricthread nut on a metric stud willnot secure the wheel to the hubproperly and will damage thestud so that it must be replaced.
OJF065009
JFa PE USA 6.qxp 5/15/2019 3:18 PM Page 19
Page 452 of 591
633
What to do in an emergency
TOWING
Towing service
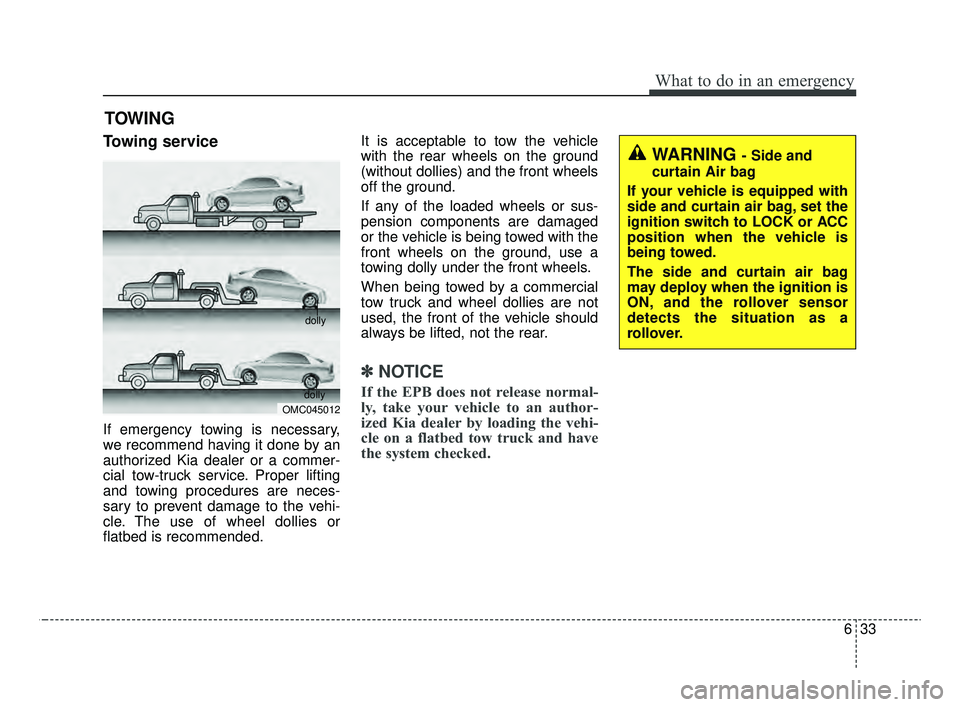
If emergency towing is necessary,
we recommend having it done by an
authorized Kia dealer or a commer-
cial tow-truck service. Proper lifting
and towing procedures are neces-
sary to prevent damage to the vehi-
cle. The use of wheel dollies or
flatbed is recommended.It is acceptable to tow the vehicle
with the rear wheels on the ground
(without dollies) and the front wheels
off the ground.
If any of the loaded wheels or sus-
pension components are damaged
or the vehicle is being towed with the
front wheels on the ground, use a
towing dolly under the front wheels.
When being towed by a commercial
tow truck and wheel dollies are not
used, the front of the vehicle should
always be lifted, not the rear.
✽ ✽
NOTICE
If the EPB does not release normal-
ly, take your vehicle to an author-
ized Kia dealer by loading the vehi-
cle on a flatbed tow truck and have
the system checked.
OMC045012 dolly
dolly
WARNING - Side and
curtain Air bag
If your vehicle is equipped with
side and curtain air bag, set the
ignition switch to LOCK or ACC
position when the vehicle is
being towed.
The side and curtain air bag
may deploy when the ignition is
ON, and the rollover sensor
detects the situation as a
rollover.
JFa PE USA 6.qxp 5/15/2019 3:18 PM Page 33
Page 454 of 591
Maintenance
Engine compartment . . . . . . . . . . . . . . . . . . . . . . . . 7-4
Maintenance services . . . . . . . . . . . . . . . . . . . . . . . . 7-6
• Owner’s responsibility . . . . . . . . . . . . . . . . . . . . . . . . . 7-6
• Owner maintenance precautions . . . . . . . . . . . . . . . . . 7-7
Owner maintenance . . . . . . . . . . . . . . . . . . . . . . . . . 7-8
• Owner maintenance schedule. . . . . . . . . . . . . . . . . . . . 7-8
Scheduled maintenance service. . . . . . . . . . . . . . . 7-10
Explanation of scheduled maintenance items . . . 7-22
• Engine oil and filter. . . . . . . . . . . . . . . . . . . . . . . . . . . 7-22
• Drive belts . . . . . . . . . . . . . . . . . . . . . . . . . . . . . . . . . . 7-22\
• Fuel filter (for gasoline) . . . . . . . . . . . . . . . . . . . . . . . 7-22
• Fuel lines, fuel hoses and connections . . . . . . . . . . . . 7-22
• Vapor hose and fuel filler cap . . . . . . . . . . . . . . . . . . 7-22
• Vacuum crankcase ventilation hoses . . . . . . . . . . . . . 7-23
• Air cleaner filter . . . . . . . . . . . . . . . . . . . . . . . . . . . . . 7-23
• Spark plugs . . . . . . . . . . . . . . . . . . . . . . . . . . . . . . . . . 7-23
• Valve clearance . . . . . . . . . . . . . . . . . . . . . . . . . . . . . . 7-23
• Cooling system . . . . . . . . . . . . . . . . . . . . . . . . . . . . . . . 7-23
• Coolant . . . . . . . . . . . . . . . . . . . . . . . . . . . . . . . . . . . . \
. 7-23
• Automatic transmission fluid . . . . . . . . . . . . . . . . . . . 7-23
• Dual clutch transmission Fluid . . . . . . . . . . . . . . . . . 7-24
• Brake hoses and lines . . . . . . . . . . . . . . . . . . . . . . . . . 7-24
• Brake fluid . . . . . . . . . . . . . . . . . . . . . . . . . . . . . . . . . . 7-24\
• Parking brake . . . . . . . . . . . . . . . . . . . . . . . . . . . . . . . 7-25
• Brake discs, pads, calipers and rotors. . . . . . . . . . . . 7-25
• Exhaust pipe and muffler . . . . . . . . . . . . . . . . . . . . . . 7-25
• Suspension mounting bolts . . . . . . . . . . . . . . . . . . . . . 7-25
• Steering gear box, linkage &
boots/lower arm ball joint . . . . . . . . . . . . . . . . . . . . 7-25
• Drive shafts and boots. . . . . . . . . . . . . . . . . . . . . . . . . 7-25
• Air conditioning refrigerant . . . . . . . . . . . . . . . . . . . . 7-25Checking fluid levels . . . . . . . . . . . . . . . . . . . . . . . 7-25
Engine oil. . . . . . . . . . . . . . . . . . . . . . . . . . . . . . . . . 7-26
• Checking the engine oil level . . . . . . . . . . . . . . . . . . . 7-26
• Changing the engine oil and filter . . . . . . . . . . . . . . . 7-27
Engine coolant . . . . . . . . . . . . . . . . . . . . . . . . . . . . 7-28
• Checking the coolant level . . . . . . . . . . . . . . . . . . . . . 7-28
• Changing the coolant . . . . . . . . . . . . . . . . . . . . . . . . . 7-30
Brake fluid . . . . . . . . . . . . . . . . . . . . . . . . . . . . . . . 7-31
• Checking the brake fluid level . . . . . . . . . . . . . . . . . . 7-31
Washer fluid . . . . . . . . . . . . . . . . . . . . . . . . . . . . . . 7-32
• Checking the washer fluid level . . . . . . . . . . . . . . . . . 7-32
Parking brake . . . . . . . . . . . . . . . . . . . . . . . . . . . . . 7-33
• Checking the parking brake. . . . . . . . . . . . . . . . . . . . 7-33
Air cleaner. . . . . . . . . . . . . . . . . . . . . . . . . . . . . . . . 7-34
• Filter replacement . . . . . . . . . . . . . . . . . . . . . . . . . . . . 7-34
7
JFa PE USA 7.qxp 5/15/2019 3:12 PM Page 1
Page 455 of 591

Climate control air filter . . . . . . . . . . . . . . . . . . . . 7-36
• Filter inspection . . . . . . . . . . . . . . . . . . . . . . . . . . . . . . 7-36
Wiper blades . . . . . . . . . . . . . . . . . . . . . . . . . . . . . . 7-38
• Blade inspection . . . . . . . . . . . . . . . . . . . . . . . . . . . . . . 7-38
• Blade replacement . . . . . . . . . . . . . . . . . . . . . . . . . . . . 7-38
Battery . . . . . . . . . . . . . . . . . . . . . . . . . . . . . . . . . . . 7-\
42
• For best battery service . . . . . . . . . . . . . . . . . . . . . . . 7-42
• Recharging the battery . . . . . . . . . . . . . . . . . . . . . . . . 7-43
• Reset items . . . . . . . . . . . . . . . . . . . . . . . . . . . . . . . . . . 7-44\
Tires and wheels . . . . . . . . . . . . . . . . . . . . . . . . . . . 7-45
• Tire care . . . . . . . . . . . . . . . . . . . . . . . . . . . . . . . . . . . . \
7-45
• Recommended cold tire inflation pressures . . . . . . . 7-45
• Tire pressure . . . . . . . . . . . . . . . . . . . . . . . . . . . . . . . . 7-46
• Checking tire inflation pressure. . . . . . . . . . . . . . . . . 7-46
• Tire rotation . . . . . . . . . . . . . . . . . . . . . . . . . . . . . . . . . 7-47
• Wheel alignment and tire balance . . . . . . . . . . . . . . . 7-48
• Tire replacement . . . . . . . . . . . . . . . . . . . . . . . . . . . . . 7-49
• Wheel replacement . . . . . . . . . . . . . . . . . . . . . . . . . . . 7-50
• Tire traction . . . . . . . . . . . . . . . . . . . . . . . . . . . . . . . . . 7-50
• Tire maintenance . . . . . . . . . . . . . . . . . . . . . . . . . . . . . 7-50
• Tire sidewall labeling . . . . . . . . . . . . . . . . . . . . . . . . . 7-50
• All season tires . . . . . . . . . . . . . . . . . . . . . . . . . . . . . . . 7-57
• Summer tires . . . . . . . . . . . . . . . . . . . . . . . . . . . . . . . . 7-57
• Snow tires . . . . . . . . . . . . . . . . . . . . . . . . . . . . . . . . . . . 7-\
57
• Tire chains . . . . . . . . . . . . . . . . . . . . . . . . . . . . . . . . . . 7-58\
• Radial-ply tires . . . . . . . . . . . . . . . . . . . . . . . . . . . . . . 7-58
• Low aspect ratio tire . . . . . . . . . . . . . . . . . . . . . . . . . . 7-59
Fuses . . . . . . . . . . . . . . . . . . . . . . . . . . . . . . . . . . . . \
7-60
• Inner panel fuse replacement . . . . . . . . . . . . . . . . . . . 7-62
• Engine compartment fuse replacement. . . . . . . . . . . 7-64
• Fuse/relay panel description. . . . . . . . . . . . . . . . . . . . 7-66
Light bulbs . . . . . . . . . . . . . . . . . . . . . . . . . . . . . . . 7-76
• Bulb replacement precaution . . . . . . . . . . . . . . . . . . . 7-76
• Light bulb position (Front). . . . . . . . . . . . . . . . . . . . . 7-78
• Light bulb position (Rear) . . . . . . . . . . . . . . . . . . . . . 7-79
• Light bulb position (Side) . . . . . . . . . . . . . . . . . . . . . . 7-80
• Headlamp (Low beam) bulb replacement
(Headlamp Type A) . . . . . . . . . . . . . . . . . . . . . . . . . . 7-80
• Headlamp (High beam) bulb replacement (Headlamp Type A) . . . . . . . . . . . . . . . . . . . . . . . . . . 7-81
• Front turn signal lamp bulb replacement (Headlamp Type A) . . . . . . . . . . . . . . . . . . . . . . . . . . 7-82
• Headlamp (Low/High beam) (LED type) bulb replacement (Headlamp Type B) . . . . . . . . . . 7-82
• Position lamp / Day time running lamp (LED type) replacement (Headlamp Type A, B) . . . . . . . . . . . . 7-83
• Front fog lamp bulb replacement . . . . . . . . . . . . . . . 7-83
• Side repeater lamp (LED type) bulb replacement . . 7-84
• Rear turn signal lamp bulb replacement . . . . . . . . . 7-84
• Stop and tail lamp bulb replacement . . . . . . . . . . . . 7-85
7
JFa PE USA 7.qxp 5/15/2019 3:12 PM Page 2