low KIA OPTIMA 2020 Features and Functions Guide
[x] Cancel search | Manufacturer: KIA, Model Year: 2020, Model line: OPTIMA, Model: KIA OPTIMA 2020Pages: 591, PDF Size: 14.1 MB
Page 504 of 591
751
Maintenance
2. Tire size designation
A tire’s sidewall is marked with a tire
size designation. You will need this
information when selecting replace-
ment tires for your car. The following
explains what the letters and num-
bers in the tire size designation
mean.
Example tire size designation:
(These numbers are provided as an
example only; your tire size designa-
tor could vary depending on your
vehicle.)
P205/55R16 89H
P - Applicable vehicle type (tiresmarked with the prefix “P’’ are
intended for use on passenger
vehicles or light trucks; however,
not all tires have this marking).
205 - Tire width in millimeters.
55 - Aspect ratio. The tire’s section height as a percentage of its
width.
R - Tire construction code (Radial).
16 - Rim diameter in inches. 89 - Load Index, a numerical code
associated with the maximum
load the tire can carry.
H - Speed Rating Symbol. See the speed rating chart in this section
for additional information.
Wheel size designation
Wheels are also marked with impor-
tant information that you need if you
ever have to replace one. The follow-
ing explains what the letters and
numbers in the wheel size designa-
tion mean.
Example wheel size designation:
6.0JX16
6.0 - Rim width in inches.
J - Rim contour designation.
16 - Rim diameter in inches. Tire speed ratings
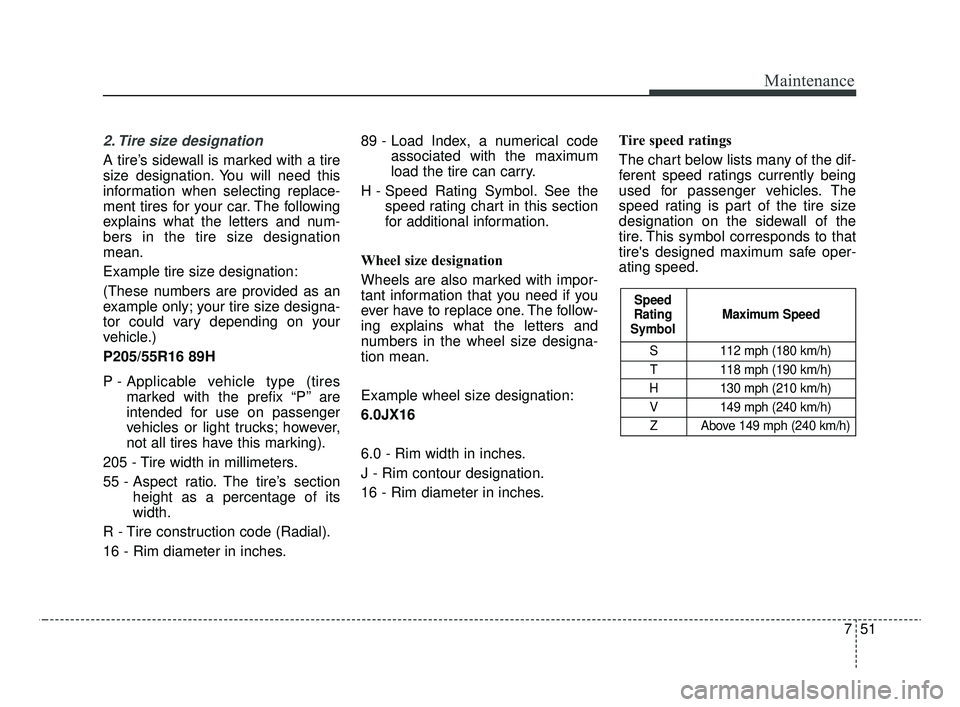
The chart below lists many of the dif-
ferent speed ratings currently being
used for passenger vehicles. The
speed rating is part of the tire size
designation on the sidewall of the
tire. This symbol corresponds to that
tire's designed maximum safe oper-
ating speed.
S 112 mph (180 km/h)
T 118 mph (190 km/h)
H 130 mph (210 km/h) V 149 mph (240 km/h)Z Above 149 mph (240 km/h)
Maximum Speed
Speed
Rating
Symbol
JFa PE USA 7.qxp 5/15/2019 3:13 PM Page 51
Page 506 of 591
753
Maintenance
Tread wear
The tread wear grade is a compara-
tive rating based on the wear rate of
the tire when tested under controlled
conditions on a specified govern-
ment test course. For example, a tire
graded 150 would wear one-and-a-
half times (1½) as well on the gov-
ernment course as a tire graded 100.
The relative performance of tires
depends upon the actual conditions
of their use, however, and may
depart significantly from the norm
due to variations in driving habits,
service practices and differences in
road characteristics and climate.Tires degrade over time, even when
they are not being used. Regardless
of the remaining tread, we recom-
mend that tires be replaced after
approximately six (6) years of normal
service. Heat caused by hot climates
or frequent high loading conditions
can accelerate the aging process.
These grades are molded on the
side-walls of passenger vehicle tires.
The tires available as standard or
optional equipment on your vehicles
may vary with respect to grade.
Traction - AA, A, B & C
The traction grades, from highest to
lowest, are AA, A, B and C. Those
grades represent the tires ability to
stop on wet pavement as measured
under controlled conditions on spec-
ified government test surfaces of
asphalt and concrete. A tire marked
C may have poor traction perform-
ance.
The traction grade assigned to this
tire is based on straight-ahead brak-
ing traction tests, and does not
include acceleration, cornering,
hydroplaning, or peak traction char-
acteristics.
JFa PE USA 7.qxp 5/15/2019 3:13 PM Page 53
Page 510 of 591
757
Maintenance
All season tires
Kia specifies all season tires on
some models to provide good per-
formance for use all year round,
including snowy and icy road condi-
tions. All season tires are identified
by ALL SEASON and/or M+S (Mud
and Snow) on the tire sidewall. Snow
tires have better snow traction than
all season tires and may be more
appropriate in some areas.
Summer tires
Kia specifies summer tires on some
models to provide superior perform-
ance on dry roads. Summer tire per-
formance is substantially reduced in
snow and ice. Summer tires do not
have the tire traction rating M+S
(Mud and Snow) on the tire side wall.
If you plan to operate your vehicle in
snowy or icy conditions, Kia recom-
mends the use of snow tires or all
season tires on all four wheels.
Snow tires
If you equip your car with snow tires,
they should be the same size and
have the same load capacity as the
original tires. Snow tires should be
installed on all four wheels; other-
wise, poor handling may result.
Snow tires should carry 4 psi (28
kPa) more air pressure than the
pressure recommended for the stan-
dard tires on the tire label on the dri-
ver's side of the center pillar, or up to
the maximum pressure shown on the
tire sidewall, whichever is less.
Do not drive faster than 75 mph (120
km/h) when your vehicle is equipped
with snow tires.WARNING
Do not use summer tires at tem-
peratures below 45°F (7°C) or
when driving on snow or ice. At
temperatures below 45°F (7°C),
summer tires can lose elastici-
ty, and therefore traction and
braking power as well. Change
the tires on your vehicle to win-
ter or all-weather tires of the
same size as the standard tires
of the vehicle. Both types of
tires are identified by the M+S
(Mud and Snow) marking. Using
summer tires at very cold tem-
peratures could cause cracks to
form, thereby damaging the
tires permanently.
JFa PE USA 7.qxp 5/15/2019 3:13 PM Page 57
Page 511 of 591

Maintenance
58
7
Tire chains
Tire chains, if necessary, should be
installed on the front wheels (drive
wheels).
Be sure that the chains are installed
in accordance with the manufactur-
er's instructions.
To minimize tire and chain wear, do
not continue to use tire chains when
they are no longer needed.
When driving on roads covered
with snow or ice, drive at less than
20 mph (30 km/h).
Use the SAE “S” class or wire chains.
If you hear noise caused by chains contacting the body, retighten the
chain to avoid contact with the
vehicle body.
To prevent body damage, retighten the chains after driving 0.3~0.6
miles (0.5~1.0 km).
Do not use tire chains on vehicles equipped with aluminum wheels.
In unavoidable circumstances, use
a wire type chain.
Use wire chains less than 0.47 inches (12 mm) to prevent damage
to the chain’s connection.
Radial-ply tires
Radial-ply tires provide improved
tread life, road hazard resistance and
smoother high speed ride. The radi-
al-ply tires used on this vehicle are
of belted construction and are select-
ed to complement the ride and han-
dling characteristics of your vehicle.
Radial-ply tires have the same load
carrying capacity as bias-ply or bias
belted tires of the same size and use
the same recommended inflation
pressure. Mixing of radial-ply tires
with bias-ply or bias belted tires is
not recommended. Any combina-
tions of radial-ply and bias-ply or bias
belted tires when used on the same
vehicle will seriously deteriorate
vehicle handling. The best rule to fol-
low is: identical radial-ply tires should
always be used as a set of four. Longer wearing tires can be more
susceptible to irregular tread wear. It
is very important to follow the tire
rotation interval shown in this section
to achieve the tread life potential of
these tires. Cuts and punctures in
radial-ply tires are repairable only in
the tread area, because of sidewall
flexing. Consult your tire dealer for
radial-ply tire repairs.
JFa PE USA 7.qxp 5/15/2019 3:13 PM Page 58
Page 512 of 591
759
Maintenance
Low aspect ratio tire
(if equipped)
Low aspect ratio tires, whose aspect
ratio is lower than 50, are provided
for sporty looks.
Because the low aspect ratio tires
are optimized for handling and brak-
ing, it may be more uncomfortable to
ride in and there is more noise com-
pare with normal tires. Tire damage can be difficult to
identify; therefore, in the event that
the tire is impacted it is recom-
mended to have the tire checked or
replaced to prevent potential air
leakage.
If the tire is damaged by driving on a rough road, off road, pothole,
manhole, or curb stone, it will not
be covered by the warranty.
You can find out the tire information on the tire sidewall.
CAUTION
Because the sidewall of the lowaspect ratio tire is shorter thanthe normal, the wheel and tire ofthe low aspect ratio tire is easi-er to be damaged. So, follow theinstructions below.
- When driving on a rough road or off road, drive cautiouslybecause tires and wheels maybe damaged. And after driv-ing, inspect tires and wheels.
- When passing over a pothole, speed bump, manhole, or curbstone, drive slowly so that thetires and wheels are not dam-aged.
- If the tire is impacted, we rec- ommend that you inspect thetire condition or contact anauthorized Kia dealer.
- To prevent damage to the tire, inspect the tire condition andpressure every 1,900 miles(3,000 km).
JFa PE USA 7.qxp 5/15/2019 3:14 PM Page 59
Page 513 of 591

Maintenance
60
7
FUSES
❈ Left side : Normal , Right side : Blown
A vehicle’s electrical system is pro-
tected from electrical overload dam-
age by fuses.
This vehicle has 2 (or 3) fuse panels,
one located in the driver’s side panel
bolster, the other in the engine com-
partment near the battery.
If any of your vehicle’s lights, acces-
sories, or controls do not work, check
the appropriate circuit fuse. If a fuse
has blown, the element inside the
fuse will melt.
If the electrical system does not
work, first check the driver’s side
fuse panel.
If the replacement fuse blows, this
indicates an electrical problem. Avoid
using the system involved and imme-
diately consult an authorized Kia
dealer.
Three kinds of fuses are used: blade
type for lower amperage rating, car-tridge type, and multi fuse for higheramperage ratings.
WARNING- Fuse replace-
ment
Never replace a fuse with any- thing but another fuse of the
same rating.
A higher capacity fuse could cause damage and possibly a
fire.
Never install a wire or alu- minum foil instead of the
proper fuse - even as a tem-
porary repair. It may cause
extensive wiring damage and
a possible fire.
Do not arbitrarily modify or add-on electric wiring to the
vehicle.
CAUTION
Do not use a screwdriver or anyother metal object to removefuses because it may cause ashort circuit and damage thesystem.
OJF075021
■
Blade type
■ Cartridge type
■ Multi fuse
■ BFT
JFa PE USA 7.qxp 5/15/2019 3:14 PM Page 60
Page 514 of 591

761
Maintenance
✽ ✽NOTICE
• When replacing a fuse, turn the
ignition “OFF” and turn off
switches of all electrical devices
then remove battery (-) terminal.
• The actual fuse/relay panel label may differ from equipped items.
WARNING- Electrical Fire
Always ensure replacements
fuses and relays are securely
fastened when installed. Failure
to do so can result in a vehicle
fire.
CAUTION
When replacing a blown fuse or relay, make sure the newfuse or relay fits tightly intothe clips. Failure to tightlyinstall the fuse or relay maycause damage to the wiringand electric systems.
Do not remove fuses, relays and terminals fastened withbolts or nuts. The fuses, relaysand terminals may not be fas-tened correctly which maycause vehicle damage.
CAUTION
Do not input any other objects except fuses or relays intofuse/relay terminals such as ascrewdriver or wiring. It maycause contact failure and sys-tem malfunction.
Do not plug in screwdrivers or aftermarket wiring into the ter-minal originally designed forfuse and relays only. The elec-trical system and wiring of thevehicle interior may be dam-aged or burned due to contactfailure.
If you directly connect the wire on the taillight or replacethe bulb which is over the reg-ulated capacity to install trail-ers etc., the inner junctionblock can get burned.
JFa PE USA 7.qxp 5/15/2019 3:14 PM Page 61
Page 516 of 591
763
Maintenance
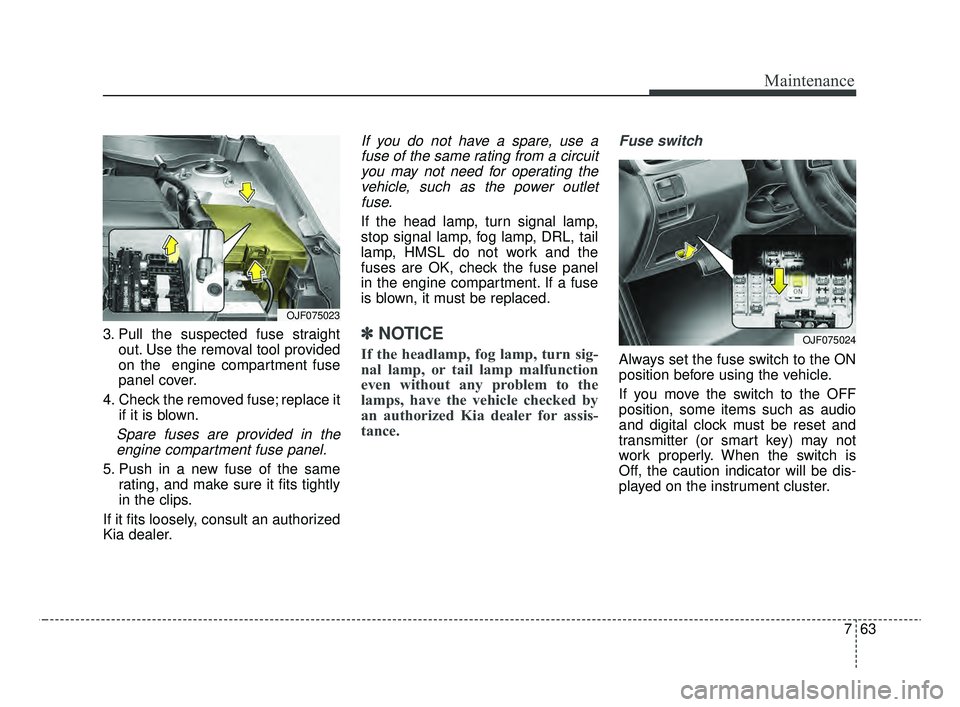
3. Pull the suspected fuse straightout. Use the removal tool provided
on the engine compartment fuse
panel cover.
4. Check the removed fuse; replace it if it is blown.
Spare fuses are provided in theengine compartment fuse panel.
5. Push in a new fuse of the same rating, and make sure it fits tightly
in the clips.
If it fits loosely, consult an authorized
Kia dealer.
If you do not have a spare, use a fuse of the same rating from a circuityou may not need for operating thevehicle, such as the power outletfuse.
If the head lamp, turn signal lamp,
stop signal lamp, fog lamp, DRL, tail
lamp, HMSL do not work and the
fuses are OK, check the fuse panel
in the engine compartment. If a fuse
is blown, it must be replaced.
✽ ✽ NOTICE
If the headlamp, fog lamp, turn sig-
nal lamp, or tail lamp malfunction
even without any problem to the
lamps, have the vehicle checked by
an authorized Kia dealer for assis-
tance.
Fuse switch
Always set the fuse switch to the ON
position before using the vehicle.
If you move the switch to the OFF
position, some items such as audio
and digital clock must be reset and
transmitter (or smart key) may not
work properly. When the switch is
Off, the caution indicator will be dis-
played on the instrument cluster.
OJF075023
OJF075024
JFa PE USA 7.qxp 5/15/2019 3:14 PM Page 63
Page 517 of 591
Maintenance
64
7
✽ ✽
NOTICE
If the vehicle is going to be unused
for over 1 month, set all switches to
OFF to prevent the batteries from
draining.
Engine compartment fuse
replacement
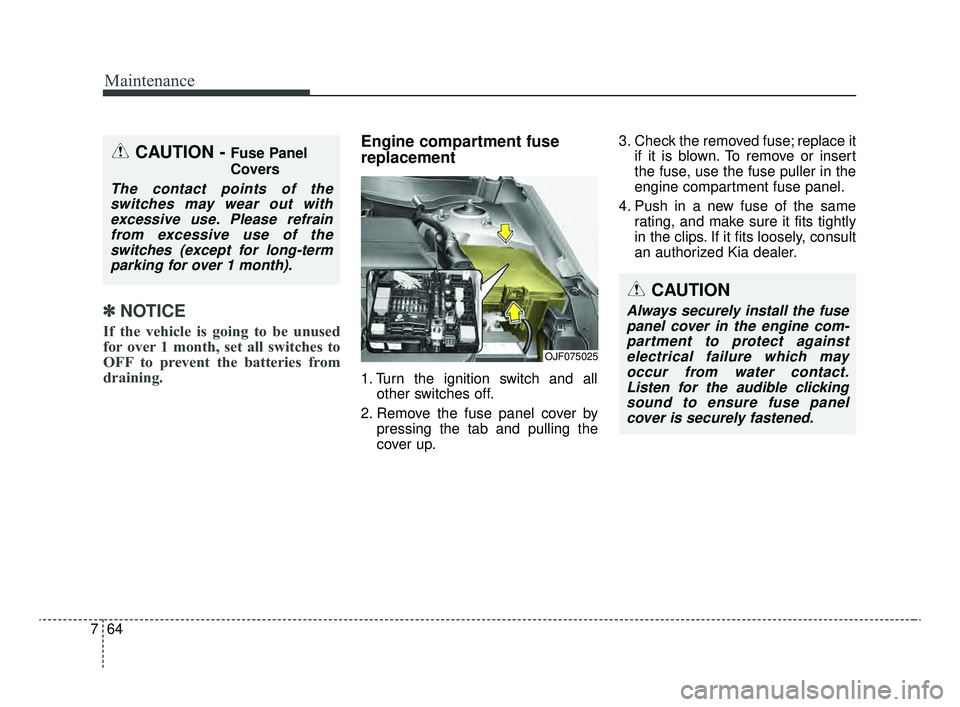
1. Turn the ignition switch and all
other switches off.
2. Remove the fuse panel cover by pressing the tab and pulling the
cover up. 3. Check the removed fuse; replace it
if it is blown. To remove or insert
the fuse, use the fuse puller in the
engine compartment fuse panel.
4. Push in a new fuse of the same rating, and make sure it fits tightly
in the clips. If it fits loosely, consult
an authorized Kia dealer.
OJF075025
CAUTION - Fuse Panel
Covers
The contact points of theswitches may wear out withexcessive use. Please refrainfrom excessive use of theswitches (except for long-termparking for over 1 month).
CAUTION
Always securely install the fusepanel cover in the engine com-partment to protect againstelectrical failure which mayoccur from water contact.Listen for the audible clickingsound to ensure fuse panelcover is securely fastened.
JFa PE USA 7.qxp 5/15/2019 3:14 PM Page 64
Page 520 of 591

767
Maintenance
Fuse NameFuse ratingCircuit Protected
MODULE 710AAround View Unit, Front Air Ventilation Seat Control Module, Front Seat Warmer Control Module, Rear Seat
Warmer Control Module
MODULE 510A
A/C Control Module, Electro Chromic Mirror, Crash Pad Switch, Head Lamp LH/RH, Auto Head Lamp
Leveling Device Module, A/V & Navigation Head Unit, Fuel Lid & Trunk Open Switch, Shift Lever Indicator,
Driver IMS Module, Driver IMS Module, Front Air Ventilation Seat Control Module, Front Seat Warmer
Control Module, Rear Seat Warmer Control Module
MODULE 610ABCM, Smart Key Control Module
A/CON10AA/C Control Module, E/R Junction Block (Blower Relay)
START10A[W/O Smart Key & IMMO.] ICM Relay Box (Burglar Alarm Relay)
[With Smart Key / IMMO.] Transmission Range Switch, PCM (G4KH/G4KJ)
A/BAG15ASRS Control Module, Passenger Occupant Detection
MODULE 310ABCM, ATM Shift Lever, Stop Lamp Switch, DBL Unit, Keyboard, A/C Control Module
MODULE 410AConsole Switch, Blind Spot Detection Radar LH/RH, Smart Cruise Control Unit, AEB Module, Lane Keeping
Assist Module
INTERIOR LAMP10ATrunk Room Lamp, Ignition Key Ill. & Door Warning Switch, Glove Box Lamp, Driver/Passenger Smart Key
Outside Handle, Front Vanity Lamp Switch LH/RH, Overhead Console Lamp, Center Room Lamp, Center
Personal Lamp, Rear Personal Lamp LH/RH, Driver/Passenger Scuff Lamp
MDPS10AMDPS Unit (Column/Rack), Steering Angle Sensor
IG125APCB Block (Fuse - TCU 2, ABS 3, ECU 3, VACUUM PUMP 2)
MODULE 910AImmobilizer Module, Smart Key Control Module
Instrument panel (Driver’s side fuse panel)
JFa PE USA 7.qxp 5/15/2019 3:14 PM Page 67