ecu KIA Optima Hybrid 2011 3.G User Guide
[x] Cancel search | Manufacturer: KIA, Model Year: 2011, Model line: Optima Hybrid, Model: KIA Optima Hybrid 2011 3.GPages: 394, PDF Size: 8.63 MB
Page 83 of 394
Features of your vehicle
12
4
DOOR LOCKS
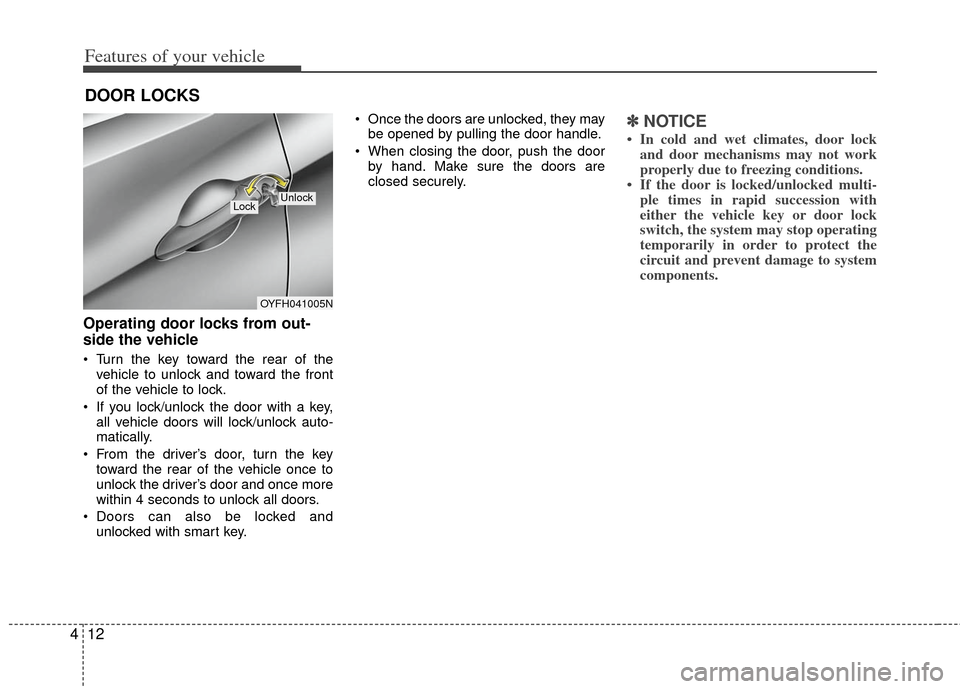
Operating door locks from out-
side the vehicle
Turn the key toward the rear of the
vehicle to unlock and toward the front
of the vehicle to lock.
If you lock/unlock the door with a key, all vehicle doors will lock/unlock auto-
matically.
From the driver’s door, turn the key toward the rear of the vehicle once to
unlock the driver’s door and once more
within 4 seconds to unlock all doors.
Doors can also be locked and unlocked with smart key. Once the doors are unlocked, they may
be opened by pulling the door handle.
When closing the door, push the door by hand. Make sure the doors are
closed securely.
✽ ✽ NOTICE
• In cold and wet climates, door lock
and door mechanisms may not work
properly due to freezing conditions.
• If the door is locked/unlocked multi- ple times in rapid succession with
either the vehicle key or door lock
switch, the system may stop operating
temporarily in order to protect the
circuit and prevent damage to system
components.
OYFH041005N
LockUnlock
Page 89 of 394
Features of your vehicle
18
4
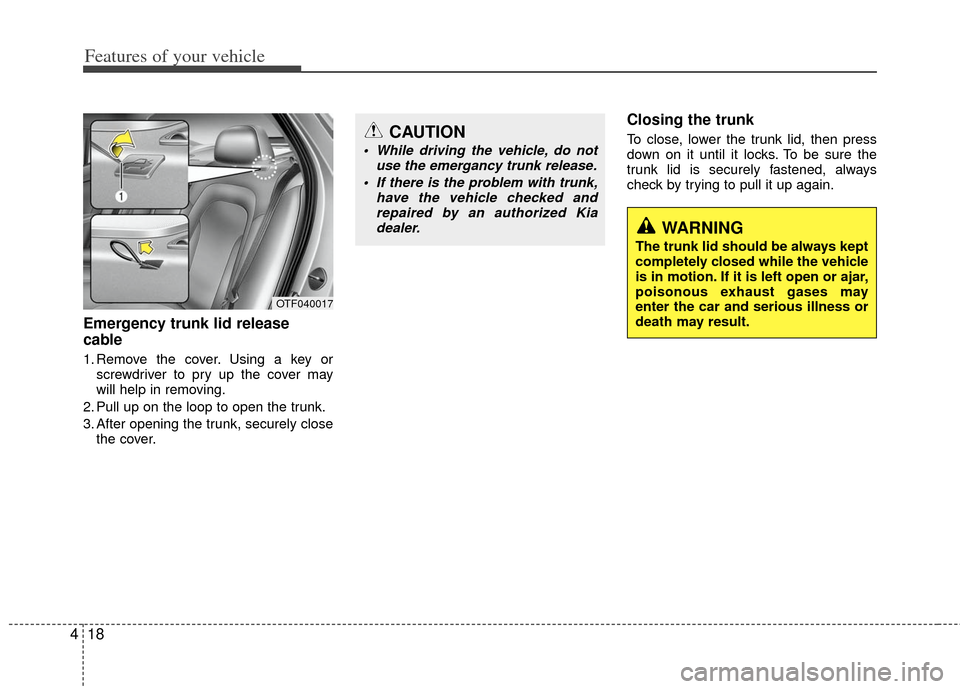
Emergency trunk lid release
cable
1. Remove the cover. Using a key or
screwdriver to pry up the cover may
will help in removing.
2. Pull up on the loop to open the trunk.
3. After opening the trunk, securely close the cover.
Closing the trunk
To close, lower the trunk lid, then press
down on it until it locks. To be sure the
trunk lid is securely fastened, always
check by trying to pull it up again.
OTF040017
CAUTION
• While driving the vehicle, do not use the emergancy trunk release.
If there is the problem with trunk, have the vehicle checked andrepaired by an authorized Kiadealer.
WARNING
The trunk lid should be always kept
completely closed while the vehicle
is in motion. If it is left open or ajar,
poisonous exhaust gases may
enter the car and serious illness or
death may result.
Page 96 of 394
425
Features of your vehicle
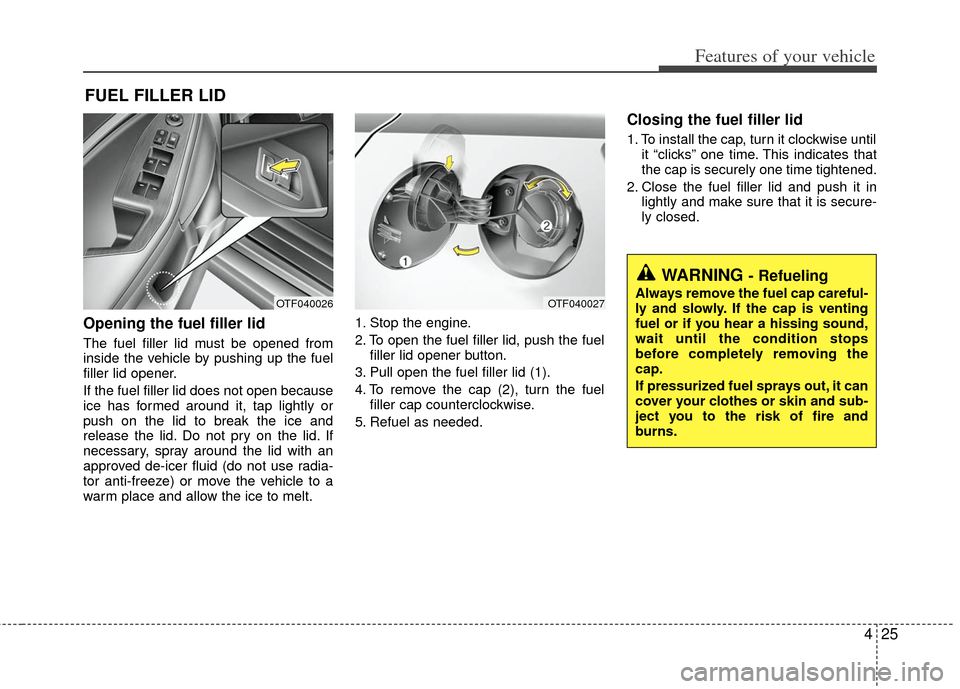
Opening the fuel filler lid
The fuel filler lid must be opened from
inside the vehicle by pushing up the fuel
filler lid opener.
If the fuel filler lid does not open because
ice has formed around it, tap lightly or
push on the lid to break the ice and
release the lid. Do not pry on the lid. If
necessary, spray around the lid with an
approved de-icer fluid (do not use radia-
tor anti-freeze) or move the vehicle to a
warm place and allow the ice to melt.1. Stop the engine.
2. To open the fuel filler lid, push the fuel
filler lid opener button.
3. Pull open the fuel filler lid (1).
4. To remove the cap (2), turn the fuel filler cap counterclockwise.
5. Refuel as needed.
Closing the fuel filler lid
1. To install the cap, turn it clockwise until it “clicks” one time. This indicates that
the cap is securely one time tightened.
2. Close the fuel filler lid and push it in lightly and make sure that it is secure-
ly closed.
FUEL FILLER LID
WARNING - Refueling
Always remove the fuel cap careful-
ly and slowly. If the cap is venting
fuel or if you hear a hissing sound,
wait until the condition stops
before completely removing the
cap.
If pressurized fuel sprays out, it can
cover your clothes or skin and sub-
ject you to the risk of fire and
burns.OTF040026OTF040027
Page 97 of 394
Features of your vehicle
26
4
Always check that the fuel cap is installed
securely to prevent fuel spillage in the
event of an accident.✽ ✽
NOTICE
When using an approved portable fuel
container, be sure to place the container
on the ground prior to refueling. Static
electricity discharge from the container
can ignite fuel vapors causing a fire.
Once refueling has begun, contact with
the vehicle should be maintained until
the filling is complete. Use only
approved portable plastic fuel contain-
ers designed to carry and store gasoline.
WARNING - Fire/explosion
risk
Read and follow all warnings post-
ed at the gas station facility. Failure
to follow all warnings will result in
severe personal injury, severe
burns or death due to fire or explo-
sion.
WARNING - Cell phonefires
Do not use cellular phones while
refueling. Electric current and/or
electronic interference from cellu-
lar phones can potentially ignite
fuel vapors causing a fire.
WARNING - Static electricity
Before touching the fuel nozzle,
you should eliminate potentially
dangerous static electricity dis-
charge by touching another metal
part of the vehicle, a safe dis-
tance away from the fuel filler
neck, nozzle, or other gas source.
Do not get back into a vehicle once you have begun refueling
since you can generate static
electricity by touching, rubbing
or sliding against any item or fab-
ric (polyester, satin, nylon, etc.)
capable of producing static elec-
tricity. Static electricity discharge
can ignite fuel vapors resulting in
rapid burning. If you must re-
enter the vehicle, you should
once again eliminate potentially
dangerous static electricity dis-
charge by touching a metal part
of the vehicle, away from the fuel
filler neck, nozzle or other gaso-
line source.
Page 98 of 394
427
Features of your vehicle
Make sure to refuel your vehicle accord-
ing to the "Fuel requirements" suggested
in section 1.
If the fuel filler cap requires replacement,
use only a genuine Kia cap or the equiv-
alent specified for your vehicle. An incor-
rect fuel filler cap can result in a serious
malfunction of the fuel system or emis-
sion control system.
CAUTION- Exterior paint
Do not spill fuel on the exterior sur-faces of the vehicle. Any type of fuelspilled on painted surfaces maydamage the paint.
WARNING - Refueling& Vehicle fires
When refueling, always shut the
engine off. Sparks produced by
electrical components related to
the engine can ignite fuel vapors
causing a fire. Once refueling is
complete, check to make sure the
filler cap and filler door are secure-
ly closed, before starting the
engine.
WARNING - Smoking
DO NOT use matches or a lighter
and DO NOT SMOKE or leave a lit
cigarette in your vehicle while at a
gas station especially during refu-
eling. Automotive fuel is highly
flammable and can, when ignited,
result in fire.
Page 111 of 394
Features of your vehicle
40
4
To adjust the Zone setting:
1. Determine the desired Zone Number
based upon your current location on
the Zone Map.
2. Press and hold the button for more than 3 but less than 6 seconds, the
current Zone Number will appear on
the display.
3. Pressing and holding the button again will cause the numbers to incre-
ment (Note: they will repeat …13, 14,
15, 1, 2, …). Releasing the button
when the desired Zone Number
appears on the display will set the new
Zone.
4. Within about 5 seconds the compass will start displaying a compass head-
ing again.
There are some conditions that can
cause changes to the vehicle magnets,
such as installing a ski rack or a CB
antenna. Body repair work on the vehicle
can also cause changes to the vehicle's
magnetic field. In these situations, the
compass will need to be re-calibrated to
quickly correct for these changes. To re-
calibrate the compass: 1. Press and hold the button for more
than 6 seconds. When the compass
memory is cleared a "C" will appear in
the display.
2. To calibrate the compass, drive the vehicle in 2 complete circles at less
than 8 km/h (5 mph).
Integrated HomeLink
®Wireless Control
System
The HomeLink® Wireless Control
System provides a convenient way to
replace up to three hand-held radio-fre-
quency (RF) transmitters with a single
built-in device. This innovative feature will
learn the radio frequency codes of most
current transmitters to operate devices
such as gate operators, garage door
openers, entry door locks, security sys-
tems, even home lighting. Both standard
and rolling code-equipped transmitters
can be programmed by following the out-
lined procedures. Additional HomeLink
®
information can be found at: www.home-
link.com or by calling 1-800-355-3515. Retain the original transmitter of the RF
device you are programming for use in
other vehicles as well as for future
HomeLink
®programming. It is also sug-
gested that upon the sale of the vehicle,
the programmed HomeLink
®buttons be
erased for security purposes.
CAUTION
Before programming HomeLink®to
a garage door opener or gate oper- ator, make sure that people and objects are out of the way of thedevice to prevent potential harm ordamage. Do not use HomeLink
®
with any garage door opener thatlacks the safety stop and reverse features required by U.S. federalsafety standards (this includes any garage door opener model manu-factured before April 1, 1982). Agarage door that cannot detect anobject - signaling the door to stop and reverse - does not meet currentU.S. federal safety standards. Using a garage door opener without thesefeatures increases the risk of seri- ous injury or death.
Page 113 of 394
Features of your vehicle
42
4
To train rolling code devices, follow these
instructions:
1. At the garage door opener receiver
(motor-head unit) in the garage, locate
the "learn" or "smart" button. This can
usually be found where the hanging
antenna wire is attached to the motor-
head unit. Exact location and color of
the button may vary by garage door
opener brand.
If there is difficulty locating the training
button, reference the device owner's
manual or please visit our Web site at
www.homelink.com.
2. Firmly press and release the "learn" or "smart" button (which activates the
"training light").
✽ ✽NOTICE
There are 30 seconds in which to initiate
step3.
3. Return to the vehicle, firmly press and
hold for two seconds the desired
HomeLink
®button then release.
Repeat the "press/hold/release"
sequence a second time to complete
the programming. (Some devices may
require you to repeat this sequence a
third time to complete the program-
ming.)
4. Press and hold the just-trained HomeLink
®button and observe the red
Status Indicator LED. If the indicator
light stays on constantly, programming
is complete and your device should
activate.
5. To program the remaining two HomeLink
®buttons, follow either steps
1 through 4 above for other Rolling
Code devices or steps 2 through 5 in
Standard Programming for standard
devices. Gate operator & Canadian program-
ming
During programming, your handheld
transmitter may automatically stop trans-
mitting. Continue to press the Integrated
HomeLink
®Wireless Control System but-
ton (note steps 2 through 4 in the
Standard Programming portion of this
document) while you press and re-press
("cycle") your handheld transmitter every
two seconds until the frequency signal
has been learned. The indicator light will
flash slowly and then rapidly after sever-
al seconds upon successful training.
Operating HomeLink
®
To operate, simply press and release the
programmed HomeLink®button.
Activation will now occur for the trained
device (i.e. garage door opener, gate
operator, security system, entry door
lock, home/office lighting, etc.). For con-
venience, the hand-held transmitter of
the device may also be used at any time.
Page 138 of 394
467
Features of your vehicle
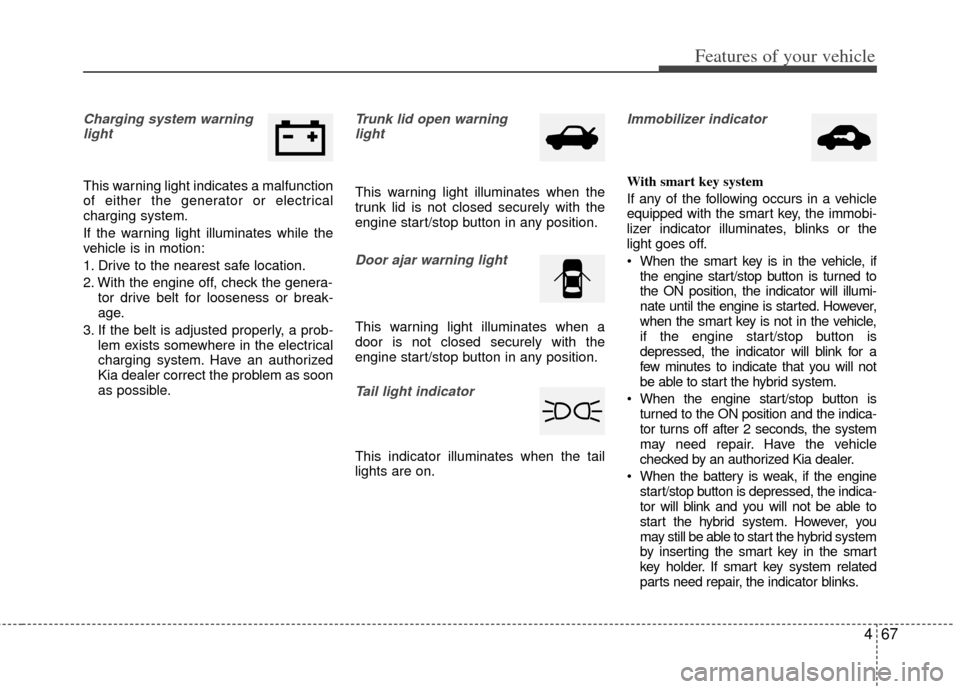
Charging system warninglight
This warning light indicates a malfunction
of either the generator or electrical
charging system.
If the warning light illuminates while the
vehicle is in motion:
1. Drive to the nearest safe location.
2. With the engine off, check the genera- tor drive belt for looseness or break-
age.
3. If the belt is adjusted properly, a prob- lem exists somewhere in the electrical
charging system. Have an authorized
Kia dealer correct the problem as soon
as possible.
Trunk lid open warninglight
This warning light illuminates when the
trunk lid is not closed securely with the
engine start/stop button in any position.
Door ajar warning light
This warning light illuminates when a
door is not closed securely with the
engine start/stop button in any position.
Tail light indicator
This indicator illuminates when the tail
lights are on.
Immobilizer indicator
With smart key system
If any of the following occurs in a vehicle
equipped with the smart key, the immobi-
lizer indicator illuminates, blinks or the
light goes off.
When the smart key is in the vehicle, if the engine start/stop button is turned to
the ON position, the indicator will illumi-
nate until the engine is started. However,
when the smart key is not in the vehicle,
if the engine start/stop button is
depressed, the indicator will blink for a
few minutes to indicate that you will not
be able to start the hybrid system.
When the engine start/stop button is turned to the ON position and the indica-
tor turns off after 2 seconds, the system
may need repair. Have the vehicle
checked by an authorized Kia dealer.
When the battery is weak, if the engine start/stop button is depressed, the indica-
tor will blink and you will not be able to
start the hybrid system. However, you
may still be able to start the hybrid system
by inserting the smart key in the smart
key holder. If smart key system related
parts need repair, the indi cator blinks.
Page 147 of 394
Features of your vehicle
76
4
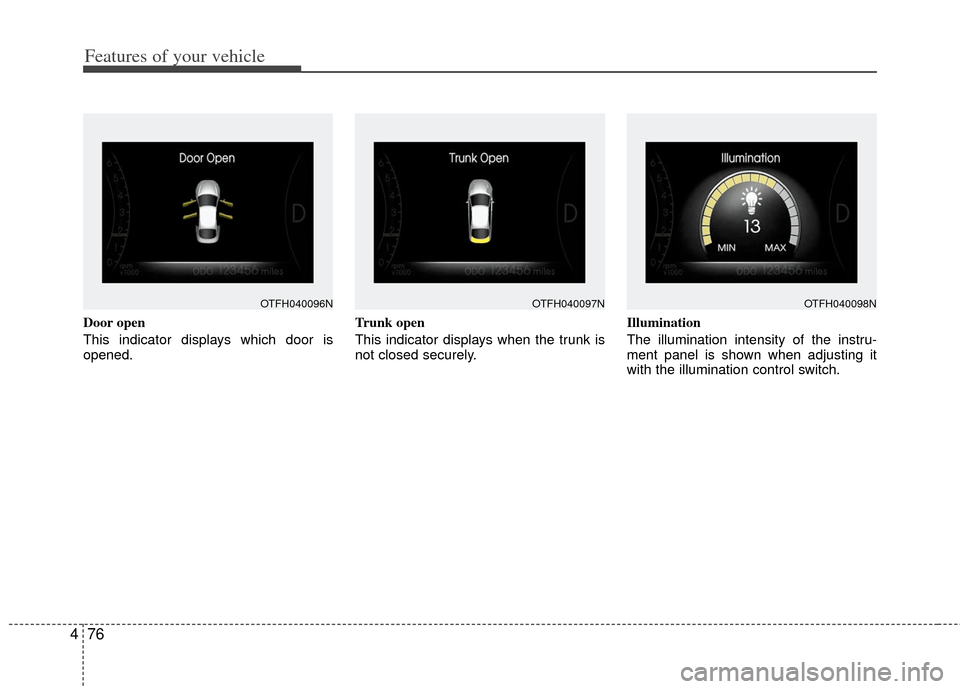
Door open
This indicator displays which door is
opened. Trunk open
This indicator displays when the trunk is
not closed securely.Illumination
The illumination intensity of the instru-
ment panel is shown when adjusting it
with the illumination control switch.
OTFH040096NOTFH040098NOTFH040097N
Page 165 of 394
Features of your vehicle
94
4
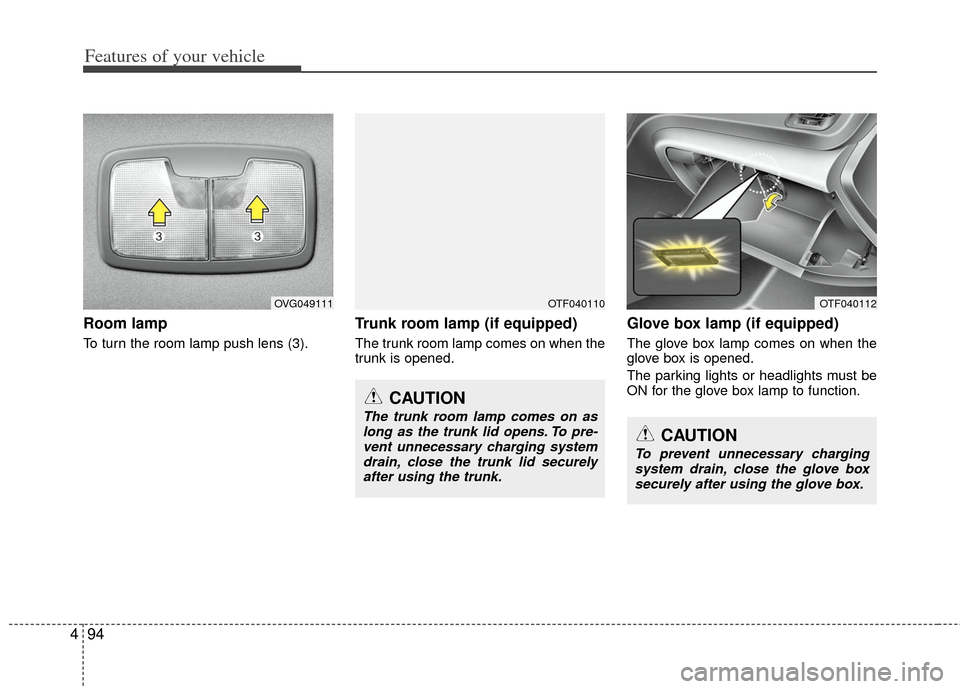
Room lamp
To turn the room lamp push lens (3).
Trunk room lamp (if equipped)
The trunk room lamp comes on when the
trunk is opened.
Glove box lamp (if equipped)
The glove box lamp comes on when the
glove box is opened.
The parking lights or headlights must be
ON for the glove box lamp to function.
OVG049111OTF040110
CAUTION
The trunk room lamp comes on as
long as the trunk lid opens. To pre- vent unnecessary charging systemdrain, close the trunk lid securelyafter using the trunk.
OTF040112
CAUTION
To prevent unnecessary chargingsystem drain, close the glove boxsecurely after using the glove box.