light KIA Optima Hybrid 2012 3.G Owners Manual
[x] Cancel search | Manufacturer: KIA, Model Year: 2012, Model line: Optima Hybrid, Model: KIA Optima Hybrid 2012 3.GPages: 394, PDF Size: 8.63 MB
Page 260 of 394
539
Driving your vehicle
Don't let your parking brake
freeze
Under some conditions your parking
brake can freeze in the engaged position.
This is most likely to happen when there
is an accumulation of snow or ice around
or near the rear brakes or if the brakes
are wet. If there is a risk the parking
brake may freeze, apply it only temporar-
ily while you put the shift lever in P (auto-
matic transaxle) or in first or reverse gear
(manual transaxle) and block the rear
wheels so the vehicle cannot roll. Then
release the parking brake.
Don't let ice and snow accumu-
late underneath
Under some conditions, snow and ice
can build up under the fenders and inter-
fere with the steering. When driving in
severe winter conditions where this may
happen, you should periodically check
underneath the car to be sure the move-
ment of the front wheels and the steering
components is not obstructed.
Carry emergency equipment
Depending on the severity of the weath-
er you should carry appropriate emer-
gency equipment. Some of the items you
may want to carry include, tow straps or
chains, flashlight, emergency flares,
sand, a shovel, jumper cables, a window
scraper, gloves, ground cloth, coveralls, a
blanket, etc.
Page 268 of 394
What to do in an emergency
26
ROAD WARNING
Hazard warning flasher
The hazard warning flasher serves as a
warning to other drivers to exercise
extreme caution when approaching,
overtaking, or passing your vehicle.It should be used whenever emergency
repairs are being made or when the vehi-
cle is stopped near the edge of a road-
way.
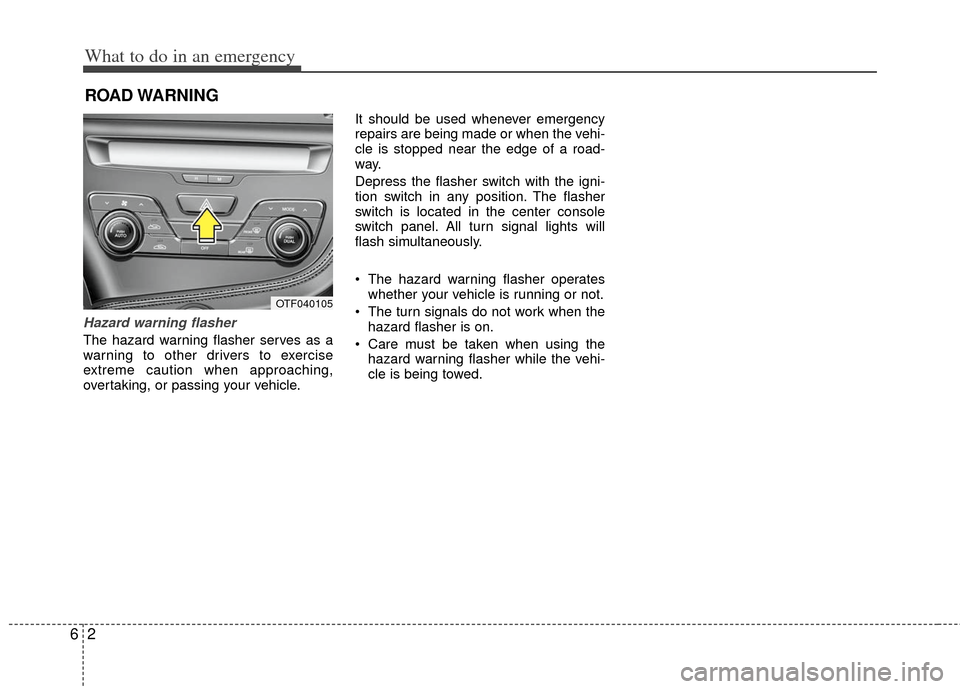
Depress the flasher switch with the igni-
tion switch in any position. The flasher
switch is located in the center console
switch panel. All turn signal lights will
flash simultaneously.
• The hazard warning flasher operates
whether your vehicle is running or not.
The turn signals do not work when the hazard flasher is on.
Care must be taken when using the hazard warning flasher while the vehi-
cle is being towed.
OTF040105
Page 270 of 394
What to do in an emergency
46
IF THE ENGINE WILL NOT START
If the engine doesn't turn over orturns over slowly
1. If your vehicle has an automatic transaxle, be sure the shift lever is in N
(Neutral) or P (Park) and the emer-
gency brake is set.
2. Check the battery connections to be sure they are clean and tight.
3. Turn on the interior light. If the light dims or goes out when you operate the
starter, the battery is discharged.
4. Check the starter connections to be sure they are securely tightened.
5. Do not push or pull the vehicle to start it. See instructions for "Jump starting".
If engine turns over normally butdoes not start
1. Check fuel level.
2. With the ignition switch in the LOCK position, check all connectors at the
ignition coil and spark plugs.
Reconnect any that may be discon-
nected or loose.
3. Check the fuel line in the engine com- partment.
4. If the engine still does not start, call an authorized Kia dealer or seek other
qualified assistance.
WARNING - Push/pull start
Do not push or pull the vehicle to
start it. Push or pull starting may
cause the catalytic converter to
overload and create a fire hazard.
Page 278 of 394
What to do in an emergency
12
6
You may not be able identify a low
tire by simply looking at it. Always
use a good quality tire pressure
gauge to measure the tire's inflation
pressure. Please note that a tire that
is hot (from being driven) will have a
higher pressure measurement than a
tire that is cold.
A cold tire means the vehicle has
been sitting for 3 hours and driven for
less than 1.6 km (1 mile) in that 3
hour period.
Allow the tire to cool before measur-
ing the inflation pressure. Always be
sure the tire is cold before inflating to
the recommended pressure.
The TPMS cannot alert you to severe
and sudden tire damage caused by
external factors such as nails or road
debris.
If you feel any vehicle instability,
immediately take your foot off the
accelerator, apply the brakes gradu-
ally and with light force, and slowly
move to a safe position off the road.✽ ✽
NOTICE
Tampering with, modifying, or dis-
abling the Tire Pressure Monitoring
System (TPMS) components may
interfere with the system's ability to
warn the driver of low tire pressure
conditions and/or TPMS malfunc-
tions. Tampering with, modifying,
or disabling the Tire Pressure
Monitoring System (TPMS) compo-
nents may void the warranty for
that portion of the vehicle.
This Device complies with
Industry Canada Standards RSS-210.
Operation is subject to the following
two conditions:
1.This device may not cause harmful interference, and
2.This device must accept any inter- ference received, including inter-
ference that may cause undesired
operation.
Page 282 of 394
What to do in an emergency
16
6
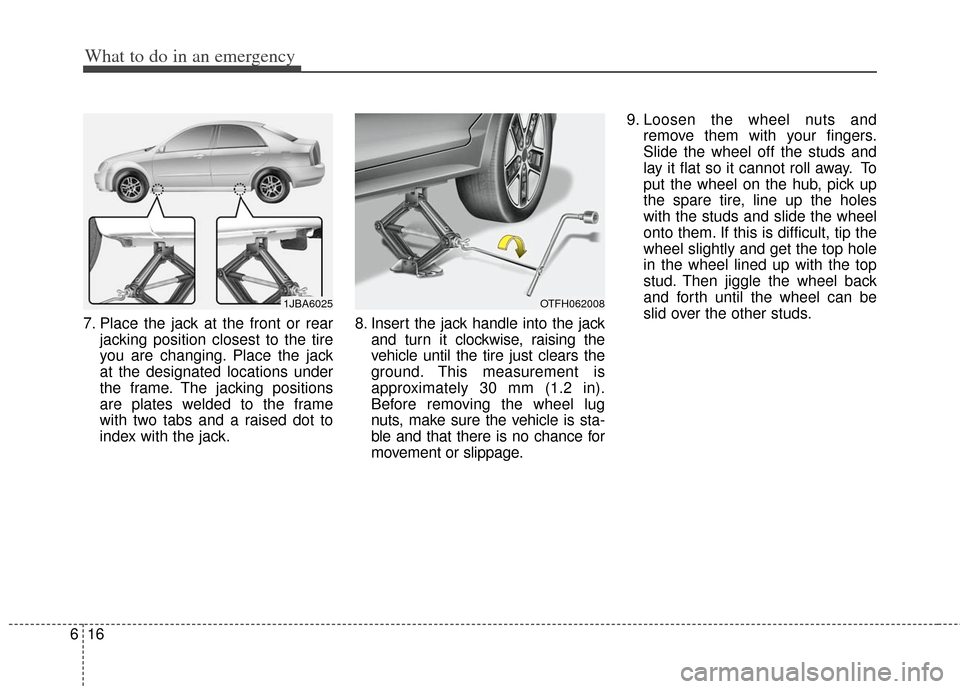
7. Place the jack at the front or rear
jacking position closest to the tire
you are changing. Place the jack
at the designated locations under
the frame. The jacking positions
are plates welded to the frame
with two tabs and a raised dot to
index with the jack. 8. Insert the jack handle into the jack
and turn it clockwise, raising the
vehicle until the tire just clears the
ground. This measurement is
approximately 30 mm (1.2 in).
Before removing the wheel lug
nuts, make sure the vehicle is sta-
ble and that there is no chance for
movement or slippage. 9. Loosen the wheel nuts and
remove them with your fingers.
Slide the wheel off the studs and
lay it flat so it cannot roll away. To
put the wheel on the hub, pick up
the spare tire, line up the holes
with the studs and slide the wheel
onto them. If this is difficult, tip the
wheel slightly and get the top hole
in the wheel lined up with the top
stud. Then jiggle the wheel back
and forth until the wheel can be
slid over the other studs.
1JBA6025OTFH062008
Page 298 of 394
75
Maintenance
OWNER MAINTENANCE
The following lists are vehicle checks and
inspections that should be performed by
the owner or an authorized Kia dealer at
the frequencies indicated to help ensure
safe, dependable operation of your vehi-
cle.
Any adverse conditions should be
brought to the attention of your dealer as
soon as possible.
These Owner Maintenance Checks are
generally not covered by warranties and
you may be charged for labor, parts and
lubricants used.Owner maintenance schedule
When you stop for fuel:
Check the engine oil level.
Check the coolant level in coolantreservoir.
Check the windshield washer fluid level.
Look for low or under-inflated tires.
While operating your vehicle:
Note any changes in the sound of the exhaust or any smell of exhaust fumes
in the vehicle.
Check for vibrations in the steering wheel. Notice any increased steering
effort or looseness in the steering
wheel, or change in its straight-ahead
position.
Notice if your vehicle constantly turns slightly or “pulls” to one side when trav-
eling on smooth, level road.
When stopping, listen and check for unusual sounds, pulling to one side,
increased brake pedal travel or “hard-
to-push” brake pedal.
If any slipping or changes in the oper- ation of your transaxle occurs, check
the transaxle fluid level.
Check the automatic transaxle P (Park) function.
Check the parking brake.
Check for fluid leaks under your vehicle (water dripping from the air condition-
ing system during or after use is nor-
mal).
Check inverter coolant.
WARNING - Hot coolant
Be careful when checking your
engine or inverter coolant level
when the engine is hot. Scalding
hot coolant and steam may blow
out under pressure.
Page 299 of 394
Maintenance
67
At least monthly:
Check the coolant level in the enginecoolant reservoir.
Check the operation of all exterior lights, including the stoplights, turn sig-
nals and hazard warning flashers.
Check the inflation pressures of all tires including the spare.
At least twice a year (i.e., every Spring and Fall) :
Check the radiator, heater and air con- ditioning hoses for leaks or damage.
Check the windshield washer spray and wiper operation. Clean the wiper
blades with clean cloth dampened with
washer fluid.
Check the headlight alignment.
Check the muffler, exhaust pipes, shields and clamps.
Check the lap/shoulder belts for wear and function.
Check for worn tires and loose wheel lug nuts.
At least once a year :
Clean the body and door drain holes.
Lubricate the door hinges and checks,and hood hinges.
Lubricate the door and hood locks and latches.
Lubricate the door rubber weather- strips.
Check the air conditioning system.
Check the power steering fluid level.
Inspect and lubricate automatic transaxle linkage and controls.
Clean the battery and terminals.
Check the brake fluid level.
Check the drive belt.
Page 330 of 394
737
Maintenance
Battery recharging
Your vehicle has a maintenance-free,
calcium-based battery.
If the battery becomes discharged in ashort time (because, for example, the
headlights or interior lights were left on
while the vehicle was not in use),
recharge it by slow charging (trickle)
for 10 hours.
If the battery gradually discharges because of high electric load while the
vehicle is being used, recharge it at 20-
30A for two hours. When recharging the battery, observe
the following precautions:
The battery must be removed from the
vehicle and placed in an area with
good ventilation.
Watch the battery during charging, and stop or reduce the charging rate if the
battery cells begin gassing (boiling)
violently or if the temperature of the
electrolyte of any cell exceeds 49°C
(120°F).
Wear eye protection when checking the battery during charging.
Disconnect the battery charger in the following order.
1. Turn off the battery charger main switch.
2. Unhook the negative clamp from the negative battery terminal.
3. Unhook the positive clamp from the positive battery terminal.
Before performing maintenance or recharging the battery, turn off all
accessories and stop the engine.
The negative battery cable must be removed first and installed last when
the battery is disconnected.
Reset items
Items should be reset after the battery
has been discharged or the battery has
been disconnected.
Auto down window (See section 4)
Sunroof (See section 4)
Trip computer (See section 4)
Climate control system (See section 4)
Clock (See section 4)
Audio (See section 4)
Page 336 of 394
743
Maintenance
Wheel replacement
When replacing the metal wheels for
any reason, make sure the new
wheels are equivalent to the original
factory units in diameter, rim width
and offset.
A wheel that is not the correct size
may adversely affect wheel and
bearing life, braking and stopping
abilities, handling characteristics,
ground clearance, body-to-tire clear-
ance, snow chain clearance,
speedometer and odometer calibra-
tion, headlight aim and bumper
height.
Tire traction
Tire traction can be reduced if you
drive on worn tires, tires that are
improperly inflated or on slippery
road surfaces. Tires should be
replaced when tread wear indicators
appear. Slow down whenever there
is rain, snow or ice on the road, to
reduce the possibility of losing con-
trol of the vehicle.
Tire maintenance
In addition to proper inflation, correct
wheel alignment helps to decrease
tire wear. If you find a tire is worn
unevenly, have your dealer check the
wheel alignment.
When you have new tires installed,
make sure they are balanced. This
will increase vehicle ride comfort and
tire life. Additionally, a tire should
always be rebalanced if it is removed
from the wheel.Tire sidewall labeling
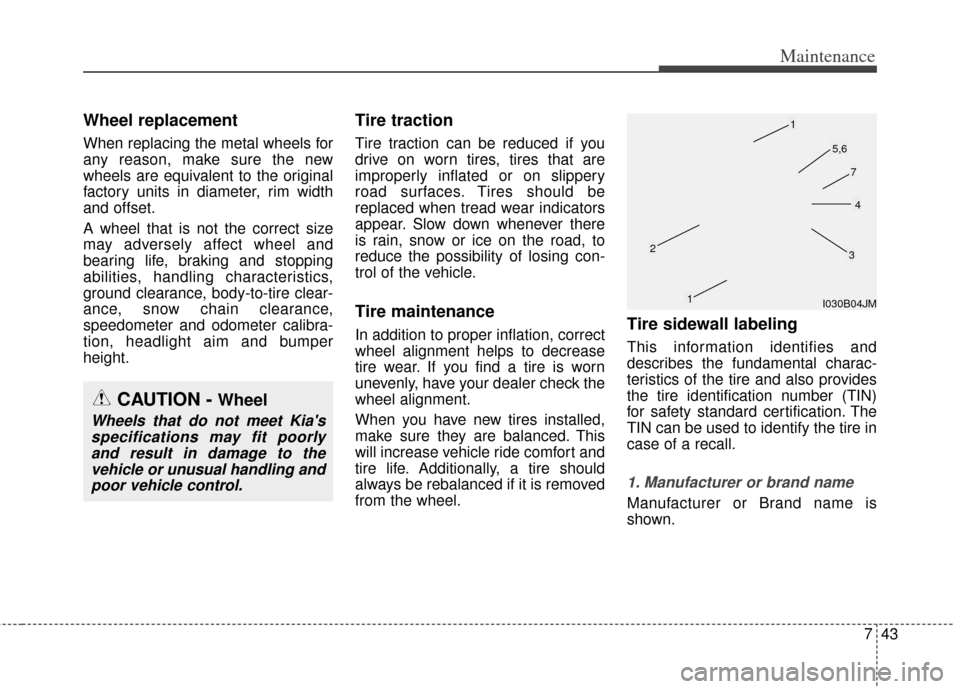
This information identifies and
describes the fundamental charac-
teristics of the tire and also provides
the tire identification number (TIN)
for safety standard certification. The
TIN can be used to identify the tire in
case of a recall.
1. Manufacturer or brand name
Manufacturer or Brand name is
shown.
CAUTION - Wheel
Wheels that do not meet Kia'sspecifications may fit poorlyand result in damage to thevehicle or unusual handling andpoor vehicle control.
I030B04JM
1
1
23
4
5,6
7
Page 337 of 394
Maintenance
44
7
2. Tire size designation
A tire’s sidewall is marked with a tire
size designation. You will need this
information when selecting replace-
ment tires for your car. The following
explains what the letters and num-
bers in the tire size designation
mean.
Example tire size designation:
(These numbers are provided as an
example only; your tire size designa-
tor could vary depending on your
vehicle.)
P205/65R16 94H
P - Applicable vehicle type (tires
marked with the prefix “P’’ are
intended for use on passenger
vehicles or light trucks; however,
not all tires have this marking).
205 - Tire width in millimeters.
65 - Aspect ratio. The tire’s section height as a percentage of its
width.
R - Tire construction code (Radial).
16 - Rim diameter in inches. 94 - Load Index, a numerical code
associated with the maximum
load the tire can carry.
H - Speed Rating Symbol. See the speed rating chart in this section
for additional information.
Wheel size designation
Wheels are also marked with impor-
tant information that you need if you
ever have to replace one. The follow-
ing explains what the letters and
numbers in the wheel size designa-
tion mean.
Example wheel size designation:
6.5JX16
6.5 - Rim width in inches.
J - Rim contour designation.
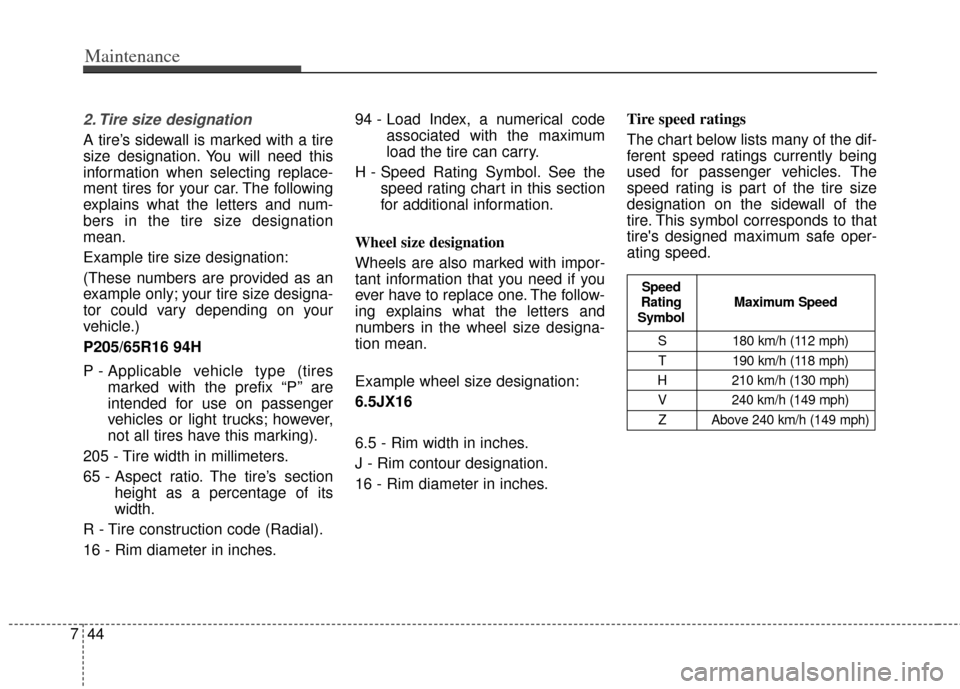
16 - Rim diameter in inches. Tire speed ratings
The chart below lists many of the dif-
ferent speed ratings currently being
used for passenger vehicles. The
speed rating is part of the tire size
designation on the sidewall of the
tire. This symbol corresponds to that
tire's designed maximum safe oper-
ating speed.
S 180 km/h (112 mph)
T 190 km/h (118 mph)
H 210 km/h (130 mph) V 240 km/h (149 mph)Z Above 240 km/h (149 mph)
Maximum Speed
Speed
Rating
Symbol