light KIA Optima Hybrid 2012 3.G Repair Manual
[x] Cancel search | Manufacturer: KIA, Model Year: 2012, Model line: Optima Hybrid, Model: KIA Optima Hybrid 2012 3.GPages: 394, PDF Size: 8.63 MB
Page 160 of 394
489
Features of your vehicle
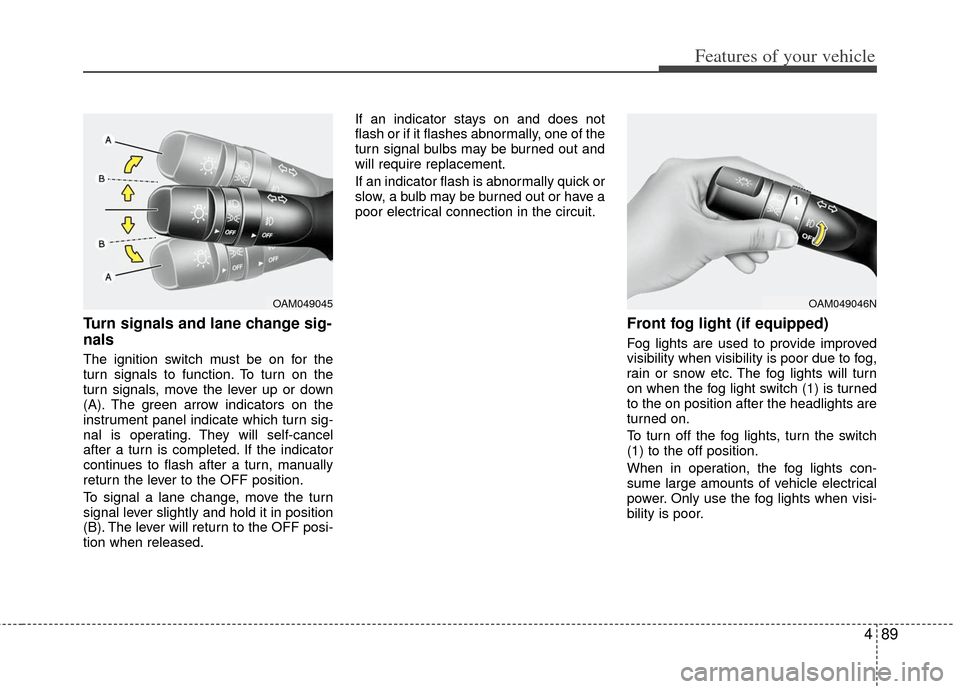
Turn signals and lane change sig-
nals
The ignition switch must be on for the
turn signals to function. To turn on the
turn signals, move the lever up or down
(A). The green arrow indicators on the
instrument panel indicate which turn sig-
nal is operating. They will self-cancel
after a turn is completed. If the indicator
continues to flash after a turn, manually
return the lever to the OFF position.
To signal a lane change, move the turn
signal lever slightly and hold it in position
(B). The lever will return to the OFF posi-
tion when released.If an indicator stays on and does not
flash or if it flashes abnormally, one of the
turn signal bulbs may be burned out and
will require replacement.
If an indicator flash is abnormally quick or
slow, a bulb may be burned out or have a
poor electrical connection in the circuit.
Front fog light (if equipped)
Fog lights are used to provide improved
visibility when visibility is poor due to fog,
rain or snow etc. The fog lights will turn
on when the fog light switch (1) is turned
to the on position after the headlights are
turned on.
To turn off the fog lights, turn the switch
(1) to the off position.
When in operation, the fog lights con-
sume large amounts of vehicle electrical
power. Only use the fog lights when visi-
bility is poor.
OAM049046NOAM049045
Page 161 of 394

Features of your vehicle
90
4
A : Wiper speed control (front)
· HI – High wiper speed
· LO – Low wiper speed
· INT – Intermittent wipe
· AUTO* – Automatic control wipe
· OFF – Off
· MIST – Single wipe
B : Intermittent control wipe time adjustment
C : Wash with brief wipes (front)
* : if equipped
Windshield wipers
Operates as follows when the ignition
switch is turned ON.
MIST : For a single wiping cycle, move the lever upward and release it. The
wipers will operate continuously if
the lever is held in this position.
OFF : Wiper is not in operation
INT : Wiper operates intermittently at the same wiping intervals. Use this
mode in a light rain or mist. To vary
the speed setting, turn the speed
control knob.
LO : Normal wiper speed
HI : Fast wiper speed
If there is heavy accumulation of snow or
ice on the windshield, defrost the wind-
shield for about 10 minutes, or until the
snow and/or ice is removed before using
the windshield wipers to ensure proper
operation.
AUTO (Automatic) control (if equipped)
The rain sensor located on the upper end
of the windshield glass senses the
amount of rainfall and controls the wiping
cycle for the proper interval. The more it
rains, the faster the wiper operates. When
the rain stops, the wiper stops.
WIPERS AND WASHERS
OAM049100L
Front
OYF049103
Rain sensor
Page 164 of 394
493
Features of your vehicle
Do not use the interior lights for extended
periods when the engine is not running.
It may cause battery discharge.
Automatic turn off function
(if equipped)
The interior lights automatically turn off
approximately 20 minutes after the igni-
tion switch is turned off.
If your vehicle is equipped with the theft
alarm system, the interior lights automat-
ically turns off approximately 3 seconds
after the system is armed stage.
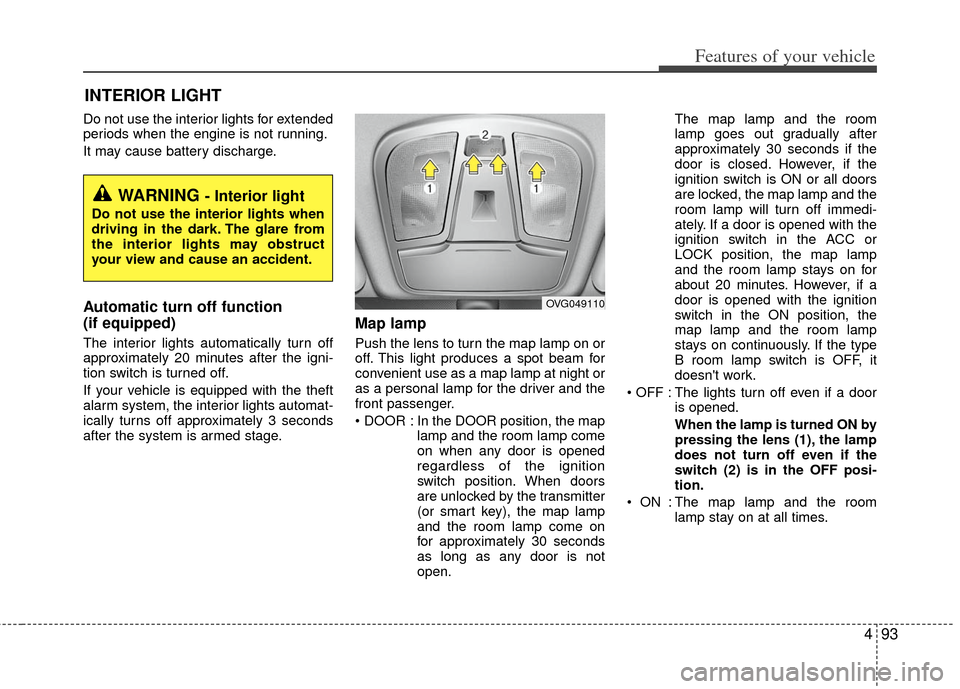
Map lamp
Push the lens to turn the map lamp on or
off. This light produces a spot beam for
convenient use as a map lamp at night or
as a personal lamp for the driver and the
front passenger.
In the DOOR position, the maplamp and the room lamp come
on when any door is opened
regardless of the ignition
switch position. When doors
are unlocked by the transmitter
(or smart key), the map lamp
and the room lamp come on
for approximately 30 seconds
as long as any door is not
open. The map lamp and the room
lamp goes out gradually after
approximately 30 seconds if the
door is closed. However, if the
ignition switch is ON or all doors
are locked, the map lamp and the
room lamp will turn off immedi-
ately. If a door is opened with the
ignition switch in the ACC or
LOCK position, the map lamp
and the room lamp stays on for
about 20 minutes. However, if a
door is opened with the ignition
switch in the ON position, the
map lamp and the room lamp
stays on continuously. If the type
B room lamp switch is OFF, it
doesn't work.
: The lights turn off even if a door is opened.
When the lamp is turned ON by
pressing the lens (1), the lamp
does not turn off even if the
switch (2) is in the OFF posi-
tion.
: The map lamp and the room lamp stay on at all times.
INTERIOR LIGHT
WARNING - Interior light
Do not use the interior lights when
driving in the dark. The glare from
the interior lights may obstruct
your view and cause an accident.
OVG049110
Page 165 of 394
Features of your vehicle
94
4
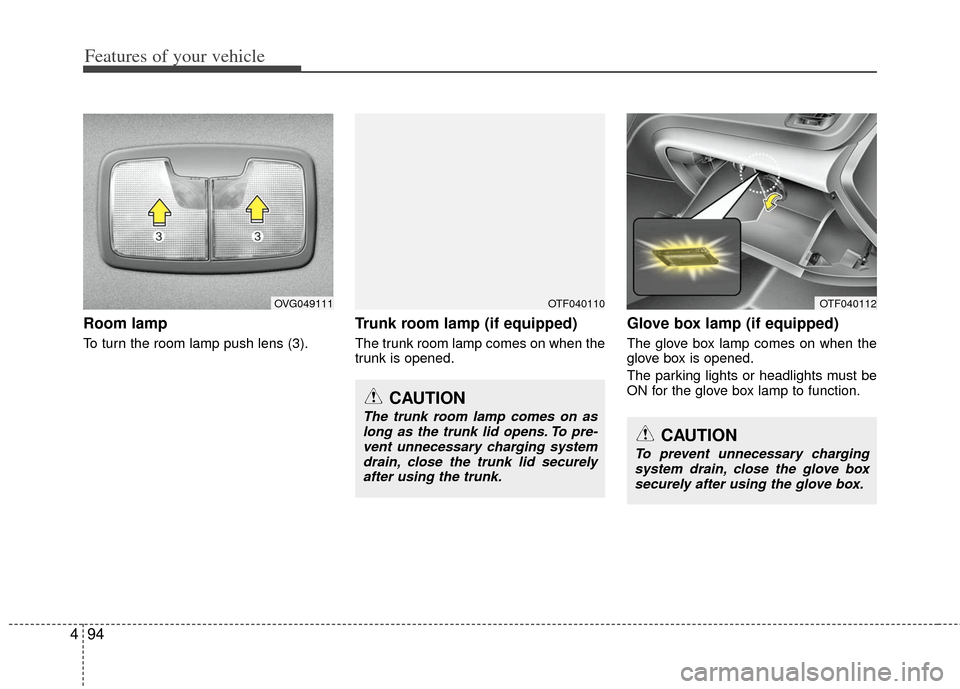
Room lamp
To turn the room lamp push lens (3).
Trunk room lamp (if equipped)
The trunk room lamp comes on when the
trunk is opened.
Glove box lamp (if equipped)
The glove box lamp comes on when the
glove box is opened.
The parking lights or headlights must be
ON for the glove box lamp to function.
OVG049111OTF040110
CAUTION
The trunk room lamp comes on as
long as the trunk lid opens. To pre- vent unnecessary charging systemdrain, close the trunk lid securelyafter using the trunk.
OTF040112
CAUTION
To prevent unnecessary chargingsystem drain, close the glove boxsecurely after using the glove box.
Page 166 of 394
495
Features of your vehicle
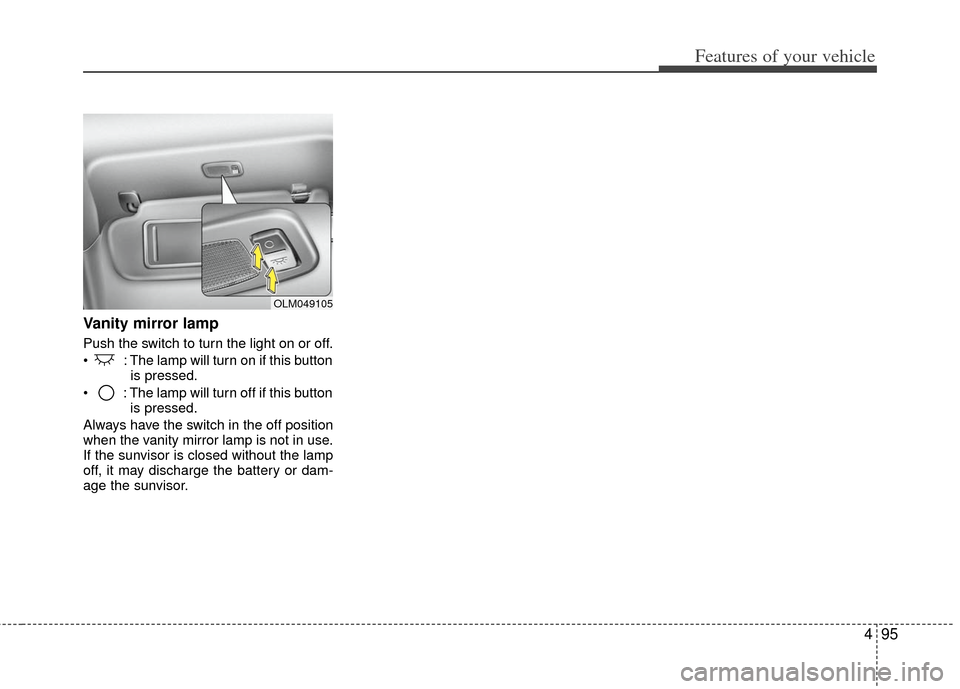
Vanity mirror lamp
Push the switch to turn the light on or off.
: The lamp will turn on if this buttonis pressed.
: The lamp will turn off if this button is pressed.
Always have the switch in the off position
when the vanity mirror lamp is not in use.
If the sunvisor is closed without the lamp
off, it may discharge the battery or dam-
age the sunvisor.
OLM049105
Page 174 of 394
4103
Features of your vehicle
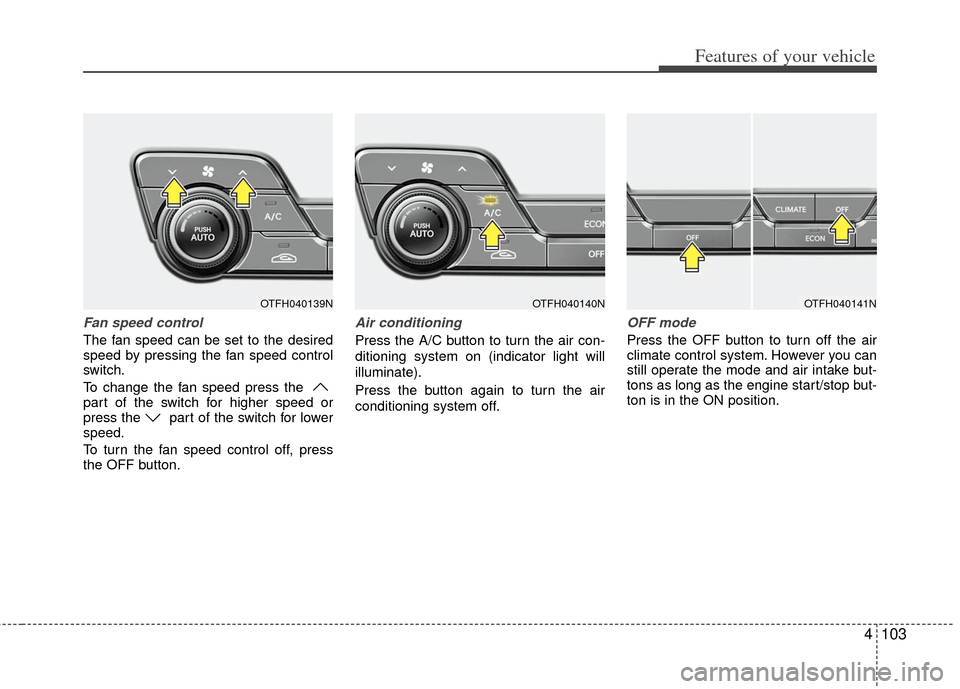
Fan speed control
The fan speed can be set to the desired
speed by pressing the fan speed control
switch.
To change the fan speed press the
part of the switch for higher speed or
press the part of the switch for lower
speed.
To turn the fan speed control off, press
the OFF button.
Air conditioning
Press the A/C button to turn the air con-
ditioning system on (indicator light will
illuminate).
Press the button again to turn the air
conditioning system off.
OFF mode
Press the OFF button to turn off the air
climate control system. However you can
still operate the mode and air intake but-
tons as long as the engine start/stop but-
ton is in the ON position.
OTFH040140NOTFH040139NOTFH040141N
Page 177 of 394
Features of your vehicle
106
4
Air conditioning system operation tips
If the vehicle has been parked in direct
sunlight during hot weather, open the
windows for a short time to let the hot
air inside the vehicle escape.
To help reduce moisture inside of the windows on rainy or humid days,
decrease the humidity inside the vehi-
cle by operating the air conditioning
system.
During air conditioning system opera- tion, you may occasionally notice a
slight change in engine speed as the
air conditioning compressor cycles.
This is a normal system operation
characteristic.
Use the air conditioning system every month only for a few minutes to ensure
maximum system performance.
When using the air conditioning sys- tem, you may notice clear water drip-
ping (or even puddling) on the ground
under the passenger side of the vehi-
cle. This is a normal system operation
characteristic. Operating the air conditioning system
in the recirculated air position provides
maximum cooling, however, continual
operation in this mode may cause the
air inside the vehicle to become stale.
During cooling operation, you may occasionally notice a misty air flow
because of rapid cooling and humid air
intake. This is a normal system opera-
tion characteristic.
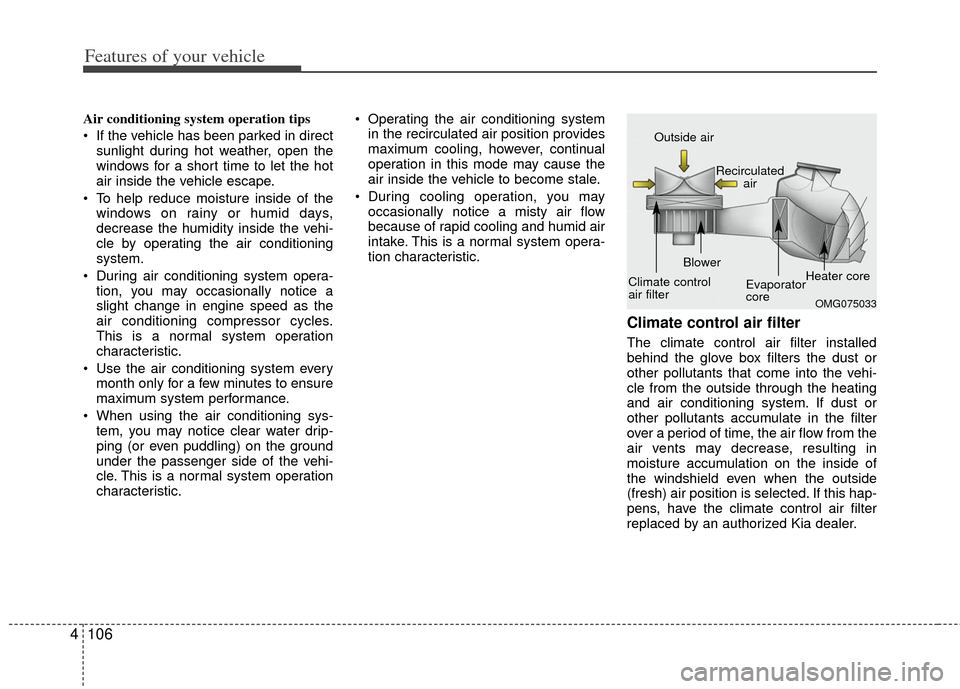
Climate control air filter
The climate control air filter installed
behind the glove box filters the dust or
other pollutants that come into the vehi-
cle from the outside through the heating
and air conditioning system. If dust or
other pollutants accumulate in the filter
over a period of time, the air flow from the
air vents may decrease, resulting in
moisture accumulation on the inside of
the windshield even when the outside
(fresh) air position is selected. If this hap-
pens, have the climate control air filter
replaced by an authorized Kia dealer.
OMG075033
Outside air
Recirculatedair
Climate control
air filter Blower
Evaporator
coreHeater core
Page 184 of 394
4113
Features of your vehicle
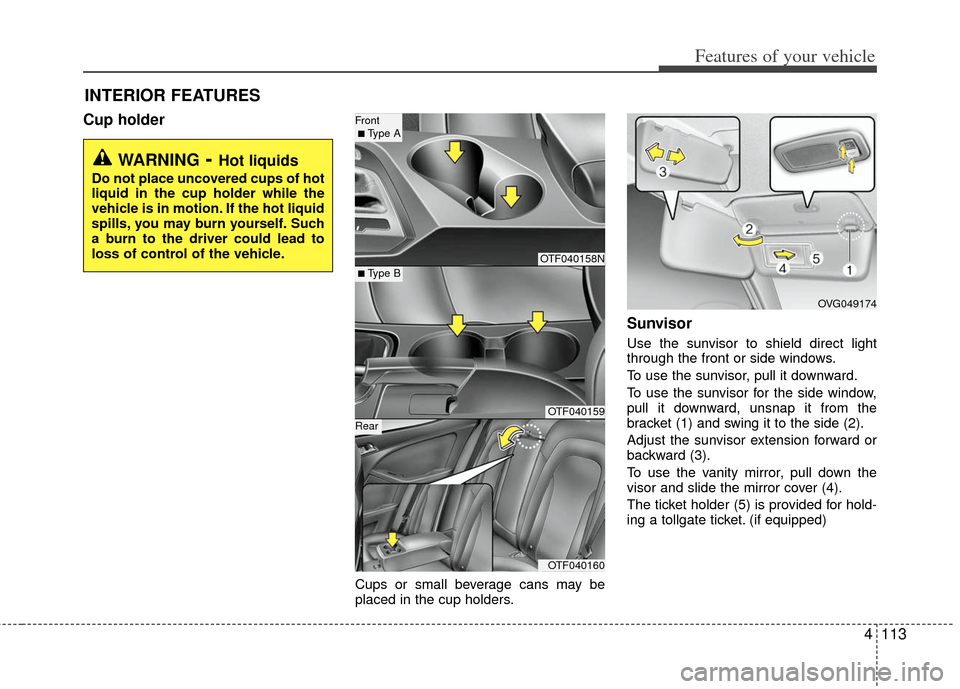
Cup holder
Cups or small beverage cans may be
placed in the cup holders.
Sunvisor
Use the sunvisor to shield direct light
through the front or side windows.
To use the sunvisor, pull it downward.
To use the sunvisor for the side window,
pull it downward, unsnap it from the
bracket (1) and swing it to the side (2).
Adjust the sunvisor extension forward or
backward (3).
To use the vanity mirror, pull down the
visor and slide the mirror cover (4).
The ticket holder (5) is provided for hold-
ing a tollgate ticket. (if equipped)
INTERIOR FEATURES
WARNING- Hot liquids
Do not place uncovered cups of hot
liquid in the cup holder while the
vehicle is in motion. If the hot liquid
spills, you may burn yourself. Such
a burn to the driver could lead to
loss of control of the vehicle.
OTF040158N
OTF040159
OTF040160
■ Type B
Front ■ Type A
Rear
OVG049174
Page 209 of 394
Features of your vehicle
138
4
Using SIRIUS Satellite Radio
Your Kia vehicle is equipped with a 3
month complimentary period of SIRIUS
Satellite Radio so you have access to
over 130 channels of music, information,
and entertainment programming.
Activation
In order to extend or reactivate your sub-
scription to SIRIUS Satellite Radio, you
will need to contact SIRIUS Customer
Care at 1-888-539-7474. Have your 12
digit SID (Sirius Identification Number)/ESN
(Electronic Serial Number) ready. To retrieve
the SID/ESN, turn on the radio, press the
[SAT] button, and tune to channel zero. Please note that the vehicle will need to
be turned on, in Sirius mode, and have
an unobstructed view of the sky in order
for the radio to receive the activation sig-
nal.
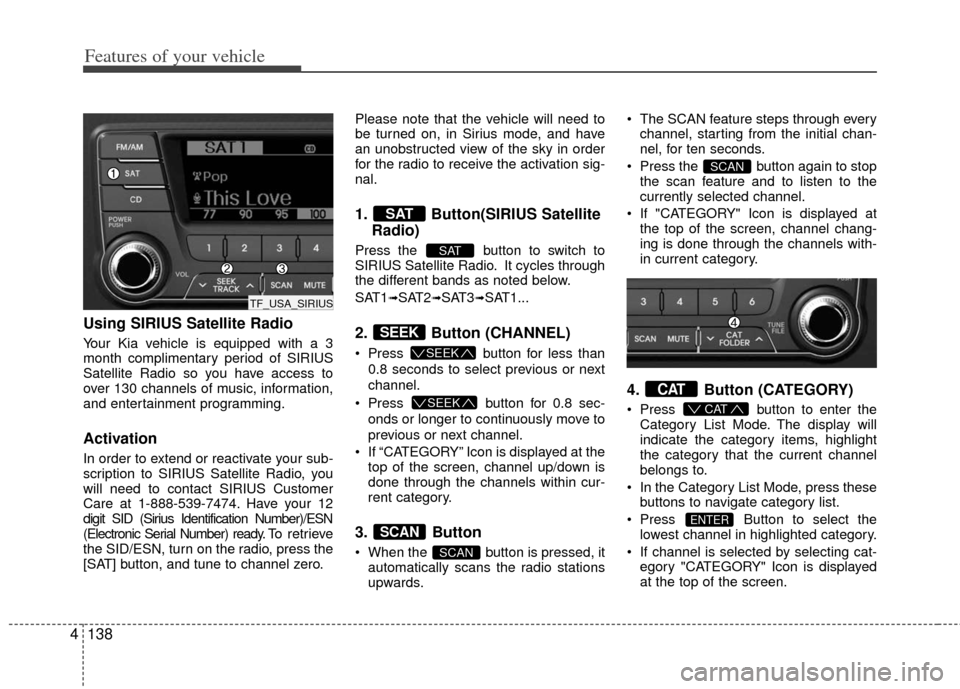
1. Button(SIRIUS Satellite
Radio)
Press the button to switch to
SIRIUS Satellite Radio. It cycles through
the different bands as noted below.
SAT1
➟SAT2➟SAT3➟SAT1...
2. Button (CHANNEL)
Press button for less than
0.8 seconds to select previous or next
channel.
Press button for 0.8 sec-
onds or longer to continuously move to
previous or next channel.
If “CATEGORY” Icon is displayed at the top of the screen, channel up/down is
done through the channels within cur-
rent category.
3. Button
When the button is pressed, itautomatically scans the radio stations
upwards. The SCAN feature steps through every
channel, starting from the initial chan-
nel, for ten seconds.
Press the button again to stop the scan feature and to listen to the
currently selected channel.
If "CATEGORY" Icon is displayed at the top of the screen, channel chang-
ing is done through the channels with-
in current category.
4. Button (CATEGORY)
Press button to enter the
Category List Mode. The display will
indicate the category items, highlight
the category that the current channel
belongs to.
In the Category List Mode, press these buttons to navigate category list.
Press Button to select the lowest channel in highlighted category.
If channel is selected by selecting cat- egory "CATEGORY" Icon is displayed
at the top of the screen.
ENTER
CAT
CAT
SCAN
SCAN
SCAN
SEEK
SEEK
SEEK
SAT
SAT
TF_USA_SIRIUS
Page 224 of 394
53
Driving your vehicle
Before entering vehicle
• Be sure that all windows, outside mir-ror(s), and outside lights are clean.
Check the condition of the tires.
Check under the vehicle for any sign of leaks.
Be sure there are no obstacles behind you if you intend to back up.
Necessary inspections
Fluid levels, such as engine oil, engine
coolant, brake fluid, and washer fluid
should be checked on a regular basis,
with the exact interval depending on the
fluid. Further details are provided in
Section 7, “Maintenance”.
Before starting
Close and lock all doors.
Position the seat so that all controls areeasily reached.
Buckle your seat belt.
Adjust the inside and outside rearview mirrors.
Be sure that all lights work.
Check all gauges.
Check the operation of warning lights when the ignition switch is turned to
the ON position.
Release the parking brake and make sure the brake warning light goes out.
For safe operation, be sure you are famil-
iar with your vehicle and its equipment.
BEFORE DRIVING
WARNING - Distracted
driving
Focus on the road while driving.
The driver's primary responsibility
is in the safe and legal operation of
the vehicle. Use of any handled
devices, other equipment or vehicle
systems that distract the drive
should not be used during vehicle
operation.
WARNING - Check
surrounding
Always check the surrounding
areas near your vehicle for people,
especially children, before putting a
vehicle into D (Drive) or R
(Reverse).