engine KIA Optima Hybrid 2016 4.G Owner's Manual
[x] Cancel search | Manufacturer: KIA, Model Year: 2016, Model line: Optima Hybrid, Model: KIA Optima Hybrid 2016 4.GPages: 466, PDF Size: 14.92 MB
Page 322 of 466
69
What to do in an emergency
Do not allow anyone to remain in the
vehicle while it is on the jack.
Make sure any children present are
in a secure place away from the road
and from the vehicle to be raised with
the jack.Removing and storing the
spare tire
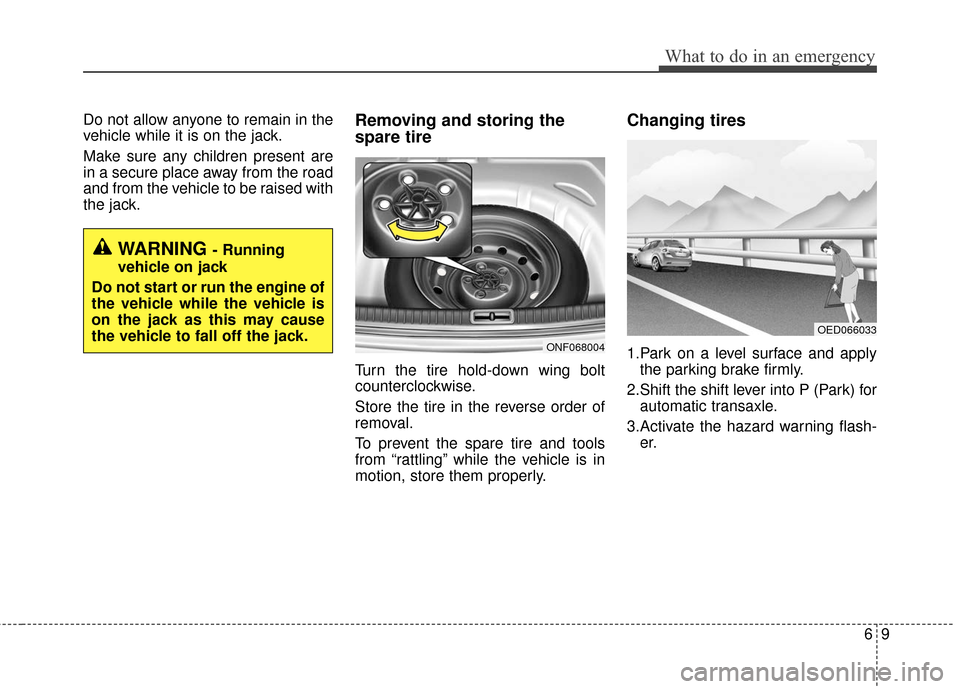
Turn the tire hold-down wing bolt
counterclockwise.
Store the tire in the reverse order of
removal.
To prevent the spare tire and tools
from “rattling” while the vehicle is in
motion, store them properly.
Changing tires
1.Park on a level surface and applythe parking brake firmly.
2.Shift the shift lever into P (Park) for automatic transaxle.
3.Activate the hazard warning flash- er.
OED066033
WARNING - Running
vehicle on jack
Do not start or run the engine of
the vehicle while the vehicle is
on the jack as this may cause
the vehicle to fall off the jack.
ONF068004
Page 329 of 466
What to do in an emergency
16
6
Jack label1. Model Name
2. Maximum allowable load
3. When using the jack, set your
parking brake.
4. When using the jack, stop the engine.
5. Do not get under a vehicle that is supported by a jack.
6. The designated locations under the frame
7. When supporting the vehicle, the base plate of jack must be vertical
under the lifting point.
8. Shift into Reverse gear on vehicles with manual transmission or move
the shift lever to the P position on
vehicles with automatic transmis-
sion.
9. The jack should be used on firm level ground.
10. Jack manufacturer
11. Production date
12. Representative company and address
❈ The actual Jack label in the vehicle may differ from the illustration. For
more detailed specifications, refer to the label attached to the jack.
Type A ■ Example
Type B
Type C
OHYK064001
OHYK064005
OHYK064002
Page 331 of 466
What to do in an emergency
18
6
It is possible that some tires, espe-
cially with larger punctures or dam-
age to the sidewall, cannot be sealed
completely.
Air pressure loss in the tire may
adversely affect tire performance.
For this reason, you should avoid
abrupt steering or other driving
maneuvers, especially if the vehicle
is heavily loaded or if a trailer is in
use.
The Tire Mobility Kit is not designed
or intended as a permanent tire
repair method and is to be used for
one tire only.
This instruction shows you step by
step procedure to temporarily seal
the puncture.
Read the section "Notes on the safe
use of the Tire Mobility Kit".Notes on the safe use of the
Tire Mobility Kit
Park your car at the side of the
road so that you can work with the
Tire Mobility Kit away from moving
traffic.
To be sure your vehicle will not move, even when you're on fairly
level ground, always set your park-
ing brake.
Only use the Tire Mobility Kit for sealing/inflation passenger car
tires. Only punctured areas located
within the tread region of the tire
can be sealed using the tire mobil-
ity kit.
Do not use on motorcycles, bicy- cles or any other type of tires.
When the tire and wheel are dam- aged, do not use Tire Mobility Kit
for your safety.
Use of the Tire Mobility Kit may not be effective for tire damage larger
than approximately 6 mm (0.24 in).
Please contact the nearest Kia
dealership if the tire cannot be
made roadworthy with the Tire
Mobility Kit. Do not use the Tire Mobility Kit if a
tire is severely damaged by driving
run flat or with insufficient air pres-
sure.
Do not remove any foreign objects such as nails or screws that have
penetrated the tire.
Provided the car is outdoors, leave the engine running. Otherwise
operating the compressor may
eventually drain the car battery.
Never leave the Tire Mobility Kit unattended while it is being used.
Do not leave the compressor run- ning for more than 10 min. at a time
or it may overheat.
Do not use the Tire Mobility Kit if the ambient temperature is below -
-30°C (22°F).
Page 333 of 466
What to do in an emergency
20
6
Using the Tire Mobility Kit
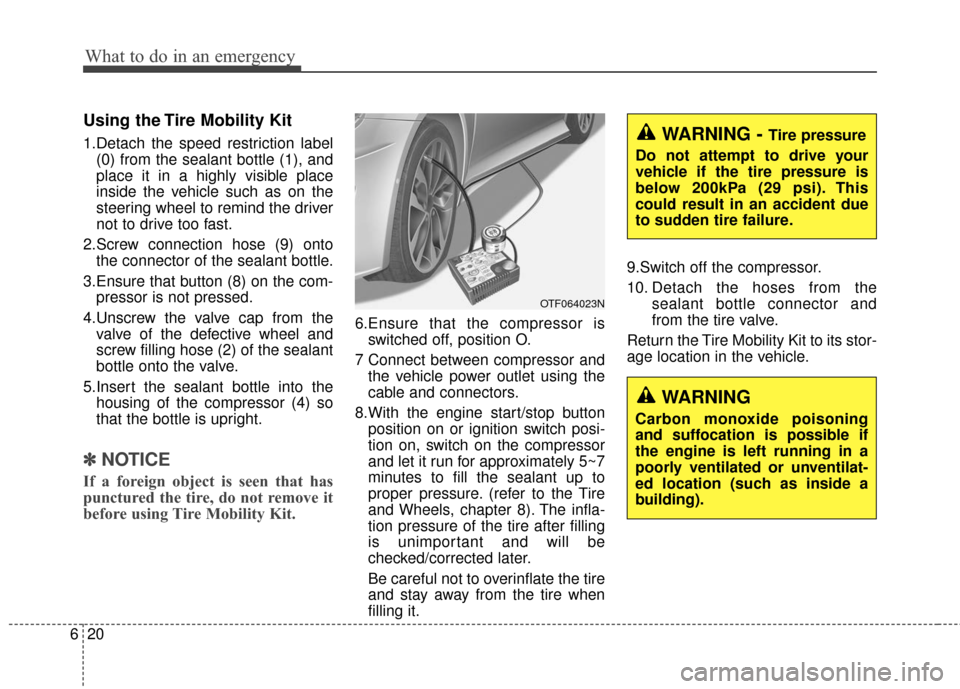
1.Detach the speed restriction label
(0) from the sealant bottle (1), and
place it in a highly visible place
inside the vehicle such as on the
steering wheel to remind the driver
not to drive too fast.
2.Screw connection hose (9) onto the connector of the sealant bottle.
3.Ensure that button (8) on the com- pressor is not pressed.
4.Unscrew the valve cap from the valve of the defective wheel and
screw filling hose (2) of the sealant
bottle onto the valve.
5.Insert the sealant bottle into the housing of the compressor (4) so
that the bottle is upright.
✽ ✽ NOTICE
If a foreign object is seen that has
punctured the tire, do not remove it
before using Tire Mobility Kit.
6.Ensure that the compressor is
switched off, position O.
7 Connect between compressor and the vehicle power outlet using the
cable and connectors.
8.With the engine start/stop button position on or ignition switch posi-
tion on, switch on the compressor
and let it run for approximately 5~7
minutes to fill the sealant up to
proper pressure. (refer to the Tire
and Wheels, chapter 8). The infla-
tion pressure of the tire after filling
is unimportant and will be
checked/corrected later.
Be careful not to overinflate the tire
and stay away from the tire when
filling it. 9.Switch off the compressor.
10. Detach the hoses from the
sealant bottle connector and
from the tire valve.
Return the Tire Mobility Kit to its stor-
age location in the vehicle.
WARNING
Carbon monoxide poisoning
and suffocation is possible if
the engine is left running in a
poorly ventilated or unventilat-
ed location (such as inside a
building).
OTF064023N
WARNING - Tire pressure
Do not attempt to drive your
vehicle if the tire pressure is
below 200kPa (29 psi). This
could result in an accident due
to sudden tire failure.
Page 341 of 466
Maintenance
Engine compartment . . . . . . . . . . . . . . . . . . . . . . . . 7-3
Maintenance services . . . . . . . . . . . . . . . . . . . . . . . . 7-4
• Owner’s responsibility . . . . . . . . . . . . . . . . . . . . . . . . . 7-4
. . . . . . . . . . . . . . . . -7-5
Owner maintenance . . . . . . . . . . . . . . . . . . . . . . . . . 7-6
Scheduled maintenance service. . . . . . . . . . . . . . . . 7-8
. . . . . . . . . . . . . . . . . . . 7-9
Explanation of scheduled maintenance items . . . 7-21
Engine oil. . . . . . . . . . . . . . . . . . . . . . . . . . . . . . . . . 7-25
. . . . . . . . . . . . . . . . . . . 7-25
. . . . . . . . . . . . . . . 7-26
Coolant . . . . . . . . . . . . . . . . . . . . . . . . . . . . . . . . . . 7-27\
. . . . . . . . . . . . . . . . . . . . . . . . . . . . . . 7-27
. . . . . . . . . . . . . . . . . . . . . . . . . . . . . . . 7-27
. . . . . . . . . . . . . . . . . . . . . . . . . 7-30
Brake fluid . . . . . . . . . . . . . . . . . . . . . . . . . . . . . . . 7-31
. . . . . . . . . . . . . . . . . . 7-31
Washer fluid . . . . . . . . . . . . . . . . . . . . . . . . . . . . . . 7-32
. . . . . . . . . . . . . . . . . 7-32
Parking brake . . . . . . . . . . . . . . . . . . . . . . . . . . . . . 7-33
Air cleaner. . . . . . . . . . . . . . . . . . . . . . . . . . . . . . . . 7-34
. . . . . . . . . . . . . . . . . . . . . . . . . . . . 7-34
Climate control air filter . . . . . . . . . . . . . . . . . . . . 7-36
. . . . . . . . . . . . . . . . . . . . . . . . . . . . . . 7-36
. . . . . . . . . . . . . . . . . . . . . . . . . . . . 7-36
Wiper blades . . . . . . . . . . . . . . . . . . . . . . . . . . . . . . 7-38
. . . . . . . . . . . . . . . . . . . . . . . . . . . . . . 7-38
. . . . . . . . . . . . . . . . . . . . . . . . . . . . 7-38
Battery . . . . . . . . . . . . . . . . . . . . . . . . . . . . . . . . . . . 7-\
40
. . . . . . . . . . . . . . . . . . . . . . . 7-40
. . . . . . . . . . . . . . . . . . . . . . . . . . . 7-42
. . . . . . . . . . . . . . . . . . . . . . . . . . . . . . . . . . 7-42\
Tires and wheels . . . . . . . . . . . . . . . . . . . . . . . . . . . 7-43
. . . . . . . . . . . . . . . . . . . . . . . . . . . . . . . . . . . . \
7-43
. . . . . . . 7-43
. . . . . . . . . . . . . . . . . . . . . . . . . . . . . . . . . 7-45
. . . . . . . . . . . . . . . 7-46
. . . . . . . . . . . . . . . . . . . . . . . . . . . . . 7-47
. . . . . . . . . . . . . . . . . . . . . . . . . . . 7-48
. . . . . . . . . . . . . . . . . . . . . . . . . . . . . . . . . 7-48
. . . . . . . . . . . . . . . . . . . . . . . . . . . . 7-48
. . . . . . . . . . . . . . . . . . . . . . . . . 7-48
. . . . . . . . . . . . . . . . . . . . . . . . . . 7-55
7
Page 343 of 466
73
Maintenance
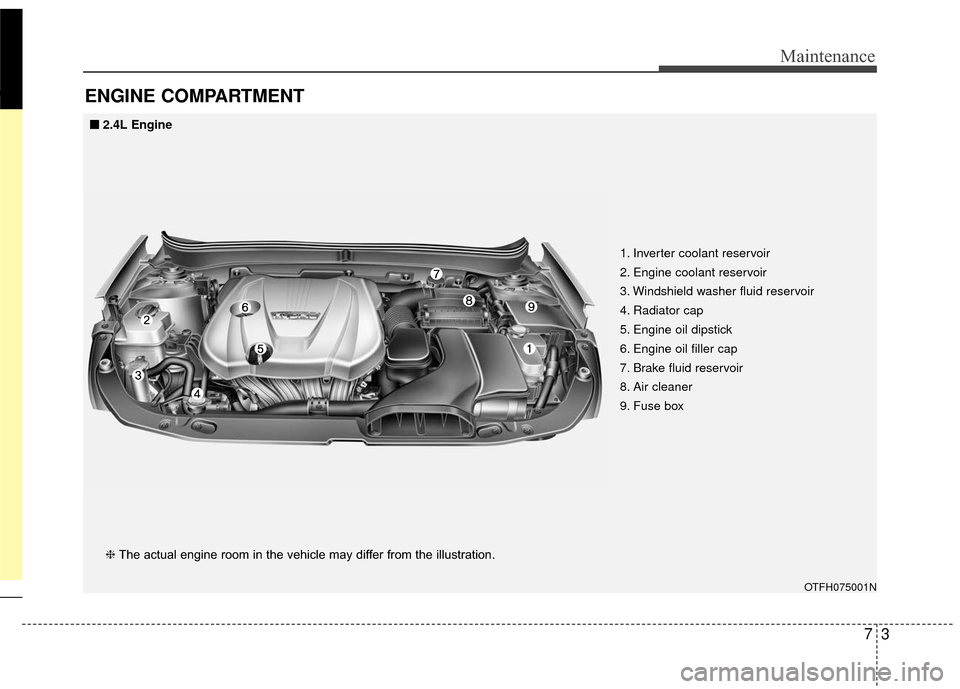
ENGINE COMPARTMENT
OTFH075001N
❈The actual engine room in the vehicle may differ from the illustration. 1. Inverter coolant reservoir
2. Engine coolant reservoir
3. Windshield washer fluid reservoir
4. Radiator cap
5. Engine oil dipstick
6. Engine oil filler cap
7. Brake fluid reservoir
8. Air cleaner
9. Fuse box
■
■
2.4L Engine
Page 345 of 466
75
Maintenance
Owner maintenance precau-
tions
Improper or incomplete service may
result in problems. This section gives
instructions only for the maintenance
items that are easy to perform.
As explained earlier in this section,
several procedures can be done only
by an authorized Kia dealer with spe-
cial tools.
✽ ✽NOTICE
Improper owner maintenance dur-
ing the warranty period may affect
warranty coverage. For details, read
the separate Warranty & Consumer
Information manual provided with
the vehicle. If you're unsure about
any servicing or maintenance proce-
dure, have it done by an authorized
Kia dealer.
After repair of the hydraulic brake
system, the air must be bled from the
system. Contact your Authorized Kia
Dealer for bleeding of the brake sys-
tem.
WARNING- Maintenance
work
Do not wear jewelry or loose
clothing while working under
the hood of your vehicle with
the engine running. These can
become entangled in moving
parts, if you must run the
engine while working under the
hood, make certain that you
remove all jewelry (especially
rings, bracelets, watches, and
necklaces) and all neckties,
scarves, and similar loose
clothing before getting near the
engine or cooling fans.WARNING
When you open the engine
hood, turn the Hybrid system
off. If not, it may result in death
or serious injury because of the
high voltage flow.
Page 346 of 466
Maintenance
67
OWNER MAINTENANCE
The following lists are vehicle checks
and inspections that should be per-
formed by the owner or an author-
ized Kia dealer at the frequencies
indicated to help ensure safe,
dependable operation of your vehi-
cle.
Any adverse conditions should be
brought to the attention of your deal-
er as soon as possible.
These Owner Maintenance Checks
are generally not covered by war-
ranties and you may be charged for
labor, parts and lubricants used.Owner maintenance schedule
When you stop for fuel:
Check the engine oil level.
Check the coolant level in coolantreservoir.
Check the windshield washer fluid level.
Look for low or under-inflated tires.
While operating your vehicle:
Note any changes in the sound of the exhaust or any smell of
exhaust fumes in the vehicle.
Check for vibrations in the steering wheel. Notice any increased steer-
ing effort or looseness in the steer-
ing wheel, or change in its straight-
ahead position.
Notice if your vehicle constantly turns slightly or “pulls” to one side
when traveling on smooth, level
road.
When stopping, listen and check for unusual sounds, pulling to one
side, increased brake pedal travel
or “hard-to-push” brake pedal.
If any slipping or changes in the operation of your transaxle occurs,
check the transaxle fluid level.
Check the automatic transaxle P (Park) function.
Check the parking brake.
Check for fluid leaks under your vehicle (water dripping from the air
conditioning system during or after
use is normal).
WARNING - Hot coolant
Be careful when checking your
engine coolant level when the
engine is hot. Scalding hot
coolant and steam may blow
out under pressure.
Page 347 of 466
77
Maintenance
At least monthly:
Check the coolant level in theengine coolant reservoir.
Check the operation of all exterior lights, including the stoplights, turn
signals and hazard warning flash-
ers.
Check the inflation pressures of all tires including the spare.
At least twice a year
(i.e., every Spring and Fall) :
Check the radiator, heater and air conditioning hoses for leaks or
damage.
Check the windshield washer spray and wiper operation. Clean
the wiper blades with clean cloth
dampened with washer fluid.
Check the headlight alignment.
Check the muffler, exhaust pipes, shields and clamps.
Check the lap/shoulder belts for wear and function.
Check for worn tires and loose wheel lug nuts.
At least once a year :
Clean the body and door drainholes.
Lubricate the door hinges and check the hood hinges.
Lubricate the door and hood locks and latches.
Lubricate the door rubber weather- strips.
Check the air conditioning system.
Check the power steering fluid level.
Inspect and lubricate automatic transaxle linkage and controls.
Clean the battery and terminals.
Check the brake fluid level.
Page 349 of 466
79
Maintenance
NORMAL MAINTENANCE SCHEDULE
The following maintenance services must be performed to ensure good emission control and performance. Keep
receipts for all vehicle emission services to protect your warranty. Where both mileage and time are shown, the fre-
quency of service is determined by whichever occurs first.
*1: If TOP TIER Detergent Gasoline is not available, one bottle of additive is recommended. Additives are available from yourauthorized Kia dealer along with information on how to use them. Do not mix other additives.
*
2: Fuel filter & Fuel tank air filter are considered to be maintenance free\
but periodic inspection is recommended for this mainte- nance schedule depends on fuel quality. If there are some important safety matters like fuel flow restriction, surging, loss of
power, hard starting problem etc, replace the fuel filter immediately regardless of maintenance schedule\
and consult an author-
ized Kia dealer for details.
*
3: The drive belt should be replaced when cracks occur or tension is reduced excessively.
*4: Inspect for excessive tappet noise and/or engine vibration and adjust if necessary.