height KIA OPTIMA PHEV 2017 Owners Manual
[x] Cancel search | Manufacturer: KIA, Model Year: 2017, Model line: OPTIMA PHEV, Model: KIA OPTIMA PHEV 2017Pages: 604, PDF Size: 13.16 MB
Page 43 of 604
H37
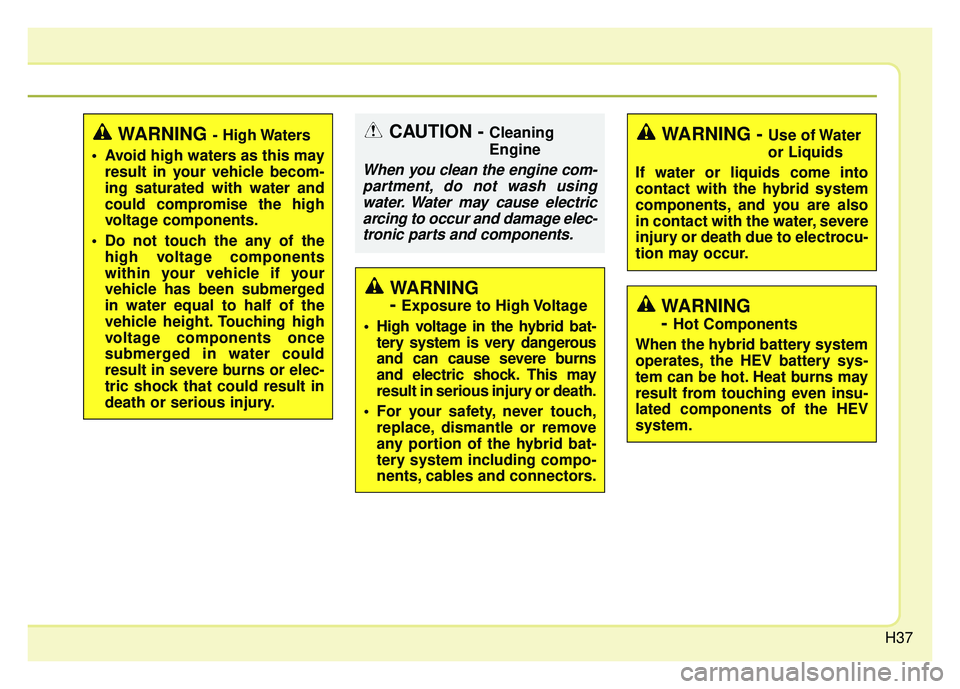
WARNING - High Waters
Avoid high waters as this may result in your vehicle becom-
ing saturated with water and
could compromise the high
voltage components.
Do not touch the any of the high voltage components
within your vehicle if your
vehicle has been submerged
in water equal to half of the
vehicle height. Touching high
voltage components once
submerged in water could
result in severe burns or elec-
tric shock that could result in
death or serious injury.
WARNING
-
Exposure to High Voltage
High voltage in the hybrid bat- tery system is very dangerous
and can cause severe burns
and electric shock. This may
result in serious injury or death.
For your safety, never touch, replace, dismantle or remove
any portion of the hybrid bat-
tery system including compo-
nents, cables and connectors.
CAUTION - Cleaning
Engine
When you clean the engine com-partment, do not wash usingwater. Water may cause electricarcing to occur and damage elec-tronic parts and components.
WARNING - Use of Water
or Liquids
If water or liquids come into
contact with the hybrid system
components, and you are also
in contact with the water, severe
injury or death due to electrocu-
tion may occur.
WARNING
-
Hot Components
When the hybrid battery system
operates, the HEV battery sys-
tem can be hot. Heat burns may
result from touching even insu-
lated components of the HEV
system.
Page 64 of 604
Safety features of your vehicle
43
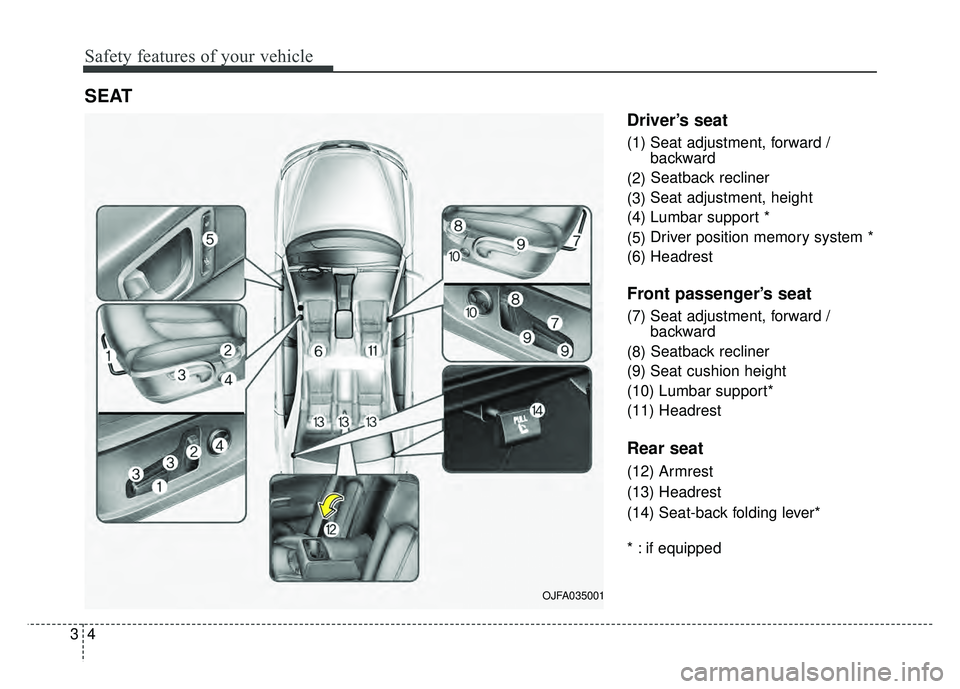
Driver’s seat
(1) Seat adjustment, forward / backward
(2) Seatback recliner
(3) Seat adjustment, height
(4) Lumbar support *
(5) Driver position memory system *
(6) Headrest
Front passenger’s seat
(7) Seat adjustment, forward / backward
(8) Seatback recliner
(9) Seat cushion height
(10) Lumbar support*
(11) Headrest
Rear seat
(12) Armrest
(13) Headrest
(14) Seat-back folding lever*
* : if equipped
SEAT
OJFA035001
Page 68 of 604
Safety features of your vehicle
83
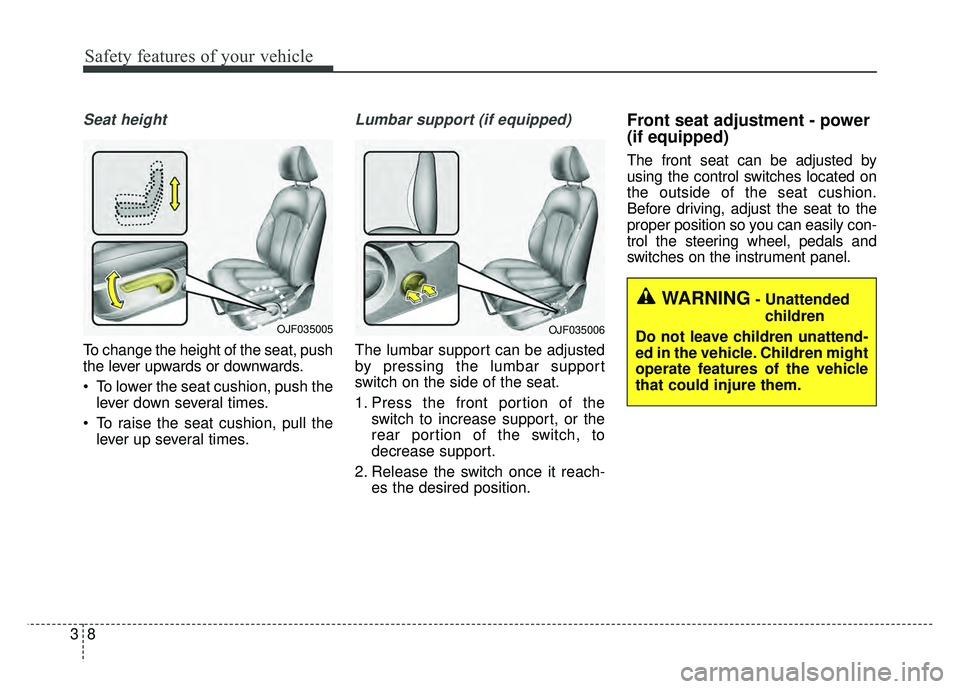
Seat height
To change the height of the seat, push
the lever upwards or downwards.
To lower the seat cushion, push thelever down several times.
To raise the seat cushion, pull the lever up several times.
Lumbar support (if equipped)
The lumbar support can be adjusted
by pressing the lumbar support
switch on the side of the seat.
1. Press the front portion of the switch to increase support, or the
rear portion of the switch, to
decrease support.
2. Release the switch once it reach- es the desired position.
Front seat adjustment - power
(if equipped)
The front seat can be adjusted by
using the control switches located on
the outside of the seat cushion.
Before driving, adjust the seat to the
proper position so you can easily con-
trol the steering wheel, pedals and
switches on the instrument panel.
WARNING- Unattended
children
Do not leave children unattend-
ed in the vehicle. Children might
operate features of the vehicle
that could injure them.
OJF035006OJF035005
Page 70 of 604
Safety features of your vehicle
10
3
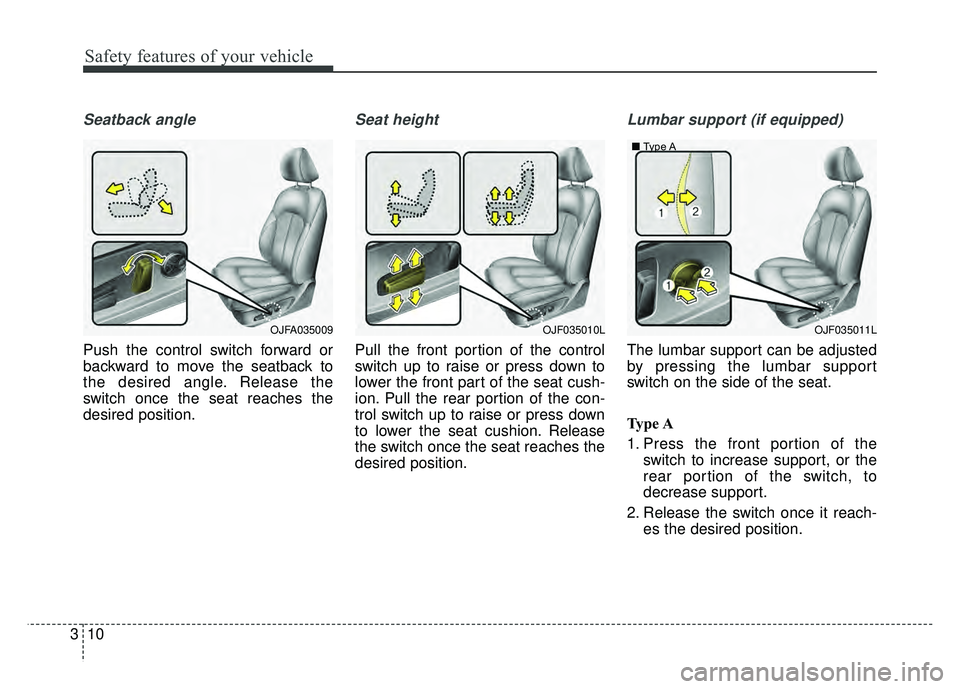
Seatback angle
Push the control switch forward or
backward to move the seatback to
the desired angle. Release the
switch once the seat reaches the
desired position.
Seat height
Pull the front portion of the control
switch up to raise or press down to
lower the front part of the seat cush-
ion. Pull the rear portion of the con-
trol switch up to raise or press down
to lower the seat cushion. Release
the switch once the seat reaches the
desired position.
Lumbar support (if equipped)
The lumbar support can be adjusted
by pressing the lumbar support
switch on the side of the seat.
Type A
1. Press the front portion of the
switch to increase support, or the
rear portion of the switch, to
decrease support.
2. Release the switch once it reach- es the desired position.
OJF035010LOJF035011L
■
Type AOJFA035009
Page 73 of 604
313
Safety features of your vehicle
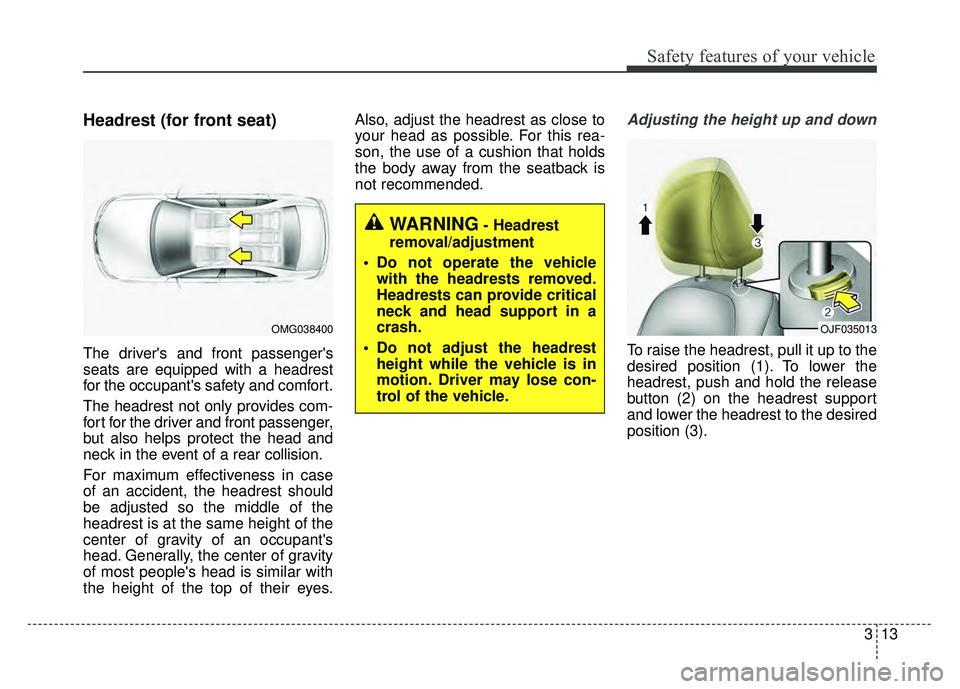
Headrest (for front seat)
The driver's and front passenger's
seats are equipped with a headrest
for the occupant's safety and comfort.
The headrest not only provides com-
fort for the driver and front passenger,
but also helps protect the head and
neck in the event of a rear collision.
For maximum effectiveness in case
of an accident, the headrest should
be adjusted so the middle of the
headrest is at the same height of the
center of gravity of an occupant's
head. Generally, the center of gravity
of most people's head is similar with
the height of the top of their eyes.Also, adjust the headrest as close to
your head as possible. For this rea-
son, the use of a cushion that holds
the body away from the seatback is
not recommended.
Adjusting the height up and down
To raise the headrest, pull it up to the
desired position (1). To lower the
headrest, push and hold the release
button (2) on the headrest support
and lower the headrest to the desired
position (3).
WARNING- Headrest
removal/adjustment
Do not operate the vehicle with the headrests removed.
Headrests can provide critical
neck and head support in a
crash.
Do not adjust the headrest height while the vehicle is in
motion. Driver may lose con-
trol of the vehicle.
OMG038400OJF035013
Page 75 of 604
315
Safety features of your vehicle
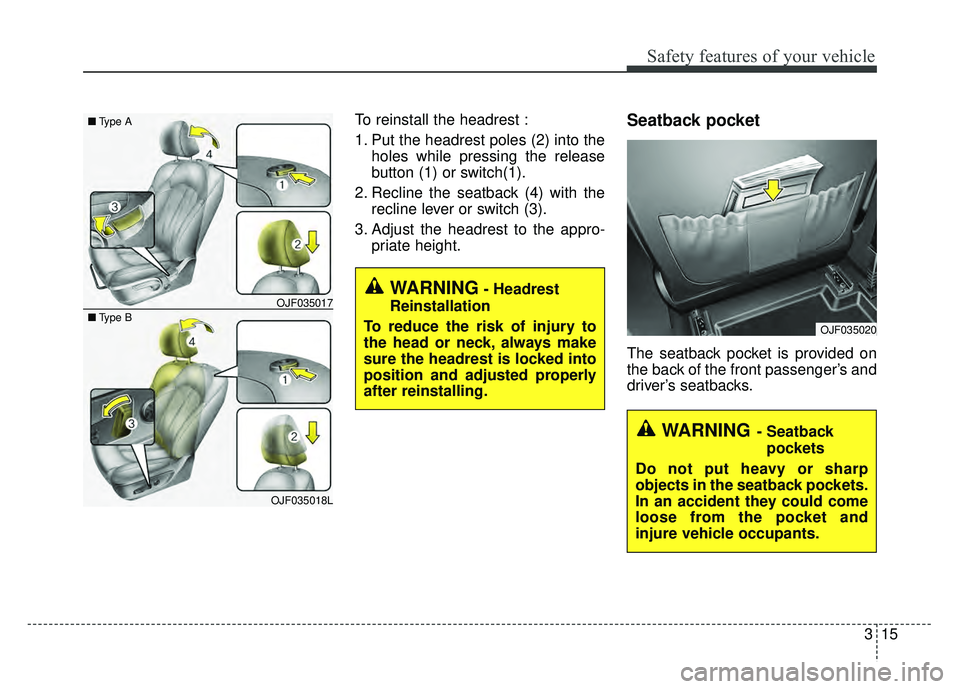
To reinstall the headrest :
1. Put the headrest poles (2) into theholes while pressing the release
button (1) or switch(1).
2. Recline the seatback (4) with the recline lever or switch (3).
3. Adjust the headrest to the appro- priate height.Seatback pocket
The seatback pocket is provided on
the back of the front passenger’s and
driver’s seatbacks.
OJF035017
OJF035018L
■
Type B
■Type A
WARNING- Headrest
Reinstallation
To reduce the risk of injury to
the head or neck, always make
sure the headrest is locked into
position and adjusted properly
after reinstalling.
OJF035020
WARNING- Seatback pockets
Do not put heavy or sharp
objects in the seatback pockets.
In an accident they could come
loose from the pocket and
injure vehicle occupants.
Page 76 of 604
Safety features of your vehicle
16
3
Rear seat adjustment
Headrest
The rear seat is equipped with head-
rests in all the seating positions for
the occupant's safety and comfort.
The headrest not only provides com-
fort for passengers, but also helps
protect the head and neck in the
event of a collision. For maximum effectiveness in case
of an accident, the headrest should
be adjusted so the middle of the
headrest is at the same height of the
center of gravity of an occupant's
head. Generally, the center of gravity
of most people's heads is similar with
the height as the top of their eyes.
Also, adjust the headrest as close to
your head as possible. For this rea-
son, the use of a cushion that holds
the body away from the seatback is
not recommended.
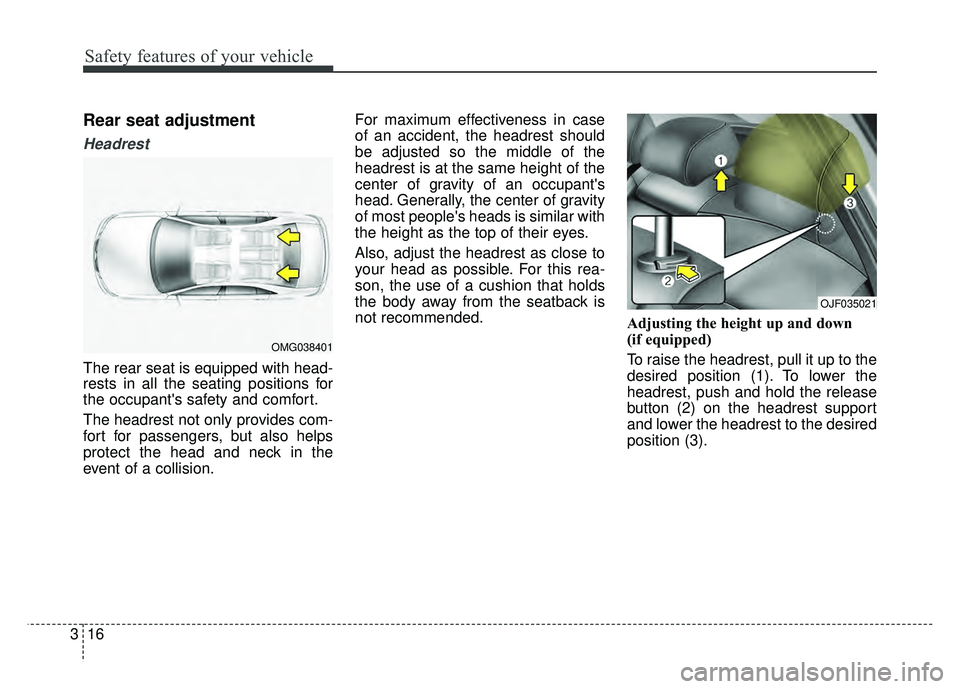
Adjusting the height up and down
(if equipped)
To raise the headrest, pull it up to the
desired position (1). To lower the
headrest, push and hold the release
button (2) on the headrest support
and lower the headrest to the desired
position (3).
OMG038401
OJF035021
Page 77 of 604
317
Safety features of your vehicle
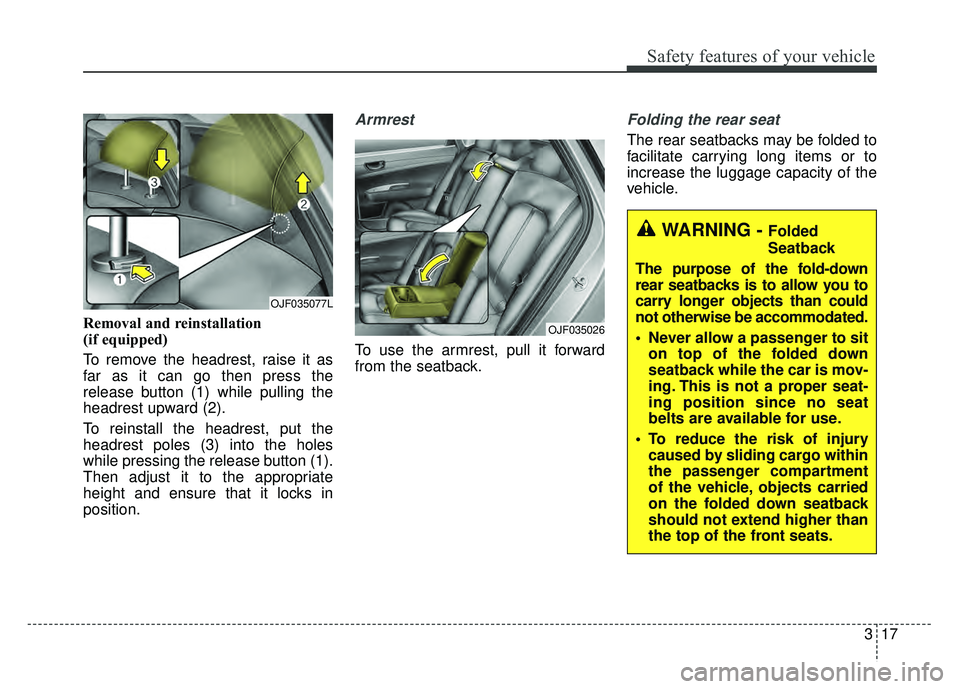
Removal and reinstallation
(if equipped)
To remove the headrest, raise it as
far as it can go then press the
release button (1) while pulling the
headrest upward (2).
To reinstall the headrest, put the
headrest poles (3) into the holes
while pressing the release button (1).
Then adjust it to the appropriate
height and ensure that it locks in
position.
Armrest
To use the armrest, pull it forward
from the seatback.
Folding the rear seat
The rear seatbacks may be folded to
facilitate carrying long items or to
increase the luggage capacity of the
vehicle.
OJF035077L
OJF035026
WARNING - Folded
Seatback
The purpose of the fold-down
rear seatbacks is to allow you to
carry longer objects than could
not otherwise be accommodated.
Never allow a passenger to sit on top of the folded down
seatback while the car is mov-
ing. This is not a proper seat-
ing position since no seat
belts are available for use.
To reduce the risk of injury caused by sliding cargo within
the passenger compartment
of the vehicle, objects carried
on the folded down seatback
should not extend higher than
the top of the front seats.
Page 84 of 604
Safety features of your vehicle
24
3
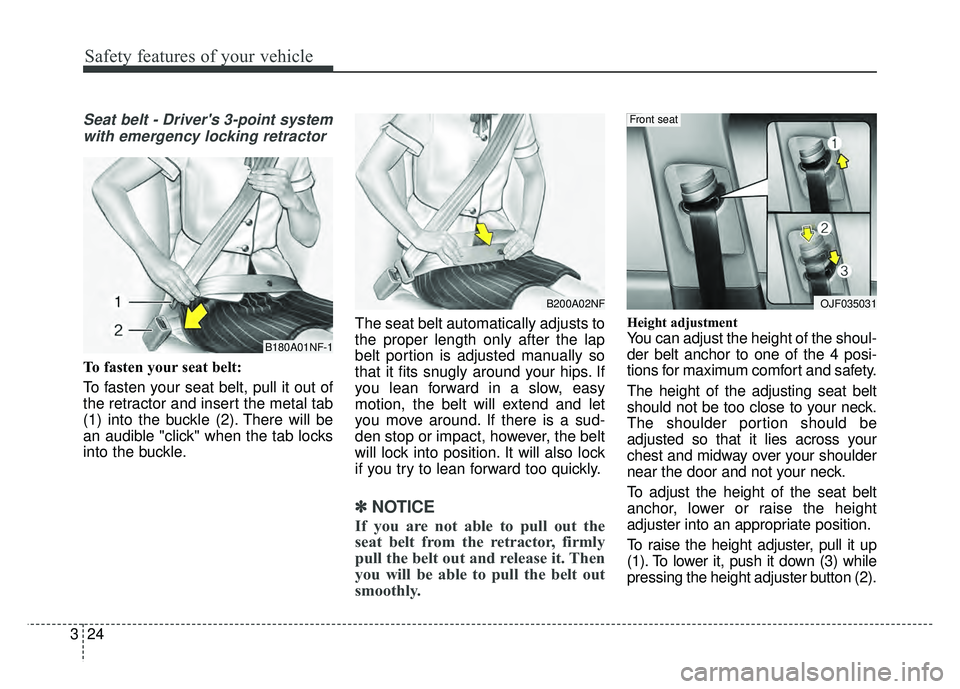
Seat belt - Driver's 3-point system
with emergency locking retractor
To fasten your seat belt:
To fasten your seat belt, pull it out of
the retractor and insert the metal tab
(1) into the buckle (2). There will be
an audible "click" when the tab locks
into the buckle. The seat belt automatically adjusts to
the proper length only after the lap
belt portion is adjusted manually so
that it fits snugly around your hips. If
you lean forward in a slow, easy
motion, the belt will extend and let
you move around. If there is a sud-
den stop or impact, however, the belt
will lock into position. It will also lock
if you try to lean forward too quickly.
✽ ✽
NOTICE
If you are not able to pull out the
seat belt from the retractor, firmly
pull the belt out and release it. Then
you will be able to pull the belt out
smoothly.
Height adjustment
You can adjust the height of the shoul-
der belt anchor to one of the 4 posi-
tions for maximum comfort and safety.
The height of the adjusting seat belt
should not be too close to your neck.
The shoulder portion should be
adjusted so that it lies across your
chest and midway over your shoulder
near the door and not your neck.
To adjust the height of the seat belt
anchor, lower or raise the height
adjuster into an appropriate position.
To raise the height adjuster, pull it up
(1). To lower it, push it down (3) while
pressing the height adjuster button (2).B180A01NF-1
B200A02NFOJF035031
Front seat
Page 85 of 604
325
Safety features of your vehicle
Release the button to lock the
anchor into position. Try sliding the
height adjuster to make sure that it
has locked into position.Seat belts - Front passenger andrear seat 3-point system withcombination locking retractor
To fasten your seat belt:
Combination retractor type seat belts
are installed in the rear seat posi-
tions to help accommodate the
installation of child restraint systems.
Although a combination retractor is
also installed in the front passenger
seat position, it is strongly recom-
mended that children always be
seated in the rear seat. NEVER
place any infant restraint system in
the front seat of the vehicle.
This type of seat belt combines the
features of both an emergency lock-
ing retractor seat belt and an auto-
matic locking retractor seat belt. To
fasten your seat belt, pull it out of the
retractor and insert the metal tab into
the buckle. There will be an audible
"click" when the tab locks into the
buckle. When not securing a child
restraint, the seat belt operates in the
same way as the driver's seat belt
(Emergency Locking Retractor Type). It automatically adjusts to the proper
length only after the lap belt portion
of the seat belt is adjusted manually
so that it fits snugly around your hips.
When the seat belt is fully extended
from the retractor to allow the instal-
lation of a child restraint system, the
seat belt operation changes to allow
the belt to retract, but not to extend
(Automatic Locking Retractor Type).
Refer to “Using a child restraint sys-
tem” in this section.
✽ ✽
NOTICE
Although the combination retractor
provides the same level of protection
for seated passengers in either emer-
gency or automatic locking modes,
have the seated passengers use the
emergency locking feature for improv-
ed convenience. The automatic locking
function is intended to facilitate child
restraint installation. To convert from
the automatic locking feature to the
emergency locking operation mode,
allow the unbuckled seat belt to fully
retract.
WARNING- Shoulder belt
positioning
Never position the shoulder belt
across your neck or face.
WARNING- Seat belt replacement
Replace your seat belts after
being in an accident. Failure to
replace seat belts after an acci-
dent could leave you with dam-
aged seat belts that will not pro-
vide protection in the event of
another collision.