start stop button KIA QUORIS 2016 Owners Manual
[x] Cancel search | Manufacturer: KIA, Model Year: 2016, Model line: QUORIS, Model: KIA QUORIS 2016Pages: 513, PDF Size: 30.14 MB
Page 372 of 513
What to do in an emergency
2
6
ROAD WARNING
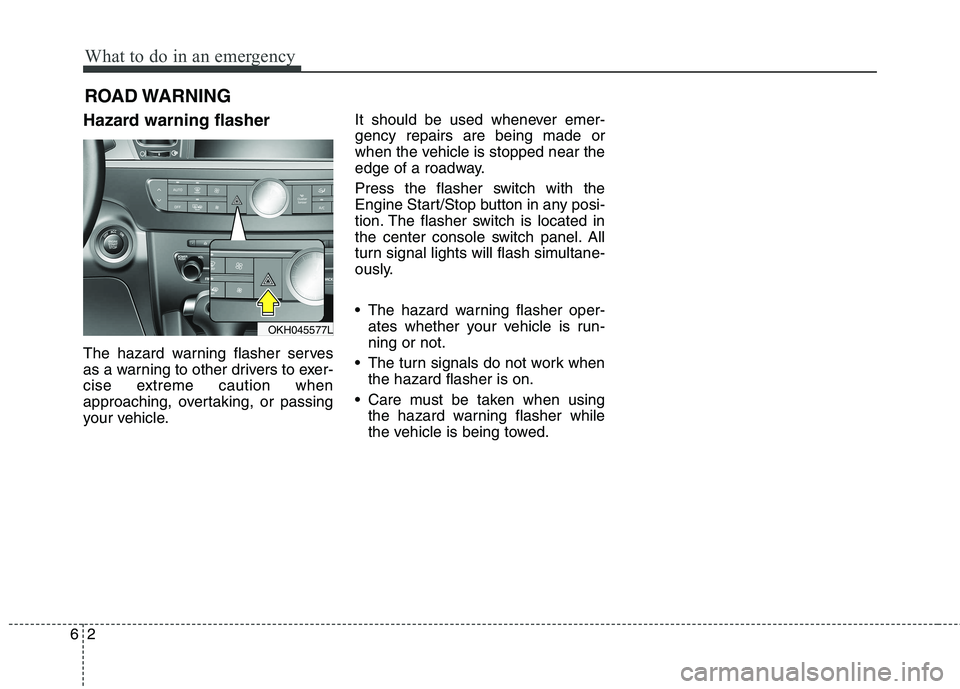
Hazard warning flasher
The hazard warning flasher serves
as a warning to other drivers to exer-
cise extreme caution when
approaching, overtaking, or passing
your vehicle. It should be used whenever emer-gency repairs are being made or
when the vehicle is stopped near the
edge of a roadway.
Press the flasher switch with the
Engine Start/Stop button in any posi-
tion. The flasher switch is located in
the center console switch panel. All
turn signal lights will flash simultane-
ously.
• The hazard warning flasher oper-
ates whether your vehicle is run- ning or not.
The turn signals do not work when the hazard flasher is on.
Care must be taken when using the hazard warning flasher while
the vehicle is being towed.
OKH045577L
Page 374 of 513
What to do in an emergency
4
6
IF THE ENGINE WILL NOT START
If engine doesn't turn over or
turns over slowly
1. If your vehicle has an automatic transaxle, be sure the shift lever is
in N (Neutral) or P (Park) and the
emergency brake is set.
2. Check the battery connections to be sure they are clean and tight.
3. Turn on the interior light. If the light dims or goes out when you oper-
ate the starter, the battery is dis-charged.
4. Check the starter connections to be sure they are securely tightened.
5. Do not push or pull the vehicle to start it. See instructions for "Jump
starting". If engine turns over normally
but does not start
1. Check fuel level.
2. With the Engine Start/Stop button
in the LOCK /OFF position, check all connectors at the ignition coils
and spark plugs. Reconnect any
that may be disconnected or loose.
3. If the engine still does not start, we recommend that you call an
authorized Kia dealer.
WARNING
If the engine will not start, do
not push or pull the car to start
it. This could result in a collision
or cause other damage.
Page 381 of 513
611
What to do in an emergency
Please note that the TPMS is not a
substitute for proper tire maintenance,
and it is the driver’s responsibility to
maintain correct tire pressure, even ifunder-inflation has not reached the
level to trigger illumination of the
TPMS low tire pressure telltale.
Your vehicle has also been equipped
with a TPMS malfunction indicator toindicate when the system is not oper-
ating properly. The TPMS malfunction
indicator is combined with the low tire
pressure telltale. When the systemdetects a malfunction, the telltale will
flash for approximately 1 minute and
then remain continuously illuminated.
This sequence will continue upon
subsequent vehicle start-ups as long
as the malfunction exists. When theTPMS malfunction indicator remains
illuminated after blinking for approxi-
mately 1 minute, the system may not
be able to detect or signal low tirepressure as intended.TPMS malfunctions may occur for a
variety of reasons, including the instal-
lation of replacement or alternate tires
or wheels on the vehicle that prevent
the TPMS from functioning properly.
Always check the TPMS malfunctiontelltale after replacing one or more
tires or wheels on your vehicle toensure that the replacement or alter-
nate tires and wheels allow the TPMS
to continue to function properly.
✽✽
NOTICE
If any of the below happens, we rec-
ommend that the system be checked
by an authorized Kia dealer.
1. The low tire pressure telltale/ TPMS malfunction indicator do
not illuminate for 3 seconds when
the Engine Start/Stop button is
turned to the ON or engine is run-
ning.
2. The TPMS malfunction indicator remains illuminated after blink-
ing for approximately 1 minute.
3. The Low tire pressure position telltale remains illuminated.
Low tire pressure telltale
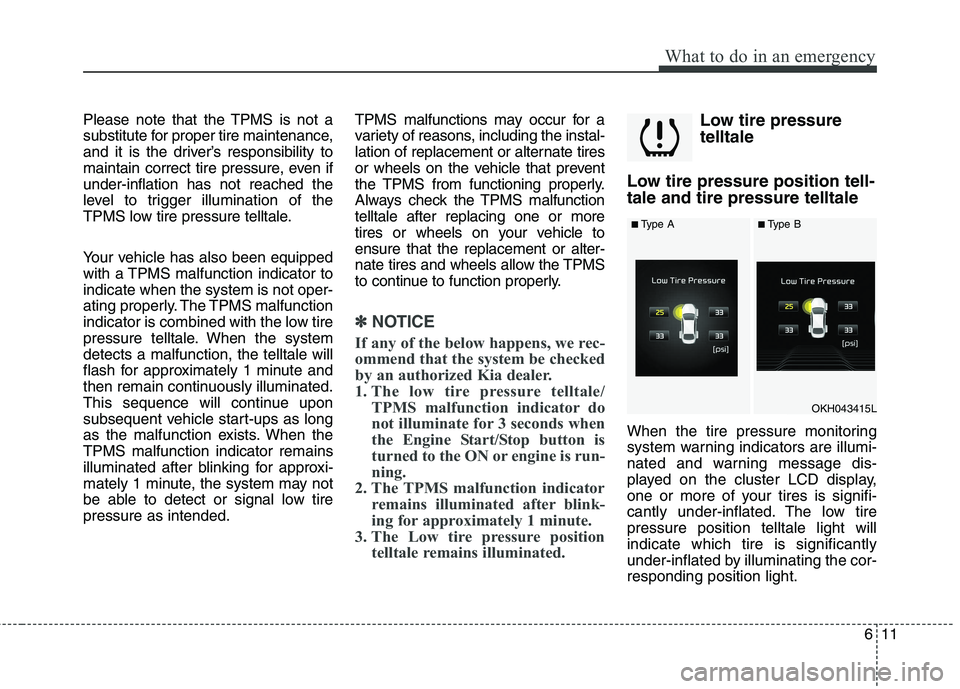
Low tire pressure position tell-tale and tire pressure telltale
When the tire pressure monitoring
system warning indicators are illumi-
nated and warning message dis-
played on the cluster LCD display,
one or more of your tires is signifi-
cantly under-inflated. The low tirepressure position telltale light willindicate which tire is significantly
under-inflated by illuminating the cor-responding position light.
■ Type A■Type B
OKH043415L
Page 395 of 513

625
What to do in an emergency
When towing your vehicle in an emergency without wheel dollies :
1. Set the Engine Start/Stop buttonin the ACC position.
2. Place the shift lever in N (Neutral).
3. Release the parking brake.
CAUTION
Failure to place the shift lever in N (Neutral) may cause internaldamage to the transaxle.
OKH062016
OKH062015
CAUTION
Do not tow the vehicle with the rear wheels on the ground asthis may cause damage to thevehicle.
Do not tow with sling-type equipment. Use wheel lift orflatbed equipment.
CAUTION
If the ECS malfunction indicator illuminates when there is no airin the suspension, the vehicleheight will be very lower, so do not drive to protect the vehiclefrom the projections on the sur-face of the ground.
(Continued)
OKH052104
Page 399 of 513
629
What to do in an emergency
Emergency towing precautions
Place the Engine Start/Stop buttonin ACC so the steering wheel isn’t
locked.
Place the transaxle shift lever in N (Neutral).
Release the parking bake.
Press the brake pedal with more force than normal since you will
have reduced brake performance.
More steering effort will be required because the power steer-
ing system will be disabled.
If you are driving down a long hill, the brakes may overheat and brake
performance will be reduced. Stop
often and let the brakes cool off.CAUTION - Automatic transaxle
If the car is being towed with all
four wheels on the ground, itcan be towed only from the front. Be sure that the transaxleis in neutral. Engine Start/Stopbutton a driver must be in the towed vehicle to operate thesteering and brakes.
To avoid serious damage to the automatic transaxle, limitthe vehicle speed to 15 km/h (10 mph) and drive less than1.5 km (1 mile) when towing.
Before towing, check the auto- matic transaxle for fluid leaksunder your vehicle. If the auto- matic transaxle fluid is leak-ing, a flatbed equipment ortowing dolly must be used.
Page 421 of 513

721
Maintenance
EXPLANATION OF SCHEDULED MAINTENANCE ITEMS
Engine oil and filter The engine oil and filter should be
changed at the intervals specified in
the maintenance schedule. If the car
is being driven in severe conditions,more frequent oil and filter changesare required. Drive belts
Inspect all drive belts for evidence of
cuts, cracks, excessive wear or oil
saturation and replace if necessary.
Drive belts should be checked peri-
odically for proper tension and
adjusted as necessary. Fuel filter A clogged filter can limit the speed at
which the vehicle may be driven,damage the emission system and
cause multiple issues such as hard
starting. If an excessive amount of
foreign matter accumulates in the
fuel tank, the filter may require
replacement more frequently.
After installing a new filter, run the
engine for several minutes, and
check for leaks at the connections.
We recommend that the fuel lines,fuel hoses and connectioner be
replaced by an authorized Kia dealer.
Fuel lines, fuel hoses and con- nections
Check the fuel lines, fuel hoses and
connections for leakage and dam-
age. We recommend that the fuel
lines, fuel hoses and connectionsr be
replaced by an authoized Kia dealer.
Vapor hose and fuel filler cap
The vapor hose and fuel filler cap should be inspected at those inter-
vals specified in the maintenance
schedule. Make sure that a new
vapor hose or fuel filler cap is cor-rectly replaced.
CAUTION
When you are inspecting the
belt, place the engine start/stopbutton in the OFF or ACC posi- tion.
Page 457 of 513
757
Maintenance
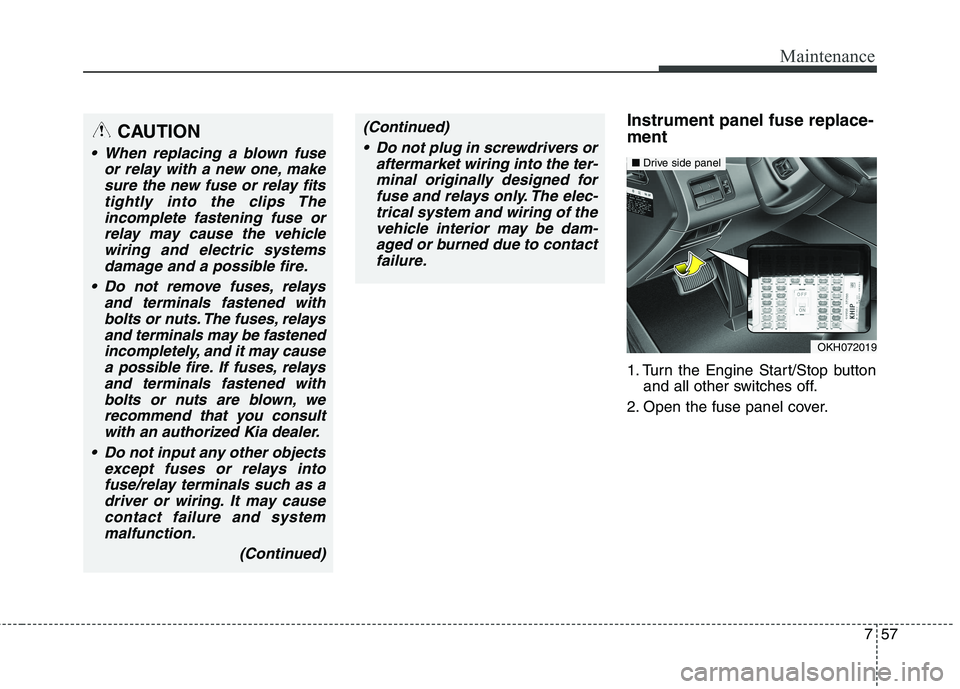
Instrument panel fuse replace- ment
1. Turn the Engine Start/Stop buttonand all other switches off.
2. Open the fuse panel cover.CAUTION
When replacing a blown fuse or relay with a new one, makesure the new fuse or relay fitstightly into the clips Theincomplete fastening fuse or relay may cause the vehiclewiring and electric systemsdamage and a possible fire.
Do not remove fuses, relays and terminals fastened withbolts or nuts. The fuses, relaysand terminals may be fastenedincompletely, and it may causea possible fire. If fuses, relays and terminals fastened withbolts or nuts are blown, werecommend that you consult with an authorized Kia dealer.
Do not input any other objects except fuses or relays intofuse/relay terminals such as adriver or wiring. It may cause contact failure and systemmalfunction.
(Continued)
OKH072019
■Drive side panel
(Continued)
Do not plug in screwdrivers or aftermarket wiring into the ter-minal originally designed for fuse and relays only. The elec-trical system and wiring of thevehicle interior may be dam-aged or burned due to contact failure.
Page 459 of 513

759
Maintenance
Engine compartment fuse replacement
1. Turn the Engine Start/Stop buttonand all other switches off. 2. Remove the fuse panel cover by
pressing the tab and pulling the
cover up. When the blade type fuse
is disconnected, remove it by using
the clip designed for changing fuseslocated in the engine room fuse
box. Upon removal, securely insert
reserve fuse of equal quantity.
3. Check the removed fuse; replace it if it is blown. To remove or insert
the fuse, use the fuse puller in the
engine compartment fuse panel.
4. Push in a new fuse of the same rating, and make sure it fits tightly
in the clips.
If it fits loosely, we recommend
that you consult an authorized Kia
dealer.
CAUTION
After checking the fuse panel in the engine compartment,securely install the fuse panelcover. If not, electrical failures may occur from water contact.
OKH072022
OKH072023
CAUTION
Always place the fuse switch in the ON position while driv-ing the vehicle.
Do not move the transportation fuse switch repeatedly. Thefuse switch may be worn out.
Place fuse switch in the "OFF" position to discharge the bat-tery in case of parking the vehicle more than a month.
Page 464 of 513

Maintenance
64
7
Fuse NameSymbolFuse rastingCircuit Protected
B/ALARM10ABCM
INHIBITOR 11
INHIBITOR10AW/O Electric ATM Shift Lever : Sport Mode Switch
With Electric ATM Shift Lever : Electric ATM Shift Lever
P/DOOR DRV15ADriver Door Latch
PASS P/SEAT20AW/O IMS : Passenger Seat Relay Box
With IMS : Passenger IMS Control Module
P/DOOR RR
LH15ARear Door Latch LH
DRV P/SEAT30ADriver Lumbar Support Valve, Driver Lumbar Support Switch, Driver Power Seat Module
S/ROOF 210ASunroof Motor
SMART KEY 22SMART KEY10AMetal Core Block (PCB #2) (P/N Relay), Smart Key Control Module
S/ROOF 120ASunroof Motor
START10AStart/Stop Button Switch
MODULE 55
MODULE10AAround View Unit, Parking Guide Unit, Head-UP, Instrument Cluster, Driver Lumbar Support Valve,
Rear Seat Console Switch, Rear Seat Warmer Control Module LH/RH, Rear Massage Control
Module LH/RH, Rear Smart Junction Box (IPS Control Module)
CLUSTER10AInstrument Cluster, Head-Up Display
SMART KEY 11SMART KEY25ASmart Key Control Module
DOOR LAMP10ADriver Door Module, Passenger Door Module
STR'G HTD15AClock Spring
Page 476 of 513
Maintenance
76
7
LIGHT BULBS
Use only the bulbs of the specified
wattage.
✽✽ NOTICE
After driving in heavy rain or wash-
ing the vehicle, headlight and tail-
light lenses could appear frosty. This
condition is caused by the tempera-
ture difference between the lamp
inside and outside. This is similar to
the condensation on your windows
inside your vehicle during the rain
and doesn’t indicate a problem with
your vehicle. If the water leaks into
the lamp bulb circuitry, we recom-
mend that the system be checked by
an authorized Kia dealer.WARNING - Working on
the lights
Prior to working on the light, firm-
ly apply the parking brake,
ensure that the Engine Start/Stop
button is in the OFF position and
turn off the lights to avoid sudden
movement of the vehicle and
burning your fingers or receiving
an electric shock.
CAUTION
Be sure to replace the burned- out bulb with one of the samewattage rating. Otherwise, it may cause damage to the fuseor electric wiring system.
CAUTION
If you don’t have necessary tools, the correct bulbs andthe expertise, we recommend that you consult an authorizedKia dealer. In many cases, it isdifficult to replace vehicle light bulbs because otherparts of the vehicle must beremoved before you can get to the bulb. This is especially trueif you have to remove the head-light assembly to get to the bulb(s). Removing/installingthe headlight assembly canresult in damage to the vehicle.
Do not install additional bulb or LED. If you install that, thelamp may not be operatedproperly and fuse box or elec-tric wiring system may have problem.