KIA QUORIS 2016 Owners Manual
Manufacturer: KIA, Model Year: 2016, Model line: QUORIS, Model: KIA QUORIS 2016Pages: 513, PDF Size: 30.14 MB
Page 471 of 513
771
Maintenance
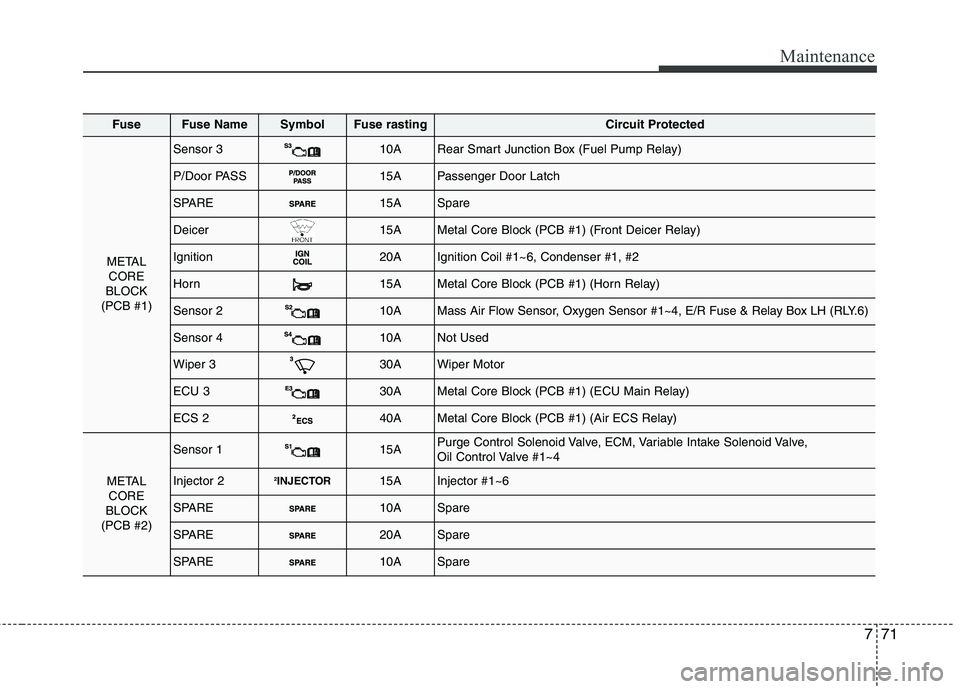
FuseFuse NameSymbolFuse rastingCircuit Protected
METALCORE
BLOCK
(PCB #1)
Sensor 310ARear Smart Junction Box (Fuel Pump Relay)
P/Door PASS15APassenger Door Latch
SPARE15ASpare
Deicer15AMetal Core Block (PCB #1) (Front Deicer Relay)
Ignition20AIgnition Coil #1~6, Condenser #1, #2
Horn15AMetal Core Block (PCB #1) (Horn Relay)
Sensor 210AMass Air Flow Sensor, Oxygen Sensor #1~4, E/R Fuse & Relay Box LH (RLY.6)
Sensor 410ANot Used
Wiper 330AWiper Motor
ECU 330AMetal Core Block (PCB #1) (ECU Main Relay)
ECS 240AMetal Core Block (PCB #1) (Air ECS Relay)
METAL CORE
BLOCK
(PCB #2)
Sensor 115APurge Control Solenoid Valve, ECM, Variable Intake Solenoid Valve,
Oil Control Valve #1~4
Injector 22 INJECTOR15AInjector #1~6
SPARE10ASpare
SPARE20ASpare
SPARE10ASpare
Page 472 of 513
Maintenance
72
7
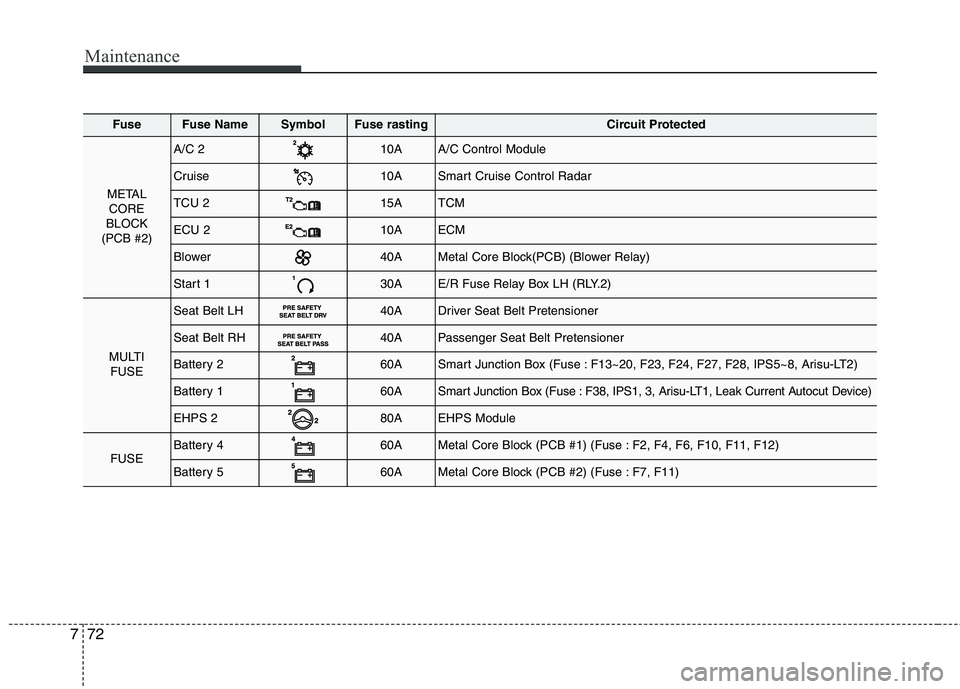
FuseFuse NameSymbolFuse rastingCircuit Protected
METAL
CORE
BLOCK
(PCB #2)
A/C 210AA/C Control Module
Cruise10ASmart Cruise Control Radar
TCU 215ATCM
ECU 210AECM
Blower40AMetal Core Block(PCB) (Blower Relay)
Start 130AE/R Fuse Relay Box LH (RLY.2)
MULTI FUSE
Seat Belt LH40ADriver Seat Belt Pretensioner
Seat Belt RH40APassenger Seat Belt Pretensioner
Battery 260ASmart Junction Box (Fuse : F13~20, F23, F24, F27, F28, IPS5~8, Arisu-LT2)
Battery 160ASmart Junction Box (Fuse : F38, IPS1, 3, Arisu-LT1, Leak Current Autocut Device)
EHPS 280AEHPS Module
FUSEBattery 460AMetal Core Block (PCB #1) (Fuse : F2, F4, F6, F10, F11, F12)
Battery 560AMetal Core Block (PCB #2) (Fuse : F7, F11)
Page 473 of 513
773
Maintenance
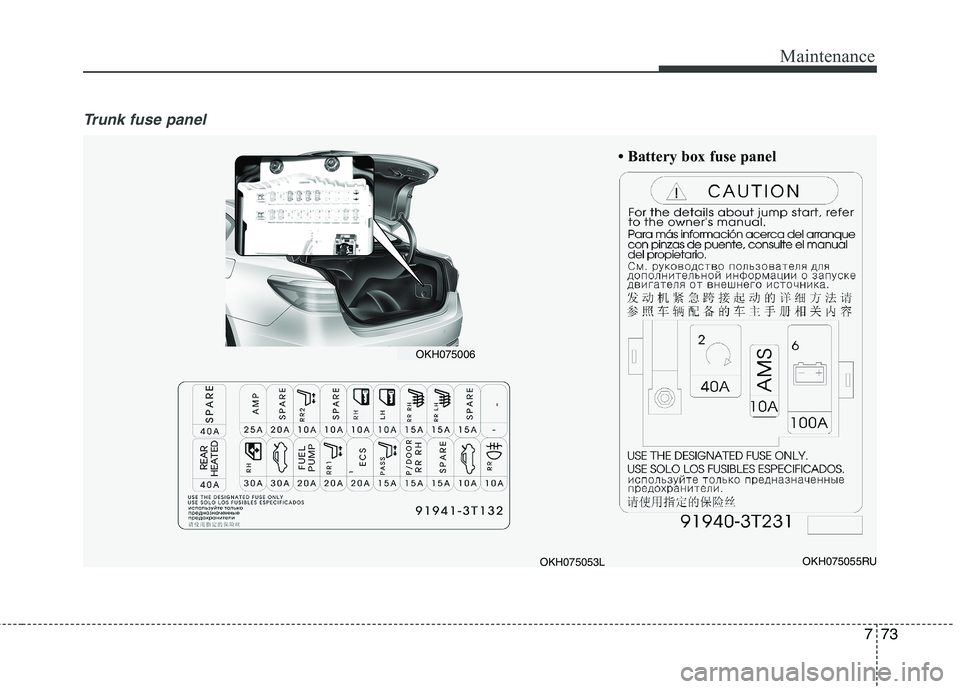
Trunk fuse panel
OKH075055RU
Battery box fuse panelOKH075053L
OKH075006
Page 474 of 513
Maintenance
74
7
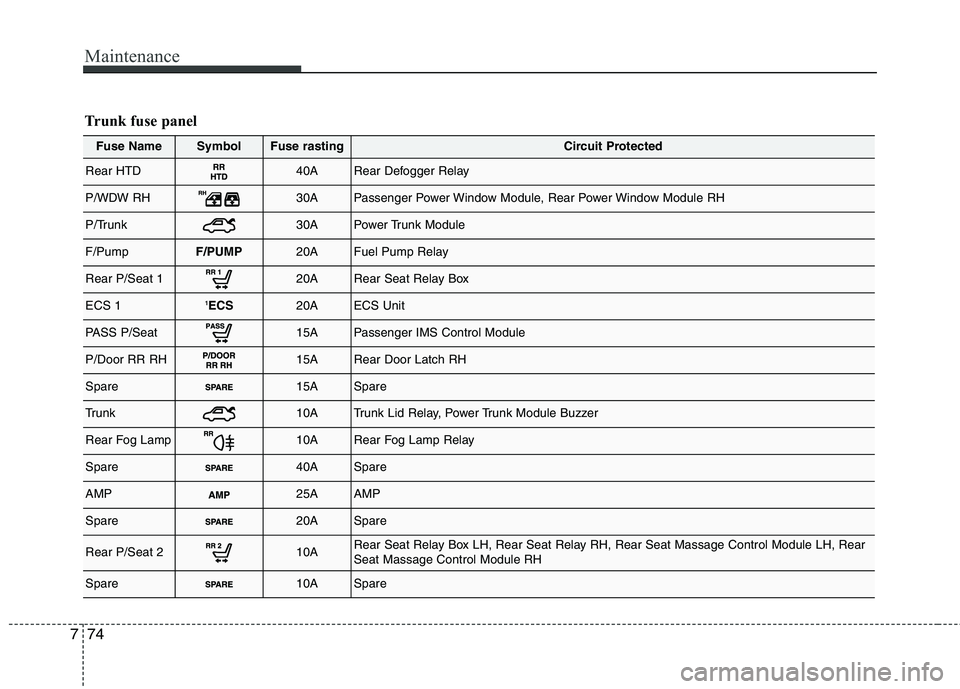
Fuse NameSymbolFuse rastingCircuit Protected
Rear HTD40ARear Defogger Relay
P/WDW RH30APassenger Power Window Module, Rear Power Window Module RH
P/Trunk30APower Trunk Module
F/PumpF/PUMP20AFuel Pump Relay
Rear P/Seat 120ARear Seat Relay Box
ECS 11
ECS20AECS Unit
PASS P/Seat15APassenger IMS Control Module
P/Door RR RH15ARear Door Latch RH
Spare15ASpare
Trunk10ATrunk Lid Relay, Power Trunk Module Buzzer
Rear Fog Lamp10ARear Fog Lamp Relay
Spare40ASpare
AMP25AAMP
Spare20ASpare
Rear P/Seat 210ARear Seat Relay Box LH, Rear Seat Relay RH, Rear Seat Massage Control Module LH, Rear Seat Massage Control Module RH
Spare10ASpare
Trunk fuse panel
Page 475 of 513
775
Maintenance
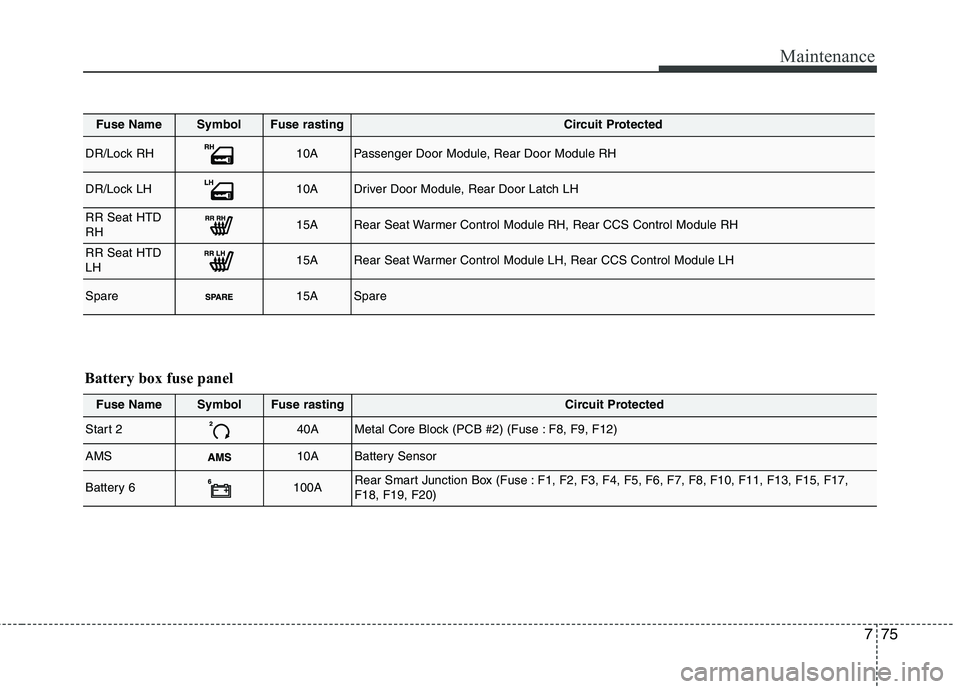
Fuse NameSymbolFuse rastingCircuit Protected
DR/Lock RH10APassenger Door Module, Rear Door Module RH
DR/Lock LH10ADriver Door Module, Rear Door Latch LH
RR Seat HTD RH15ARear Seat Warmer Control Module RH, Rear CCS Control Module RH
RR Seat HTD LH15ARear Seat Warmer Control Module LH, Rear CCS Control Module LH
Spare15ASpare
Fuse NameSymbolFuse rastingCircuit Protected
Start 240AMetal Core Block (PCB #2) (Fuse : F8, F9, F12)
AMS10ABattery Sensor
Battery 6100ARear Smart Junction Box (Fuse : F1, F2, F3, F4, F5, F6, F7, F8, F10, F11, F13, F15, F17, F18, F19, F20)
Battery box fuse panel
Page 476 of 513
Maintenance
76
7
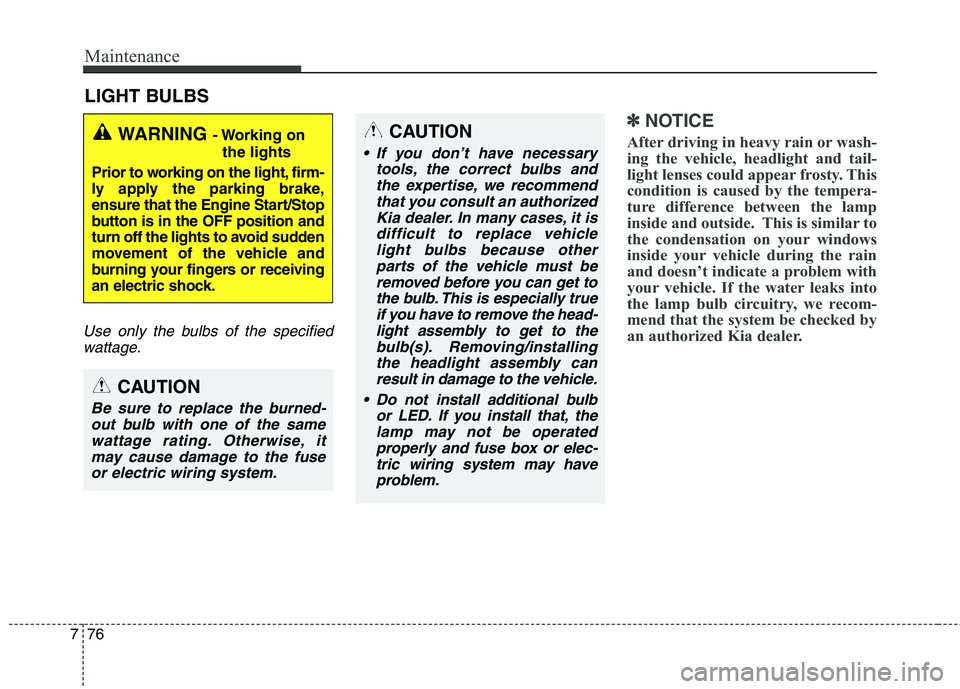
LIGHT BULBS
Use only the bulbs of the specified
wattage.
✽✽ NOTICE
After driving in heavy rain or wash-
ing the vehicle, headlight and tail-
light lenses could appear frosty. This
condition is caused by the tempera-
ture difference between the lamp
inside and outside. This is similar to
the condensation on your windows
inside your vehicle during the rain
and doesn’t indicate a problem with
your vehicle. If the water leaks into
the lamp bulb circuitry, we recom-
mend that the system be checked by
an authorized Kia dealer.WARNING - Working on
the lights
Prior to working on the light, firm-
ly apply the parking brake,
ensure that the Engine Start/Stop
button is in the OFF position and
turn off the lights to avoid sudden
movement of the vehicle and
burning your fingers or receiving
an electric shock.
CAUTION
Be sure to replace the burned- out bulb with one of the samewattage rating. Otherwise, it may cause damage to the fuseor electric wiring system.
CAUTION
If you don’t have necessary tools, the correct bulbs andthe expertise, we recommend that you consult an authorizedKia dealer. In many cases, it isdifficult to replace vehicle light bulbs because otherparts of the vehicle must beremoved before you can get to the bulb. This is especially trueif you have to remove the head-light assembly to get to the bulb(s). Removing/installingthe headlight assembly canresult in damage to the vehicle.
Do not install additional bulb or LED. If you install that, thelamp may not be operatedproperly and fuse box or elec-tric wiring system may have problem.
Page 477 of 513
777
Maintenance
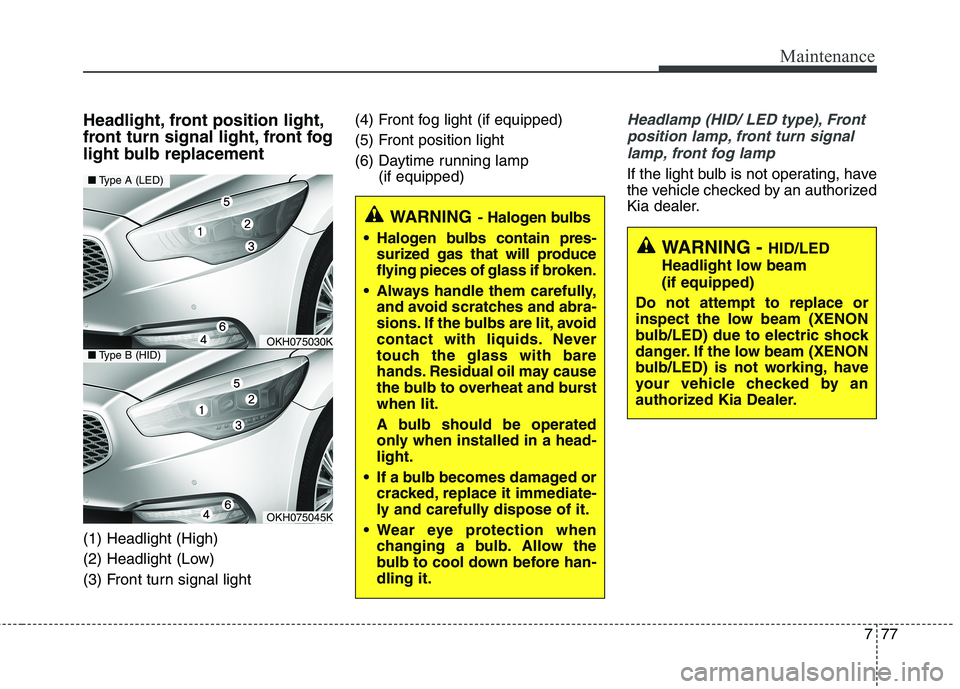
Headlight, front position light,
front turn signal light, front fog
light bulb replacement (1) Headlight (High)
(2) Headlight (Low)
(3) Front turn signal light(4) Front fog light (if equipped)
(5) Front position light
(6) Daytime running lamp
(if equipped)Headlamp (HID/ LED type), Front
position lamp, front turn signal lamp, front fog lamp
If the light bulb is not operating, have
the vehicle checked by an authorized
Kia dealer.
OKH075030K
OKH075045K
■ Type A (LED)
■Type B (HID)
WARNING - Halogen bulbs
Halogen bulbs contain pres-
surized gas that will produce
flying pieces of glass if broken.
Always handle them carefully, and avoid scratches and abra-
sions. If the bulbs are lit, avoid
contact with liquids. Never
touch the glass with bare
hands. Residual oil may cause
the bulb to overheat and burstwhen lit.
A bulb should be operated
only when installed in a head-light.
If a bulb becomes damaged or cracked, replace it immediate-
ly and carefully dispose of it.
Wear eye protection when changing a bulb. Allow the
bulb to cool down before han-dling it.WARNING - HID/LED
Headlight low beam (if equipped)
Do not attempt to replace or
inspect the low beam (XENON
bulb/LED) due to electric shock
danger. If the low beam (XENON
bulb/LED) is not working, have
your vehicle checked by an
authorized Kia Dealer.
Page 478 of 513
Maintenance
78
7
✽✽
NOTICE
HID/LED lamps have superior per-
formance vs. halogen bulbs.
HID/LED lamps are estimated by
the manufacturer to last twice as
long or longer than halogen bulbs
depending on their frequency of use.
They will probably require replace-
ment at some point in the life of the
vehicle. Cycling the headlamps on
and off more than typical use will
shorten HID/LED lamps life.
HID/LED lamps do not fail in the
same manner as halogen incandes-
cent lamps. If a headlamp goes out
after a period of operation but will
immediately relight when the head-
lamp switch is cycled it is likely the
HID/LED lamp needs to be
replaced. HID/LED lighting compo-
nents are more complex than con-
ventional halogen bulbs thus have
higher replacement cost. ✽✽
NOTICE
We recommend that the headlight
aiming be adjusted after an accident
or after the headlight assembly is
reinstalled at an authorized Kia
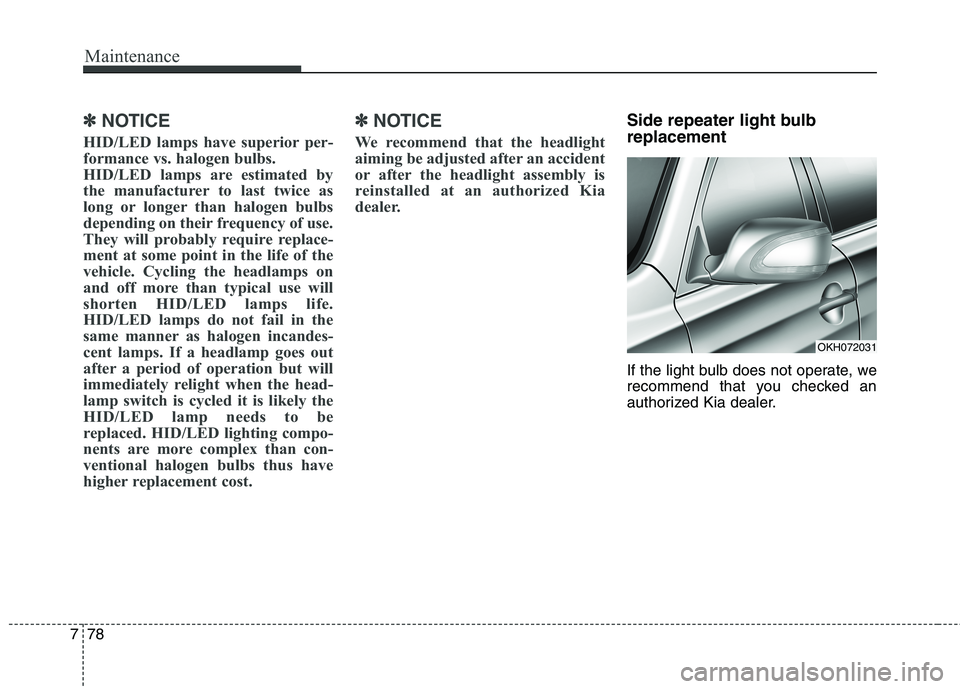
dealer.Side repeater light bulb replacement
If the light bulb does not operate, we
recommend that you checked an
authorized Kia dealer.
OKH072031
Page 479 of 513
779
Maintenance
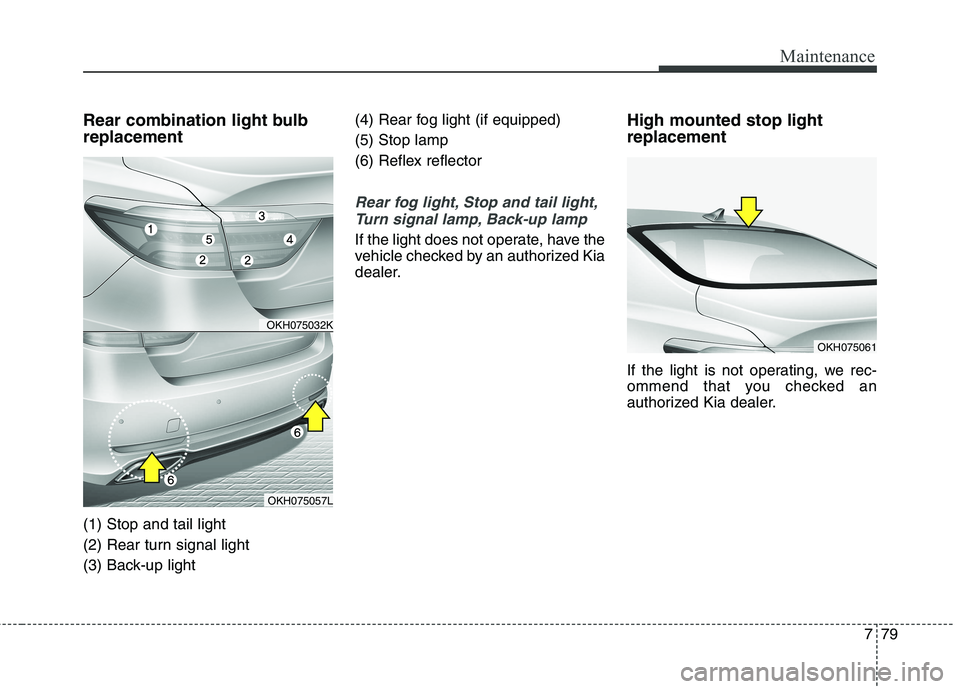
Rear combination light bulb replacement (1) Stop and tail light
(2) Rear turn signal light
(3) Back-up light(4) Rear fog light (if equipped)(5) Stop lamp
(6) Reflex reflector
Rear fog light, Stop and tail light,
Turn signal lamp, Back-up lamp
If the light does not operate, have the
vehicle checked by an authorized Kia
dealer. High mounted stop light replacement
If the light is not operating, we rec-
ommend that you checked an
authorized Kia dealer.
OKH075032K
OKH075057L
OKH075061
Page 480 of 513
Maintenance
80
7
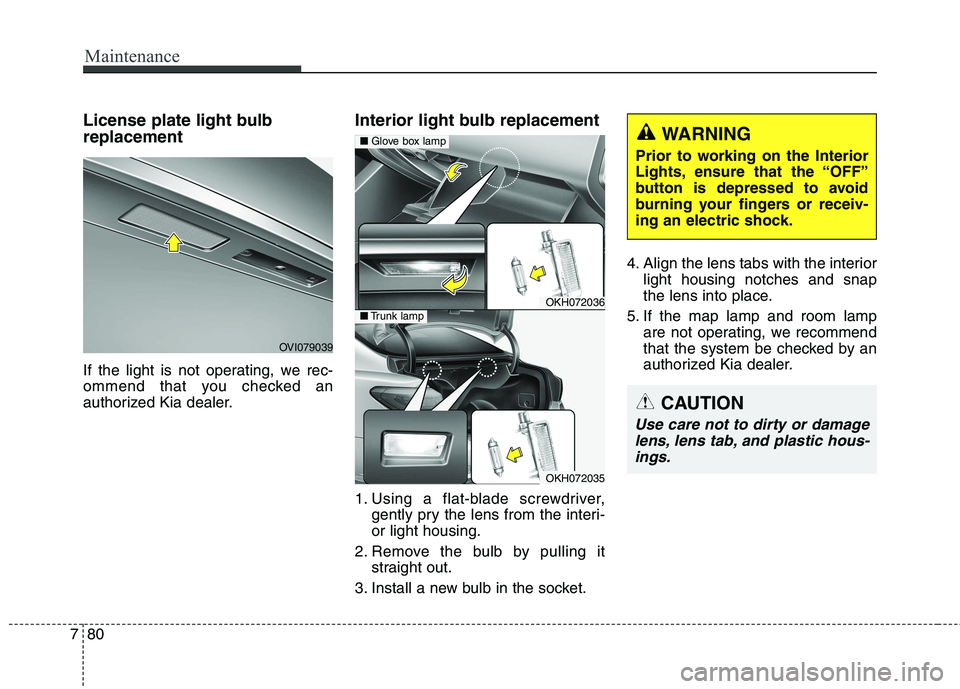
License plate light bulb replacement
If the light is not operating, we rec-
ommend that you checked an
authorized Kia dealer. Interior light bulb replacement
1. Using a flat-blade screwdriver,
gently pry the lens from the interi- or light housing.
2. Remove the bulb by pulling it straight out.
3. Install a new bulb in the socket. 4. Align the lens tabs with the interior
light housing notches and snap
the lens into place.
5. If the map lamp and room lamp are not operating, we recommend
that the system be checked by an
authorized Kia dealer.
OVI079039
OKH072036
OKH072035
■Glove box lamp
■Trunk lamp
WARNING
Prior to working on the Interior
Lights, ensure that the “OFF”
button is depressed to avoid
burning your fingers or receiv-
ing an electric shock.
CAUTION
Use care not to dirty or damage lens, lens tab, and plastic hous-ings.