oil level KIA Rio 2016 3.G Owner's Manual
[x] Cancel search | Manufacturer: KIA, Model Year: 2016, Model line: Rio, Model: KIA Rio 2016 3.GPages: 449, PDF Size: 14.93 MB
Page 128 of 449
457
Features of your vehicle
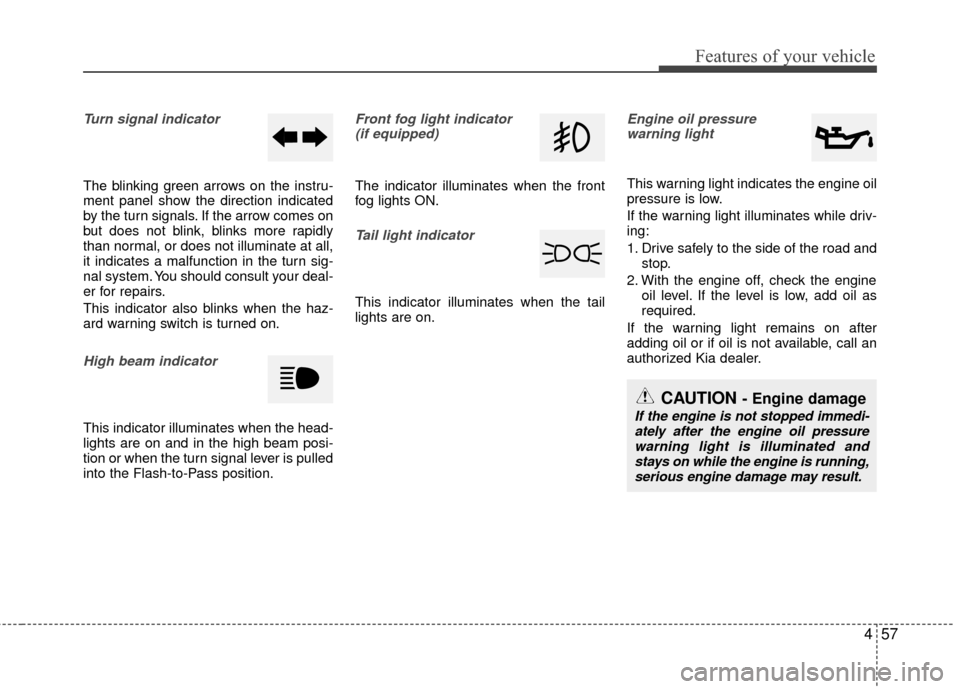
Turn signal indicator
The blinking green arrows on the instru-
ment panel show the direction indicated
by the turn signals. If the arrow comes on
but does not blink, blinks more rapidly
than normal, or does not illuminate at all,
it indicates a malfunction in the turn sig-
nal system. You should consult your deal-
er for repairs.
This indicator also blinks when the haz-
ard warning switch is turned on.
High beam indicator
This indicator illuminates when the head-
lights are on and in the high beam posi-
tion or when the turn signal lever is pulled
into the Flash-to-Pass position.
Front fog light indicator (if equipped)
The indicator illuminates when the front
fog lights ON.
Tail light indicator
This indicator illuminates when the tail
lights are on.
Engine oil pressure warning light
This warning light indicates the engine oil
pressure is low.
If the warning light illuminates while driv-
ing:
1. Drive safely to the side of the road and stop.
2. With the engine off, check the engine oil level. If the level is low, add oil as
required.
If the warning light remains on after
adding oil or if oil is not available, call an
authorized Kia dealer.
CAUTION - Engine damage
If the engine is not stopped immedi- ately after the engine oil pressurewarning light is illuminated and stays on while the engine is running,serious engine damage may result.
Page 129 of 449
Features of your vehicle
58
4
The oil pressure warning light comes on
whenever there is insufficient oil pres-
sure. In normal operation, it should come
on when the ignition switch is turned on,
then go out when the engine is started. If
the oil pressure warning light stays on
while the engine is running, there is a
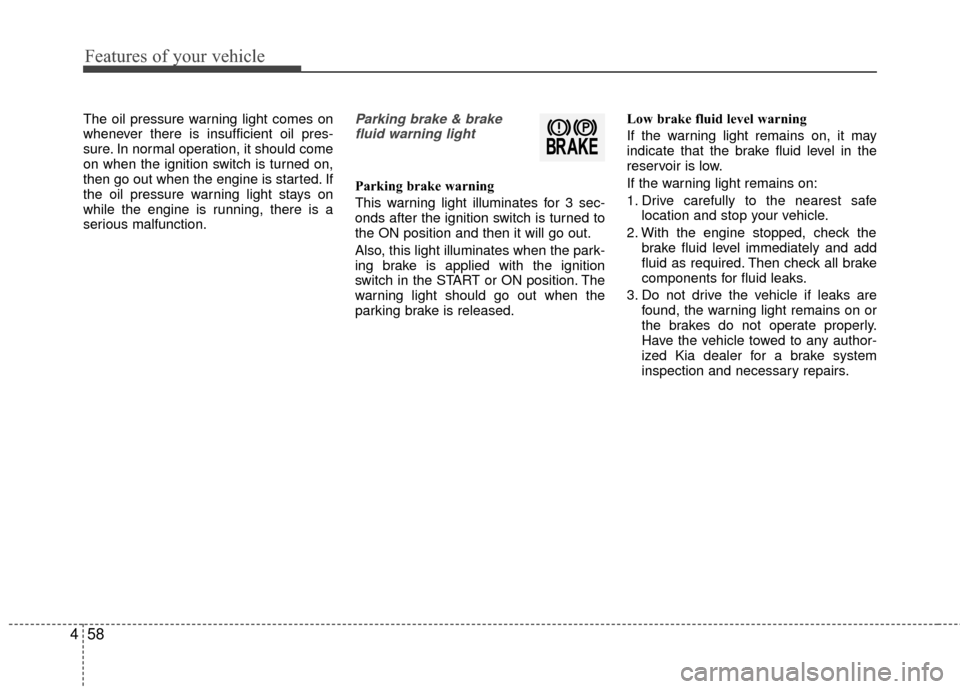
serious malfunction.Parking brake & brake
fluid warning light
Parking brake warning
This warning light illuminates for 3 sec-
onds after the ignition switch is turned to
the ON position and then it will go out.
Also, this light illuminates when the park-
ing brake is applied with the ignition
switch in the START or ON position. The
warning light should go out when the
parking brake is released. Low brake fluid level warning
If the warning light remains on, it may
indicate that the brake fluid level in the
reservoir is low.
If the warning light remains on:
1. Drive carefully to the nearest safe
location and stop your vehicle.
2. With the engine stopped, check the brake fluid level immediately and add
fluid as required. Then check all brake
components for fluid leaks.
3. Do not drive the vehicle if leaks are found, the warning light remains on or
the brakes do not operate properly.
Have the vehicle towed to any author-
ized Kia dealer for a brake system
inspection and necessary repairs.
Page 198 of 449
Features of your vehicle
4127
Adjust the volume to levels that allowthe driver to hear sounds from outside
of the vehicle. Driving in a state where
external sounds cannot be heard may
lead to accidents.
Pay attention to the volume setting when turning the device on. A sudden
output of extreme volume upon turning
the device on could lead to hearing
impairment. (Adjust the volume to a
suitable levels before turning off the
device.) Turn on the car ignition before using
the audio system. Do not operate the
audio system for long periods of time
with the ignition turned off; such opera-
tions may lead to battery discharge.
In case of product malfunction, please contact your place of purchase or After
Service center.
Placing the audio system within an electromagnetic environment may
result in noise interference.CAUTION
Do not subject the device to severe shock or impact. Directpressure onto the front side of the monitor may cause damage tothe LCD or touch screen.
When cleaning the device, make sure to turn off the audio systemand use a dry and smooth cloth.Never use tough materials, chem- ical cloths, or solvents (alcohol,benzene, thinners, etc.) as such materials may damage the devicepanel or cause color/quality dete- rioration
Do not place beverages close to the audio system. Spilling bever-ages may lead to system mal-function.
Prevent caustic solutions such as perfume and cosmetic oil fromcontacting the dashboard because they may cause damageor discoloration.
Page 250 of 449
53
Driving your vehicle
Before entering vehicle
• Be sure that all windows, outside mir-ror(s), and outside lights are clean.
Check the condition of the tires.
Check under the vehicle for any sign of leaks.
Be sure there are no obstacles behind you if you intend to back up.
Necessary inspections
Fluid levels, such as engine oil, engine
coolant, brake fluid, and washer fluid
should be checked on a regular basis,
with the exact interval depending on the
fluid. Further details are provided in
Section 7, “Maintenance”.
Before starting
Close and lock all doors.
Position the seat so that all controls are
easily reached.
Buckle your seat belt.
Adjust the inside and outside rearview mirrors.
Be sure that all lights work.
Check all gauges.
Check the operation of warning lights when the ignition switch is turned to
the ON position.
Release the parking brake and make sure the brake warning light goes out.
For safe operation, be sure you are famil-
iar with your vehicle and its equipment.
BEFORE DRIVING
WARNING - Distracted driving
Focus on the road while driving.
The driver's primary responsibility
is in the safe and legal operation of
the vehicle. Use of any handled
devices, other equipment or vehicle
systems that distract the drive
should not be used during vehicle
operation.
WARNING
- Check surrounding
Always check the surrounding areas
near your vehicle for people, espe-
cially children, before putting a vehi-
cle into D (Drive) or R (Reverse).
Page 298 of 449
551
Driving your vehicle
Use high quality ethylene glycol
coolant
Your vehicle is delivered with high quality
ethylene glycol coolant in the cooling
system. It is the only type of coolant that
should be used because it helps prevent
corrosion in the cooling system, lubri-
cates the water pump and prevents
freezing. Be sure to replace or replenish
your coolant in accordance with the
maintenance schedule in section 7.
Before winter, have your coolant tested to
assure that its freezing point is sufficient
for the temperatures anticipated during
the winter.
Check battery and cables
Winter puts additional burdens on the
battery system. Visually inspect the bat-
tery and cables as described in section
7. The level of charge in your battery can
be checked by an authorized Kia dealer
or a service station.
Change to "winter weight" oil if
necessary
In some climates it is recommended that
a lower viscosity "winter weight" oil be
used during cold weather. See section 8
for recommendations. If you aren't sure
what weight oil you should use, consult
an authorized Kia dealer.
Check spark plugs and ignition
system
Inspect your spark plugs as described in
section 7 and replace them if necessary.
Also check all ignition wiring and compo-
nents to be sure they are not cracked,
worn or damaged in any way.
To keep locks from freezing
To keep the locks from freezing, squirt an
approved de-icer fluid or glycerine into
the key opening. If a lock is covered with
ice, squirt it with an approved de-icing
fluid to remove the ice. If the lock is
frozen internally, you may be able to thaw
it out by using a heated key. Handle the
heated key with care to avoid injury.
Use approved window washer
anti-freeze in system
To keep the water in the window washer
system from freezing, add an approved
window washer anti-freeze solution in
accordance with instructions on the con-
tainer. Window washer anti-freeze is
available from an authorized Kia dealer
and most auto parts outlets. Do not use
engine coolant or other types of anti-
freeze as these may damage the paint
finish.
Page 309 of 449
What to do in an emergency
46
IF THE ENGINE WILL NOT START
If the engine doesn't turn over or
turns over slowly
1. If your vehicle has an automatictransaxle, be sure the shift lever is in N
(Neutral) or P (Park) and the emer-
gency brake is set.
2. Check the battery connections to be sure they are clean and tight.
3. Turn on the interior light. If the light dims or goes out when you operate the
starter, the battery is discharged.
4. Check the starter connections to be sure they are securely tightened.
5. Do not push or pull the vehicle to start it. See instructions for "Jump starting".
If engine turns over normally but
does not start
1. Check fuel level.
2. With the ignition switch in the LOCKposition, check all connectors at the
ignition coil and spark plugs.
Reconnect any that may be discon-
nected or loose.
3. Check the fuel line in the engine com- partment.
4. If the engine still does not start, call an authorized Kia dealer or seek other
qualified assistance.
WARNING - Push/pull start
Do not push or pull the vehicle to
start it. Push or pull starting may
cause the catalytic converter to
overload and create a fire hazard.
Page 341 of 449
75
Maintenance
OWNER MAINTENANCE
The following lists are vehicle checks and
inspections that should be performed by
the owner or an authorized Kia dealer at
the frequencies indicated to help ensure
safe, dependable operation of your vehi-
cle.
Any adverse conditions should be
brought to the attention of your dealer as
soon as possible.
These Owner Maintenance Checks are
generally not covered by warranties and
you may be charged for labor, parts and
lubricants used.Owner maintenance schedule
When you stop for fuel:
Check the engine oil level.
Check the coolant level in coolantreservoir.
Check the windshield washer fluid level.
Look for low or under-inflated tires.
While operating your vehicle:
Note any changes in the sound of the exhaust or any smell of exhaust fumes
in the vehicle.
Check for vibrations in the steering wheel. Notice any increased steering
effort or looseness in the steering
wheel, or change in the straight-ahead
position.
Notice if your vehicle constantly turns slightly or “pulls” to one side when trav-
eling on smooth, level road.
When stopping, listen and check for unusual sounds, pulling to one side,
increased brake pedal travel or “hard-
to-push” brake pedal.
If any slipping or changes in the oper- ation of your transaxle occurs, check
the transaxle fluid level.
Check the automatic transaxle P (Park) function.
Check the parking brake.
Check for fluid leaks under your vehicle (water dripping from the air condition-
ing system during or after use is nor-
mal).
WARNING - Hot coolant
Be careful when checking your
engine coolant level when the
engine is hot. Scalding hot coolant
and steam may blow out under
pressure.
Page 370 of 449
Maintenance
34
7
ENGINE OIL
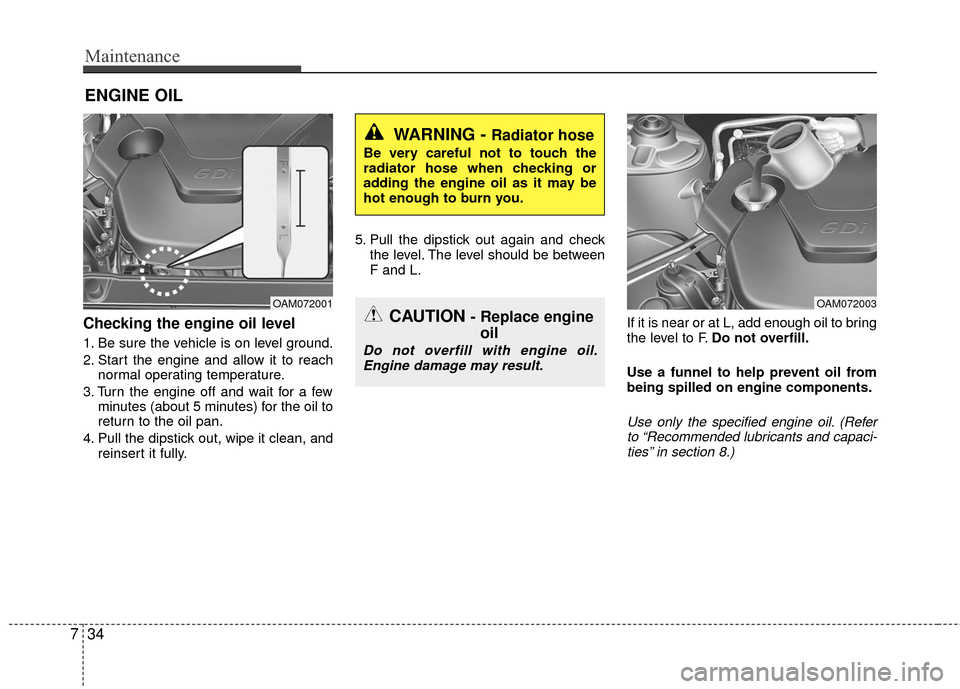
Checking the engine oil level
1. Be sure the vehicle is on level ground.
2. Start the engine and allow it to reach
normal operating temperature.
3. Turn the engine off and wait for a few minutes (about 5 minutes) for the oil to
return to the oil pan.
4. Pull the dipstick out, wipe it clean, and reinsert it fully. 5. Pull the dipstick out again and check
the level. The level should be between
F and L.
If it is near or at L, add enough oil to bring
the level to F.Do not overfill.
Use a funnel to help prevent oil from
being spilled on engine components.
Use only the specified engine oil. (Refer to “Recommended lubricants and capaci- ties” in section 8.)
WARNING - Radiator hose
Be very careful not to touch the
radiator hose when checking or
adding the engine oil as it may be
hot enough to burn you.
CAUTION - Replace engine oil
Do not overfill with engine oil.
Engine damage may result.
OAM072001OAM072003
Page 375 of 449
739
Maintenance
BRAKE/CLUTCH (IF EQUIPPED) FLUID
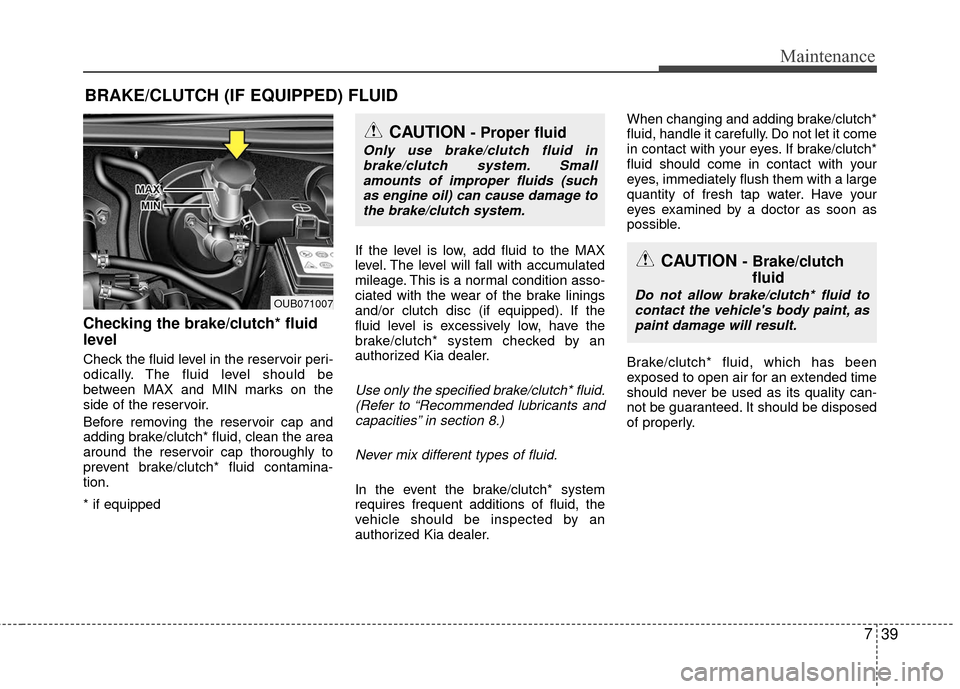
Checking the brake/clutch* fluid
level
Check the fluid level in the reservoir peri-
odically. The fluid level should be
between MAX and MIN marks on the
side of the reservoir.
Before removing the reservoir cap and
adding brake/clutch* fluid, clean the area
around the reservoir cap thoroughly to
prevent brake/clutch* fluid contamina-
tion.
* if equippedIf the level is low, add fluid to the MAX
level. The level will fall with accumulated
mileage. This is a normal condition asso-
ciated with the wear of the brake linings
and/or clutch disc (if equipped). If the
fluid level is excessively low, have the
brake/clutch* system checked by an
authorized Kia dealer.
Use only the specified brake/clutch* fluid.
(Refer to “Recommended lubricants and capacities” in section 8.)
Never mix different types of fluid.
In the event the brake/clutch* system
requires frequent additions of fluid, the
vehicle should be inspected by an
authorized Kia dealer. When changing and adding brake/clutch*
fluid, handle it carefully. Do not let it come
in contact with your eyes. If brake/clutch*
fluid should come in contact with your
eyes, immediately flush them with a large
quantity of fresh tap water. Have your
eyes examined by a doctor as soon as
possible.
Brake/clutch* fluid, which has been
exposed to open air for an extended time
should never be used as its quality can-
not be guaranteed. It should be disposed
of properly.
CAUTION - Brake/clutch
fluid
Do not allow brake/clutch* fluid to
contact the vehicle's body paint, aspaint damage will result.
CAUTION - Proper fluid
Only use brake/clutch fluid in brake/clutch system. Smallamounts of improper fluids (suchas engine oil) can cause damage tothe brake/clutch system.
OUB071007
Page 392 of 449
Maintenance
56
7
Temperature -A, B & C
The temperature grades are A (the
highest), B and C representing the
tire’s resistance to the generation of
heat and its ability to dissipate heat
when tested under controlled condi-
tions on a specified indoor laboratory
test wheel.
Sustained high temperature can
cause the material of the tire to
degenerate and reduce tire life, and
excessive temperature can lead to
sudden tire failure. Grades B and A
represent higher levels of perform-
ance on the laboratory test wheel
than the minimum required by law. Tire terminology and definitions
Air Pressure:
The amount of air
inside the tire pressing outward on
the tire. Air pressure is expressed in
kilopascal (kPa) or pounds per
square inch (psi).
Accessory Weight: This means the
combined weight of optional acces-
sories. Some examples of optional
accessories are, automatic
transaxle, power seats, and air con-
ditioning.
Aspect Ratio: The relationship of a
tire's height to its width.
Belt: A rubber coated layer of cords
that is located between the plies and
the tread. Cords may be made from
steel or other reinforcing materials.
Bead: The tire bead contains steel
wires wrapped by steel cords that
hold the tire onto the rim.
Bias Ply Tire: A pneumatic tire in
which the plies are laid at alternate
angles less than 90 degrees to the
centerline of the tread. Cold Tire Pressure:
The amount of
air pressure in a tire, measured in
kilopascals (kPa) or pounds per
square inch (psi) before a tire has
built up heat from driving.
Curb Weight: This means the weight
of a motor vehicle with standard and
optional equipment including the
maximum capacity of fuel, oil and
coolant, but without passengers and
cargo.
DOT Markings: The DOT code
includes the Tire Identification
Number (TIN), an alphanumeric des-
ignator which can also identify the
tire manufacturer, production plant,
brand and date of production.
GVWR: Gross Vehicle Weight Rating
GAWR FRT: Gross Axle Weight
Rating for the Front Axle.
GAWR RR: Gross Axle Weight
Rating for the Rear axle.
Intended Outboard Sidewall: The
side of an asymmetrical tire, that
must always face outward when
mounted on a vehicle.
Kilopascal (kPa): The metric unit for
air pressure.