window KIA RIO 2020 Owners Manual
[x] Cancel search | Manufacturer: KIA, Model Year: 2020, Model line: RIO, Model: KIA RIO 2020Pages: 516, PDF Size: 10.49 MB
Page 12 of 516
Your vehicle at a glance
22
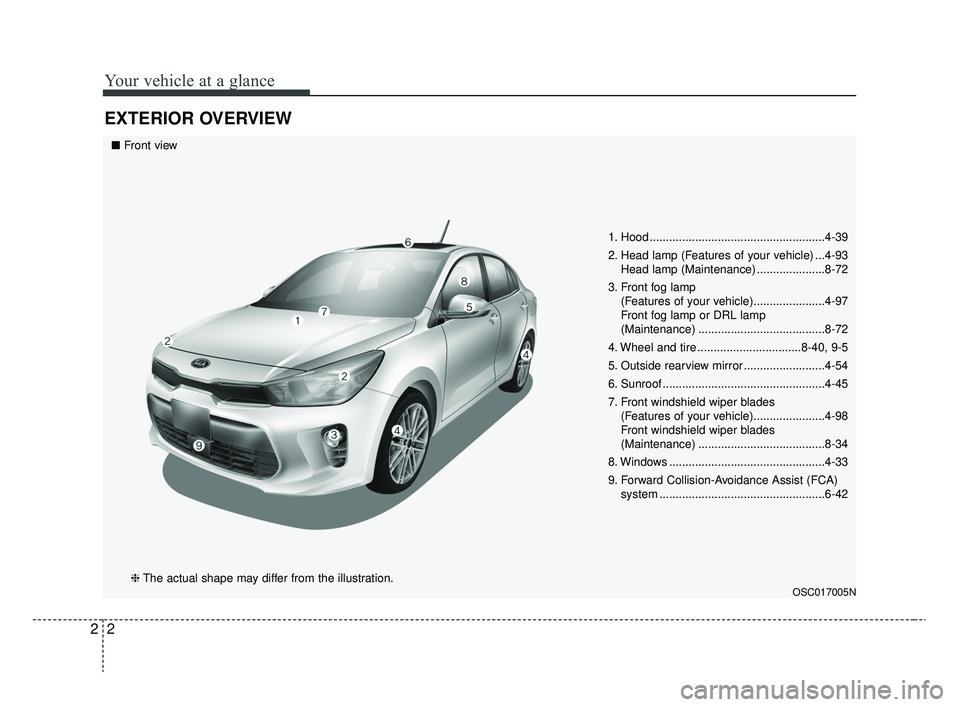
EXTERIOR OVERVIEW
1. Hood ......................................................4-39
2. Head lamp (Features of your vehicle) ...4-93Head lamp (Maintenance) .....................8-72
3. Front fog lamp (Features of your vehicle)......................4-97
Front fog lamp or DRL lamp
(Maintenance) .......................................8-72
4. Wheel and tire ................................8-40, 9-5
5. Outside rearview mirror .........................4-54
6. Sunroof ..................................................4-45
7. Front windshield wiper blades (Features of your vehicle)......................4-98
Front windshield wiper blades
(Maintenance) .......................................8-34
8. Windows ................................................4-33
9. Forward Collision-Avoidance Assist (FCA) system ...................................................6-42
OSC017005N
■Front view
❈ The actual shape may differ from the illustration.
SC CAN (ENG) 2.qxp 8/2/2019 2:55 PM Page 2
Page 14 of 516
Your vehicle at a glance
42
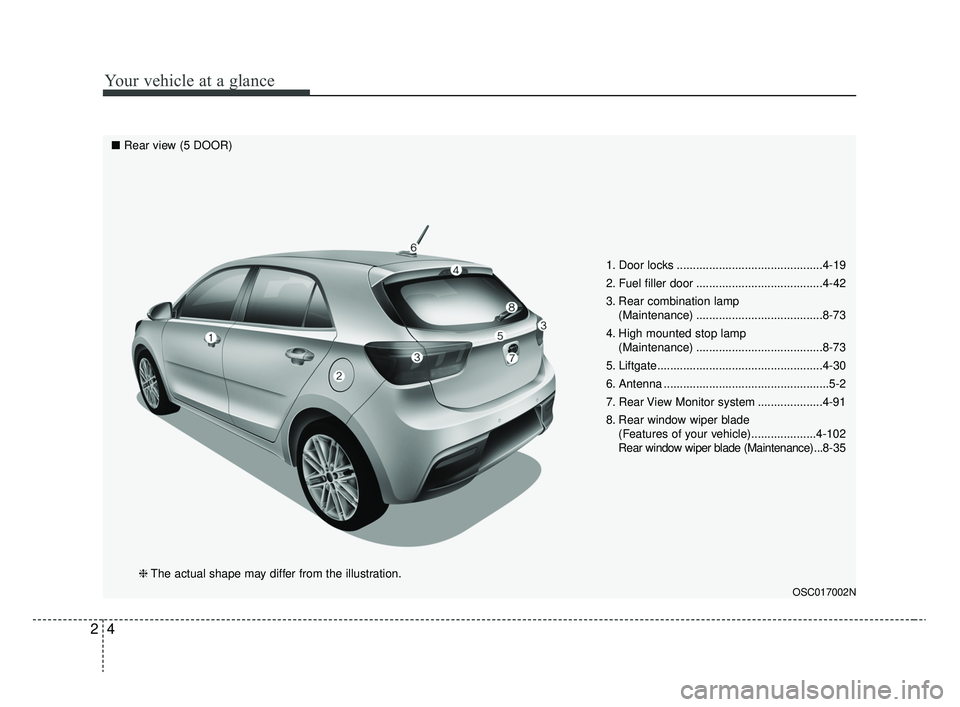
1. Door locks .............................................4-19
2. Fuel filler door .......................................4-42
3. Rear combination lamp (Maintenance) .......................................8-73
4. High mounted stop lamp (Maintenance) .......................................8-73
5. Liftgate...................................................4-30
6. Antenna ...................................................5-2
7. Rear View Monitor system ....................4-91
8. Rear window wiper blade (Features of your vehicle)....................4-102
Rear window wiper blade (Maintenance) ...8-35
OSC017002N
■Rear view (5 DOOR)
❈The actual shape may differ from the illustration.
SC CAN (ENG) 2.qxp 8/2/2019 2:55 PM Page 4
Page 15 of 516
25
Your vehicle at a glance
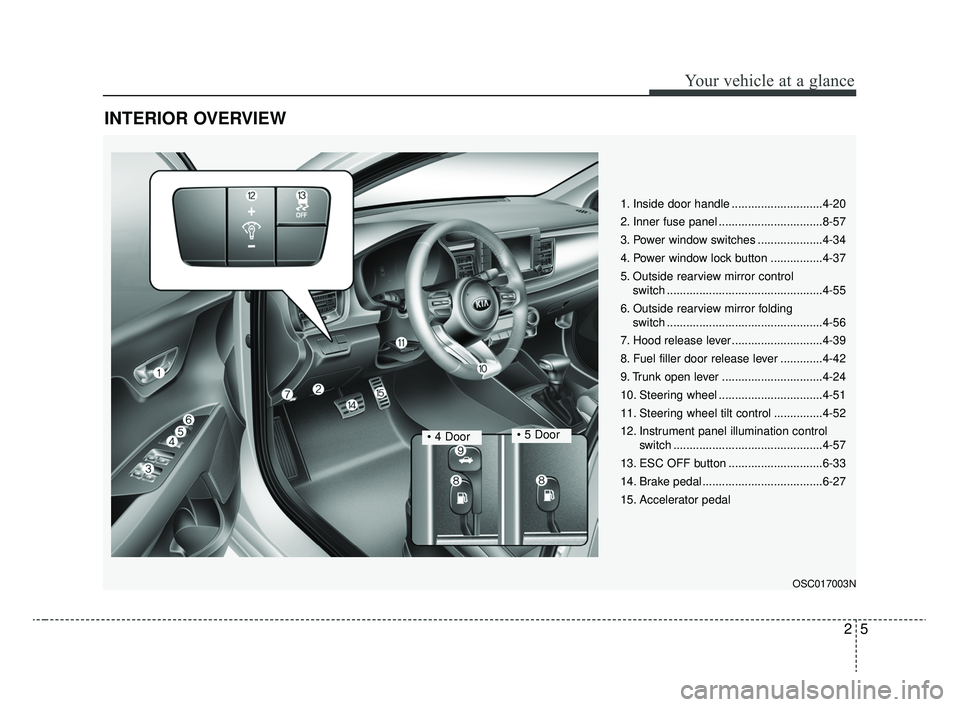
INTERIOR OVERVIEW
1. Inside door handle ............................4-20
2. Inner fuse panel ................................8-57
3. Power window switches ....................4-34
4. Power window lock button ................4-37
5. Outside rearview mirror control switch ................................................4-55
6. Outside rearview mirror folding switch ................................................4-56
7. Hood release lever ............................4-39
8. Fuel filler door release lever .............4-42
9. Trunk open lever ...............................4-24
10. Steering wheel ................................4-51
11. Steering wheel tilt control ...............4-52
12. Instrument panel illumination control switch ..............................................4-57
13. ESC OFF button .............................6-33
14. Brake pedal .....................................6-27
15. Accelerator pedal
OSC017003N
• 4 Door
SC CAN (ENG) 2.qxp 8/2/2019 2:55 PM Page 5
Page 54 of 516
337
Safety features of your vehicle
However, air bag inflation can also
cause injuries which can include
facial abrasions, bruises and bro-
ken bones because the inflation
speed also causes the air bags to
expand with a great deal of force.
There are even circumstances
under which contact with the
steering wheel or passenger air
bag can cause fatal injuries,
especially if the occupant is
positioned excessively close to
the steering wheel or passenger
air bag.Noise and smoke
When the air bags inflate, they make
a loud noise and they leave smoke
and powder in the air inside of the
vehicle. This is normal and is a result
of the ignition of the air bag inflator.
After the air bag inflates, you may
feel substantial discomfort in breath-
ing due to the contact of your chest
to both the seat belt and the air bag,
as well as from breathing the smoke
and powder. Open your doors
and/or windows as soon as possi-
ble after the impact in order to
reduce discomfort and prevent
prolonged exposure to smoke and
powder.
Though the smoke and powder are
non-toxic, they may cause irritation
to the skin, eyes, nose and throat,
etc. If this is the case, wash and rinse
with cold water immediately and con-
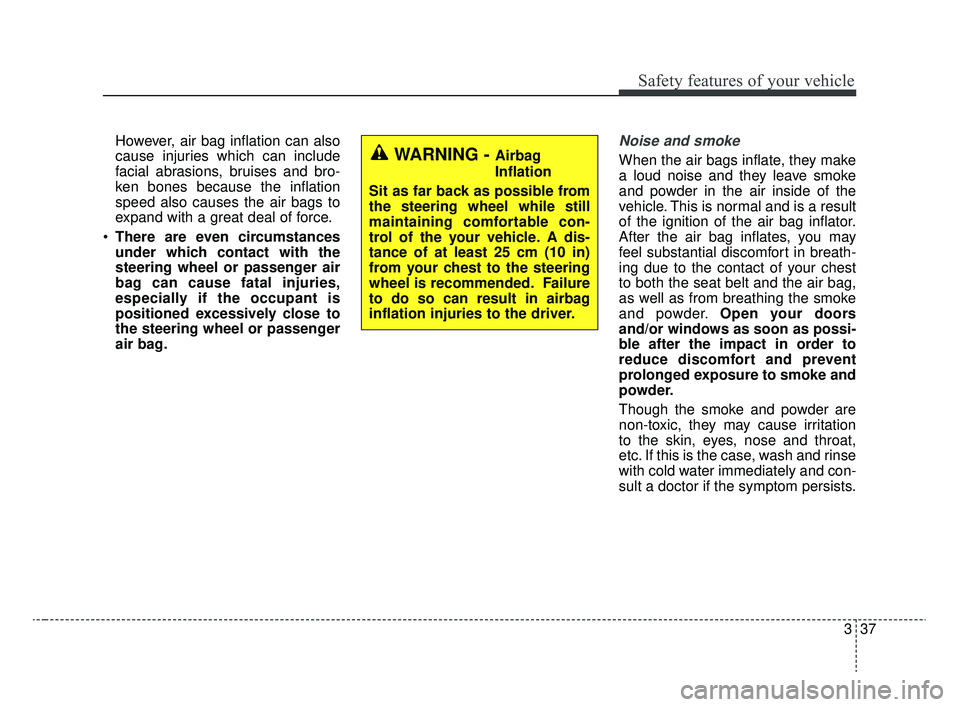
sult a doctor if the symptom persists.WARNING - Airbag
Inflation
Sit as far back as possible from
the steering wheel while still
maintaining comfortable con-
trol of the your vehicle. A dis-
tance of at least 25 cm (10 in)
from your chest to the steering
wheel is recommended. Failure
to do so can result in airbag
inflation injuries to the driver.
SC CAN (ENG) 3.QXP 6/7/2019 9:39 AM Page 37
Page 55 of 516
Safety features of your vehicle
38
3
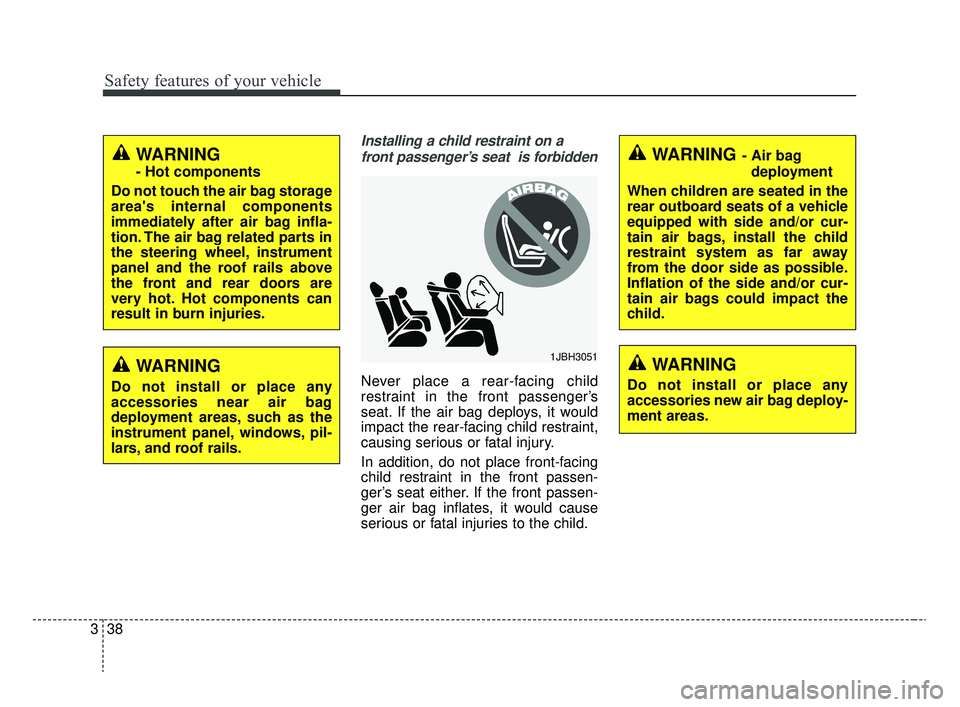
Installing a child restraint on a
front passenger’s seat is forbidden
Never place a rear-facing child
restraint in the front passenger’s
seat. If the air bag deploys, it would
impact the rear-facing child restraint,
causing serious or fatal injury.
In addition, do not place front-facing
child restraint in the front passen-
ger’s seat either. If the front passen-
ger air bag inflates, it would cause
serious or fatal injuries to the child.
WARNING
- Hot components
Do not touch the air bag storage
area's internal components
immediately after air bag infla-
tion. The air bag related parts in
the steering wheel, instrument
panel and the roof rails above
the front and rear doors are
very hot. Hot components can
result in burn injuries.
1JBH3051
WARNING - Air bag deployment
When children are seated in the
rear outboard seats of a vehicle
equipped with side and/or cur-
tain air bags, install the child
restraint system as far away
from the door side as possible.
Inflation of the side and/or cur-
tain air bags could impact the
child.
WARNING
Do not install or place any
accessories near air bag
deployment areas, such as the
instrument panel, windows, pil-
lars, and roof rails.
WARNING
Do not install or place any
accessories new air bag deploy-
ment areas.
SC CAN (ENG) 3.QXP 6/7/2019 9:39 AM Page 38
Page 73 of 516
Safety features of your vehicle
56
3
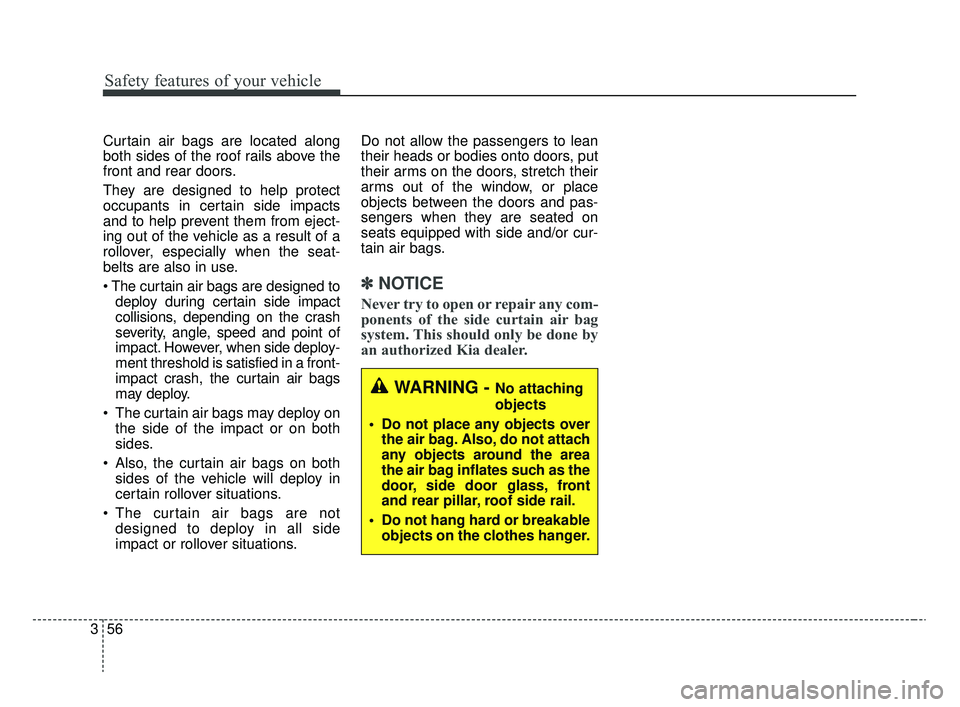
Curtain air bags are located along
both sides of the roof rails above the
front and rear doors.
They are designed to help protect
occupants in certain side impacts
and to help prevent them from eject-
ing out of the vehicle as a result of a
rollover, especially when the seat-
belts are also in use.
The curtain air bags are designed to
deploy during certain side impact
collisions, depending on the crash
severity, angle, speed and point of
impact. However, when side deploy-
ment threshold is satisfied in a front-
impact crash, the curtain air bags
may deploy.
The curtain air bags may deploy on the side of the impact or on both
sides.
Also, the curtain air bags on both sides of the vehicle will deploy in
certain rollover situations.
The curtain air bags are not designed to deploy in all side
impact or rollover situations. Do not allow the passengers to lean
their heads or bodies onto doors, put
their arms on the doors, stretch their
arms out of the window, or place
objects between the doors and pas-
sengers when they are seated on
seats equipped with side and/or cur-
tain air bags.
✽ ✽
NOTICE
Never try to open or repair any com-
ponents of the side curtain air bag
system. This should only be done by
an authorized Kia dealer.
WARNING - No attaching
objects
Do not place any objects over the air bag. Also, do not attach
any objects around the area
the air bag inflates such as the
door, side door glass, front
and rear pillar, roof side rail.
Do not hang hard or breakable objects on the clothes hanger.
SC CAN (ENG) 3.QXP 6/7/2019 9:40 AM Page 56
Page 81 of 516
Features of your vehicle
Keys . . . . . . . . . . . . . . . . . . . . . . . . . . . . . . . . . . . . \
. . 4-4
• Record your key number . . . . . . . . . . . . . . . . . . . . . . . 4-4
• Key operations . . . . . . . . . . . . . . . . . . . . . . . . . . . . . . . . 4-4
Smart key . . . . . . . . . . . . . . . . . . . . . . . . . . . . . . . . . 4-6
• Smart key functions . . . . . . . . . . . . . . . . . . . . . . . . . . . 4-6
• Smart key precautions . . . . . . . . . . . . . . . . . . . . . . . . . 4-8
Remote keyless entry . . . . . . . . . . . . . . . . . . . . . . . 4-10
• Remote keyless entry system operations . . . . . . . . . . 4-10
• Transmitter precautions . . . . . . . . . . . . . . . . . . . . . . . 4-11
• Battery replacement . . . . . . . . . . . . . . . . . . . . . . . . . . 4-12
• Immobilizer system . . . . . . . . . . . . . . . . . . . . . . . . . . . 4-14
• Limp home (override) procedure . . . . . . . . . . . . . . . 4-15
Theft-alarm system . . . . . . . . . . . . . . . . . . . . . . . . 4-16
• Armed stage . . . . . . . . . . . . . . . . . . . . . . . . . . . . . . . . . 4-16
• Theft-alarm stage . . . . . . . . . . . . . . . . . . . . . . . . . . . . 4-17
• Disarmed stage. . . . . . . . . . . . . . . . . . . . . . . . . . . . . . . 4-18
Door locks . . . . . . . . . . . . . . . . . . . . . . . . . . . . . . . . 4-19
• Operating door locks from outside the vehicle . . . . 4-19
• Operating door locks from inside the vehicle . . . . . . 4-20
• Impact sensing door unlock system . . . . . . . . . . . . . . 4-22
• Auto door lock/unlock feature . . . . . . . . . . . . . . . . . . 4-22
• Speed sensing door lock system . . . . . . . . . . . . . . . . . 4-22
• Child-protector rear door lock. . . . . . . . . . . . . . . . . . 4-22
Trunk (for 4 door) . . . . . . . . . . . . . . . . . . . . . . . . . 4-24
• Opening the trunk . . . . . . . . . . . . . . . . . . . . . . . . . . . . 4-24
• Closing the trunk . . . . . . . . . . . . . . . . . . . . . . . . . . . . . 4-24
• Emergency trunk safety release . . . . . . . . . . . . . . . . . 4-25
Smart trunk (for 4 door) . . . . . . . . . . . . . . . . . . . . 4-26
Liftgate (for 5 door) . . . . . . . . . . . . . . . . . . . . . . . . 4-30
• Opening the liftgate . . . . . . . . . . . . . . . . . . . . . . . . . . . 4-30
• Closing the liftgate. . . . . . . . . . . . . . . . . . . . . . . . . . . . 4-30
• Emergency liftgate safety release. . . . . . . . . . . . . . . . 4-31
Windows . . . . . . . . . . . . . . . . . . . . . . . . . . . . . . . . . 4-33
• Power windows . . . . . . . . . . . . . . . . . . . . . . . . . . . . . . 4-34
• Manual windows . . . . . . . . . . . . . . . . . . . . . . . . . . . . . 4-38
Hood. . . . . . . . . . . . . . . . . . . . . . . . . . . . . . . . . . . . \
. 4-39
• Opening the hood . . . . . . . . . . . . . . . . . . . . . . . . . . . . 4-39
• Closing the hood . . . . . . . . . . . . . . . . . . . . . . . . . . . . . 4-40
• Hood open warning . . . . . . . . . . . . . . . . . . . . . . . . . . . 4-40
Fuel filler door . . . . . . . . . . . . . . . . . . . . . . . . . . . . 4-42
• Opening the fuel filler door . . . . . . . . . . . . . . . . . . . . 4-42
• Closing the fuel filler door . . . . . . . . . . . . . . . . . . . . . 4-42
Sunroof . . . . . . . . . . . . . . . . . . . . . . . . . . . . . . . . . . 4-45\
• Sunroof open warning. . . . . . . . . . . . . . . . . . . . . . . . . 4-46
• Sliding the sunroof . . . . . . . . . . . . . . . . . . . . . . . . . . . 4-47
• Tilting the sunroof . . . . . . . . . . . . . . . . . . . . . . . . . . . . 4-48
4
SC CAN (ENG) 4.QXP 12/12/2019 5:08 PM Page 1
Page 82 of 516
• Sunshade . . . . . . . . . . . . . . . . . . . . . . . . . . . . . . . . . . . 4-\
49
• Resetting the sunroof . . . . . . . . . . . . . . . . . . . . . . . . . 4-49
Steering wheel . . . . . . . . . . . . . . . . . . . . . . . . . . . . . 4-51
• Electric Power Steering (EPS) . . . . . . . . . . . . . . . . . . 4-51
• Tilt and telescopic steering . . . . . . . . . . . . . . . . . . . . . 4-52
• Horn . . . . . . . . . . . . . . . . . . . . . . . . . . . . . . . . . . . . \
. . . 4-52
• Heated steering wheel . . . . . . . . . . . . . . . . . . . . . . . . . 4-53
Mirrors . . . . . . . . . . . . . . . . . . . . . . . . . . . . . . . . . . 4-54\
• Inside rearview mirror . . . . . . . . . . . . . . . . . . . . . . . . 4-54
• Outside rearview mirror. . . . . . . . . . . . . . . . . . . . . . . 4-54
Instrument cluster . . . . . . . . . . . . . . . . . . . . . . . . . 4-57
• Instrument cluster control . . . . . . . . . . . . . . . . . . . . . 4-58
• LCD window control . . . . . . . . . . . . . . . . . . . . . . . . . . 4-58
• Gauges . . . . . . . . . . . . . . . . . . . . . . . . . . . . . . . . . . . . \
. 4-59
• Transmission Shift Indicator . . . . . . . . . . . . . . . . . . . 4-62
LCD windows . . . . . . . . . . . . . . . . . . . . . . . . . . . . . 4-64
• Over view . . . . . . . . . . . . . . . . . . . . . . . . . . . . . . . . . . . 4-\
64
• Trip information (Trip computer) . . . . . . . . . . . . . . . 4-64
• LCD modes (for type B cluster) . . . . . . . . . . . . . . . . . 4-69
• Service mode . . . . . . . . . . . . . . . . . . . . . . . . . . . . . . . . 4-70
• User settings mode (for type B cluster) . . . . . . . . . . . 4-70
Warning and indicator lights . . . . . . . . . . . . . . . . 4-79
• Warning lights . . . . . . . . . . . . . . . . . . . . . . . . . . . . . . . 4-79
• Indicator lights. . . . . . . . . . . . . . . . . . . . . . . . . . . . . . . 4-87
Rear view monitor system . . . . . . . . . . . . . . . . . . . 4-91
• Rear view monitor function . . . . . . . . . . . . . . . . . . . . 4-91
Lighting . . . . . . . . . . . . . . . . . . . . . . . . . . . . . . . . . . 4-92\
• Battery saver function. . . . . . . . . . . . . . . . . . . . . . . . . 4-92
• Headlight escort function . . . . . . . . . . . . . . . . . . . . . . 4-92
• Headlight welcome function . . . . . . . . . . . . . . . . . . . . 4-92
• Daytime running light . . . . . . . . . . . . . . . . . . . . . . . . . 4-93
• Lighting control . . . . . . . . . . . . . . . . . . . . . . . . . . . . . . 4-93
• High beam operation. . . . . . . . . . . . . . . . . . . . . . . . . . 4-95
• Turn signals and lane change signals . . . . . . . . . . . . 4-96
• Front fog light . . . . . . . . . . . . . . . . . . . . . . . . . . . . . . . 4-97
Wipers and washers . . . . . . . . . . . . . . . . . . . . . . . . 4-98
• Windshield wipers . . . . . . . . . . . . . . . . . . . . . . . . . . . . 4-99
• Windshield washers (front) . . . . . . . . . . . . . . . . . . . 4-100
• Rear window wiper and washer switch (for 5 door) . . . . . . . . . . . . . . . . . . . . . . . . . . . . . . . . 4-102
Interior light . . . . . . . . . . . . . . . . . . . . . . . . . . . . . 4-103
• Automatic turn off function . . . . . . . . . . . . . . . . . . . 4-103
• Map lamp . . . . . . . . . . . . . . . . . . . . . . . . . . . . . . . . . . 4-10\
3
• Room lamp . . . . . . . . . . . . . . . . . . . . . . . . . . . . . . . . . 4-104
• Trunk/Liftgate room lamp . . . . . . . . . . . . . . . . . . . . 4-106
• Glove box lamp . . . . . . . . . . . . . . . . . . . . . . . . . . . . . 4-106
• Vanity mirror lamp . . . . . . . . . . . . . . . . . . . . . . . . . . 4-107
Defroster . . . . . . . . . . . . . . . . . . . . . . . . . . . . . . . . 4-108
• Rear window defroster . . . . . . . . . . . . . . . . . . . . . . . 4-108
4
SC CAN (ENG) 4.QXP 12/12/2019 5:08 PM Page 2
Page 100 of 516
Features of your vehicle
20
4
Operating door locks from
inside the vehicle
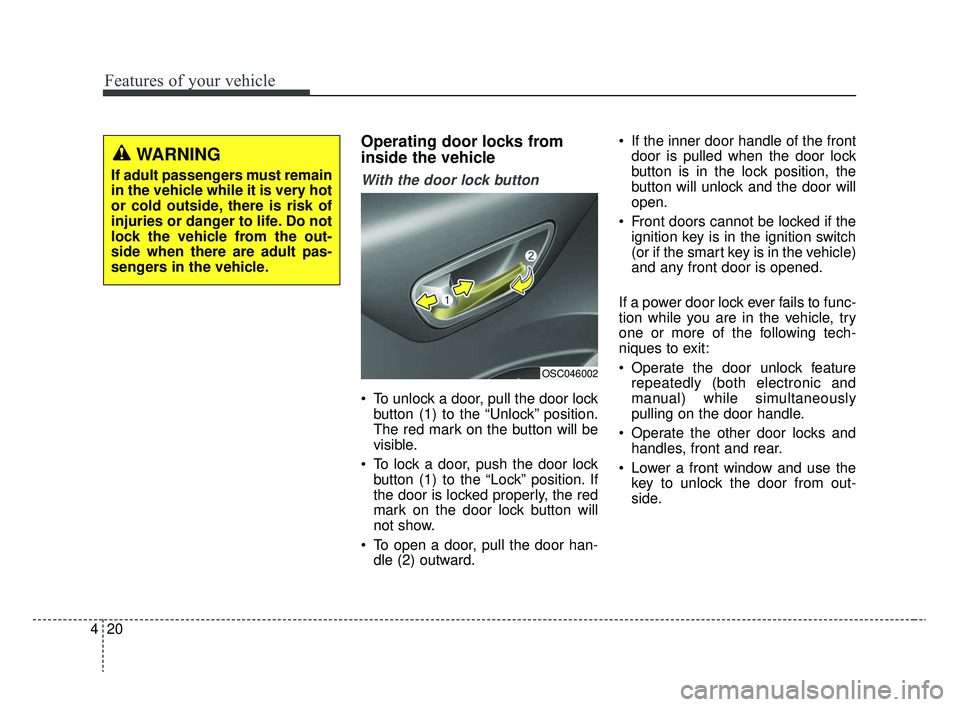
With the door lock button
To unlock a door, pull the door lock
button (1) to the “Unlock” position.
The red mark on the button will be
visible.
To lock a door, push the door lock button (1) to the “Lock” position. If
the door is locked properly, the red
mark on the door lock button will
not show.
To open a door, pull the door han- dle (2) outward. If the inner door handle of the front
door is pulled when the door lock
button is in the lock position, the
button will unlock and the door will
open.
Front doors cannot be locked if the ignition key is in the ignition switch
(or if the smart key is in the vehicle)
and any front door is opened.
If a power door lock ever fails to func-
tion while you are in the vehicle, try
one or more of the following tech-
niques to exit:
Operate the door unlock feature repeatedly (both electronic and
manual) while simultaneously
pulling on the door handle.
Operate the other door locks and handles, front and rear.
Lower a front window and use the key to unlock the door from out-
side.
OSC046002
WARNING
If adult passengers must remain
in the vehicle while it is very hot
or cold outside, there is risk of
injuries or danger to life. Do not
lock the vehicle from the out-
side when there are adult pas-
sengers in the vehicle.
SC CAN (ENG) 4.QXP 12/12/2019 5:08 PM Page 20
Page 107 of 516
427
Features of your vehicle
1. Setting
To activate the Smart Trunk,
(1) Change the LCD modes to Usersetting mode
(2) Select the Door mode
(3) Check the Smart Trunk.
❈ For more details, refer to “LCD
Windows” in this chapter
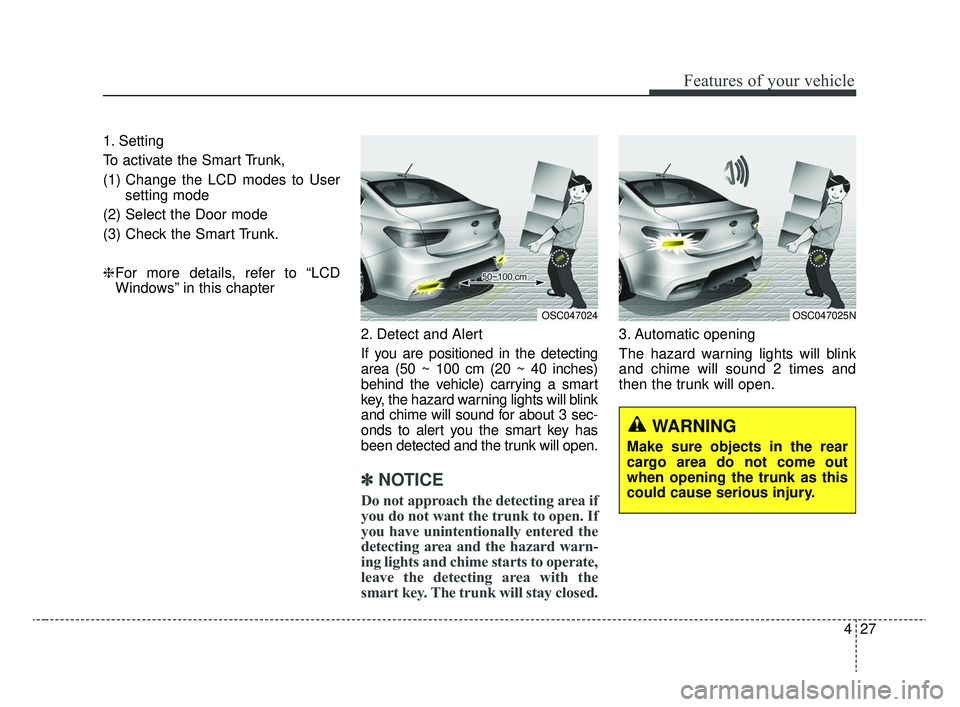
2. Detect and Alert
If you are positioned in the detecting
area (50 ~ 100 cm (20 ~ 40 inches)
behind the vehicle) carrying a smart
key, the hazard warning lights will blink
and chime will sound for about 3 sec-
onds to alert you the smart key has
been detected and the trunk will open.
✽ ✽NOTICE
Do not approach the detecting area if
you do not want the trunk to open. If
you have unintentionally entered the
detecting area and the hazard warn-
ing lights and chime starts to operate,
leave the detecting area with the
smart key. The trunk will stay closed.
3. Automatic opening
The hazard warning lights will blink
and chime will sound 2 times and
then the trunk will open.
OSC047024OSC047025N
WARNING
Make sure objects in the rear
cargo area do not come out
when opening the trunk as this
could cause serious injury.
SC CAN (ENG) 4.QXP 12/12/2019 5:09 PM Page 27