trunk KIA RIO HATCHBACK 2015 User Guide
[x] Cancel search | Manufacturer: KIA, Model Year: 2015, Model line: RIO HATCHBACK, Model: KIA RIO HATCHBACK 2015Pages: 447, PDF Size: 9.49 MB
Page 93 of 447
Features of your vehicle
22
4
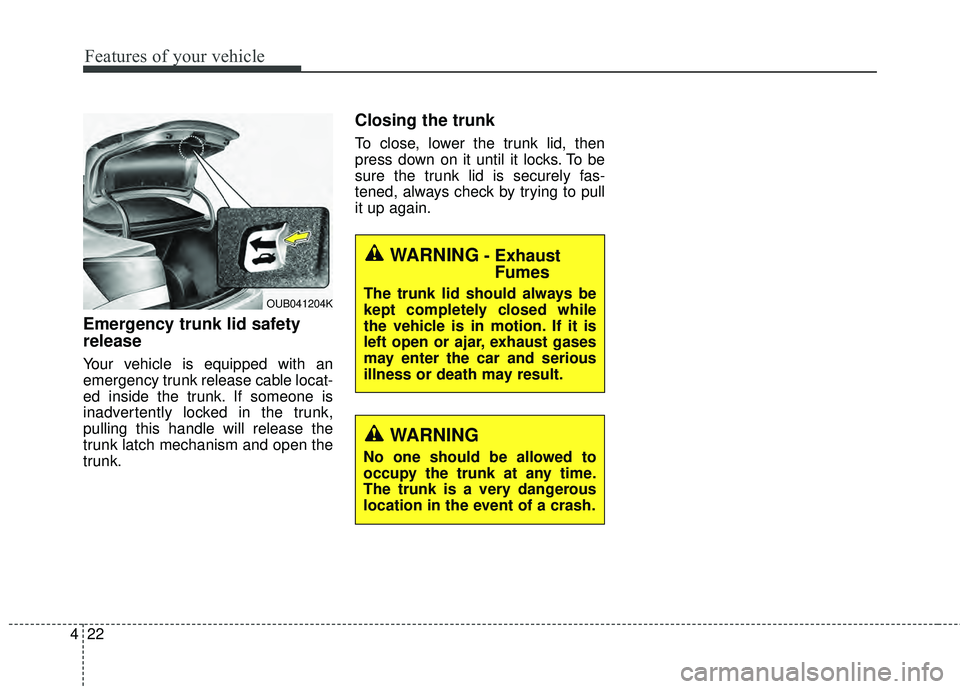
Emergency trunk lid safety
release
Your vehicle is equipped with an
emergency trunk release cable locat-
ed inside the trunk. If someone is
inadvertently locked in the trunk,
pulling this handle will release the
trunk latch mechanism and open the
trunk.
Closing the trunk
To close, lower the trunk lid, then
press down on it until it locks. To be
sure the trunk lid is securely fas-
tened, always check by trying to pull
it up again.
WARNING- Exhaust
Fumes
The trunk lid should always be
kept completely closed while
the vehicle is in motion. If it is
left open or ajar, exhaust gases
may enter the car and serious
illness or death may result.
WARNING
No one should be allowed to
occupy the trunk at any time.
The trunk is a very dangerous
location in the event of a crash.
OUB041204K
Page 134 of 447
463
Features of your vehicle
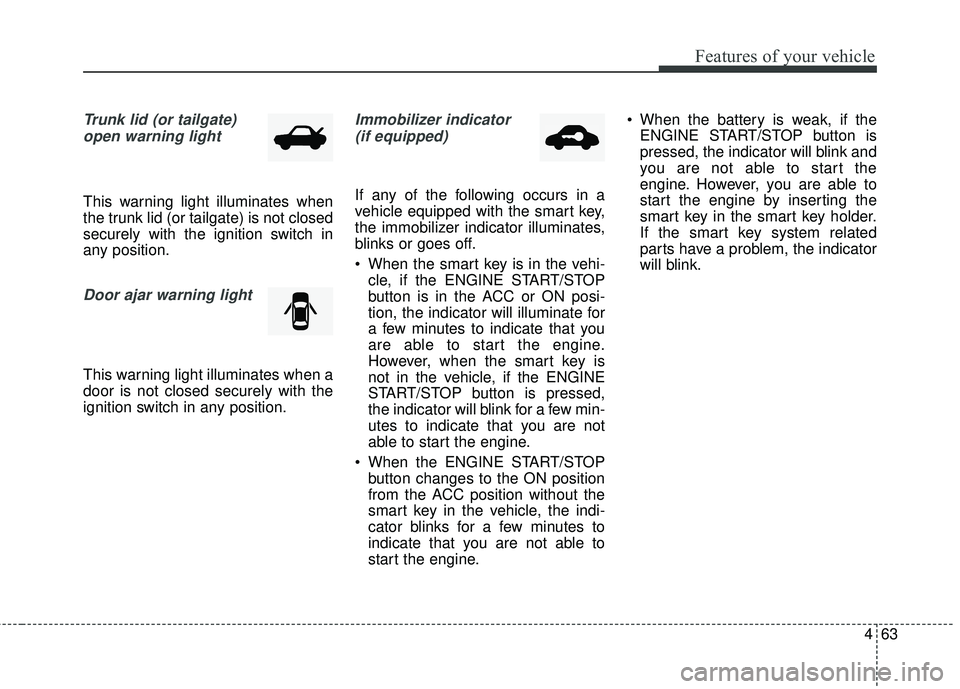
Trunk lid (or tailgate)open warning light
This warning light illuminates when
the trunk lid (or tailgate) is not closed
securely with the ignition switch in
any position.
Door ajar warning light
This warning light illuminates when a
door is not closed securely with the
ignition switch in any position.
Immobilizer indicator (if equipped)
If any of the following occurs in a
vehicle equipped with the smart key,
the immobilizer indicator illuminates,
blinks or goes off.
When the smart key is in the vehi- cle, if the ENGINE START/STOP
button is in the ACC or ON posi-
tion, the indicator will illuminate for
a few minutes to indicate that you
are able to start the engine.
However, when the smart key is
not in the vehicle, if the ENGINE
START/STOP button is pressed,
the indicator will blink for a few min-
utes to indicate that you are not
able to start the engine.
When the ENGINE START/STOP button changes to the ON position
from the ACC position without the
smart key in the vehicle, the indi-
cator blinks for a few minutes to
indicate that you are not able to
start the engine. When the battery is weak, if the
ENGINE START/STOP button is
pressed, the indicator will blink and
you are not able to start the
engine. However, you are able to
start the engine by inserting the
smart key in the smart key holder.
If the smart key system related
parts have a problem, the indicator
will blink.
Page 156 of 447
485
Features of your vehicle
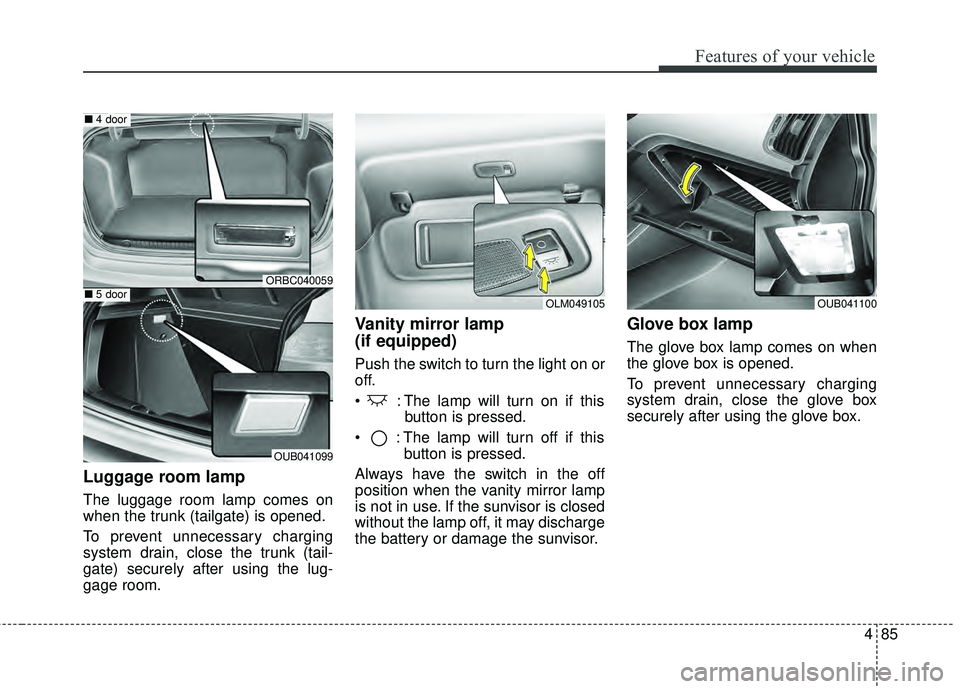
Luggage room lamp
The luggage room lamp comes on
when the trunk (tailgate) is opened.
To prevent unnecessary charging
system drain, close the trunk (tail-
gate) securely after using the lug-
gage room.
Vanity mirror lamp
(if equipped)
Push the switch to turn the light on or
off.
: The lamp will turn on if thisbutton is pressed.
: The lamp will turn off if this button is pressed.
Always have the switch in the off
position when the vanity mirror lamp
is not in use. If the sunvisor is closed
without the lamp off, it may discharge
the battery or damage the sunvisor.
Glove box lamp
The glove box lamp comes on when
the glove box is opened.
To prevent unnecessary charging
system drain, close the glove box
securely after using the glove box.
OLM049105OUB041100
ORBC040059
OUB041099
■ 4 door
■5 door
Page 405 of 447
Maintenance
74
7
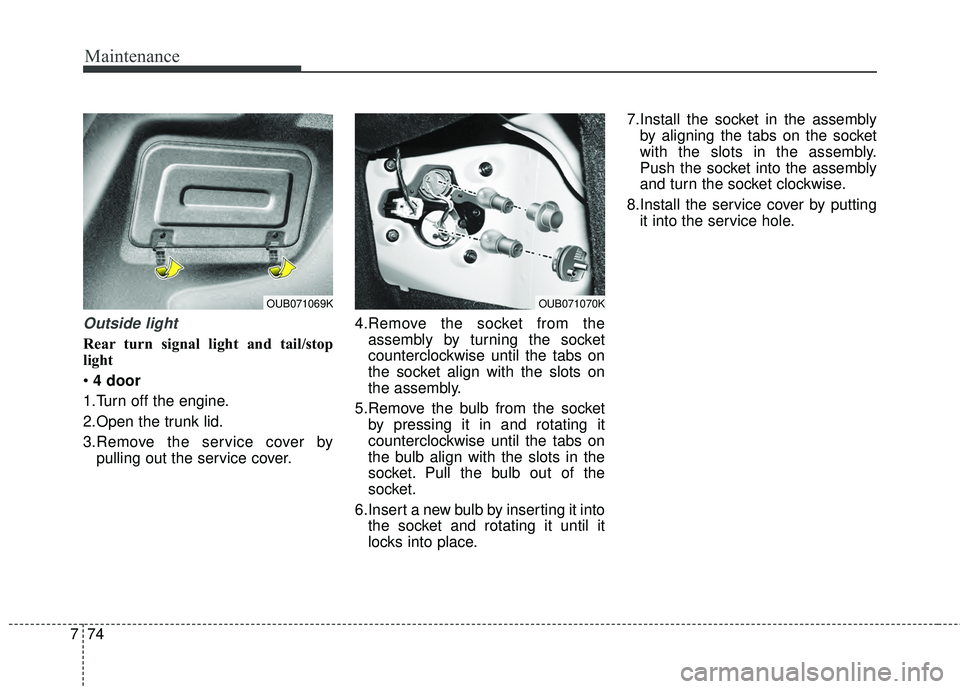
Outside light
Rear turn signal light and tail/stop
light
4 door
1.Turn off the engine.
2.Open the trunk lid.
3.Remove the service cover by pulling out the service cover. 4.Remove the socket from the
assembly by turning the socket
counterclockwise until the tabs on
the socket align with the slots on
the assembly.
5.Remove the bulb from the socket by pressing it in and rotating it
counterclockwise until the tabs on
the bulb align with the slots in the
socket. Pull the bulb out of the
socket.
6.Insert a new bulb by inserting it into the socket and rotating it until it
locks into place. 7.Install the socket in the assembly
by aligning the tabs on the socket
with the slots in the assembly.
Push the socket into the assembly
and turn the socket clockwise.
8.Install the service cover by putting it into the service hole.
OUB071070KOUB071069K
Page 407 of 447
Maintenance
76
7
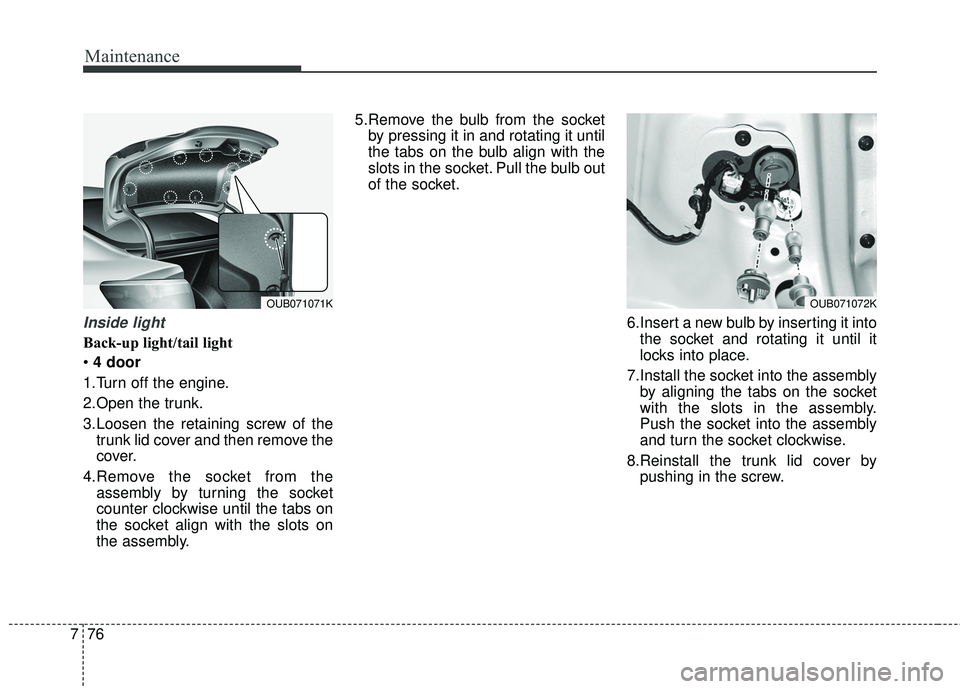
Inside light
Back-up light/tail light
4 door
1.Turn off the engine.
2.Open the trunk.
3.Loosen the retaining screw of the trunk lid cover and then remove the
cover.
4.Remove the socket from the assembly by turning the socket
counter clockwise until the tabs on
the socket align with the slots on
the assembly. 5.Remove the bulb from the socket
by pressing it in and rotating it until
the tabs on the bulb align with the
slots in the socket. Pull the bulb out
of the socket.
6.Insert a new bulb by inserting it intothe socket and rotating it until it
locks into place.
7.Install the socket into the assembly by aligning the tabs on the socket
with the slots in the assembly.
Push the socket into the assembly
and turn the socket clockwise.
8.Reinstall the trunk lid cover by pushing in the screw.
OUB071072KOUB071071K
Page 409 of 447
Maintenance
78
7
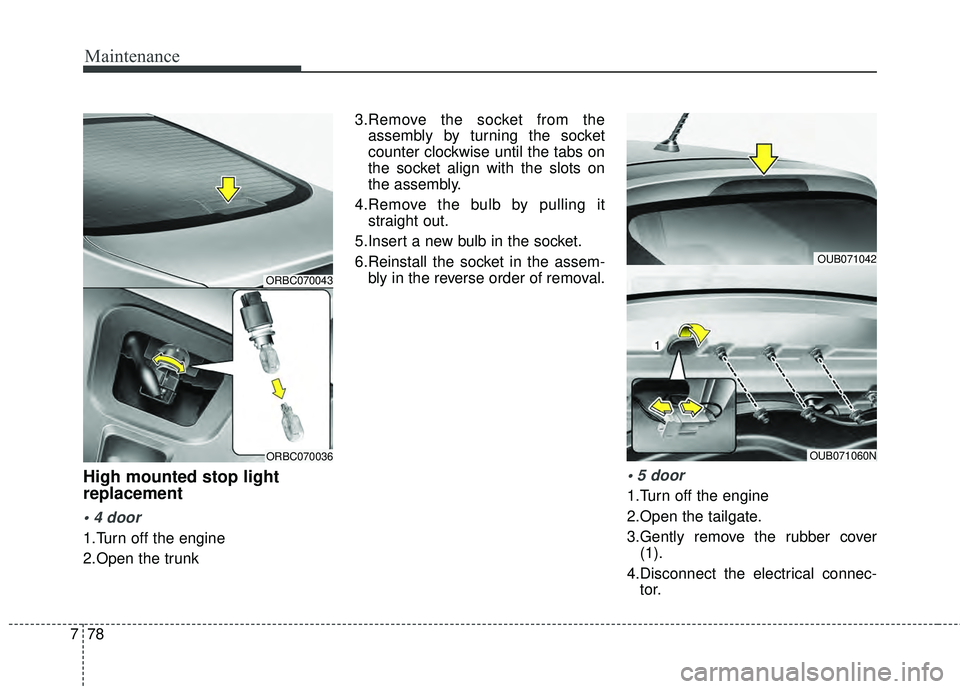
High mounted stop light
replacement
1.Turn off the engine
2.Open the trunk 3.Remove the socket from the
assembly by turning the socket
counter clockwise until the tabs on
the socket align with the slots on
the assembly.
4.Remove the bulb by pulling it straight out.
5.Insert a new bulb in the socket.
6.Reinstall the socket in the assem- bly in the reverse order of removal.
1.Turn off the engine
2.Open the tailgate.
3.Gently remove the rubber cover(1).
4.Disconnect the electrical connec- tor.
OUB071060N
OUB071042
ORBC070043
ORBC070036
Page 445 of 447
I9
Index
Luggage net ··················\
··················\
··················\
···········4-99
Luggage tray ··················\
··················\
··················\
········4-100
Sunroof··················\
··················\
··················\
··················\
···4-35
Sunvisor ··················\
··················\
··················\
·················4-10\
4
Tachometer··················\
··················\
··················\
···············4-46
Tailgate··················\
··················\
··················\
··················\
···4-23 Emergency safety release ··················\
··················\
········4-24
Telescoping steering ··················\
··················\
··················\
4-40
Tether anchor system ··················\
··················\
·················3-28\
Theft-alarm system ··················\
··················\
··················\
··4-13
Tilt steering ··················\
··················\
··················\
··············4-40
Tire and loading information label ··················\
··············5-56
Tire chains··················\
··················\
··················\
················5-53
Tire mobility kit ··················\
··················\
··················\
·······6-23
Tire pressure monitoring system (TPMS) ··················\
·····6-9
Tire specification and pressure label ··················\
·············8-9
Tires and wheels ··················\
··················\
·················7-42\
, 8-5 Checking tire inflation pressure ··················\
················7-43
Compact spare tire replacement ··················\
················7-46
Recommended cold tire inflation pressures ················7-42
Tire care ··················\
··················\
··················\
·················7-42\
Tire maintenance ··················\
··················\
··················\
···7-47
Tire replacement ··················\
··················\
··················\
····7-46
Tire rotation ··················\
··················\
··················\
···········7-44
Tire sidewall labeling ··················\
··················\
··············7-47 Tire traction ··················\
··················\
··················\
···········7-47
Wheel alignment and tire balance ··················\
·············7-44
Wheel replacement ··················\
··················\
··················\
7-47
Towing ··················\
··················\
··················\
··················\
···6-29
Towing capacity ··················\
··················\
··················\
·······5-57
Transaxle Automatic transaxle ··················\
··················\
·················5-16\
Manual transaxle ··················\
··················\
··················\
···5-13
Trip computer ··················\
··················\
··················\
··········4-49
Trunk ··················\
··················\
··················\
··················\
······4-21
User settings··················\
··················\
··················\
·············4-54
Vehicle break-in process ··················\
··················\
··············1-5
Vehicle capacity weight ··················\
··················\
·············5-56
Vehicle certification label ··················\
··················\
············8-8
Vehicle curb weight ··················\
··················\
··················\
·5-61
Vehicle data collection and event data recorders
Vehicle identification number (VIN) ··················\
·············8-8
Vehicle load limit ··················\
··················\
··················\
·····5-56 Cargo capacity ··················\
··················\
··················\
·······5-57
Certification label ··················\
··················\
··················\
··5-59
Seating capacity ··················\
··················\
··················\
·····5-57
Steps For Determining Correct Load Limit ················5-57
T
U
V