KIA RIO HATCHBACK 2016 Owners Manual
Manufacturer: KIA, Model Year: 2016, Model line: RIO HATCHBACK, Model: KIA RIO HATCHBACK 2016Pages: 477, PDF Size: 13.46 MB
Page 151 of 477
481
Features of your vehicle
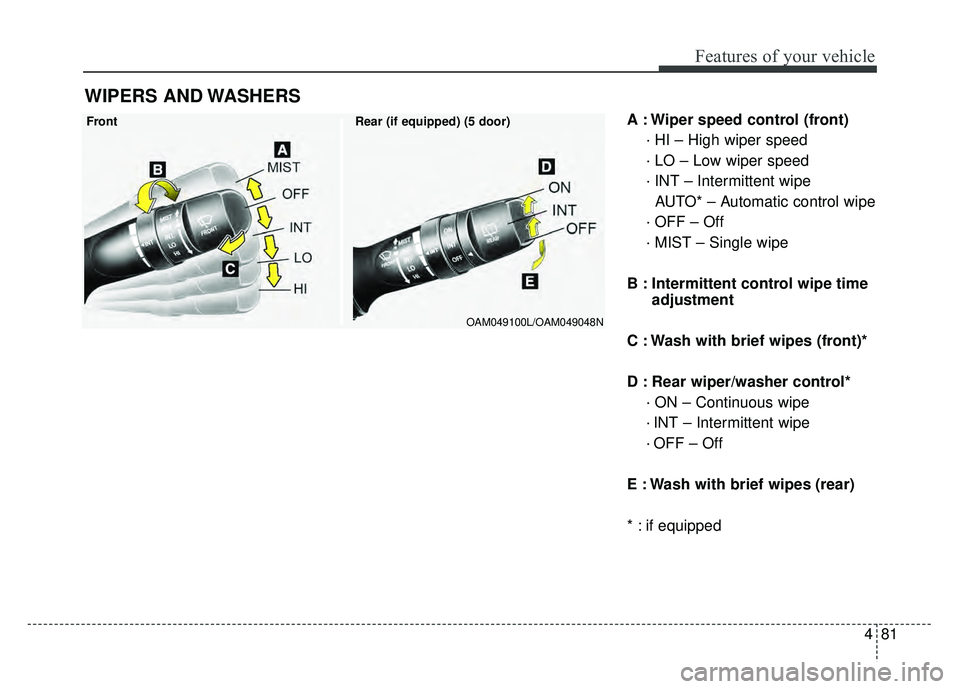
A : Wiper speed control (front)· HI – High wiper speed
· LO – Low wiper speed
· INT – Intermittent wipe AUTO* – Automatic control wipe
· OFF – Off
· MIST – Single wipe
B : Intermittent control wipe time adjustment
C : Wash with brief wipes (front)*
D : Rear wiper/washer control* · ON – Continuous wipe
· INT – Intermittent wipe
· OFF – Off
E : Wash with brief wipes (rear)
* : if equipped
WIPERS AND WASHERS
Front Rear (if equipped) (5 door)
OAM049100L/OAM049048N
Page 152 of 477
Features of your vehicle
82
4
Windshield wipers
Operates as follows when the igni-
tion switch is turned ON.
MIST : For a single wiping cycle,
move the lever upward and
release it. The wipers will
operate continuously if the
lever is held in this position.
OFF : Wiper is not in operation
INT : Wiper operates intermittently at the same wiping intervals. Use
this mode in a light rain or mist.
To vary the speed setting, turn
the speed control knob.
LO : Normal wiper speed
HI : Fast wiper speed
If there is heavy accumulation of
snow or ice on the windshield,
defrost the windshield for about 10
minutes, or until the snow and/or ice
is removed before using the wind-
shield wipers to ensure proper oper-
ation.
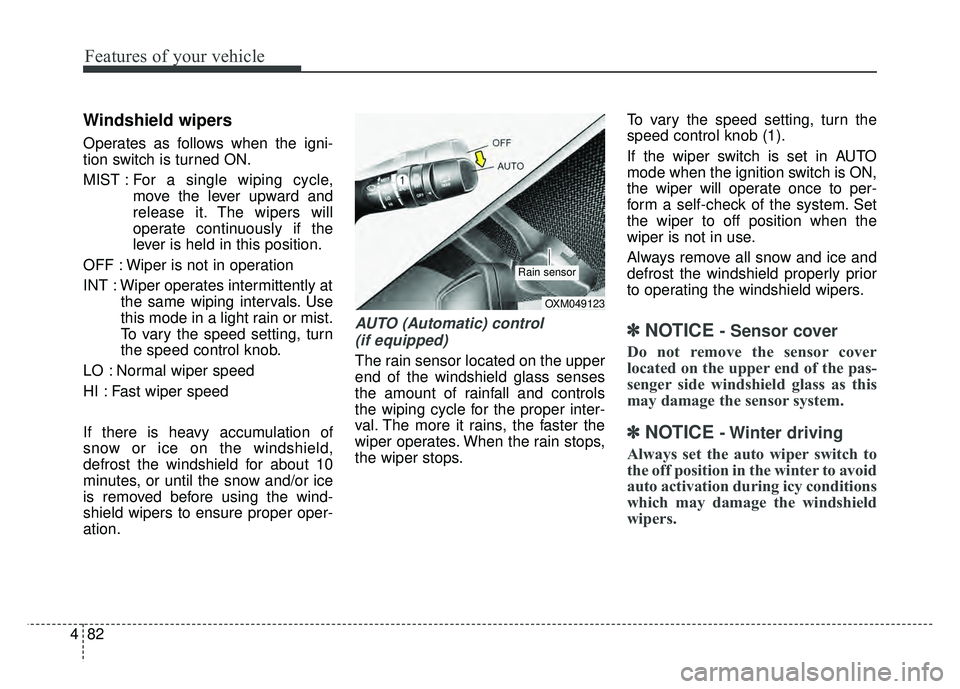
AUTO (Automatic) control (if equipped)
The rain sensor located on the upper
end of the windshield glass senses
the amount of rainfall and controls
the wiping cycle for the proper inter-
val. The more it rains, the faster the
wiper operates. When the rain stops,
the wiper stops. To vary the speed setting, turn the
speed control knob (1).
If the wiper switch is set in AUTO
mode when the ignition switch is ON,
the wiper will operate once to per-
form a self-check of the system. Set
the wiper to off position when the
wiper is not in use.
Always remove all snow and ice and
defrost the windshield properly prior
to operating the windshield wipers.
✽ ✽
NOTICE - Sensor cover
Do not remove the sensor cover
located on the upper end of the pas-
senger side windshield glass as this
may damage the sensor system.
✽ ✽
NOTICE - Winter driving
Always set the auto wiper switch to
the off position in the winter to avoid
auto activation during icy conditions
which may damage the windshield
wipers.
OXM049123
Rain sensor
Page 153 of 477
483
Features of your vehicle
Windshield washers
In the OFF position, pull the lever
gently toward you to spray washer
fluid on the windshield and to run the
wipers 1-3 cycles.
Use this function when the wind-
shield is dirty.
The spray and wiper operation will
continue until you release the lever. If
the washer does not work, check the
washer fluid level.
If the fluid level is not sufficient, you
will need to add appropriate non-
abrasive windshield washer fluid to
the washer reservoir.
The reservoir filler neck is located in
the front of the engine compartment
on the passenger side.CAUTION - Washerpump
To prevent possible damage to
the washer pump, do not oper-ate the washer when the fluidreservoir is empty.
WARNING- Obscured visibility
Do not use the washer in freez-
ing temperatures without first
warming the windshield with
the defrosters; the washer solu-
tion could freeze on the wind-
shield and obscure your vision.
CAUTION - Wiper position
When washing the vehicle, set
the wiper switch in the off posi-tion to stop the auto wiper oper-ation.
The wiper may operate and bedamaged if the switch is set inthe AUTO mode while washingthe vehicle.
Page 154 of 477
Features of your vehicle
84
4
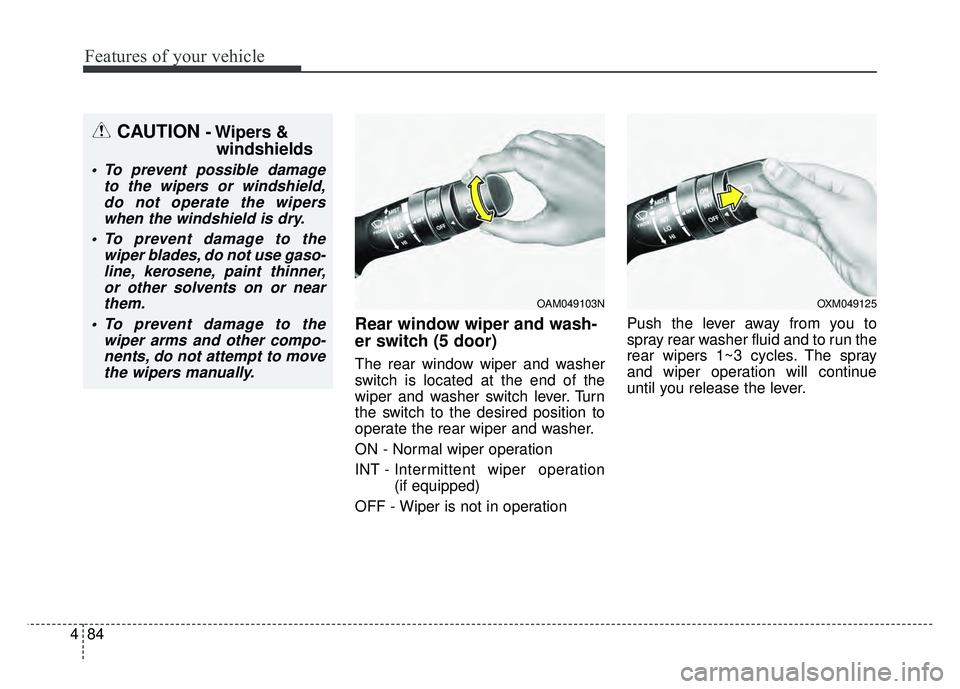
Rear window wiper and wash-
er switch (5 door)
The rear window wiper and washer
switch is located at the end of the
wiper and washer switch lever. Turn
the switch to the desired position to
operate the rear wiper and washer.
ON - Normal wiper operation
INT - Intermittent wiper operation
(if equipped)
OFF - Wiper is not in operation Push the lever away from you to
spray rear washer fluid and to run the
rear wipers 1~3 cycles. The spray
and wiper operation will continue
until you release the lever.
CAUTION- Wipers &
windshields
To prevent possible damage
to the wipers or windshield,do not operate the wiperswhen the windshield is dry.
To prevent damage to the wiper blades, do not use gaso-line, kerosene, paint thinner,or other solvents on or nearthem.
To prevent damage to the wiper arms and other compo-nents, do not attempt to movethe wipers manually.
OAM049103NOXM049125
Page 155 of 477
485
Features of your vehicle
Do not use the interior lights for
extended periods when the engine is
not running.
It may cause battery discharge.
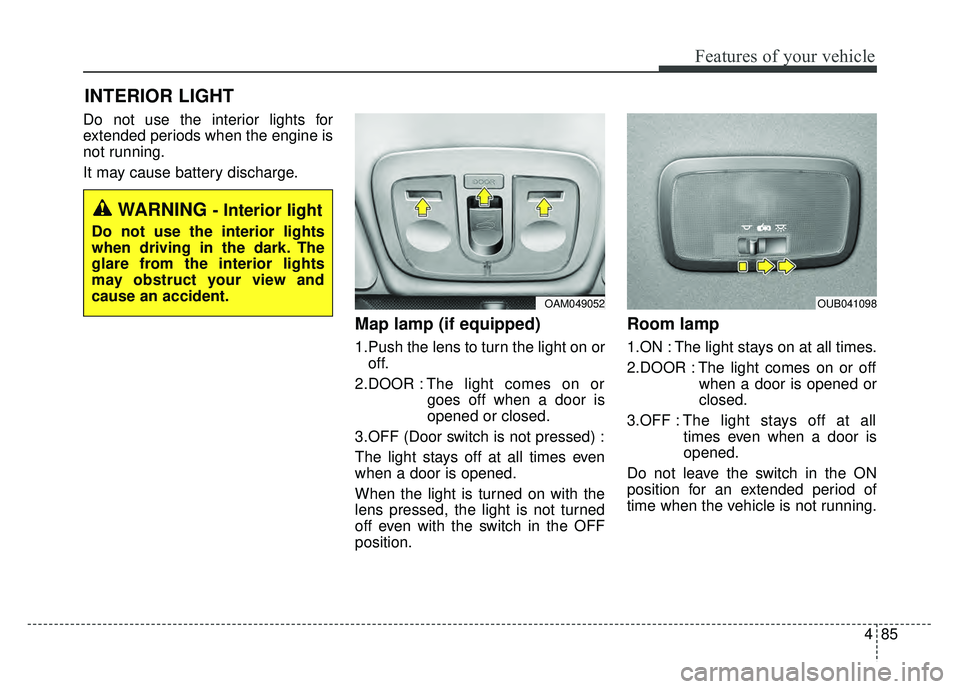
Map lamp (if equipped)
1.Push the lens to turn the light on oroff.
2.DOOR : The light comes on or
goes off when a door is
opened or closed.
3.OFF (Door switch is not pressed) :
The light stays off at all times even
when a door is opened.
When the light is turned on with the
lens pressed, the light is not turned
off even with the switch in the OFF
position.
Room lamp
1.ON : The light stays on at all times.
2.DOOR : The light comes on or off when a door is opened or
closed.
3.OFF : The light stays off at all
times even when a door is
opened.
Do not leave the switch in the ON
position for an extended period of
time when the vehicle is not running.
INTERIOR LIGHT
WARNING - Interior light
Do not use the interior lights
when driving in the dark. The
glare from the interior lights
may obstruct your view and
cause an accident.
OAM049052OUB041098
Page 156 of 477
Features of your vehicle
86
4
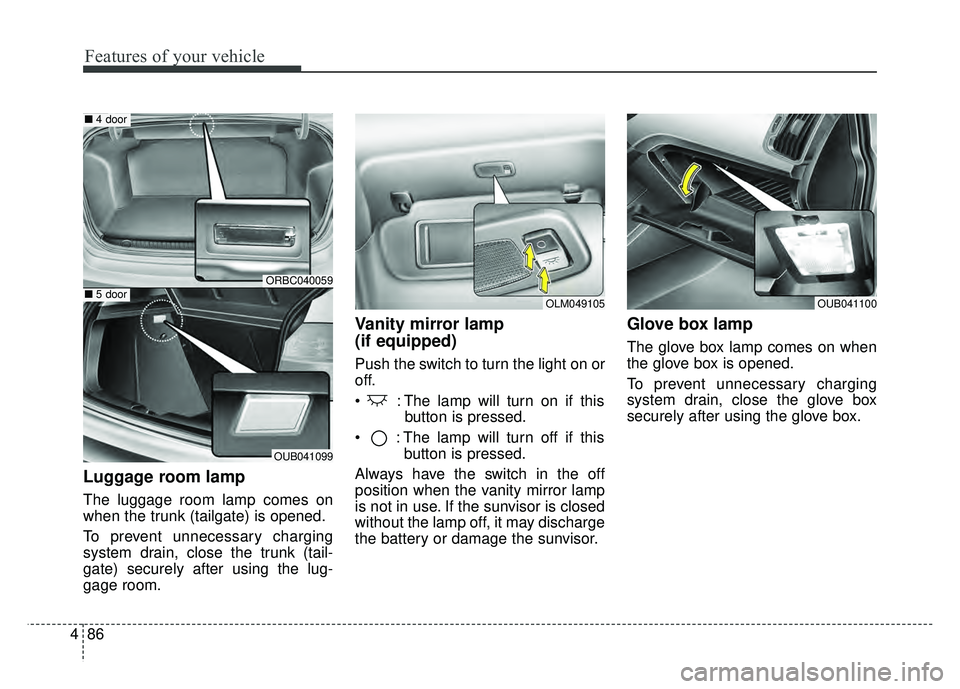
Luggage room lamp
The luggage room lamp comes on
when the trunk (tailgate) is opened.
To prevent unnecessary charging
system drain, close the trunk (tail-
gate) securely after using the lug-
gage room.
Vanity mirror lamp
(if equipped)
Push the switch to turn the light on or
off.
: The lamp will turn on if this
button is pressed.
: The lamp will turn off if this button is pressed.
Always have the switch in the off
position when the vanity mirror lamp
is not in use. If the sunvisor is closed
without the lamp off, it may discharge
the battery or damage the sunvisor.
Glove box lamp
The glove box lamp comes on when
the glove box is opened.
To prevent unnecessary charging
system drain, close the glove box
securely after using the glove box.
OLM049105OUB041100
ORBC040059
OUB041099
■ 4 door
■5 door
Page 157 of 477
487
Features of your vehicle
If you want to defrost and defog the
front windshield, refer to “Windshield
Defrosting and Defogging” in this
section.
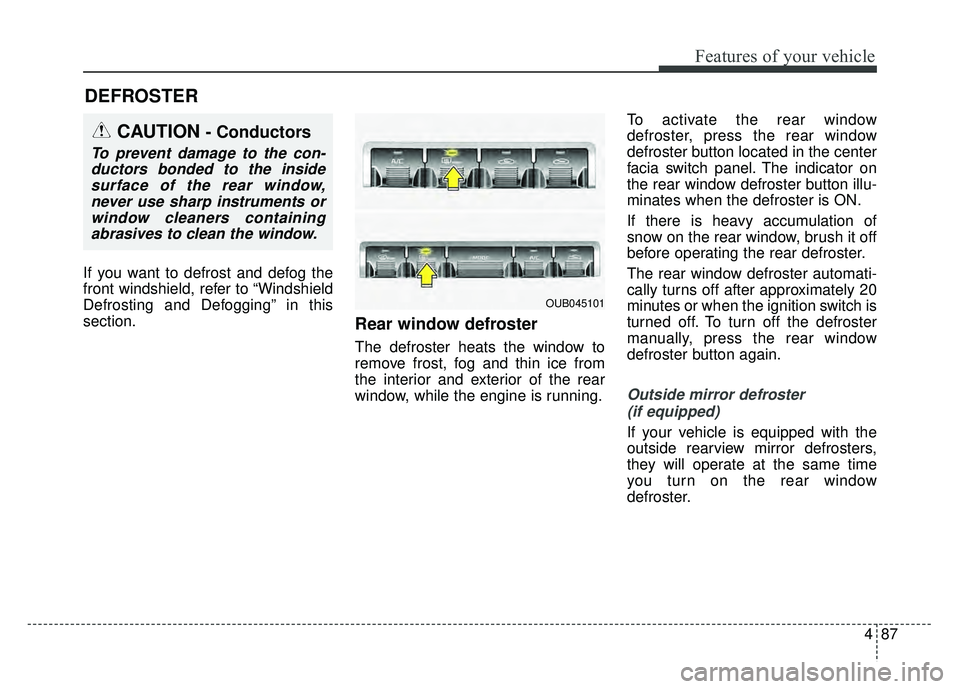
Rear window defroster
The defroster heats the window to
remove frost, fog and thin ice from
the interior and exterior of the rear
window, while the engine is running.To activate the rear window
defroster, press the rear window
defroster button located in the center
facia switch panel. The indicator on
the rear window defroster button illu-
minates when the defroster is ON.
If there is heavy accumulation of
snow on the rear window, brush it off
before operating the rear defroster.
The rear window defroster automati-
cally turns off after approximately 20
minutes or when the ignition switch is
turned off. To turn off the defroster
manually, press the rear window
defroster button again.
Outside mirror defroster
(if equipped)
If your vehicle is equipped with the
outside rearview mirror defrosters,
they will operate at the same time
you turn on the rear window
defroster.
DEFROSTER
CAUTION- Conductors
To prevent damage to the con-ductors bonded to the insidesurface of the rear window,never use sharp instruments orwindow cleaners containingabrasives to clean the window.
OUB045101
Page 158 of 477
Features of your vehicle
88
4
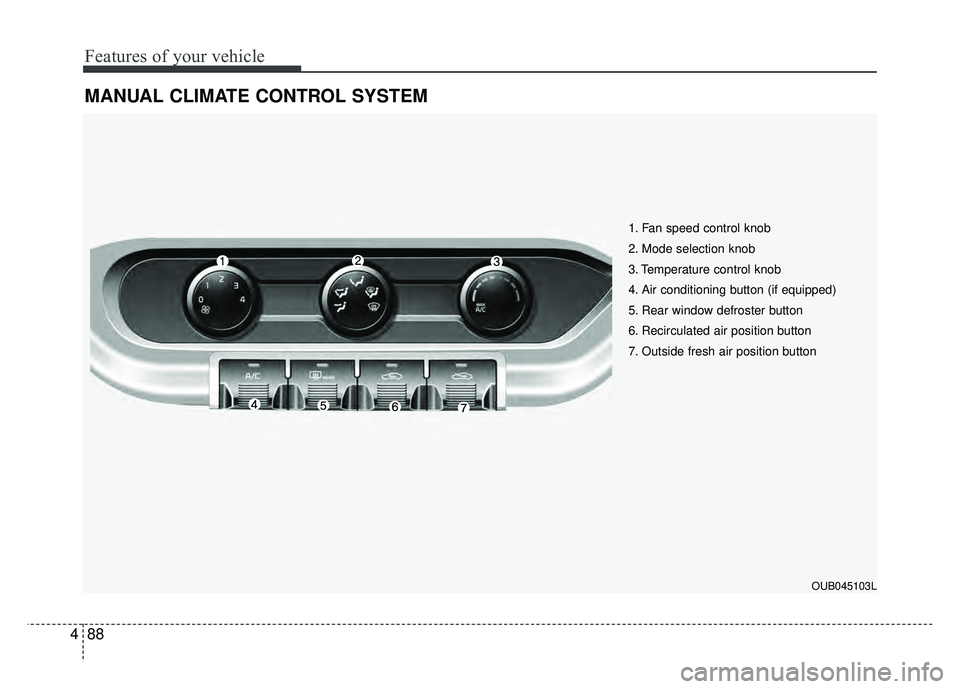
MANUAL CLIMATE CONTROL SYSTEM
1. Fan speed control knob
2. Mode selection knob
3. Temperature control knob
4. Air conditioning button (if equipped)
5. Rear window defroster button
6. Recirculated air position button
7. Outside fresh air position button
OUB045103L
Page 159 of 477
489
Features of your vehicle
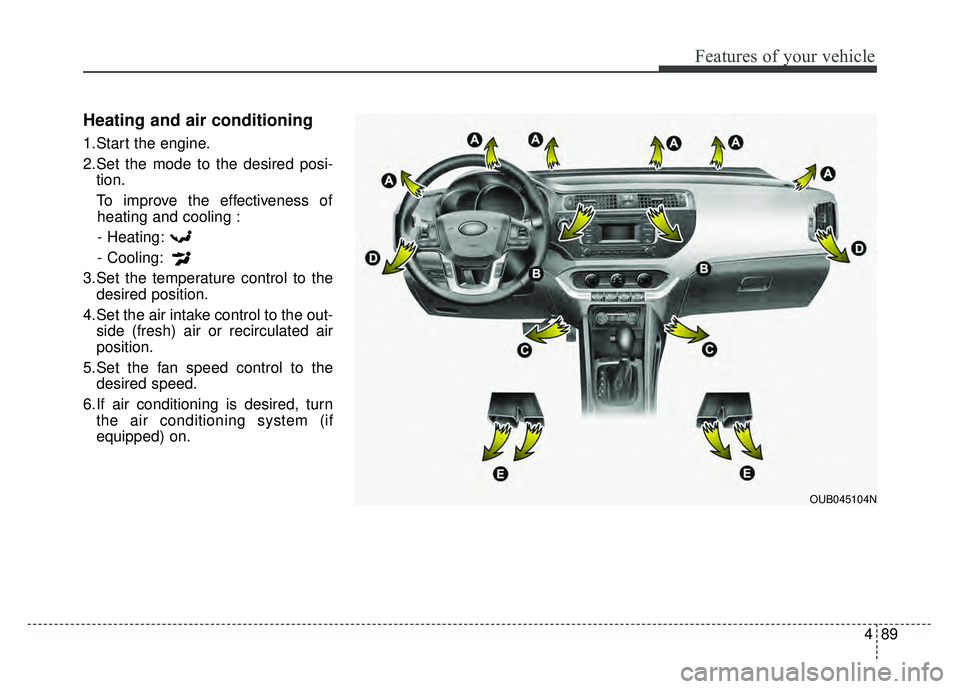
Heating and air conditioning
1.Start the engine.
2.Set the mode to the desired posi-tion.
To improve the effectiveness of heating and cooling :
- Heating:
- Cooling:
3.Set the temperature control to the desired position.
4.Set the air intake control to the out- side (fresh) air or recirculated air
position.
5.Set the fan speed control to the desired speed.
6.If air conditioning is desired, turn the air conditioning system (if
equipped) on.
OUB045104N
Page 160 of 477
Features of your vehicle
90
4
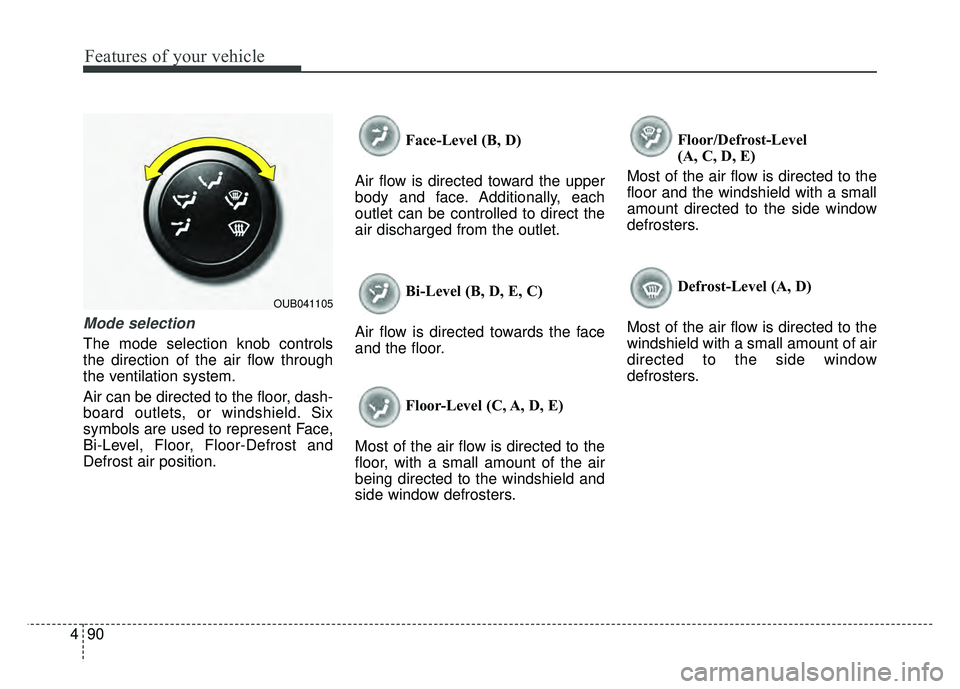
Mode selection
The mode selection knob controls
the direction of the air flow through
the ventilation system.
Air can be directed to the floor, dash-
board outlets, or windshield. Six
symbols are used to represent Face,
Bi-Level, Floor, Floor-Defrost and
Defrost air position. Face-Level (B, D)
Air flow is directed toward the upper
body and face. Additionally, each
outlet can be controlled to direct the
air discharged from the outlet.
Bi-Level (B, D, E, C)
Air flow is directed towards the face
and the floor.
Floor-Level (C, A, D, E)
Most of the air flow is directed to the
floor, with a small amount of the air
being directed to the windshield and
side window defrosters. Floor/Defrost-Level
(A, C, D, E)
Most of the air flow is directed to the
floor and the windshield with a small
amount directed to the side window
defrosters.
Defrost-Level (A, D)
Most of the air flow is directed to the
windshield with a small amount of air
directed to the side window
defrosters.
OUB041105