sensor KIA Sedona 2010 2.G User Guide
[x] Cancel search | Manufacturer: KIA, Model Year: 2010, Model line: Sedona, Model: KIA Sedona 2010 2.GPages: 360, PDF Size: 6.17 MB
Page 105 of 360

Features of your vehicle
96
3
Frontal air bags are not designed to
inflate in rear collisions, because occu-
pants are moved backward by the
force of the impact. In this case, the air
bags do not provide proper protection. Front air bags may not inflate in side
impact collision, because occupants
move to the direction of the collision,
and thus in side impacts, frontal air bag
deployment does not provide occupant
protection.
However, side or curtain air bags may
inflate depending on the intensity, vehi-
cle speed and angles of impact. In a slant or angled collision, the force
of impact may direct the occupants in a
direction between the front and side air
bags, and thus the sensors may not
deploy any air bags.
1VQA2089OVQ036018NOUN036087
Page 106 of 360
397
Features of your vehicle
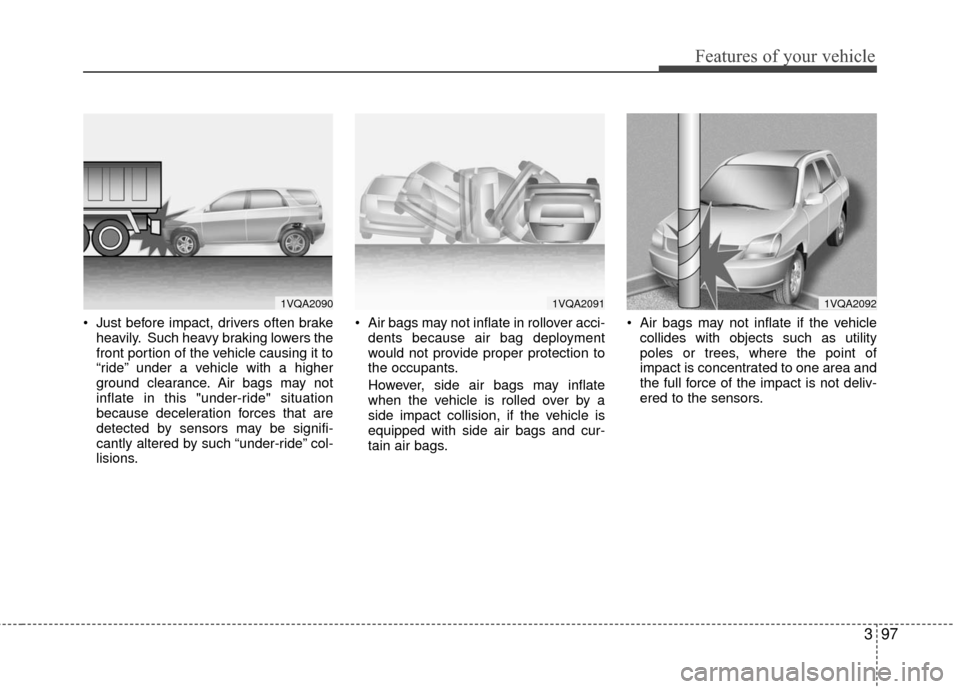
Just before impact, drivers often brakeheavily. Such heavy braking lowers the
front portion of the vehicle causing it to
“ride” under a vehicle with a higher
ground clearance. Air bags may not
inflate in this "under-ride" situation
because deceleration forces that are
detected by sensors may be signifi-
cantly altered by such “under-ride” col-
lisions. Air bags may not inflate in rollover acci-
dents because air bag deployment
would not provide proper protection to
the occupants.
However, side air bags may inflate
when the vehicle is rolled over by a
side impact collision, if the vehicle is
equipped with side air bags and cur-
tain air bags. Air bags may not inflate if the vehicle
collides with objects such as utility
poles or trees, where the point of
impact is concentrated to one area and
the full force of the impact is not deliv-
ered to the sensors.
1VQA20901VQA20911VQA2092
Page 107 of 360

Features of your vehicle
98
3
Air bag system operation
Air bag only operates when the ignition
switch is turned to the ON or START
positions.
Air bags inflate instantly in the event of serious frontal or side collision (if
equipped with side air bag or curtain
air bag) in order to help protect the
occupants from serious physical injury.
There is no single speed at which the air bags will inflate.
Generally, air bags are designed to
inflate by the severity of a collision and
its direction. These two factors deter-
mine whether the sensors send out an
electronic deployment/inflation signal. Air bag deployment depends on a
number of factors including vehicle
speed, angles of impact and the densi-
ty and stiffness of the vehicles or
objects which your vehicle hits in the
collision. However, factors are not limit-
ed to those mentioned above.
The front air bags will completely inflate and deflate in an instant.
It is virtually impossible for you to see
the air bags inflate during an accident.
It is much more likely that you will sim-
ply see the deflated air bags hanging
out of their storage compartments after
the collision. In order to help provide protection in a
severe collision, the air bags must
inflate rapidly. The speed of air bag
inflation is a consequence of the
extremely short time in which a collision
occurs and the need to get the air bag
between the occupant and the vehicle
structures before the occupant impacts
those structures. This speed of inflation
reduces the risk of serious or life-
threatening injuries in a severe collision
and is thus a necessary part of air bag
design.
However, air bag inflation can also
cause injuries which normally can
include facial abrasions, bruises and
broken bones, and sometimes more
serious injuries because that inflation
speed also causes the air bags to
expand with a great deal force.
There are even circumstances under which contact with the steer-
ing wheel air bag can cause fatal
injuries, especially if the occupant
is positioned excessively close to
the steering wheel.
Page 117 of 360
Features of your vehicle
108
3
Rearview mirror
Adjust the rearview mirror to center on
the view through the rear window. Make
this adjustment before you start driving.
Manual type (if equipped)
Make this adjustment before you start
driving and while the day/night lever is in
the day position.
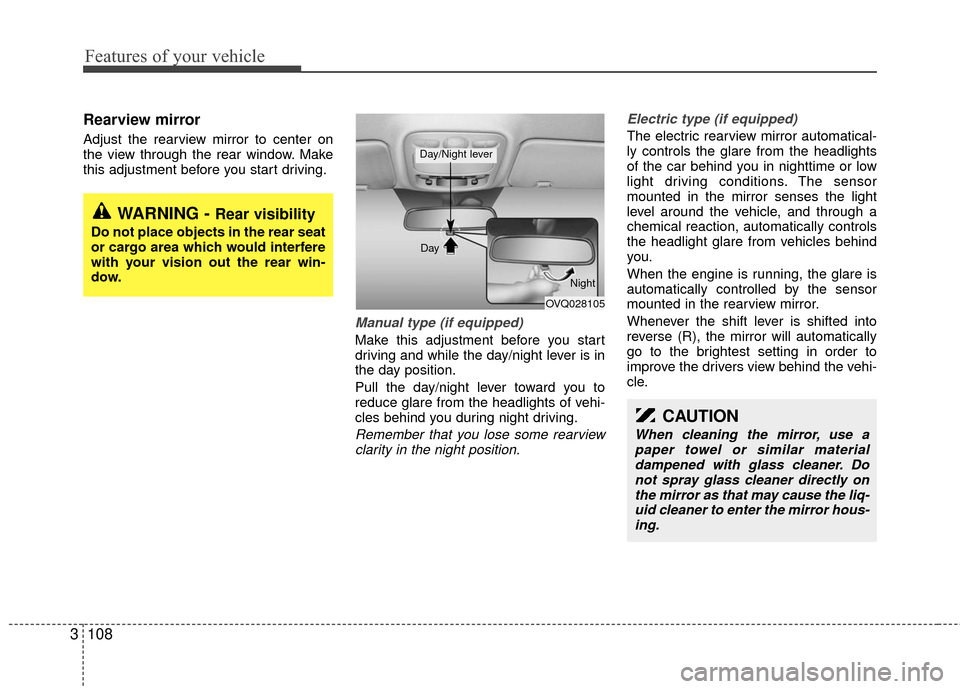
Pull the day/night lever toward you to
reduce glare from the headlights of vehi-
cles behind you during night driving.
Remember that you lose some rearview
clarity in the night position. Electric type (if equipped)
The electric rearview mirror automatical-
ly controls the glare from the headlights
of the car behind you in nighttime or low
light driving conditions. The sensor
mounted in the mirror senses the light
level around the vehicle, and through a
chemical reaction, automatically controls
the headlight glare from vehicles behind
you.
When the engine is running, the glare is
automatically controlled by the sensor
mounted in the rearview mirror.
Whenever the shift lever is shifted into
reverse (R), the mirror will automatically
go to the brightest setting in order to
improve the drivers view behind the vehi-
cle.
WARNING - Rear visibility
Do not place objects in the rear seat
or cargo area which would interfere
with your vision out the rear win-
dow.
CAUTION
When cleaning the mirror, use a
paper towel or similar materialdampened with glass cleaner. Donot spray glass cleaner directly on the mirror as that may cause the liq-uid cleaner to enter the mirror hous- ing.
OVQ028105
Day
Night
Day/Night lever
Page 142 of 360

3133
Features of your vehicle
Windshield wipers
Operates as follows when the ignition
switch is turned ON.
MIST: For a single wiping cycle, push thelever upward and release it with
the lever in the OFF position. The
wipers will operate continuously if
the lever is pushed upward and
held.
OFF : Wiper is not in operation
INT : Wiper operates intermittently at the same wiping intervals. Use
this mode in a light rain or mist. To
vary the speed setting, turn the
speed control knob (1).
LO : Normal wiper speed
HI : Fast wiper speed
✽ ✽ NOTICE
If there is heavy accumulation of snow
or ice on the windshield, defrost the
windshield for about 10 minutes, or
until the snow and/or ice is removed
before using the windshield wipers to
ensure proper operation.
Auto control (if equipped)
The rain sensor located on the upper end
of windshield glass senses the amount of
rainfall and controls the wiping cycle for
the proper intervals. The more it rains,
the faster the wiper operates. When the
rain stops, the wiper stops. To vary the
speed setting, turn the speed control
knob (1).
If the wiper switch is set in AUTO mode
when the ignition switch is ON, or the
speed control knob is turned toward the
upward position when the wiper switch is
in AUTO mode, wiper will operate once to
perform a self-check of the system. Set
the wiper to OFF position when the wiper
is not in use.
OVQ038052N-1
Page 143 of 360

Features of your vehicle
134
3
Variable intermittent wipers
Set the lever to the INT/AUTO position
and choose the desired wiper interval by
turning the ring(1).
One - touch wiper
For a single wiping cycle, push the lever
upward and release it with the lever in the
OFF position.
The wipers will operate continuously if
the lever is pushed upward and held.
CAUTION
When the ignition switch is ON and
the windshield wiper switch is placed in the AUTO mode, use cau-tion in the following situations to avoid any injury to the hands orother parts of the body:
Do not touch the upper end of the windshield glass facing the rainsensor.
Do not wipe the upper end of the windshield glass with a damp orwet cloth.
Do not put pressure on the wind- shield glass.
CAUTION
When washing the vehicle, set thewiper switch in the OFF position tostop the auto wiper operation.
Wiper may operate and be damagedif the switch is set in AUTO modewhile washing vehicle.
Do not remove the sensor coverlocated on the upper end of the pas-senger side windshield glass.Damage to system parts couldoccur and may not be covered byyou vehicle warranty.
When the starting the vehicle in win-ter, set the wiper switch in the OFFposition. Otherwise, wipers mayoperate and ice may damage the windshield wiper blades. Alwaysremove all snow and ice and defrostthe windshield properly prior tooperating the windshield wipers.
CAUTION
To prevent possible damage to the wipers or windshield, do notoperate the wipers when thewindshield is dry.
To prevent damage to the wiper blades, do not use gasoline,kerosene, paint thinner, or othersolvents on or near them.
To prevent damage to the wiper arms and other components, donot attempt to move the wipersmanually.
Page 179 of 360
3169
Features of your vehicle
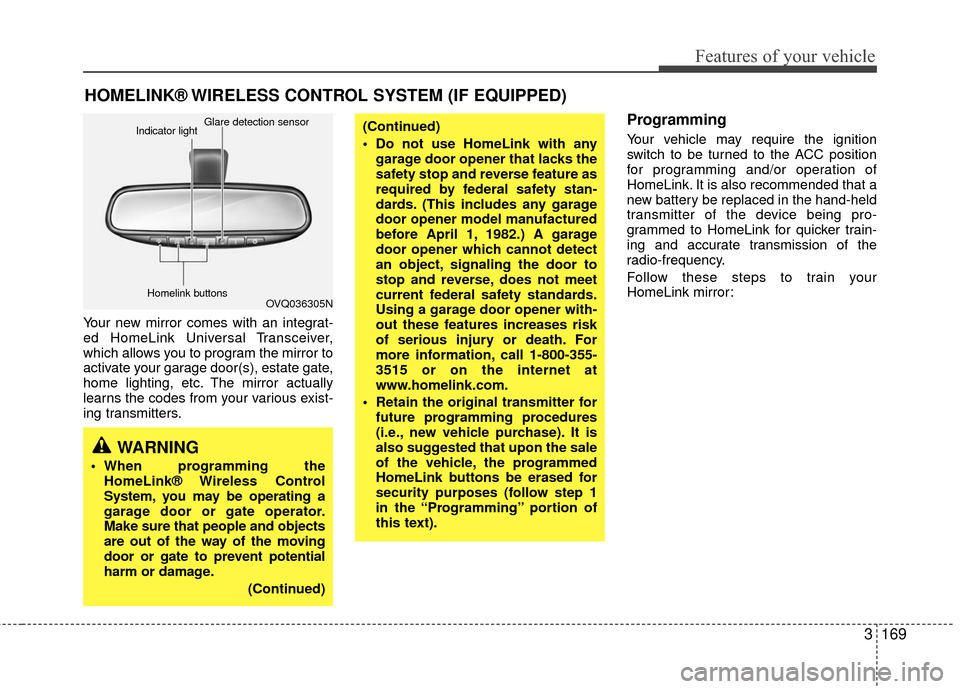
Your new mirror comes with an integrat-
ed HomeLink Universal Transceiver,
which allows you to program the mirror to
activate your garage door(s), estate gate,
home lighting, etc. The mirror actually
learns the codes from your various exist-
ing transmitters.
Programming
Your vehicle may require the ignition
switch to be turned to the ACC position
for programming and/or operation of
HomeLink. It is also recommended that a
new battery be replaced in the hand-held
transmitter of the device being pro-
grammed to HomeLink for quicker train-
ing and accurate transmission of the
radio-frequency.
Follow these steps to train your
HomeLink mirror:
HOMELINK® WIRELESS CONTROL SYSTEM (IF EQUIPPED)
WARNING
When programming theHomeLink® Wireless Control
System, you may be operating a
garage door or gate operator.
Make sure that people and objects
are out of the way of the moving
door or gate to prevent potential
harm or damage.
(Continued)
(Continued)
Do not use HomeLink with anygarage door opener that lacks the
safety stop and reverse feature as
required by federal safety stan-
dards. (This includes any garage
door opener model manufactured
before April 1, 1982.) A garage
door opener which cannot detect
an object, signaling the door to
stop and reverse, does not meet
current federal safety standards.
Using a garage door opener with-
out these features increases risk
of serious injury or death. For
more information, call 1-800-355-
3515 or on the internet at
www.homelink.com.
Retain the original transmitter for future programming procedures
(i.e., new vehicle purchase). It is
also suggested that upon the sale
of the vehicle, the programmed
HomeLink buttons be erased for
security purposes (follow step 1
in the “Programming” portion of
this text).
OVQ036305N
Glare detection sensor
Indicator light
Homelink buttons
Page 271 of 360
419
Driving your vehicle
The Electronic Stability Control (ESC)
monitors information from various vehicle
sensors and then compares the driver's
commands with the actual behavior of the
vehicle. If an unstable condition occurs - a
sudden evasive movement for example -
ESC intervenes within fractions of a
second via the engine computer and
brake system and attempts to stabilize
the vehicle.
ESC operation
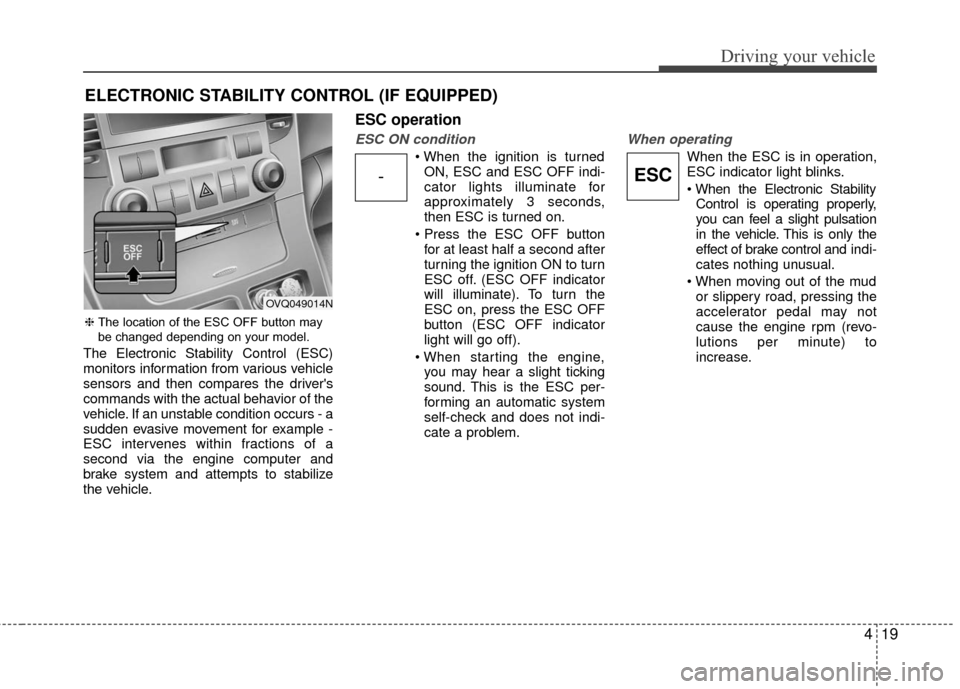
ESC ON condition
ON, ESC and ESC OFF indi-
cator lights illuminate for
approximately 3 seconds,
then ESC is turned on.
for at least half a second after
turning the ignition ON to turn
ESC off. (ESC OFF indicator
will illuminate). To turn the
ESC on, press the ESC OFF
button (ESC OFF indicator
light will go off).
you may hear a slight ticking
sound. This is the ESC per-
forming an automatic system
self-check and does not indi-
cate a problem.
When operating
When the ESC is in operation,
ESC indicator light blinks.
Control is operating properly,
you can feel a slight pulsation
in the vehicle. This is only the
effect of brake control and indi-
cates nothing unusual.
or slippery road, pressing the
accelerator pedal may not
cause the engine rpm (revo-
lutions per minute) to
increase.
ELECTRONIC STABILITY CONTROL (IF EQUIPPED)
-ESC
❈ The location of the ESC OFF button may
be changed depending on your model.
OVQ049014N
Page 273 of 360
421
Driving your vehicle
✽
✽NOTICE
• When operating the vehicle on a
dynamometer, ensure that the ESC is
turned off (ESC OFF light illuminat-
ed). If the ESC is left on, it may pre-
vent the vehicle speed from increas-
ing, and result in false diagnosis.
• Turning the ESC off does not affect ABS or brake system operation.
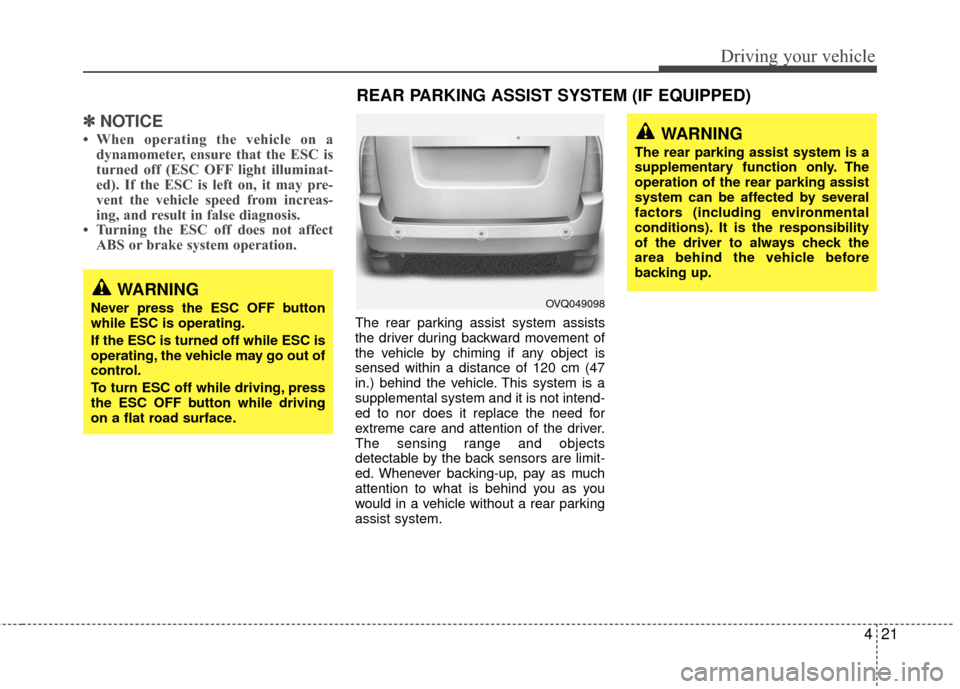
The rear parking assist system assists
the driver during backward movement of
the vehicle by chiming if any object is
sensed within a distance of 120 cm (47
in.) behind the vehicle. This system is a
supplemental system and it is not intend-
ed to nor does it replace the need for
extreme care and attention of the driver.
The sensing range and objects
detectable by the back sensors are limit-
ed. Whenever backing-up, pay as much
attention to what is behind you as you
would in a vehicle without a rear parking
assist system.
WARNING
Never press the ESC OFF button
while ESC is operating.
If the ESC is turned off while ESC is
operating, the vehicle may go out of
control.
To turn ESC off while driving, press
the ESC OFF button while driving
on a flat road surface.
REAR PARKING ASSIST SYSTEM (IF EQUIPPED)
WARNING
The rear parking assist system is a
supplementary function only. The
operation of the rear parking assist
system can be affected by several
factors (including environmental
conditions). It is the responsibility
of the driver to always check the
area behind the vehicle before
backing up.
OVQ049098
Page 274 of 360
Driving your vehicle
22
4
Operation of the rear parking
assist system
Operating condition
This system will activate when backing
up with the ignition key ON.
If the vehicle is moved at speed over
5 km/h (3 mph), the system may not
activated correctly.
The sensing distance while the rear parking assist system is in operation is
approximately 120 cm (47 in.).
When more than two objects are sensed at the same time, the closest
one will be recognized first.
Types of warning sound
When an object is 120 cm to 81 cm (47in. to 32 in.) from the rear bumper :
Buzzer beeps intermittently
When an object is 80 cm to 41 cm (31 in. to 16 in.) from the rear bumper :
Buzzer beeps more frequently
When an object is within 40 cm (15 in.) of the rear bumper : Buzzer sounds
continuously.
Non-operational conditions of
rear parking assist system
Rear parking assist system may notoperate normally when:
1. Moisture is frozen to the sensor. (It will operate normally when moisture
melts.)
2. Sensor is covered with foreign matter, such as snow or water, or the sensor
cover is blocked. (It will operate nor-
mally when the material is removed or
the sensor is no longer blocked.)
3. Driving on uneven road surfaces (unpaved roads, gravel, bumps, gradi-
ent).
4. Objects generating excessive noise (vehicle horns, loud motorcycle
engines, or truck air brakes) are within
range of the sensor.
5. Heavy rain or water spray exists.
6. Wireless transmitters or mobile phones are within range of the sensor.
7. Sensor is covered with snow.
8. Trailer towing
Detecting range may decrease when:
1. Sensor is stained with foreign matter such as snow or water. (Sensing range
will return to normal when removed.)
2. Outside air temperature is extremely hot or cold.
Following objects may not be recog-nized by the sensor:
1. Sharp or slim objects such as ropes, chains or small poles.
2. Objects which tend to absorb sensor frequency such as clothes, spongy
material or snow.
3. Undetectable objects smaller than 1 m (40 in.) and narrower than 14 cm (6 in.)
in diameter.