KIA Sedona 2011 2.G Owner's Manual
Manufacturer: KIA, Model Year: 2011, Model line: Sedona, Model: KIA Sedona 2011 2.GPages: 370, PDF Size: 6.75 MB
Page 161 of 370
Features of your vehicle
144
3
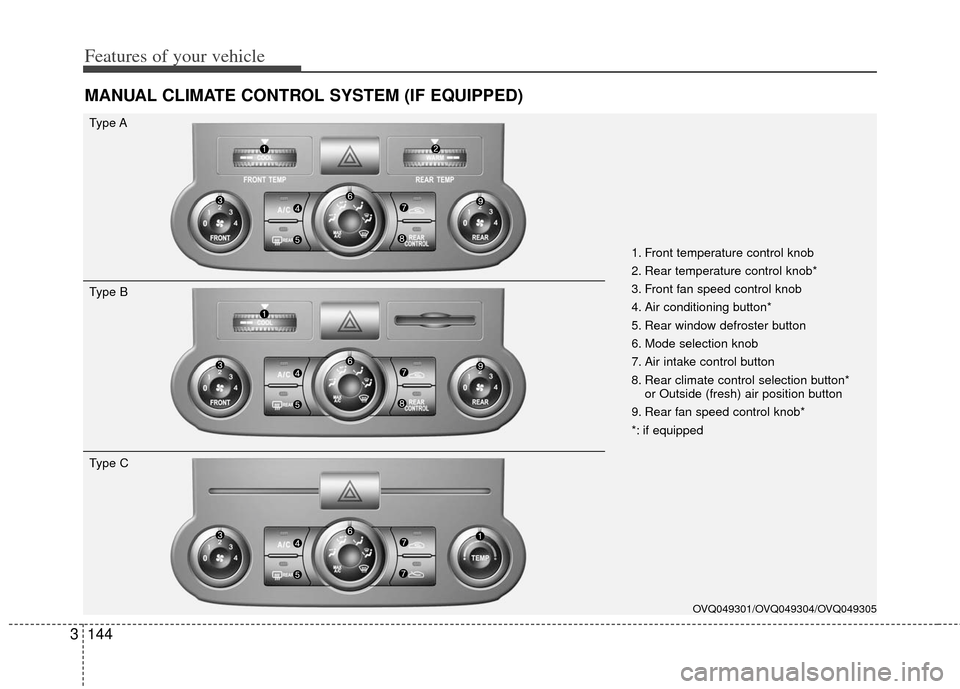
MANUAL CLIMATE CONTROL SYSTEM (IF EQUIPPED)
OVQ049301/OVQ049304/OVQ049305
1. Front temperature control knob
2. Rear temperature control knob*
3. Front fan speed control knob
4. Air conditioning button*
5. Rear window defroster button
6. Mode selection knob
7. Air intake control button
8. Rear climate control selection button*
or Outside (fresh) air position button
9. Rear fan speed control knob*
*: if equipped
Type A
Type B
Type C
Page 162 of 370
3145
Features of your vehicle
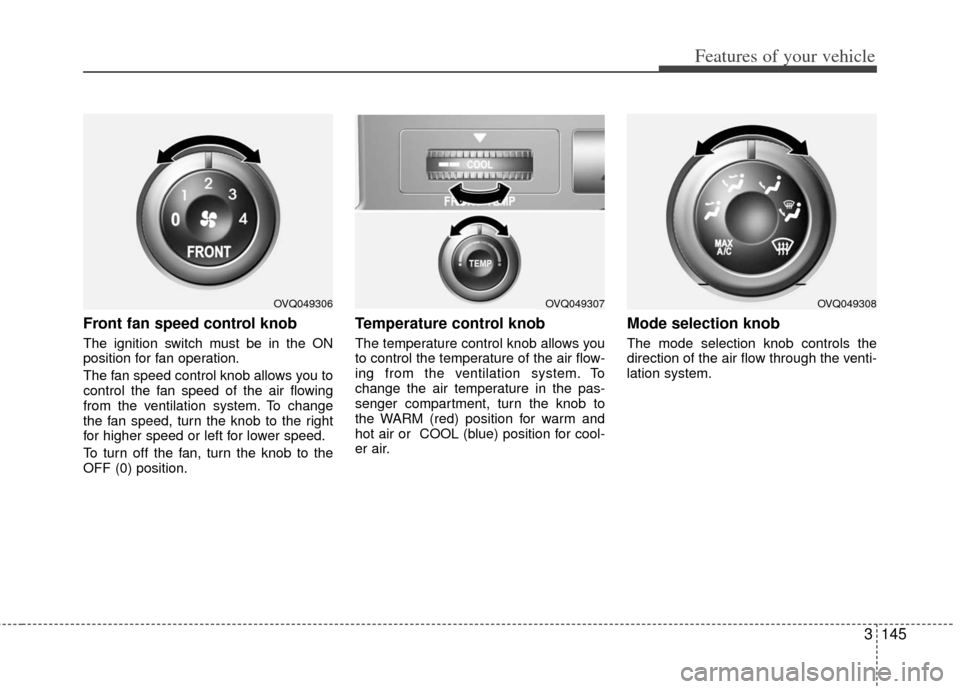
Front fan speed control knob
The ignition switch must be in the ON
position for fan operation.
The fan speed control knob allows you to
control the fan speed of the air flowing
from the ventilation system. To change
the fan speed, turn the knob to the right
for higher speed or left for lower speed.
To turn off the fan, turn the knob to the
OFF (0) position.
Temperature control knob
The temperature control knob allows you
to control the temperature of the air flow-
ing from the ventilation system. To
change the air temperature in the pas-
senger compartment, turn the knob to
the WARM (red) position for warm and
hot air or COOL (blue) position for cool-
er air.
Mode selection knob
The mode selection knob controls the
direction of the air flow through the venti-
lation system.
OVQ049306OVQ049307OVQ049308
Page 163 of 370
Features of your vehicle
146
3
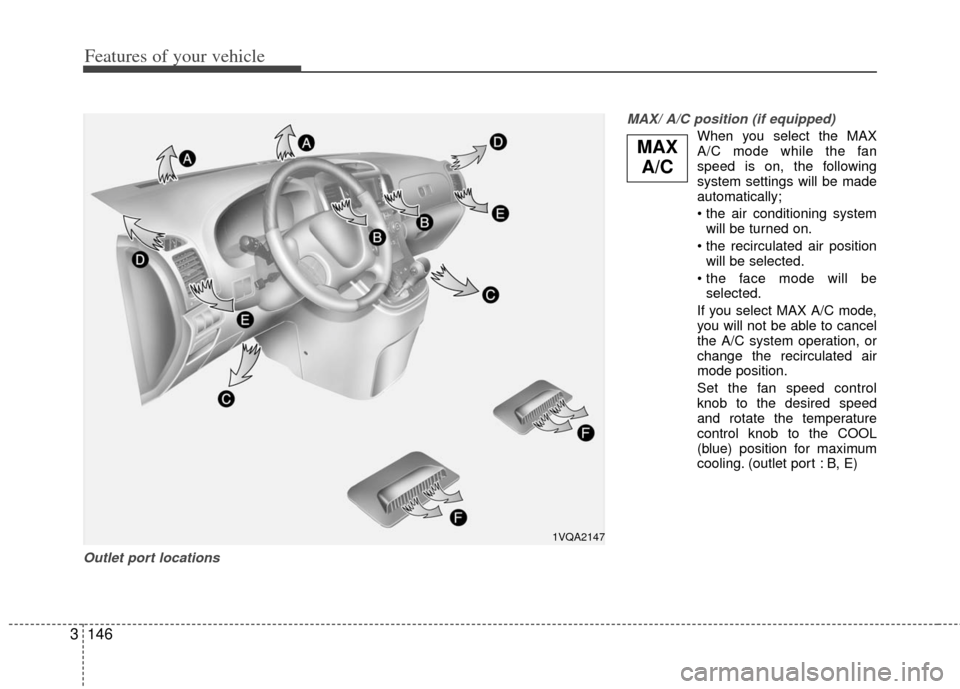
Outlet port locations MAX/ A/C position (if equipped)
When you select the MAX
A/C mode while the fan
speed is on, the following
system settings will be made
automatically;
• the air conditioning system
will be turned on.
will be selected.
selected.
If you select MAX A/C mode, you will not be able to cancel
the A/C system operation, or
change the recirculated air
mode position.
Set the fan speed control knob to the desired speed
and rotate the temperature
control knob to the COOL
(blue) position for maximum
cooling. (outlet port : B, E)
1VQA2147
MAX A/C
Page 164 of 370
3147
Features of your vehicle
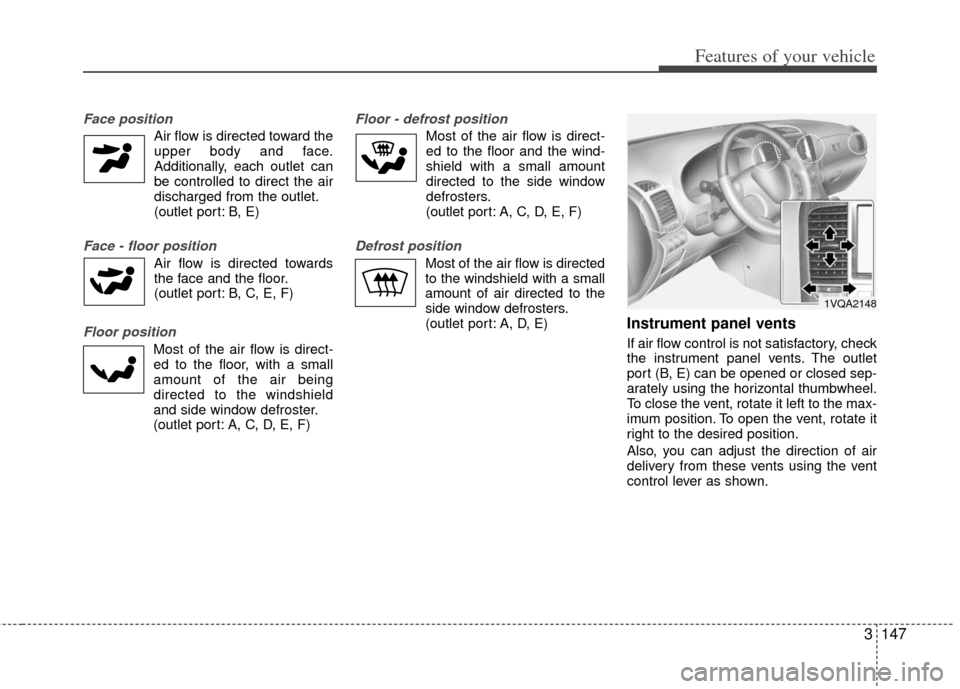
Face position
Air flow is directed toward theupper body and face.
Additionally, each outlet can
be controlled to direct the air
discharged from the outlet.
(outlet port: B, E)
Face - floor position
Air flow is directed towardsthe face and the floor.
(outlet port: B, C, E, F)
Floor position
Most of the air flow is direct-
ed to the floor, with a small
amount of the air being
directed to the windshield
and side window defroster.
(outlet port: A, C, D, E, F)
Floor - defrost position
Most of the air flow is direct-
ed to the floor and the wind-
shield with a small amount
directed to the side window
defrosters.
(outlet port: A, C, D, E, F)
Defrost position
Most of the air flow is directed
to the windshield with a small
amount of air directed to the
side window defrosters.
(outlet port: A, D, E)
Instrument panel vents
If air flow control is not satisfactory, check
the instrument panel vents. The outlet
port (B, E) can be opened or closed sep-
arately using the horizontal thumbwheel.
To close the vent, rotate it left to the max-
imum position. To open the vent, rotate it
right to the desired position.
Also, you can adjust the direction of air
delivery from these vents using the vent
control lever as shown.
1VQA2148
Page 165 of 370
Features of your vehicle
148
3
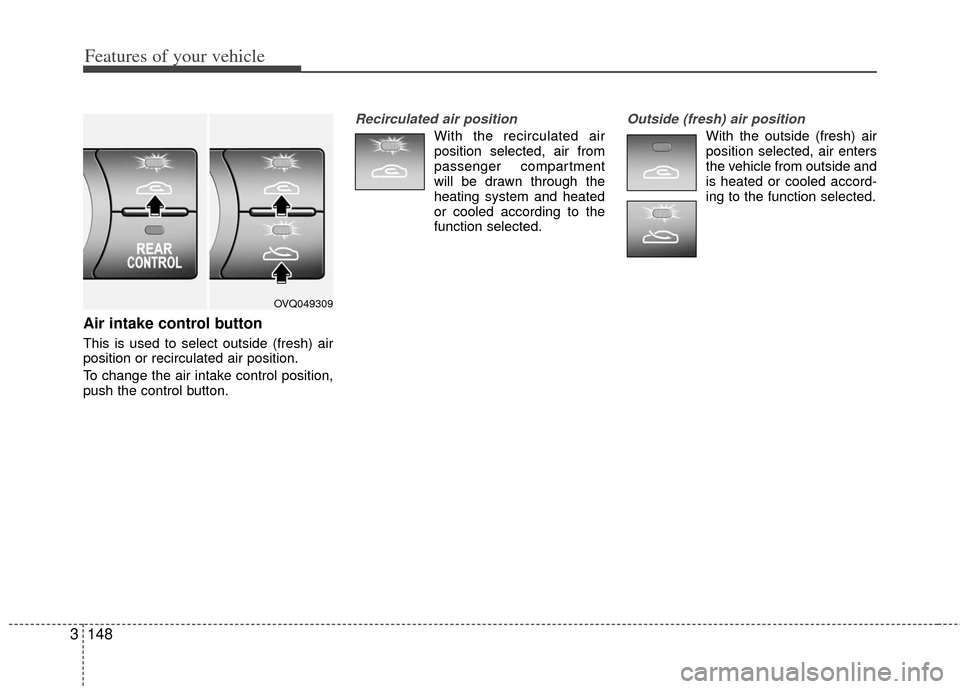
Air intake control button
This is used to select outside (fresh) air
position or recirculated air position.
To change the air intake control position,
push the control button.
Recirculated air position
With the recirculated air
position selected, air from
passenger compartment
will be drawn through the
heating system and heated
or cooled according to the
function selected.
Outside (fresh) air position
With the outside (fresh) air
position selected, air enters
the vehicle from outside and
is heated or cooled accord-
ing to the function selected.
OVQ049309
Page 166 of 370
3149
Features of your vehicle
✽
✽NOTICE
It should be noted that prolonged oper-
ation of the heating in recirculated air
position will cause fogging of the wind-
shield and side windows and the air
within the passenger compartment will
become stale.
In addition, prolonged use of the air
conditioning with the “recirculated air
position” selected, will result in exces-
sively dry air in the passenger compart-
ment.
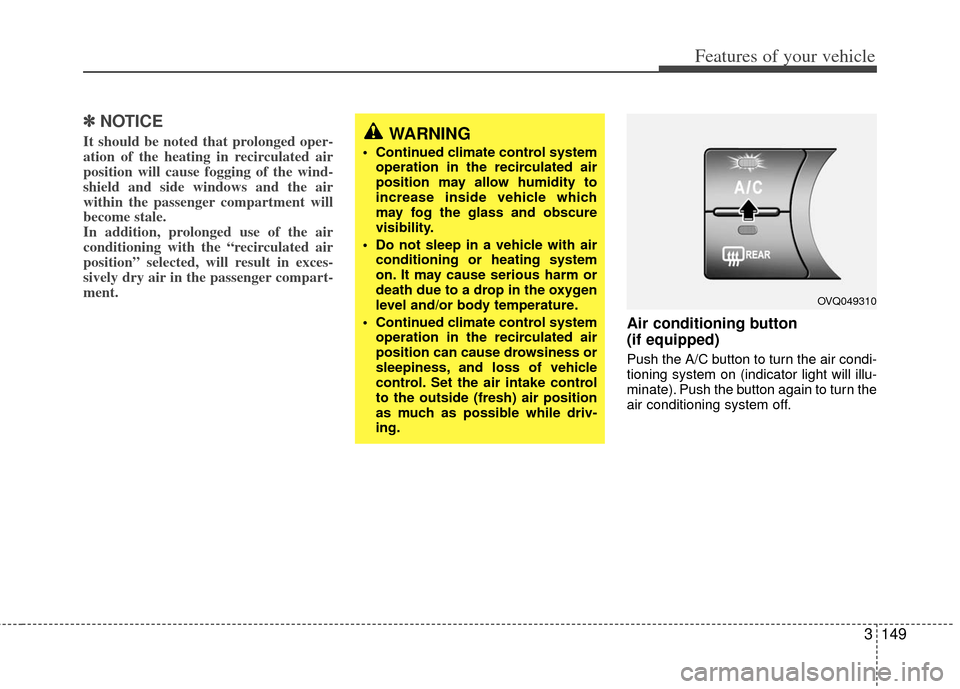
Air conditioning button
(if equipped)
Push the A/C button to turn the air condi-
tioning system on (indicator light will illu-
minate). Push the button again to turn the
air conditioning system off.
WARNING
• Continued climate control system
operation in the recirculated air
position may allow humidity to
increase inside vehicle which
may fog the glass and obscure
visibility.
Do not sleep in a vehicle with air conditioning or heating system
on. It may cause serious harm or
death due to a drop in the oxygen
level and/or body temperature.
Continued climate control system operation in the recirculated air
position can cause drowsiness or
sleepiness, and loss of vehicle
control. Set the air intake control
to the outside (fresh) air position
as much as possible while driv-
ing.
OVQ049310
Page 167 of 370
Features of your vehicle
150
3
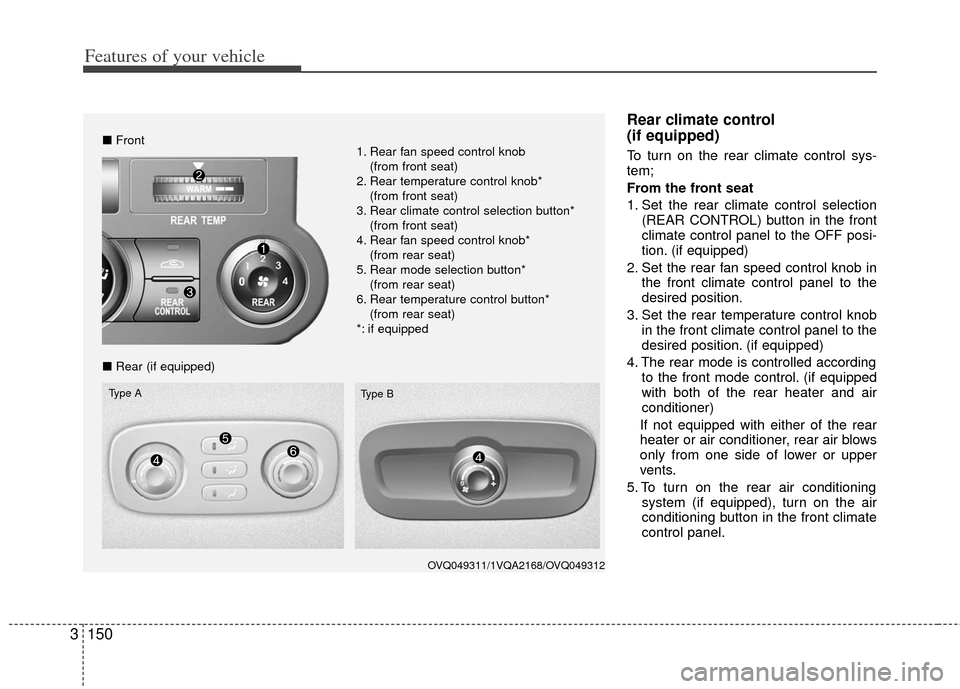
Rear climate control
(if equipped)
To turn on the rear climate control sys-
tem;
From the front seat
1. Set the rear climate control selection
(REAR CONTROL) button in the front
climate control panel to the OFF posi-
tion. (if equipped)
2. Set the rear fan speed control knob in the front climate control panel to the
desired position.
3. Set the rear temperature control knob in the front climate control panel to the
desired position. (if equipped)
4. The rear mode is controlled according to the front mode control. (if equipped
with both of the rear heater and air
conditioner)
If not equipped with either of the rear
heater or air conditioner, rear air blows
only from one side of lower or upper
vents.
5. To turn on the rear air conditioning system (if equipped), turn on the air
conditioning button in the front climate
control panel.
OVQ049311/1VQA2168/OVQ049312
■Front
■ Rear (if equipped)
Type A
Type B
1. Rear fan speed control knob
(from front seat)
2. Rear temperature control knob* (from front seat)
3. Rear climate control selection button* (from front seat)
4. Rear fan speed control knob* (from rear seat)
5. Rear mode selection button* (from rear seat)
6. Rear temperature control button* (from rear seat)
*: if equipped
Page 168 of 370
3151
Features of your vehicle
From the rear seat (if equipped)
1. Set the rear climate control selection(REAR CONTROL) button in the front
climate control panel to the ON posi-
tion.
2. Set the rear fan speed control knob on the rear climate control panel to the
desired position.
3. Set the rear temperature control knob on the rear climate control panel to the
desired position. (if equipped)
4. Select the desired rear mode button on the rear climate control panel. (if
equipped)
If not equipped with either of the rear
heater or air conditioner, rear air blows
only from one side of lower or upper
vents.
5. To turn on the rear air conditioning system (if equipped), turn on the air
conditioning button in the front climate
control panel.
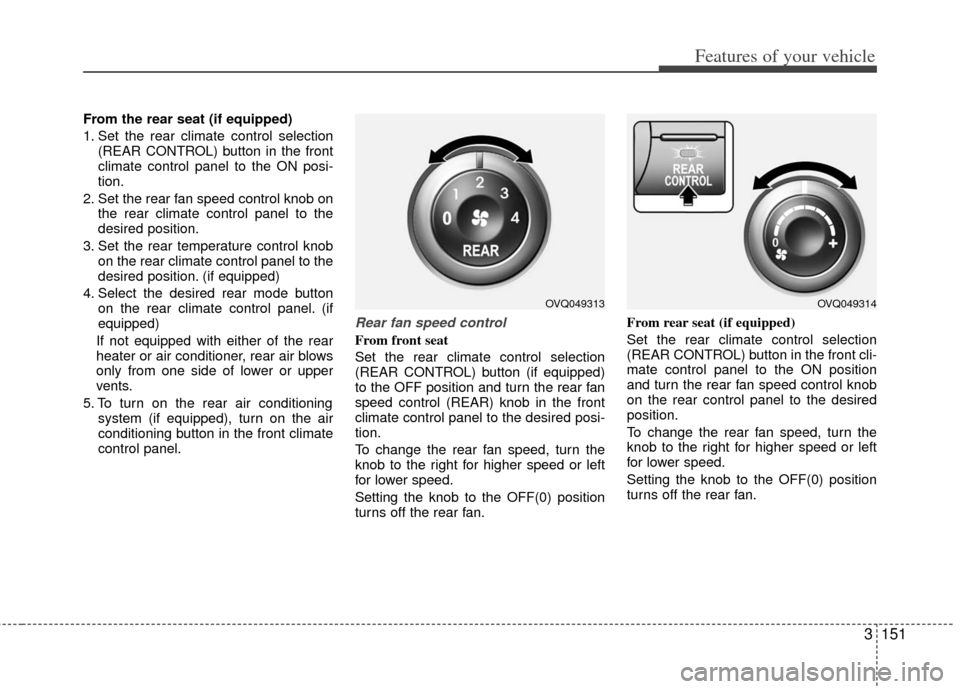
Rear fan speed control
From front seat
Set the rear climate control selection
(REAR CONTROL) button (if equipped)
to the OFF position and turn the rear fan
speed control (REAR) knob in the front
climate control panel to the desired posi-
tion.
To change the rear fan speed, turn the
knob to the right for higher speed or left
for lower speed.
Setting the knob to the OFF(0) position
turns off the rear fan. From rear seat (if equipped)
Set the rear climate control selection
(REAR CONTROL) button in the front cli-
mate control panel to the ON position
and turn the rear fan speed control knob
on the rear control panel to the desired
position.
To change the rear fan speed, turn the
knob to the right for higher speed or left
for lower speed.
Setting the knob to the OFF(0) position
turns off the rear fan.
OVQ049313OVQ049314
Page 169 of 370
Features of your vehicle
152
3
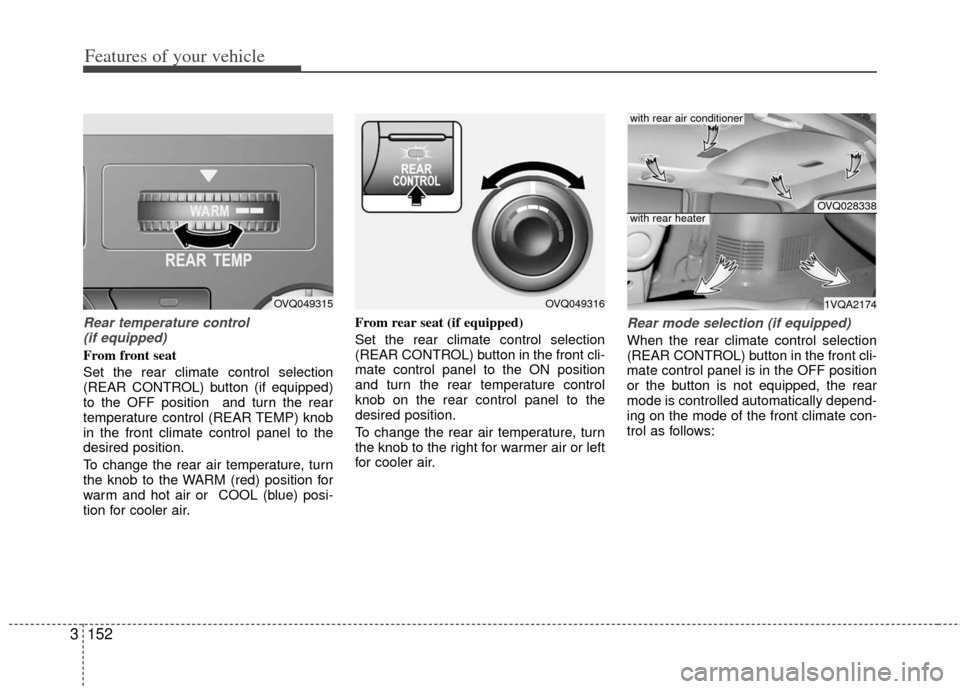
Rear temperature control
(if equipped)
From front seat
Set the rear climate control selection
(REAR CONTROL) button (if equipped)
to the OFF position and turn the rear
temperature control (REAR TEMP) knob
in the front climate control panel to the
desired position.
To change the rear air temperature, turn
the knob to the WARM (red) position for
warm and hot air or COOL (blue) posi-
tion for cooler air. From rear seat (if equipped)
Set the rear climate control selection
(REAR CONTROL) button in the front cli-
mate control panel to the ON position
and turn the rear temperature control
knob on the rear control panel to the
desired position.
To change the rear air temperature, turn
the knob to the right for warmer air or left
for cooler air.
Rear mode selection (if equipped)
When the rear climate control selection
(REAR CONTROL) button in the front cli-
mate control panel is in the OFF position
or the button is not equipped, the rear
mode is controlled automatically depend-
ing on the mode of the front climate con-
trol as follows:
OVQ049315OVQ049316
OVQ028338
1VQA2174
with rear air conditioner
with rear heater
Page 170 of 370
3153
Features of your vehicle
Front climate control is MAX A/C, :Rear air blows from the upper vents on
the rear ceiling.
Front climate control is : Rear air blows from the upper vents on
the rear ceiling and the lower vents on
the right rear trim together.
Front climate control is , , : Rear air blows from the lower vents on
the right rear trim.
❇ If the rear air conditioner is not
equipped, rear air blows only from the
lower vents.
❇ If the rear heater is not equipped, rear
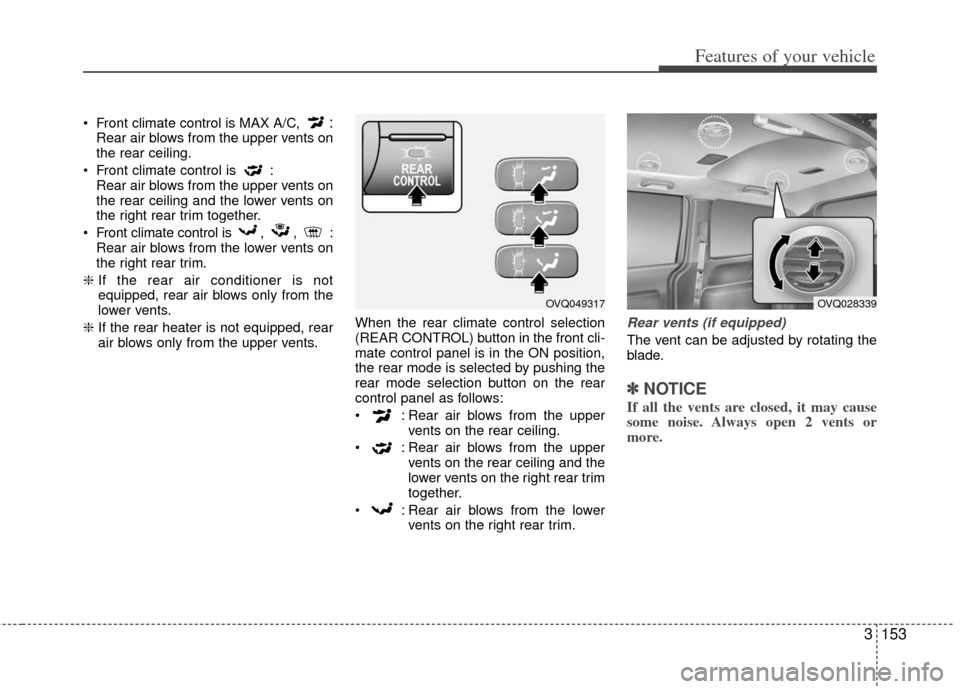
air blows only from the upper vents. When the rear climate control selection
(REAR CONTROL) button in the front cli-
mate control panel is in the ON position,
the rear mode is selected by pushing the
rear mode selection button on the rear
control panel as follows:
: Rear air blows from the upper
vents on the rear ceiling.
: Rear air blows from the upper vents on the rear ceiling and the
lower vents on the right rear trim
together.
: Rear air blows from the lower vents on the right rear trim.
Rear vents (if equipped)
The vent can be adjusted by rotating the
blade.
✽ ✽NOTICE
If all the vents are closed, it may cause
some noise. Always open 2 vents or
more.
OVQ049317OVQ028339