change time KIA SEDONA 2019 Owners Manual
[x] Cancel search | Manufacturer: KIA, Model Year: 2019, Model line: SEDONA, Model: KIA SEDONA 2019Pages: 593, PDF Size: 15.93 MB
Page 1 of 593
Kia, THE COMPANY
Thank you for becoming the owner of a new Kia vehicle.
As a global car manufacturer focused on building high-quality vehi-
cles with exceptional value, Kia Motors is dedicated to providing you
with a customer service experience that exceeds your expectations.
All information contained in this Owner’s Manual was accurate at the
time of publication. However, Kia reserves the right to make changes
at any time so that our policy of continual product improvement can
be carried out.
This manual applies to all trims of this vehicle and includes images,
descriptions, and explanations of optional as well as standard equip-
ment. As a result, some material in this manual may not be applicable
to your specific Kia vehicle. Some images are shown for illustration
only and may show features that differ from those on your vehicle.Drive safely and enjoy your Kia!
Page 2 of 593
i
Thank you for choosing a Kia vehicle.
When you require service, remember that your Kia dealer
knows your vehicle best. Your dealer has factory-trained tech-
nicians, recommended special tools and genuine Kia replace-
ment parts. It is dedicated to your complete customer satisfac-
tion.
Because subsequent owners require this important information
as well, this publication should remain with the vehicle if it is
sold.
This manual will familiarize you with operational, mainte-
nance and safety information about your new vehicle. It is sup-
plemented by a Warranty and Consumer Information manual
that provides important information on all warranties regarding
your vehicle.
We urge you to read these publications carefully and follow the
recommendations to help assure enjoyable and safe operation
of your new vehicle.
Kia offers a great variety of options, components and features
for its various models. Therefore, some of the equipment
described in this manual, along with the various illustrations,
may not be applicable to your particular vehicle.
The information and specifications provided in this manual
were accurate at the time of printing. Kia reserves the right to
discontinue or change specifications or design at any time
without notice and without incurring any obligation. If you
have questions, always check with your Kia dealer.
We assure you of our continuing interest in your motoring
pleasure and satisfaction in your Kia vehicle.
© 2018 Kia Canada Inc.
All rights reserved. Reproduction by any means, electronic or
mechanical, including photocopying, recording, or by any
information storage and retrieval system or translation in
whole or part is not permitted without written authorization
from Kia Canada Inc..
Printed in Korea
Foreword
Page 23 of 593
37
Safety features of your vehicle
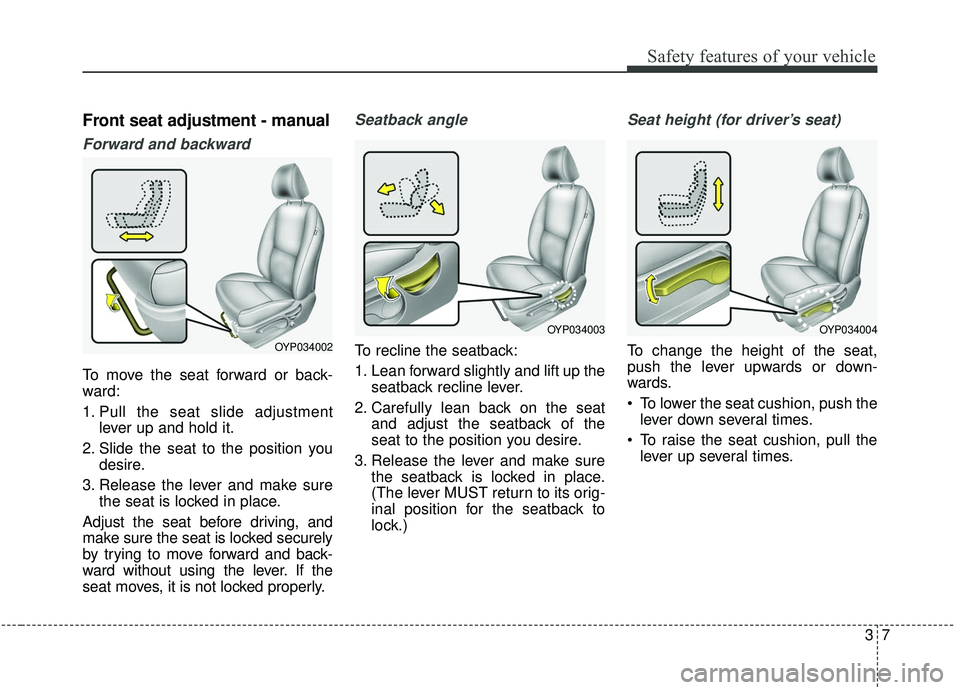
Front seat adjustment - manual
Forward and backward
To move the seat forward or back-
ward:
1. Pull the seat slide adjustmentlever up and hold it.
2. Slide the seat to the position you desire.
3. Release the lever and make sure the seat is locked in place.
Adjust the seat before driving, and
make sure the seat is locked securely
by trying to move forward and back-
ward without using the lever. If the
seat moves, it is not locked properly.
Seatback angle
To recline the seatback:
1. Lean forward slightly and lift up the seatback recline lever.
2. Carefully lean back on the seat and adjust the seatback of the
seat to the position you desire.
3. Release the lever and make sure the seatback is locked in place.
(The lever MUST return to its orig-
inal position for the seatback to
lock.)
Seat height (for driver’s seat)
To change the height of the seat,
push the lever upwards or down-
wards.
To lower the seat cushion, push thelever down several times.
To raise the seat cushion, pull the lever up several times.OYP034002
OYP034004OYP034003
Page 35 of 593
319
Safety features of your vehicle
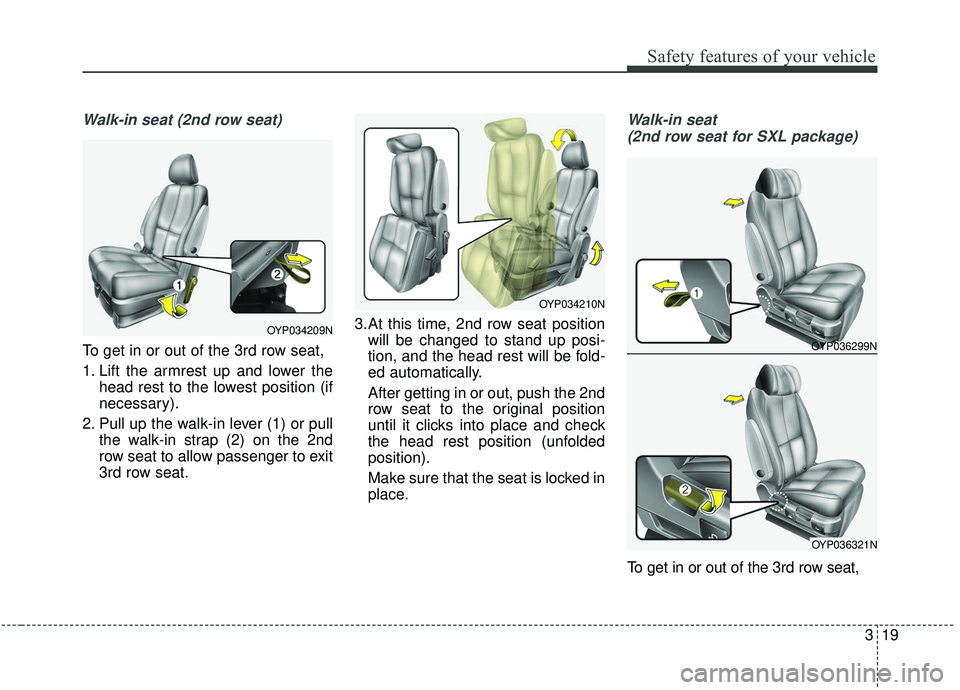
Walk-in seat (2nd row seat)
To get in or out of the 3rd row seat,
1. Lift the armrest up and lower thehead rest to the lowest position (if
necessary).
2. Pull up the walk-in lever (1) or pull the walk-in strap (2) on the 2nd
row seat to allow passenger to exit
3rd row seat. 3.At this time, 2nd row seat position
will be changed to stand up posi-
tion, and the head rest will be fold-
ed automatically.
After getting in or out, push the 2nd
row seat to the original position
until it clicks into place and check
the head rest position (unfolded
position).
Make sure that the seat is locked in
place.
Walk-in seat
(2nd row seat for SXL package)
To get in or out of the 3rd row seat,
OYP034209N
OYP034210N
OYP036299N
OYP036321N
Page 107 of 593
Parking distance warning . . . . . . . . . . . . . . . . . . 4-129
• Operation of the parking distance warning . . . . . . 4-129
• Non-operational conditions of parking distance warning. . . . . . . . . . . . . . . . . . . . . . . . . . . . . . . . . . . 4-\
131
• Self-diagnosis . . . . . . . . . . . . . . . . . . . . . . . . . . . . . . . 4-132
Rear view monitor . . . . . . . . . . . . . . . . . . . . . . . . 4-133
360° camera monitoring system . . . . . . . . . . . . . 4-134
Lighting . . . . . . . . . . . . . . . . . . . . . . . . . . . . . . . . . 4-135
• Battery saver function. . . . . . . . . . . . . . . . . . . . . . . . 4-135
• Headlight escort function . . . . . . . . . . . . . . . . . . . . . 4-135
• Daytime running light . . . . . . . . . . . . . . . . . . . . . . . . 4-135
• Lighting control . . . . . . . . . . . . . . . . . . . . . . . . . . . . . 4-136
• High beam operation. . . . . . . . . . . . . . . . . . . . . . . . . 4-137
• High beam assist . . . . . . . . . . . . . . . . . . . . . . . . . . . . 4-138
• Turn signals and lane change signals . . . . . . . . . . . 4-142
• Front fog light . . . . . . . . . . . . . . . . . . . . . . . . . . . . . . 4-143
• Headlight leveling device . . . . . . . . . . . . . . . . . . . . . 4-143
• Dynamic Bending Light (DBL) . . . . . . . . . . . . . . . . 4-143
Wipers and washers . . . . . . . . . . . . . . . . . . . . . . . 4-145
• Windshield wipers . . . . . . . . . . . . . . . . . . . . . . . . . . 4-145
• Front windshield washers . . . . . . . . . . . . . . . . . . . . . 4-146
• Rear window wiper and washer switch. . . . . . . . . . 4-147
Interior lights . . . . . . . . . . . . . . . . . . . . . . . . . . . . 4-148
• Automatic turn off function . . . . . . . . . . . . . . . . . . . 4-148
• Room lamp . . . . . . . . . . . . . . . . . . . . . . . . . . . . . . . . . 4-148 • Map lamp . . . . . . . . . . . . . . . . . . . . . . . . . . . . . . . . . . 4-14\
9
• Luggage lamp . . . . . . . . . . . . . . . . . . . . . . . . . . . . . . 4-149
• Vanity mirror lamp . . . . . . . . . . . . . . . . . . . . . . . . . . 4-149
• Glove box lamp . . . . . . . . . . . . . . . . . . . . . . . . . . . . . 4-149
Defroster . . . . . . . . . . . . . . . . . . . . . . . . . . . . . . . . 4-151
• Rear window defroster . . . . . . . . . . . . . . . . . . . . . . . 4-151
Manual climate control system . . . . . . . . . . . . . . 4-152
• Heating and air conditioning . . . . . . . . . . . . . . . . . . 4-152
• Rear climate control . . . . . . . . . . . . . . . . . . . . . . . . . 4-160
• System operation . . . . . . . . . . . . . . . . . . . . . . . . . . . . 4-163
• Climate control air filter. . . . . . . . . . . . . . . . . . . . . . 4-166
• Checking the amount of air conditioner
refrigerant and compressor lubricant . . . . . . . . . . 4-167
Automatic climate control system . . . . . . . . . . . 4-168
• Automatic heating and air conditioning . . . . . . . . . 4-169
• Manual heating and air conditioning . . . . . . . . . . . 4-170
• Outside thermometer . . . . . . . . . . . . . . . . . . . . . . . . 4-174
• Rear climate control . . . . . . . . . . . . . . . . . . . . . . . . . 4-179
• From the front seat . . . . . . . . . . . . . . . . . . . . . . . . . . 4-179
• From the rear seat . . . . . . . . . . . . . . . . . . . . . . . . . . . 4-179
• System operation . . . . . . . . . . . . . . . . . . . . . . . . . . . . 4-182
• Climate control air filter. . . . . . . . . . . . . . . . . . . . . . 4-184
• Checking the amount of air conditionerrefrigerant and compressor lubricant . . . . . . . . . . 4-185
4
Page 141 of 593
437
Features of your vehicle
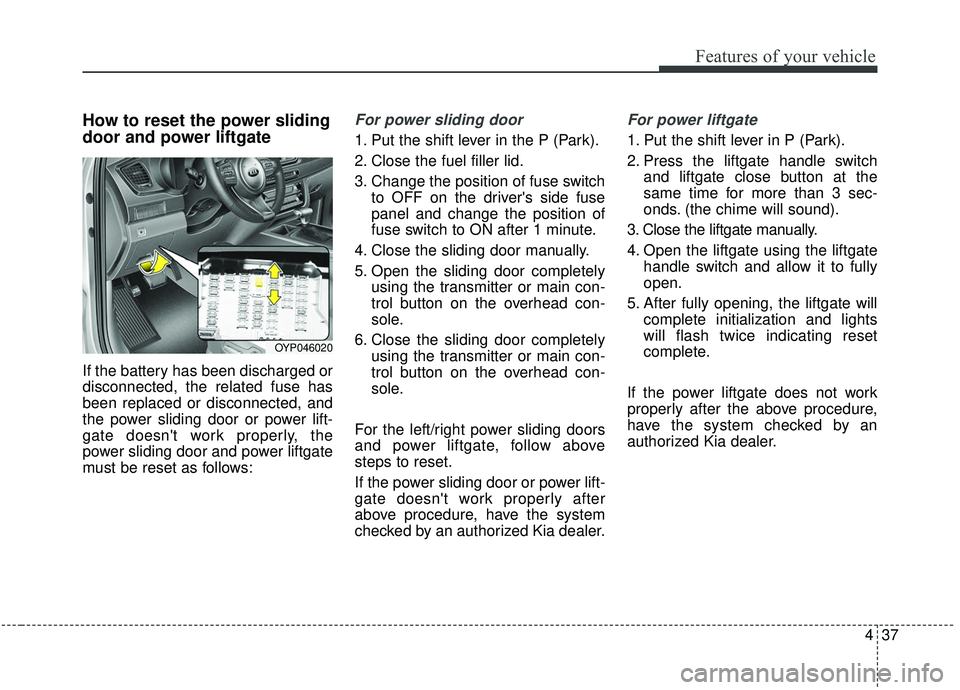
How to reset the power sliding
door and power liftgate
If the battery has been discharged or
disconnected, the related fuse has
been replaced or disconnected, and
the power sliding door or power lift-
gate doesn't work properly, the
power sliding door and power liftgate
must be reset as follows:
For power sliding door
1. Put the shift lever in the P (Park).
2. Close the fuel filler lid.
3. Change the position of fuse switchto OFF on the driver's side fuse
panel and change the position of
fuse switch to ON after 1 minute.
4. Close the sliding door manually.
5. Open the sliding door completely using the transmitter or main con-
trol button on the overhead con-
sole.
6. Close the sliding door completely using the transmitter or main con-
trol button on the overhead con-
sole.
For the left/right power sliding doors
and power liftgate, follow above
steps to reset.
If the power sliding door or power lift-
gate doesn't work properly after
above procedure, have the system
checked by an authorized Kia dealer.
For power liftgate
1. Put the shift lever in P (Park).
2. Press the liftgate handle switch and liftgate close button at the
same time for more than 3 sec-
onds. (the chime will sound).
3. Close the liftgate manually.
4. Open the liftgate using the liftgate handle switch and allow it to fully
open.
5. After fully opening, the liftgate will complete initialization and lights
will flash twice indicating reset
complete.
If the power liftgate does not work
properly after the above procedure,
have the system checked by an
authorized Kia dealer.
OYP046020
Page 187 of 593
483
Features of your vehicle
Erasing HomeLink®buttons
Individual buttons cannot be erased.
However, to erase all three pro-
grammed buttons:
1. Press and hold the two outerHomeLink
®buttons until the indi-
cator light begins to flash-after 20
seconds.
2. Release both buttons. Do not hold for longer than 30 seconds.
The Integrated HomeLink
®Wireless
Control System is now in the training
(learn) mode and can be pro-
grammed at any time following the
appropriate steps in the
Programming sections above. RSS ID: NZLZTVHL3
IC: 4112A-ZTVHL3
This device complies with Industry
Canada licence-exempt RSS stan-
dard(s).
Operation is subject to the following
two conditions:
(1) This device may not cause inter-
ference, and
(2) This device must accept any
interference, including interfer-
ence that may cause undesired
operation of the device. The transceiver has been tested and
complies with RSS and Industry
Canada rules. Changes or modifica-
tions not expressly approved by the
party responsible for compliance
could void the user's authority to
operate the device.
NVS
®and Z-NAV™ are registered
trademarks. Nav®are of Gentex
Corporation, Zeeland, Michigan.
HomeLink
®is a registered trademark
owned by Johnson Controls
Technology Company, Holland,
Michigan.
Page 205 of 593
4101
Features of your vehicle
From the point at which the remain-
ing distance to drive amounts to
1,500 km (900 mi.) or the remaining
period amounts to 3 days, Service
Required message automatically
displays and remained on LCD
screen for a number of seconds
every time the engine start/stop but-
ton is ON.
With Service Required in place,
Service Required Alarm message
pops up when an aggregated
amount of miles/time driven reaches
a certain point.
With Service Required mode, press
OK button for more than 1 second.
The values will return to initial setting
values.❈
See User Settings
Mode in this chapter for further
information about Service Required
Setting.
❈ Service Required Setting
Battery Cable Disconnection, Fuse
Switch OFF, or Service Required
Setting values (an amount of
miles/time driven) can be randomly
changed. In such cases, re-enter
Service Required Setting values.Master Warning Mode
This warning light informs the driv- er of the following situations
- Forward Collision-Avoidance (if equipped) blockage
- Forward Collision-Avoidance (if equipped) malfunction
- Blind-Spot Collision Warning (if equipped) malfunction
- Blind-Spot Collision Warning (if equipped) blockage
- LED headlamp (if equipped) mal- function
- High Beam Assist (if equipped) malfunction
- Low engine oil
- Smart Cruise Control with Stop &Go (if equipped) blockage
- Smart Cruise Control with Stop & Go (if equipped) malfunction
Page 209 of 593
4105
Features of your vehicle
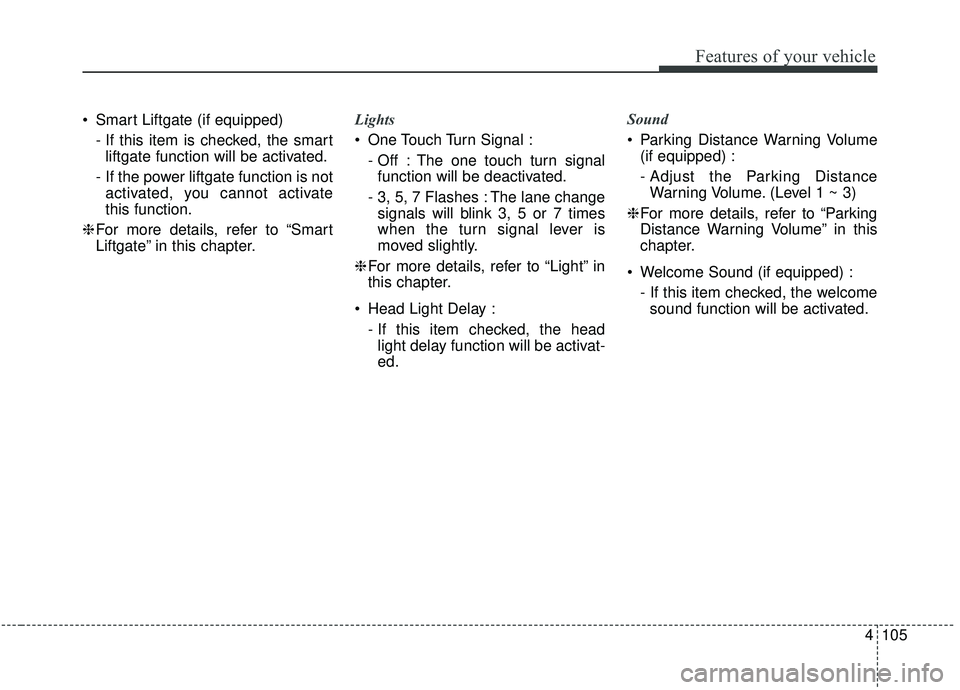
Smart Liftgate (if equipped)- If this item is checked, the smartliftgate function will be activated.
- If the power liftgate function is not activated, you cannot activate
this function.
❈ For more details, refer to “Smart
Liftgate” in this chapter. Lights
One Touch Turn Signal :
- Off : The one touch turn signalfunction will be deactivated.
- 3, 5, 7 Flashes : The lane change signals will blink 3, 5 or 7 times
when the turn signal lever is
moved slightly.
❈ For more details, refer to “Light” in
this chapter.
Head Light Delay : - If this item checked, the headlight delay function will be activat-
ed. Sound
Parking Distance Warning Volume
(if equipped) :
- Adjust the Parking DistanceWarning Volume. (Level 1 ~ 3)
❈ For more details, refer to “Parking
Distance Warning Volume” in this
chapter.
Welcome Sound (if equipped) : - If this item checked, the welcomesound function will be activated.
Page 211 of 593
4107
Features of your vehicle
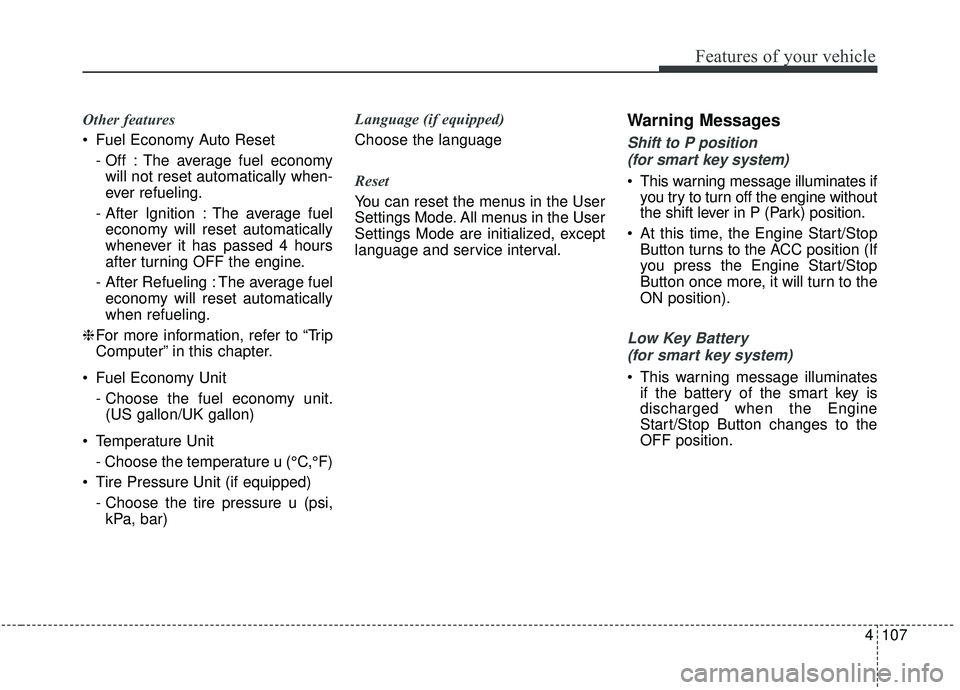
Other features
Fuel Economy Auto Reset - Off : The average fuel economywill not reset automatically when-
ever refueling.
- After Ignition : The average fuel economy will reset automatically
whenever it has passed 4 hours
after turning OFF the engine.
- After Refueling : The average fuel economy will reset automatically
when refueling.
❈ For more information, refer to “Trip
Computer” in this chapter.
Fuel Economy Unit - Choose the fuel economy unit.(US gallon/UK gallon)
Temperature Unit - Choose the temperature u (°C,°F)
Tire Pressure Unit (if equipped) - Choose the tire pressure u (psi,kPa, bar) Language (if equipped)
Choose the language
Reset
You can reset the menus in the User
Settings Mode. All menus in the User
Settings Mode are initialized, except
language and service interval.Warning Messages
Shift to P position
(for smart key system)
This warning message illuminates if you try to turn off the engine without
the shift lever in P (Park) position.
At this time, the Engine Start/Stop Button turns to the ACC position (If
you press the Engine Start/Stop
Button once more, it will turn to the
ON position).
Low Key Battery
(for smart key system)
This warning message illuminates if the battery of the smart key is
discharged when the Engine
Start/Stop Button changes to the
OFF position.