fuse KIA SORENTO 2010 Owners Manual
[x] Cancel search | Manufacturer: KIA, Model Year: 2010, Model line: SORENTO, Model: KIA SORENTO 2010Pages: 399, PDF Size: 40.44 MB
Page 12 of 399

Your vehicle at a glance
2
2
INTERIOR OVERVIEW
1. Door lock/unlock button ....................4-14
2. Outside rearview mirror folding
button*...............................................4-38
3. Outside rearview mirror control switch ................................................4-37
4. Central door lock switch* ..................4-14
5. Power window lock button* ...............4-23
6. Power window switches ....................4-20
7. Fuel filler lid release button...............4-26
8. Head lamp leveling device*...............4-67
9. 4WD lock button* ..............................5-23
10. ESP OFF button* ...........................5-35
11. Headlight washer button*................4-68
12. DBC button* ....................................5-38
13. Instrument panel illumination control switch*.............................................4-41
14. Steering wheel tilt control* ..............4-34
15. Steering wheel ................................4-33
16. Fuse box .........................................7-51
17. Hood release lever ..........................4-24
18. Seat...................................................3-2
19. Air vent ............................................4-78
* : if equipped
OXM019001L
Page 14 of 399
Your vehicle at a glance
4
2
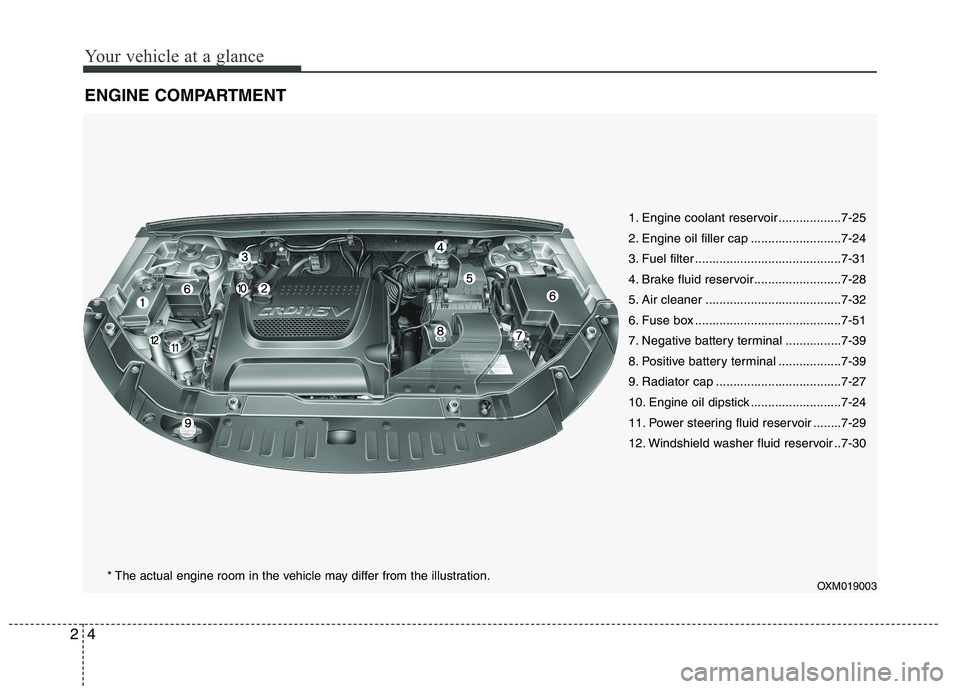
ENGINE COMPARTMENT
OXM019003
1. Engine coolant reservoir ..................7-25
2. Engine oil filler cap ..........................7-24
3. Fuel filter ..........................................7-31
4. Brake fluid reservoir.........................7-28
5. Air cleaner .......................................7-32
6. Fuse box ..........................................7-51
7. Negative battery terminal ................7-39
8. Positive battery terminal ..................7-39
9. Radiator cap ....................................7-27
10. Engine oil dipstick ..........................7-24
11. Power steering fluid reservoir ........7-29
12. Windshield washer fluid reservoir ..7-30
* The actual engine room in the vehicle may differ from the illustration.
Page 60 of 399
Safety features of your vehicle
46
3
WARNING
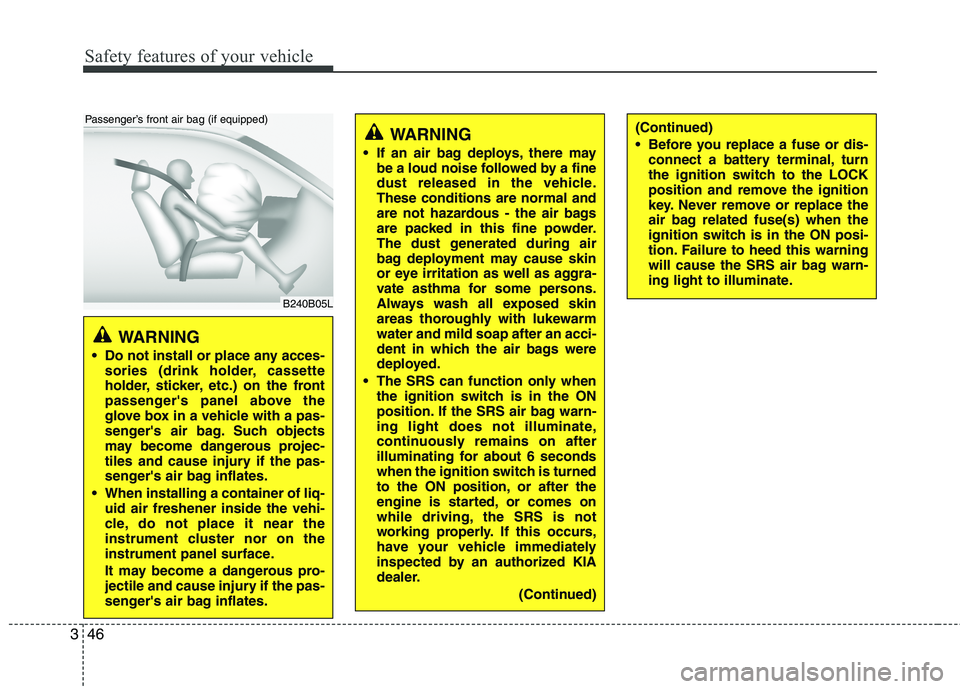
Do not install or place any acces- sories (drink holder, cassette
holder, sticker, etc.) on the front
passenger's panel above the
glove box in a vehicle with a pas-
senger's air bag. Such objects
may become dangerous projec-
tiles and cause injury if the pas-
senger's air bag inflates.
When installing a container of liq- uid air freshener inside the vehi-
cle, do not place it near the
instrument cluster nor on the
instrument panel surface.
It may become a dangerous pro-
jectile and cause injury if the pas-
senger's air bag inflates.
B240B05L
Passenger’s front air bag (if equipped)
WARNING
If an air bag deploys, there may be a loud noise followed by a fine
dust released in the vehicle.These conditions are normal and
are not hazardous - the air bags
are packed in this fine powder.
The dust generated during air
bag deployment may cause skin
or eye irritation as well as aggra-
vate asthma for some persons.
Always wash all exposed skin
areas thoroughly with lukewarmwater and mild soap after an acci-
dent in which the air bags were
deployed.
The SRS can function only when the ignition switch is in the ON
position. If the SRS air bag warn-
ing light does not illuminate,
continuously remains on after
illuminating for about 6 seconds
when the ignition switch is turned
to the ON position, or after the
engine is started, or comes on
while driving, the SRS is not
working properly. If this occurs,
have your vehicle immediately
inspected by an authorized KIA
dealer.
(Continued)(Continued)
Before you replace a fuse or dis-connect a battery terminal, turn
the ignition switch to the LOCK
position and remove the ignition
key. Never remove or replace the
air bag related fuse(s) when the
ignition switch is in the ON posi-
tion. Failure to heed this warning
will cause the SRS air bag warn-
ing light to illuminate.
Page 98 of 399
423
Features of your vehicle
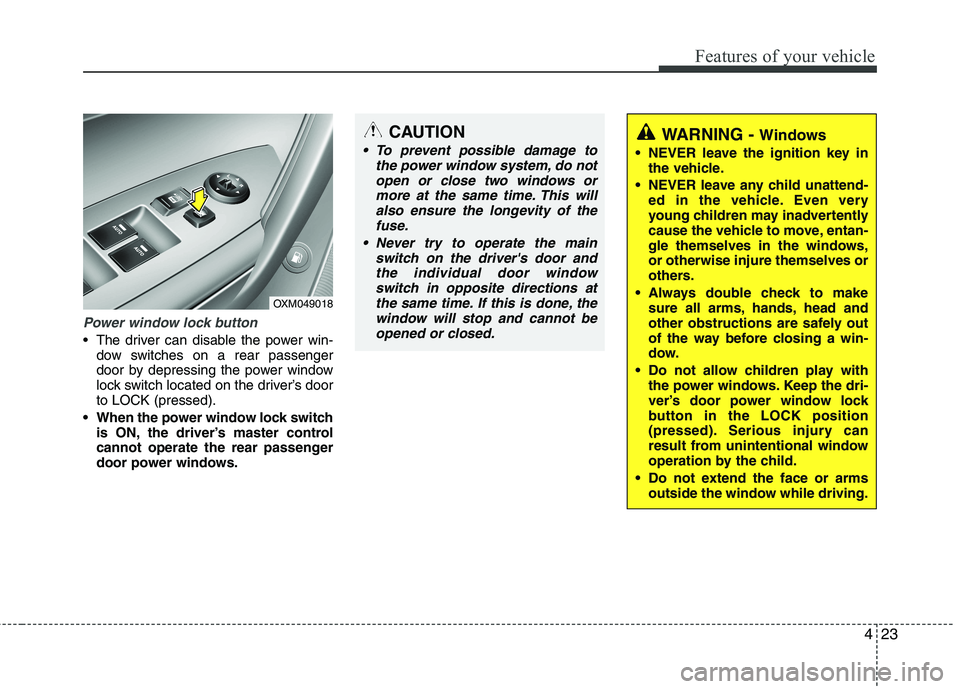
Power window lock button
The driver can disable the power win-dow switches on a rear passenger
door by depressing the power window
lock switch located on the driver’s doorto LOCK (pressed).
When the power window lock switch is ON, the driver’s master control
cannot operate the rear passenger
door power windows.
CAUTION
To prevent possible damage to
the power window system, do not
open or close two windows or more at the same time. This willalso ensure the longevity of the fuse.
Never try to operate the main switch on the driver's door andthe individual door windowswitch in opposite directions at
the same time. If this is done, thewindow will stop and cannot beopened or closed.WARNING - Windows
NEVER leave the ignition key in the vehicle.
NEVER leave any child unattend- ed in the vehicle. Even very
young children may inadvertently
cause the vehicle to move, entan-
gle themselves in the windows,or otherwise injure themselves or
others.
Always double check to make sure all arms, hands, head and
other obstructions are safely out
of the way before closing a win-
dow.
Do not allow children play with the power windows. Keep the dri-
ver’s door power window lock
button in the LOCK position
(pressed). Serious injury can
result from unintentional window
operation by the child.
Do not extend the face or arms outside the window while driving.
OXM049018
Page 177 of 399
Features of your vehicle
102
4
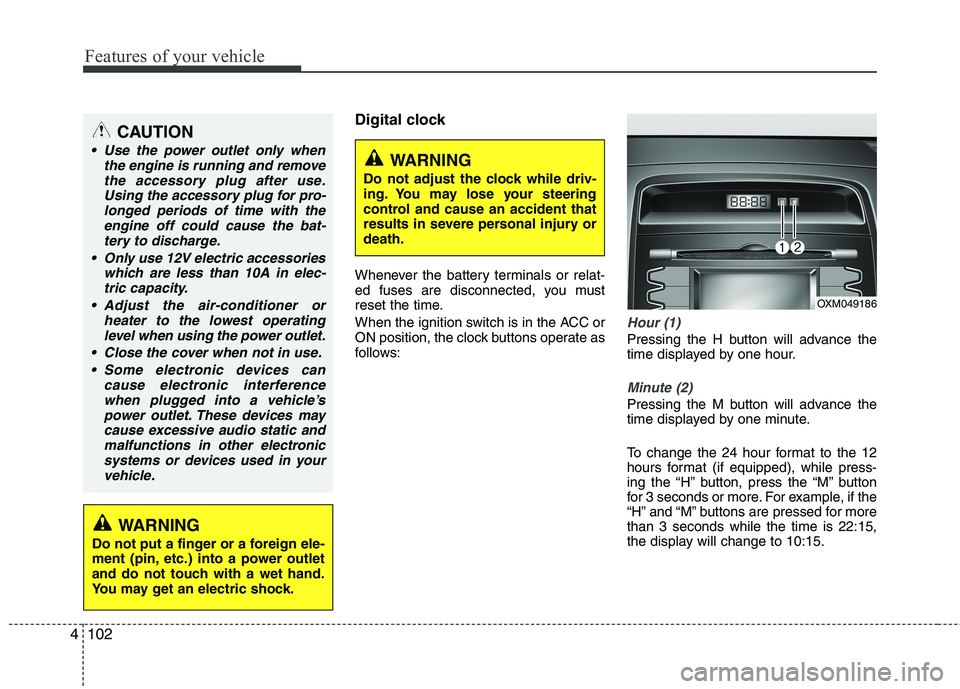
Digital clock
Whenever the battery terminals or relat-
ed fuses are disconnected, you must
reset the time.
When the ignition switch is in the ACC or
ON position, the clock buttons operate as
follows:
Hour (1)
Pressing the H button will advance the
time displayed by one hour.
Minute (2)
Pressing the M button will advance the
time displayed by one minute.
To change the 24 hour format to the 12
hours format (if equipped), while press-
ing the “H” button, press the “M” button
for 3 seconds or more. For example, if the
“H” and “M” buttons are pressed for morethan 3 seconds while the time is 22:15,
the display will change to 10:15.
WARNING
Do not adjust the clock while driv-
ing. You may lose your steering
control and cause an accident that
results in severe personal injury ordeath.
CAUTION
Use the power outlet only when the engine is running and remove
the accessory plug after use.Using the accessory plug for pro-longed periods of time with the engine off could cause the bat-
tery to discharge.
Only use 12V electric accessories which are less than 10A in elec-tric capacity.
Adjust the air-conditioner or heater to the lowest operatinglevel when using the power outlet.
Close the cover when not in use. Some electronic devices can cause electronic interference
when plugged into a vehicle’spower outlet. These devices may cause excessive audio static andmalfunctions in other electronic
systems or devices used in yourvehicle.
WARNING
Do not put a finger or a foreign ele-
ment (pin, etc.) into a power outlet
and do not touch with a wet hand.
You may get an electric shock.
OXM049186
Page 225 of 399
513
Driving your vehicle
✽✽
NOTICE
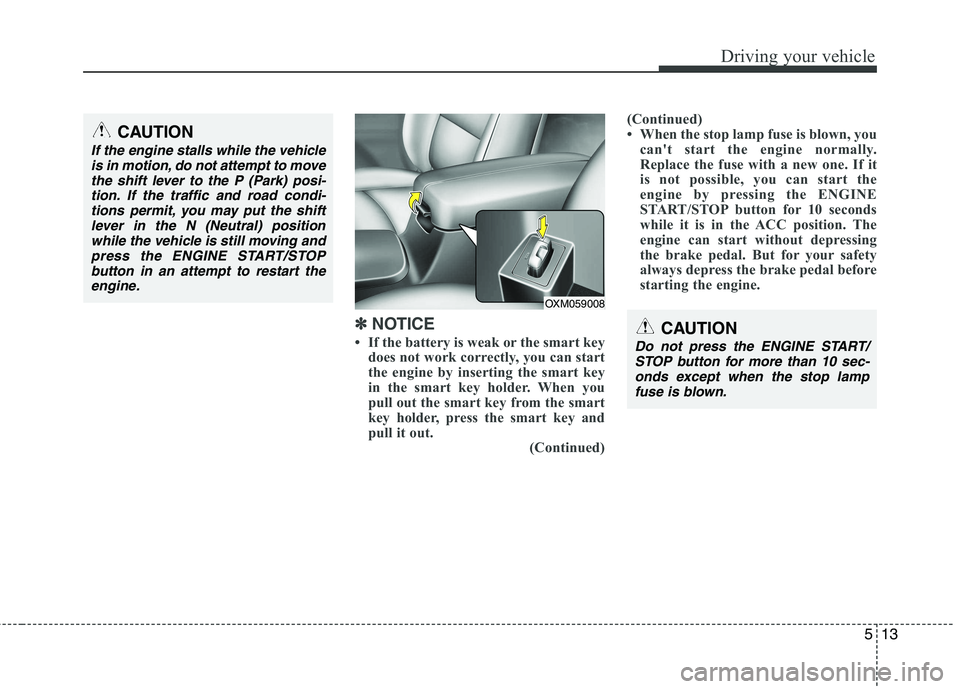
If the battery is weak or the smart key does not work correctly, you can start
the engine by inserting the smart key
in the smart key holder. When you
pull out the smart key from the smart
key holder, press the smart key and
pull it out. (Continued)(Continued)
When the stop lamp fuse is blown, you
can't start the engine normally.
Replace the fuse with a new one. If it
is not possible, you can start the
engine by pressing the ENGINE
START/STOP button for 10 seconds
while it is in the ACC position. The
engine can start without depressing
the brake pedal. But for your safety
always depress the brake pedal before
starting the engine.CAUTION
Do not press the ENGINE START/
STOP button for more than 10 sec-
onds except when the stop lamp fuse is blown.
OXM059008
CAUTION
If the engine stalls while the vehicle is in motion, do not attempt to move
the shift lever to the P (Park) posi-tion. If the traffic and road condi-tions permit, you may put the shift lever in the N (Neutral) position
while the vehicle is still moving andpress the ENGINE START/STOPbutton in an attempt to restart the
engine.
Page 307 of 399
7
Engine compartment / 7-2
Maintenance services / 7-4
Owner maintenance / 7-6
Scheduled maintenance service / 7-8
Explanation of scheduled maintenance items / 7-21
Engine oil / 7-24
Engine coolant / 7-25
Brake fluid / 7-28
Power steering fluid / 7-29
Washer fluid / 7-30
Parking brake / 7-30
Fuel filter / 7-31
Air cleaner / 7-32
Climate control air filter / 7-34
Wiper blades / 7-36
Battery / 7-39
Tires and wheels / 7-41
Fuses / 7-51
Light bulbs / 7-63
Appearance care / 7-72
Emission control system / 7-78
Maintenance
Page 308 of 399
Maintenance
2
7
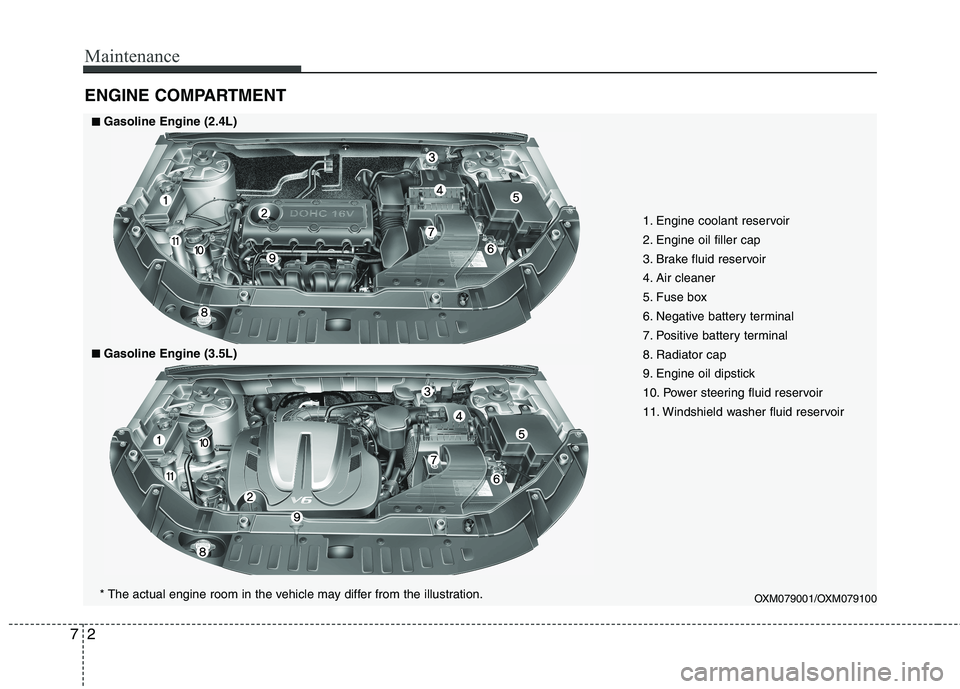
ENGINE COMPARTMENT
1. Engine coolant reservoir
2. Engine oil filler cap
3. Brake fluid reservoir
4. Air cleaner
5. Fuse box
6. Negative battery terminal
7. Positive battery terminal
8. Radiator cap
9. Engine oil dipstick
10. Power steering fluid reservoir
11. Windshield washer fluid reservoir
OXM079001/OXM079100
■■Gasoline Engine (2.4L)
■
■ Gasoline Engine (3.5L)
* The actual engine room in the vehicle may differ from the illustration.
Page 309 of 399
73
Maintenance
OXM019003
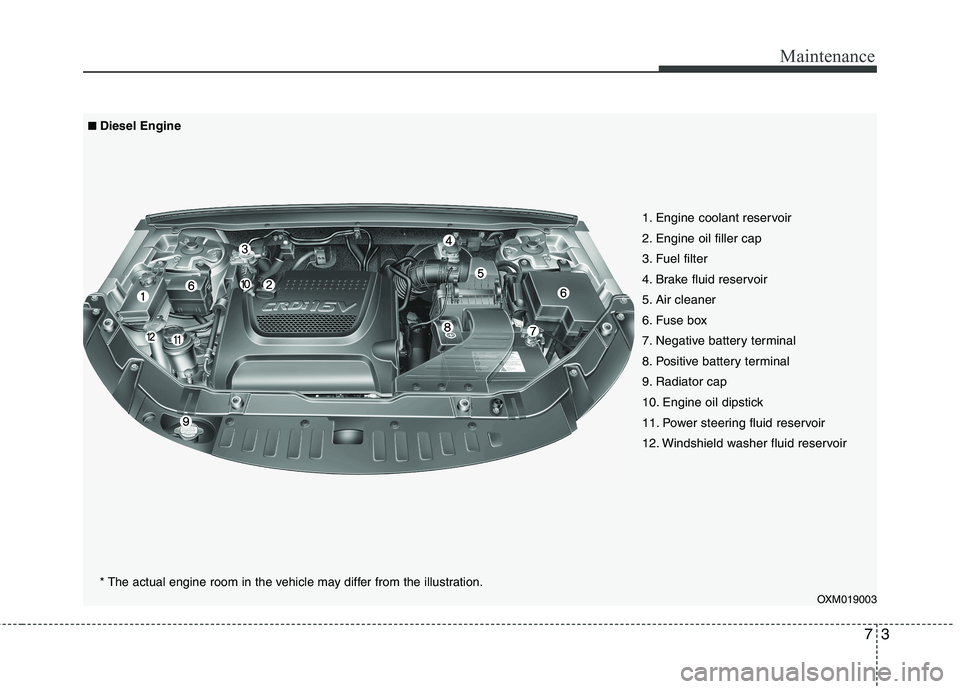
1. Engine coolant reservoir
2. Engine oil filler cap
3. Fuel filter
4. Brake fluid reservoir
5. Air cleaner
6. Fuse box
7. Negative battery terminal
8. Positive battery terminal
9. Radiator cap
10. Engine oil dipstick
11. Power steering fluid reservoir
12. Windshield washer fluid reservoir
* The actual engine room in the vehicle may differ from the illustration.
■■Diesel Engine
Page 357 of 399
751
Maintenance
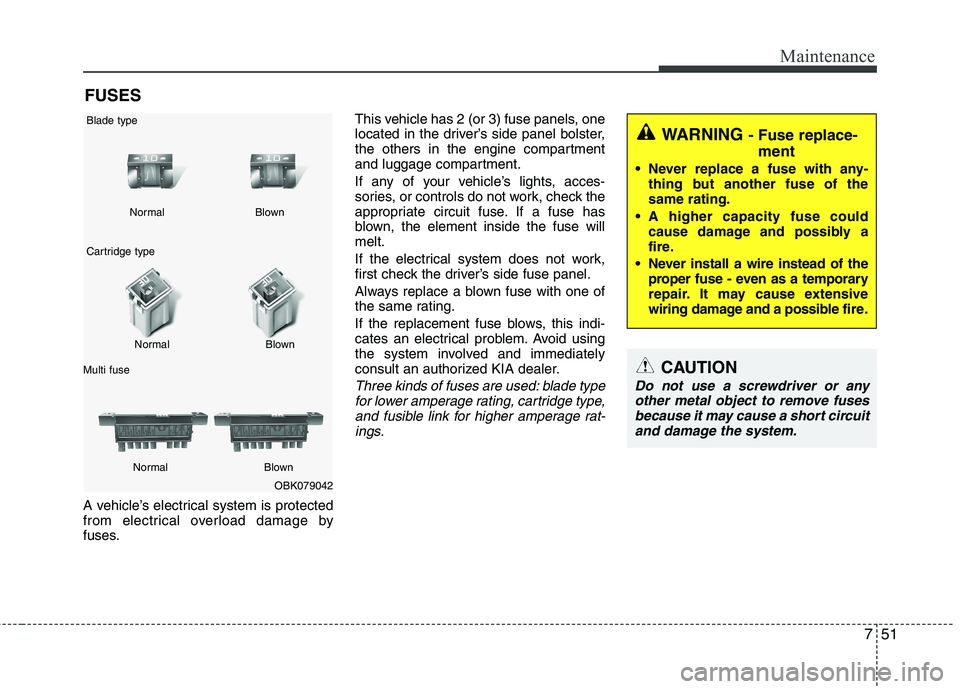
FUSES
A vehicle’s electrical system is protected
from electrical overload damage by
fuses. This vehicle has 2 (or 3) fuse panels, one
located in the driver’s side panel bolster,
the others in the engine compartment
and luggage compartment.
If any of your vehicle’s lights, acces-
sories, or controls do not work, check the
appropriate circuit fuse. If a fuse has
blown, the element inside the fuse willmelt.
If the electrical system does not work,
first check the driver’s side fuse panel.
Always replace a blown fuse with one of
the same rating.
If the replacement fuse blows, this indi-
cates an electrical problem. Avoid using
the system involved and immediately
consult an authorized KIA dealer.
Three kinds of fuses are used: blade type
for lower amperage rating, cartridge type,
and fusible link for higher amperage rat-ings.
OBK079042
Normal
Normal
Blade type
Cartridge type
Multi fuse Blown
Blown
Normal Blown
WARNING - Fuse replace-
ment
Never replace a fuse with any- thing but another fuse of the same rating.
A higher capacity fuse could cause damage and possibly a
fire.
Never install a wire instead of the proper fuse - even as a temporary
repair. It may cause extensive
wiring damage and a possible fire.
CAUTION
Do not use a screwdriver or any
other metal object to remove fuses because it may cause a short circuitand damage the system.