clock KIA Sorento 2014 3.G Owner's Manual
[x] Cancel search | Manufacturer: KIA, Model Year: 2014, Model line: Sorento, Model: KIA Sorento 2014 3.GPages: 508, PDF Size: 7.59 MB
Page 13 of 508
25
Your vehicle at a glance
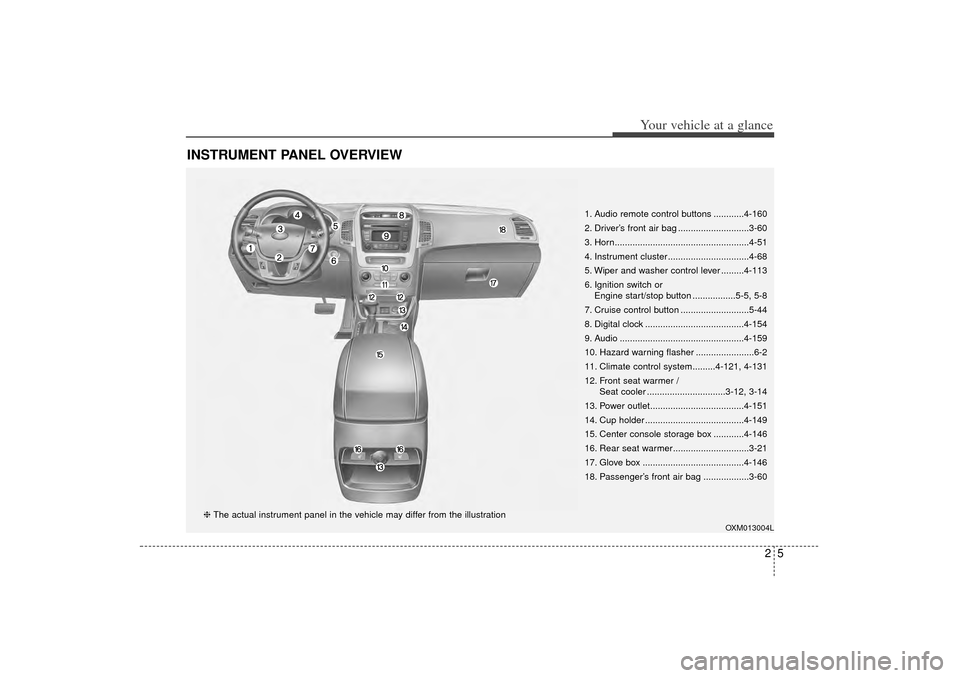
INSTRUMENT PANEL OVERVIEW
1. Audio remote control buttons ............4-160
2. Driver’s front air bag ............................3-60
3. Horn.....................................................4-51
4. Instrument cluster ................................4-68
5. Wiper and washer control lever .........4-113
6. Ignition switch or Engine start/stop button .................5-5, 5-8
7. Cruise control button ...........................5-44
8. Digital clock .......................................4-154
9. Audio .................................................4-159
10. Hazard warning flasher .......................6-2
11. Climate control system.........4-121, 4-131
12. Front seat warmer / Seat cooler ...............................3-12, 3-14
13. Power outlet.....................................4-151
14. Cup holder .......................................4-149
15. Center console storage box ............4-146
16. Rear seat warmer..............................3-21
17. Glove box ........................................4-146
18. Passenger’s front air bag ..................3-60
OXM013004L
❈ The actual instrument panel in the vehicle may differ from the illustration
XM(FL) CAN(ENG) 2.QXP 1/23/2013 3:21 PM Page 5
Page 94 of 508
Defroster . . . . . . . . . . . . . . . . . . . . . . . . . . . . . . . . 4-120• Rear window defroster . . . . . . . . . . . . . . . . . . . . . . . 4-120Manual climate control system . . . . . . . . . . . . . . 4-121• Heating and air conditioning . . . . . . . . . . . . . . . . . . 4-122
• 3rd row air conditioning . . . . . . . . . . . . . . . . . . . . . 4-126
• System operation . . . . . . . . . . . . . . . . . . . . . . . . . . . . 4-127
• Climate control air filter. . . . . . . . . . . . . . . . . . . . . . 4-129
• Air Conditioning refrigerant label . . . . . . . . . . . . . 4-130
• Checking the amount of air conditioner refrigerantand compressor lubricant. . . . . . . . . . . . . . . . . . . . 4-130Automatic climate control system . . . . . . . . . . . 4-131• Automatic heating and air conditioning . . . . . . . . . 4-133
• Manual heating and air conditioning . . . . . . . . . . . 4-134
• Outside thermometer . . . . . . . . . . . . . . . . . . . . . . . . 4-137
• 3rd row air conditioning . . . . . . . . . . . . . . . . . . . . . . 4-140Windshield defrosting and defogging . . . . . . . . . 4-142• Manual climate control system . . . . . . . . . . . . . . . . 4-142
• Automatic climate control system . . . . . . . . . . . . . . 4-143
• Defogging logic. . . . . . . . . . . . . . . . . . . . . . . . . . . . . . 4-144Storage compartments . . . . . . . . . . . . . . . . . . . . . 4-146• Center console storage . . . . . . . . . . . . . . . . . . . . . . . 4-146
• Glove box . . . . . . . . . . . . . . . . . . . . . . . . . . . . . . . . . . 4-14\
6
• Sunglass holder . . . . . . . . . . . . . . . . . . . . . . . . . . . . 4-147
• Luggage box . . . . . . . . . . . . . . . . . . . . . . . . . . . . . . . . 4-148
Interior features . . . . . . . . . . . . . . . . . . . . . . . . . 4-149• Cup holder . . . . . . . . . . . . . . . . . . . . . . . . . . . . . . . . . 4-149
• Bottle holder. . . . . . . . . . . . . . . . . . . . . . . . . . . . . . . . 4-\
150
• Sunvisor . . . . . . . . . . . . . . . . . . . . . . . . . . . . . . . . . . . 4-\
150
• Power outlet . . . . . . . . . . . . . . . . . . . . . . . . . . . . . . . . 4-151
• AC inverter . . . . . . . . . . . . . . . . . . . . . . . . . . . . . . . . 4-152
• Clock . . . . . . . . . . . . . . . . . . . . . . . . . . . . . . . . . . . . \
. . 4-154
• Ashtray . . . . . . . . . . . . . . . . . . . . . . . . . . . . . . . . . . . . \
4-154
• Clothes hanger . . . . . . . . . . . . . . . . . . . . . . . . . . . . . 4-155
• Floor mat anchor(s). . . . . . . . . . . . . . . . . . . . . . . . . . 4-155
• Side curtain . . . . . . . . . . . . . . . . . . . . . . . . . . . . . . . . 4-156
• Luggage net holder . . . . . . . . . . . . . . . . . . . . . . . . . . 4-156Exterior features . . . . . . . . . . . . . . . . . . . . . . . . . . 4-157• Roof rack . . . . . . . . . . . . . . . . . . . . . . . . . . . . . . . . . . 4-15\
7Audio system . . . . . . . . . . . . . . . . . . . . . . . . . . . . . 4-159• Antenna . . . . . . . . . . . . . . . . . . . . . . . . . . . . . . . . . . . 4-\
159
4
XM(FL) CAN(ENG) 4a(~158).QXP 1/23/2013 3:46 PM Page 3
Page 112 of 508
421
Features of your vehicle
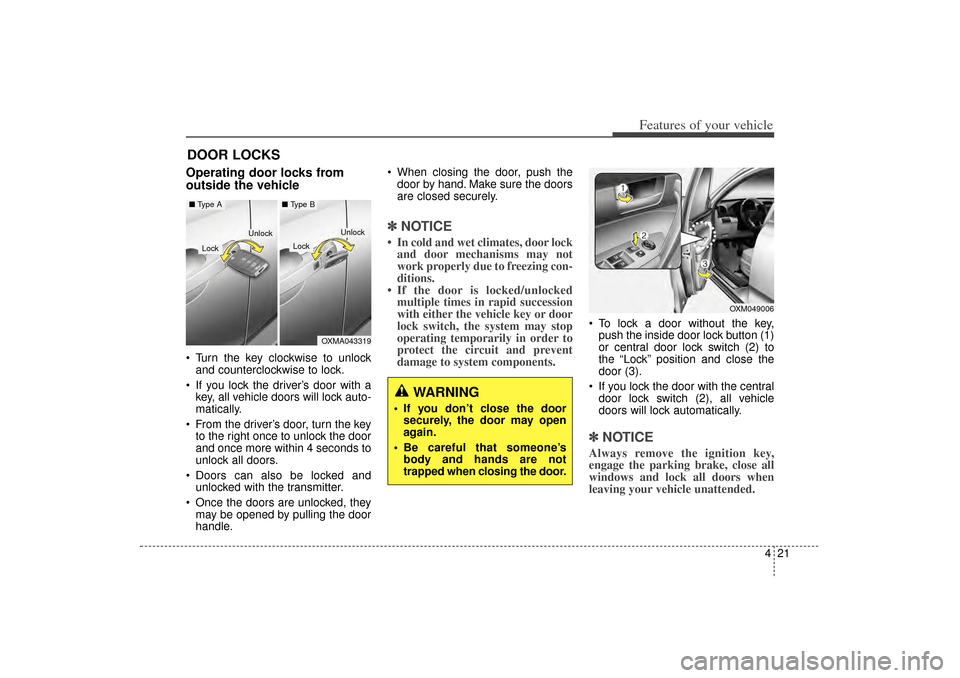
DOOR LOCKS Operating door locks from
outside the vehicle Turn the key clockwise to unlockand counterclockwise to lock.
If you lock the driver’s door with a key, all vehicle doors will lock auto-
matically.
From the driver’s door, turn the key to the right once to unlock the door
and once more within 4 seconds to
unlock all doors.
Doors can also be locked and unlocked with the transmitter.
Once the doors are unlocked, they may be opened by pulling the door
handle. When closing the door, push the
door by hand. Make sure the doors
are closed securely.
✽ ✽ NOTICE• In cold and wet climates, door lock
and door mechanisms may not
work properly due to freezing con-
ditions.
• If the door is locked/unlocked multiple times in rapid succession
with either the vehicle key or door
lock switch, the system may stop
operating temporarily in order to
protect the circuit and prevent
damage to system components.
To lock a door without the key,
push the inside door lock button (1)
or central door lock switch (2) to
the “Lock” position and close the
door (3).
If you lock the door with the central door lock switch (2), all vehicle
doors will lock automatically.✽ ✽ NOTICEAlways remove the ignition key,
engage the parking brake, close all
windows and lock all doors when
leaving your vehicle unattended.
OXMA043319
Lock
Lock
Unlock
■ Type A
■ Type B
Unlock
OXM049006
WARNING
If you don’t close the door
securely, the door may open
again.
Be careful that someone’s body and hands are not
trapped when closing the door.
XM(FL) CAN(ENG) 4a(~158).QXP 1/23/2013 3:46 PM Page 21
Page 131 of 508
Features of your vehicle40
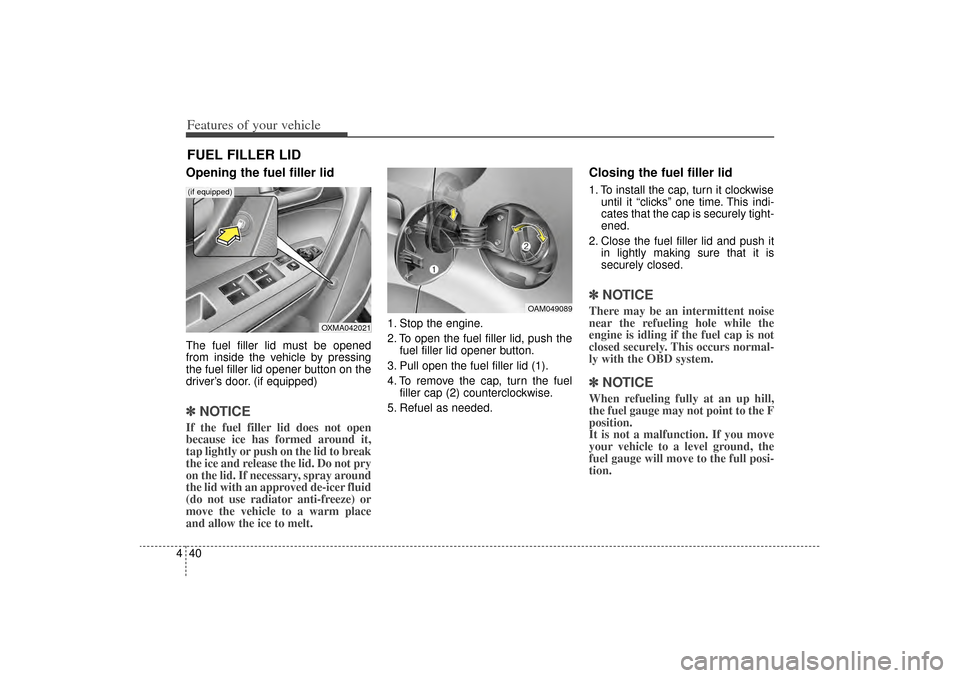
4Opening the fuel filler lidThe fuel filler lid must be opened
from inside the vehicle by pressing
the fuel filler lid opener button on the
driver’s door. (if equipped)✽ ✽
NOTICEIf the fuel filler lid does not open
because ice has formed around it,
tap lightly or push on the lid to break
the ice and release the lid. Do not pry
on the lid. If necessary, spray around
the lid with an approved de-icer fluid
(do not use radiator anti-freeze) or
move the vehicle to a warm place
and allow the ice to melt.
1. Stop the engine.
2. To open the fuel filler lid, push the
fuel filler lid opener button.
3. Pull open the fuel filler lid (1).
4. To remove the cap, turn the fuel filler cap (2) counterclockwise.
5. Refuel as needed.
Closing the fuel filler lid1. To install the cap, turn it clockwise until it “clicks” one time. This indi-
cates that the cap is securely tight-
ened.
2. Close the fuel filler lid and push it in lightly making sure that it is
securely closed.✽ ✽NOTICEThere may be an intermittent noise
near the refueling hole while the
engine is idling if the fuel cap is not
closed securely. This occurs normal-
ly with the OBD system.✽ ✽NOTICEWhen refueling fully at an up hill,
the fuel gauge may not point to the F
position.
It is not a malfunction. If you move
your vehicle to a level ground, the
fuel gauge will move to the full posi-
tion.
FUEL FILLER LID
OAM049089
OXMA042021
(if equipped)
XM(FL) CAN(ENG) 4a(~158).QXP 1/23/2013 3:48 PM Page 40
Page 245 of 508
Features of your vehicle154
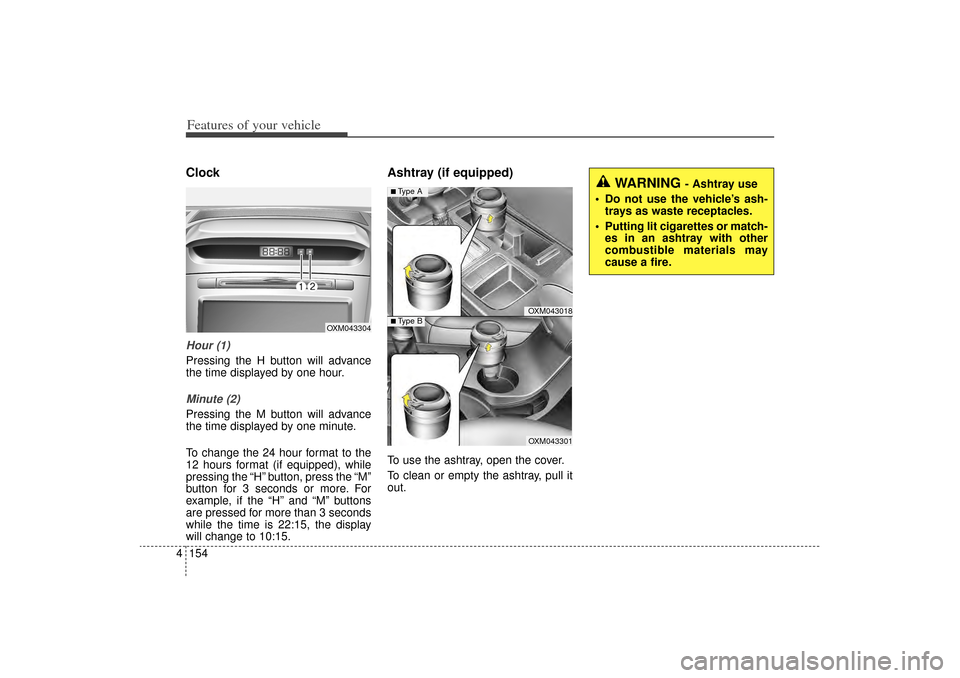
4ClockHour (1)Pressing the H button will advance
the time displayed by one hour.Minute (2)Pressing the M button will advance
the time displayed by one minute.
To change the 24 hour format to the
12 hours format (if equipped), while
pressing the “H” button, press the “M”
button for 3 seconds or more. For
example, if the “H” and “M” buttons
are pressed for more than 3 seconds
while the time is 22:15, the display
will change to 10:15.
Ashtray (if equipped)To use the ashtray, open the cover.
To clean or empty the ashtray, pull it
out.
OXM043304
WARNING
- Ashtray use
Do not use the vehicle’s ash- trays as waste receptacles.
Putting lit cigarettes or match- es in an ashtray with other
combustible materials may
cause a fire.
OXM043018OXM043301
■Type A■ Type B
XM(FL) CAN(ENG) 4a(~158).QXP 1/23/2013 3:56 PM Page 154
Page 250 of 508
4 159
Features of your vehicle
✽
✽NOTICE If you install an after market HID
head lamp, your vehicle’s audio and
electronic device may malfunction.
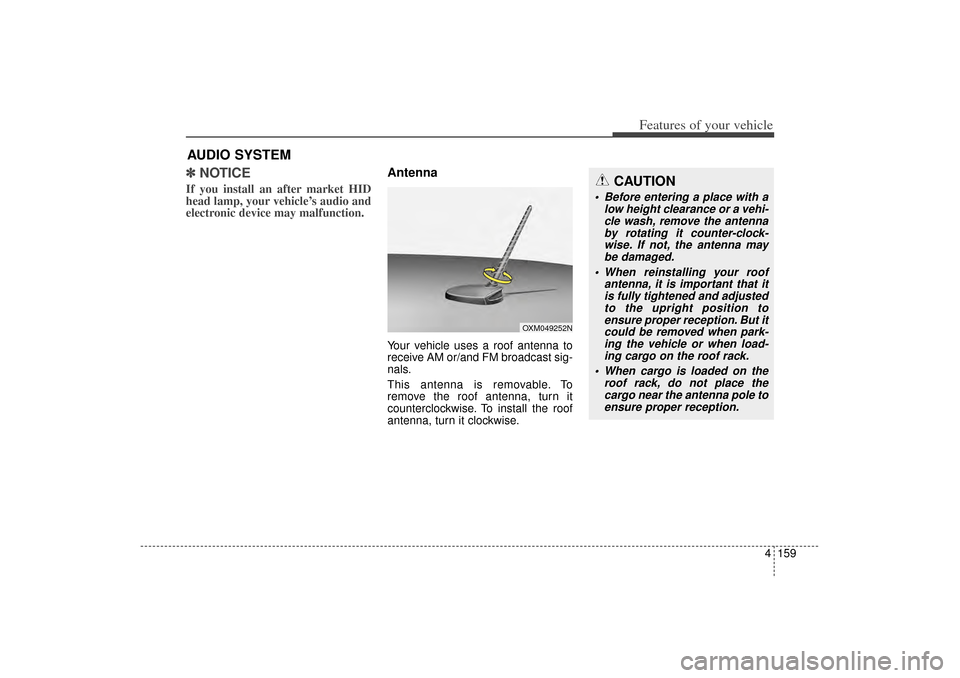
AntennaYour vehicle uses a roof antenna to
receive AM or/and FM broadcast sig-
nals.
This antenna is removable. To
remove the roof antenna, turn it
counterclockwise. To install the roof
antenna, turn it clockwise.
AUDIO SYSTEM
CAUTION
• Before entering a place with a
low height clearance or a vehi-cle wash, remove the antennaby rotating it counter-clock-wise. If not, the antenna maybe damaged.
When reinstalling your roof antenna, it is important that itis fully tightened and adjustedto the upright position toensure proper reception. But itcould be removed when park-ing the vehicle or when load-ing cargo on the roof rack.
When cargo is loaded on the roof rack, do not place thecargo near the antenna pole toensure proper reception.
OXM049252N
XM(FL) CAN(ENG) 4b(AUDIO).qxp 1/23/2013 3:42 PM Page 159
Page 395 of 508
69
What to do in an emergency
Removing and storing the
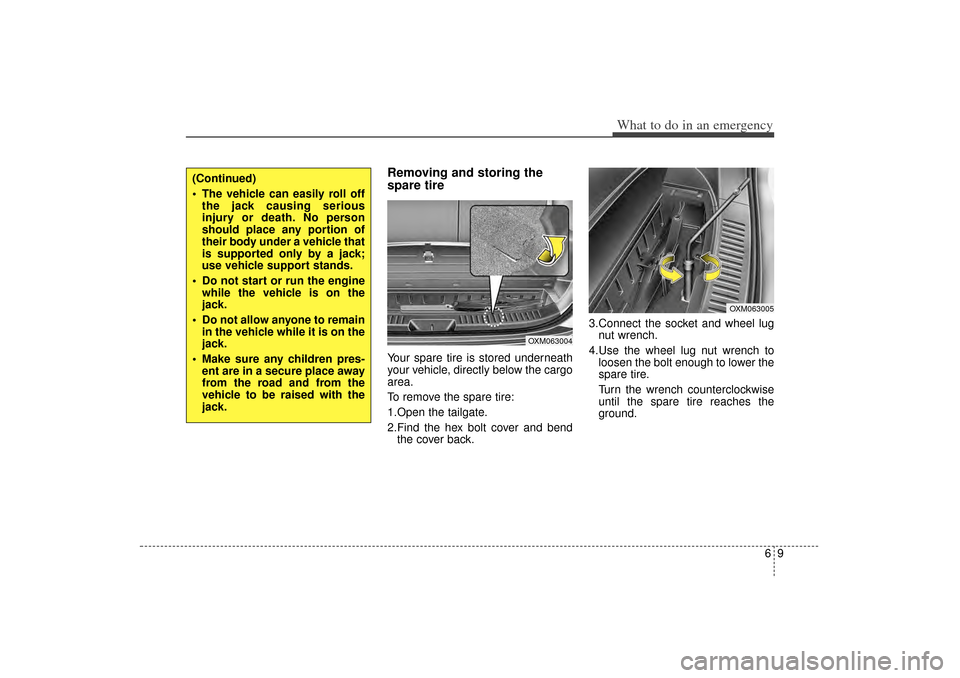
spare tire Your spare tire is stored underneath
your vehicle, directly below the cargo
area.
To remove the spare tire:
1.Open the tailgate.
2.Find the hex bolt cover and bendthe cover back. 3.Connect the socket and wheel lug
nut wrench.
4.Use the wheel lug nut wrench to loosen the bolt enough to lower the
spare tire.
Turn the wrench counterclockwise
until the spare tire reaches the
ground.
(Continued)
The vehicle can easily roll offthe jack causing serious
injury or death. No person
should place any portion of
their body under a vehicle that
is supported only by a jack;
use vehicle support stands.
Do not start or run the engine while the vehicle is on the
jack.
Do not allow anyone to remain in the vehicle while it is on the
jack.
Make sure any children pres- ent are in a secure place away
from the road and from the
vehicle to be raised with the
jack.
OXM063004
OXM063005
XM(FL) CAN(ENG) 6.QXP 1/23/2013 3:33 PM Page 9
Page 396 of 508
What to do in an emergency10
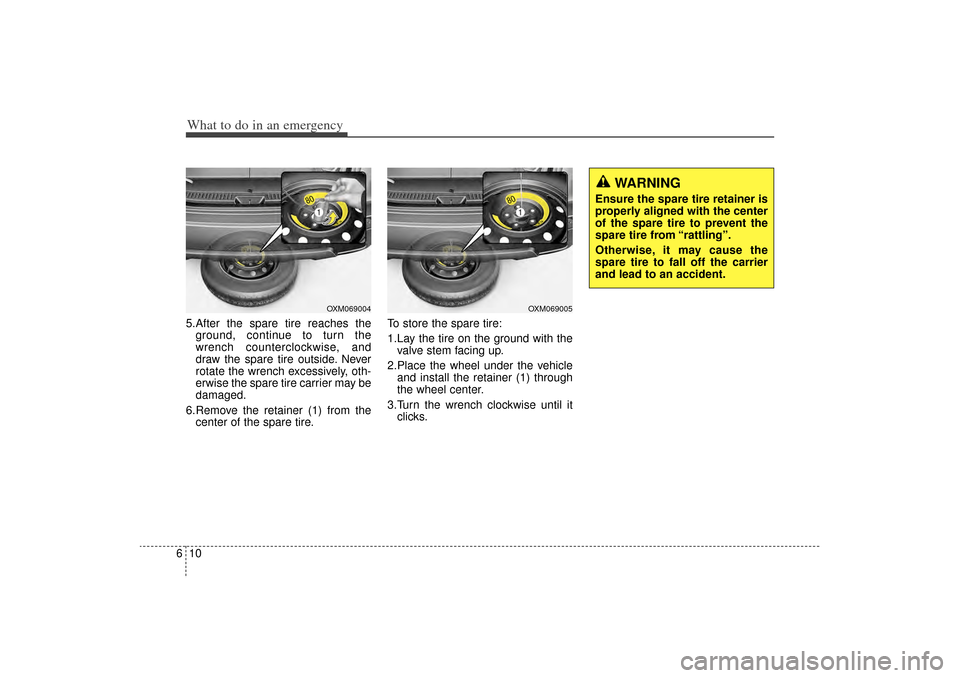
65.After the spare tire reaches the
ground, continue to turn the
wrench counterclockwise, and
draw the spare tire outside. Never
rotate the wrench excessively, oth-
erwise the spare tire carrier may be
damaged.
6.Remove the retainer (1) from the center of the spare tire. To store the spare tire:
1.Lay the tire on the ground with the
valve stem facing up.
2.Place the wheel under the vehicle and install the retainer (1) through
the wheel center.
3.Turn the wrench clockwise until it clicks.
WARNING
Ensure the spare tire retainer is
properly aligned with the center
of the spare tire to prevent the
spare tire from “rattling”.
Otherwise, it may cause the
spare tire to fall off the carrier
and lead to an accident.
OXM069005
OXM069004
XM(FL) CAN(ENG) 6.QXP 1/23/2013 3:34 PM Page 10
Page 398 of 508
What to do in an emergency12
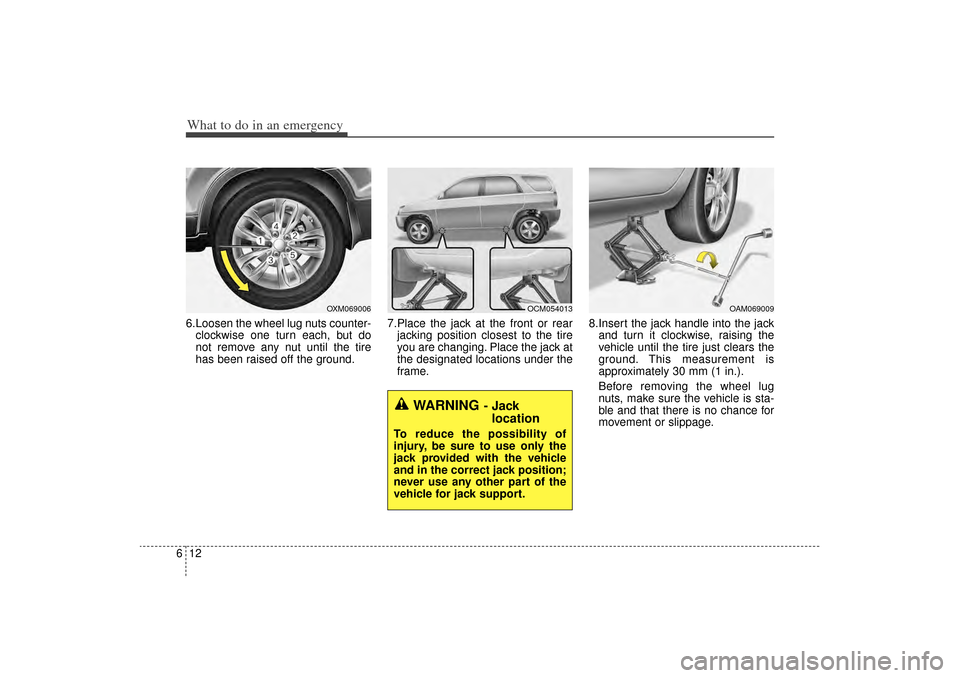
66.Loosen the wheel lug nuts counter-
clockwise one turn each, but do
not remove any nut until the tire
has been raised off the ground. 7.Place the jack at the front or rear
jacking position closest to the tire
you are changing. Place the jack at
the designated locations under the
frame. 8.Insert the jack handle into the jack
and turn it clockwise, raising the
vehicle until the tire just clears the
ground. This measurement is
approximately 30 mm (1 in.).
Before removing the wheel lug
nuts, make sure the vehicle is sta-
ble and that there is no chance for
movement or slippage.
WARNING
- Jack location
To reduce the possibility of
injury, be sure to use only the
jack provided with the vehicle
and in the correct jack position;
never use any other part of the
vehicle for jack support.
OCM054013
OAM069009
OXM069006
XM(FL) CAN(ENG) 6.QXP 1/23/2013 3:34 PM Page 12
Page 399 of 508
613
What to do in an emergency
9.Loosen the wheel nuts and removethem with your fingers. Slide the
wheel off the studs and lay it flat so
it cannot roll away. To put the wheel
on the hub, pick up the spare tire,
line up the holes with the studs and
slide the wheel onto them. If this is
difficult, tip the wheel slightly and
get the top hole in the wheel lined
up with the top stud. Then jiggle the
wheel back and forth until the
wheel can slide over the other
studs. 10. To install the wheel, hold it on the
studs, put the wheel nuts on the
studs and tighten them finger
tight. Jiggle the tire to be sure it is
completely seated, then tighten
the nuts as much as possible
with your fingers again.
11. Insert the wrench into the jack and lower the vehicle to the
ground by turning the wheel nut
wrench counterclockwise.
WARNING
Wheels may have sharp edges.
Handle them carefully to avoid
possible severe injury. Before
putting the wheel into place, be
sure that there is nothing on the
hub or wheel (such as mud, tar,
gravel, etc.) that prevents the
wheel from fitting solidly
against the hub.
If there is, remove it. If the con-
tact of the mounting surface
between the wheel and hub is
not good, the wheel nuts could
come loose and cause the loss
of a wheel. Loss of a wheel may
result in loss of control of the
vehicle. This may cause serious
injury or death.
XM(FL) CAN(ENG) 6.QXP 1/23/2013 3:34 PM Page 13