key battery KIA Sorento 2016 3.G Owner's Manual
[x] Cancel search | Manufacturer: KIA, Model Year: 2016, Model line: Sorento, Model: KIA Sorento 2016 3.GPages: 565, PDF Size: 10.63 MB
Page 85 of 565
Features of your vehicle
Folding key . . . . . . . . . . . . . . . . . . . . . . . . . . . . . . . . 4-5
• Record your key number . . . . . . . . . . . . . . . . . . . . . . . 4-5
• Key operations . . . . . . . . . . . . . . . . . . . . . . . . . . . . . . . . 4-5
• Transmitter precautions . . . . . . . . . . . . . . . . . . . . . . . . 4-7
• Battery replacement . . . . . . . . . . . . . . . . . . . . . . . . . . . 4-8
• Immobilizer system . . . . . . . . . . . . . . . . . . . . . . . . . . . . 4-9
Smart key . . . . . . . . . . . . . . . . . . . . . . . . . . . . . . . . 4-12
• Record your key number . . . . . . . . . . . . . . . . . . . . . . 4-12
• Smart key function . . . . . . . . . . . . . . . . . . . . . . . . . . . 4-12
• Loss of the smart key . . . . . . . . . . . . . . . . . . . . . . . . . 4-16
• Smart key precautions . . . . . . . . . . . . . . . . . . . . . . . . 4-16
• Battery replacement . . . . . . . . . . . . . . . . . . . . . . . . . . 4-17
• Smart key immobilizer system . . . . . . . . . . . . . . . . . . 4-18
Theft-alarm system . . . . . . . . . . . . . . . . . . . . . . . . 4-19
• Armed stage . . . . . . . . . . . . . . . . . . . . . . . . . . . . . . . . . 4-19
• Theft-alarm stage . . . . . . . . . . . . . . . . . . . . . . . . . . . . 4-20
• Disarmed stage. . . . . . . . . . . . . . . . . . . . . . . . . . . . . . . 4-20
Door locks . . . . . . . . . . . . . . . . . . . . . . . . . . . . . . . 4-22
• Operating door locks from outside the vehicle . . . . 4-22
• Operating door locks from inside the vehicle . . . . . . 4-23
• Impact sensing door unlock system . . . . . . . . . . . . . . 4-24
• Child-protector rear door lock. . . . . . . . . . . . . . . . . . 4-25
Liftgate (tailgate) (for manual liftgate (tailgate)) . . . . . . . . . . . . . . 4-26
• Opening the liftgate (tailgate) . . . . . . . . . . . . . . . . . . 4-26
• Closing the liftgate (tailgate) . . . . . . . . . . . . . . . . . . . 4-26
• Emergency liftgate (tailgate) safety release . . . . . . . 4-27
Power liftgate (tailgate) . . . . . . . . . . . . . . . . . . . . . 4-28
• Opening the liftgate (tailgate) . . . . . . . . . . . . . . . . . . 4-29
• Closing the liftgate (tailgate) . . . . . . . . . . . . . . . . . . . 4-30
• Smart liftgate (tailgate) . . . . . . . . . . . . . . . . . . . . . . . . 4-34
• Emergency liftgate (tailgate) safety release . . . . . . . 4-38
Windows . . . . . . . . . . . . . . . . . . . . . . . . . . . . . . . . . 4-39
• Power windows . . . . . . . . . . . . . . . . . . . . . . . . . . . . . . 4-40
Hood. . . . . . . . . . . . . . . . . . . . . . . . . . . . . . . . . . . . \
. 4-44
• Opening the hood . . . . . . . . . . . . . . . . . . . . . . . . . . . . 4-44
• Closing the hood . . . . . . . . . . . . . . . . . . . . . . . . . . . . . 4-45
Fuel filler lid . . . . . . . . . . . . . . . . . . . . . . . . . . . . . . 4-46
• Opening the fuel filler lid . . . . . . . . . . . . . . . . . . . . . . 4-46
• Closing the fuel filler lid . . . . . . . . . . . . . . . . . . . . . . . 4-46
• Emergency fuel filler lid release . . . . . . . . . . . . . . . . 4-49
Panoramic sunroof . . . . . . . . . . . . . . . . . . . . . . . . . 4-50
• Sunroof open warning. . . . . . . . . . . . . . . . . . . . . . . . . 4-51
• Sunshade . . . . . . . . . . . . . . . . . . . . . . . . . . . . . . . . . . . 4-\
51
• Sliding the sunroof . . . . . . . . . . . . . . . . . . . . . . . . . . . 4-52
• Tilting the sunroof . . . . . . . . . . . . . . . . . . . . . . . . . . . 4-53
• Closing the sunroof . . . . . . . . . . . . . . . . . . . . . . . . . . . 4-54
• Resetting the sunroof . . . . . . . . . . . . . . . . . . . . . . . . . 4-54
4
UM CAN (ENG) 4.qxp 12/1/2014 12:49 PM Page 1
Page 91 of 565
47
Features of your vehicle
Liftgate (Tailgate) unlock (3)
The liftgate (tailgate) is unlocked if
the button is pressed for more than 1
second.
Also, once the liftgate (tailgate) is
opened and then closed, the liftgate
(tailgate) will be locked automatically.
For Power Liftgate (tailgate) Only:
The Power Liftgate (tailgate) will
open if the button is pressed for more
than 1 second. Also, once the liftgate
(tailgate) is opened and then closed,
the liftgate (tailgate) will be locked
again automatically.
If the power liftgate (tailgate) is
switched ‘Off’ using the button in the
overhead console, the liftgate (tail-
gate) unlock button will operate to
unlock the liftgate (tailgate) as
described above.
For detailed information refer to the
"Power liftgate (liftgate)" in this chap-
ter.
Panic (4)
The horn sounds and hazard warn-
ing lights flash for about 27 seconds
if this button is pressed for more than
0.5 second. To stop the horn and
lights, press any button on the trans-
mitter.
Transmitter precautions
The transmitter will not work if anyof following occur:
- The ignition key is in the ignitionswitch.
- You exceed the operating dis- tance limit (about 10 m [30 feet]).
- The battery in the transmitter is weak.
- Other vehicles or objects may be blocking the signal.
- The weather is extremely cold.
- The transmitter is close to a radio transmitter such as a radio sub-
station or an airport which can
interfere with normal operation of
the transmitter.
UM CAN (ENG) 4.qxp 12/1/2014 12:49 PM Page 7
Page 92 of 565
Features of your vehicle
84
When the transmitter does not workcorrectly, open and close the door
with the ignition key. If you have a
problem with the transmitter, con-
tact an authorized Kia dealer.
If the transmitter is in close proxim- ity to your mobile phone, the signal
could be blocked by your mobile
phones normal operational signals.
This is especially important when
the phone is active such as making
and receiving calls, text messag-
ing, and/or sending/receiving
emails. Avoid placing the transmit-
ter and your mobile phone in the
same pants or jacket pocket and
always try to maintain an adequate
distance between the two devices.
✽ ✽ NOTICE
If the keyless entry system is inoper-
ative due to exposure to water or liq-
uids, it will not be covered by your
manufacturer’s vehicle warranty.
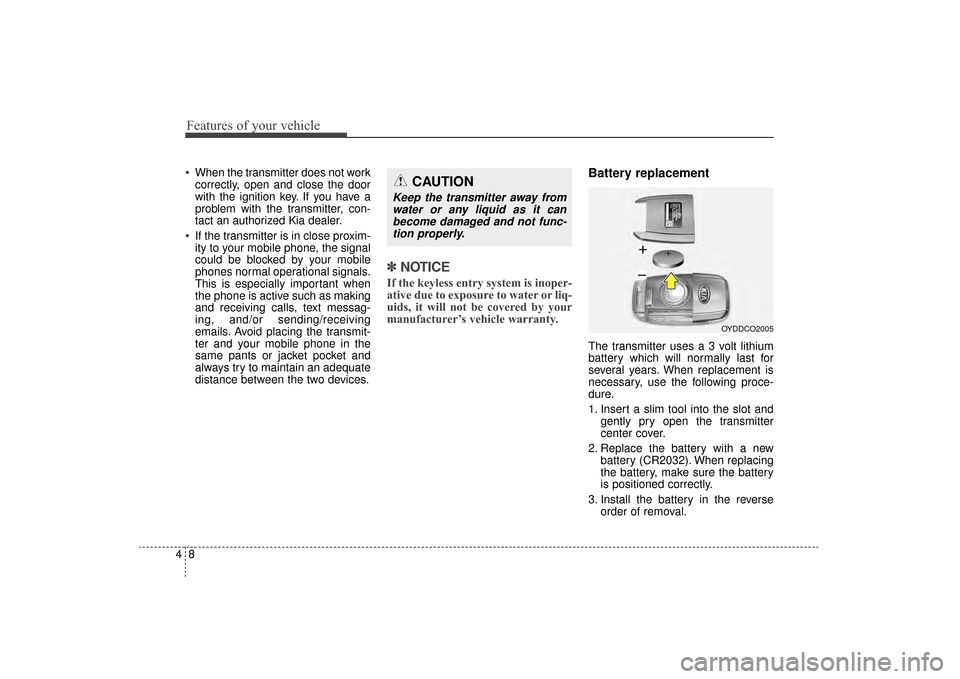
Battery replacement
The transmitter uses a 3 volt lithium
battery which will normally last for
several years. When replacement is
necessary, use the following proce-
dure.
1. Insert a slim tool into the slot and
gently pry open the transmitter
center cover.
2. Replace the battery with a new battery (CR2032). When replacing
the battery, make sure the battery
is positioned correctly.
3. Install the battery in the reverse order of removal.
OYDDCO2005
CAUTION
Keep the transmitter away fromwater or any liquid as it canbecome damaged and not func-tion properly.
UM CAN (ENG) 4.qxp 12/1/2014 12:49 PM Page 8
Page 93 of 565
49
Features of your vehicle
For replacement transmitters, see an
authorized Kia dealer for transmitter
reprogramming.
The transmitter is designed to giveyou years of trouble-free use, how-
ever it can malfunction if exposed to
moisture or static electricity. If you
are unsure how to use your trans-
mitter or replace the battery, contact
an authorized Kia dealer.
Using the wrong battery can cause the transmitter to malfunction. Be
sure to use the correct battery.
To avoid damaging the transmitter, don't drop it, get it wet, or expose it
to heat or sunlight.
An inappropriately dis- posed battery can be
harmful to the environment
and may cause harm to
human health. Dispose the
battery according to your
local law(s) or regulation.Immobilizer system
Your vehicle is equipped with an
electronic engine immobilizer system
to reduce the risk of unauthorized
vehicle use.
Your immobilizer system is com-
prised of a small transponder in the
ignition key and electronic devices
inside the vehicle.
With the immobilizer system, when-
ever you insert your ignition key into
the ignition switch and turn it to ON,
verifies if the ignition key is valid.
If the key is determined to be valid,
the engine will start.
If the key is determined to be invalid,
the engine will not start.CAUTION - Transmitter
damage
Do not drop, wet or expose the keyless entry system transmit-ter to heat or sunlight.
IC WARNING
This device complies with
Industry Canada licence-
exempt RSS standard(s).
Operation is subject to the fol-
lowing two conditions: (1) this
device may not cause interfer-
ence, and (2) this device must
accept any interference, includ-
ing interference that may cause
undesired operation of the
device.
UM CAN (ENG) 4.qxp 12/1/2014 12:49 PM Page 9
Page 101 of 565
417
Features of your vehicle
Battery replacement
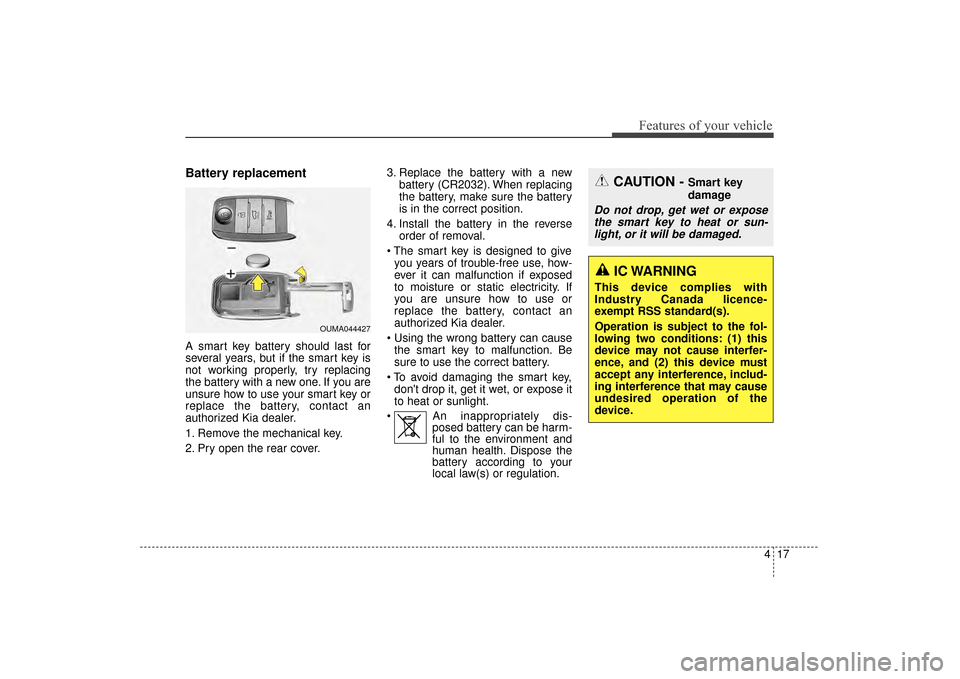
A smart key battery should last for
several years, but if the smart key is
not working properly, try replacing
the battery with a new one. If you are
unsure how to use your smart key or
replace the battery, contact an
authorized Kia dealer.
1. Remove the mechanical key.
2. Pry open the rear cover.3. Replace the battery with a new
battery (CR2032). When replacing
the battery, make sure the battery
is in the correct position.
4. Install the battery in the reverse order of removal.
you years of trouble-free use, how-
ever it can malfunction if exposed
to moisture or static electricity. If
you are unsure how to use or
replace the battery, contact an
authorized Kia dealer.
the smart key to malfunction. Be
sure to use the correct battery.
don't drop it, get it wet, or expose it
to heat or sunlight.
An inappropriately dis- posed battery can be harm-
ful to the environment and
human health. Dispose the
battery according to your
local law(s) or regulation.
CAUTION - Smart key
damage
Do not drop, get wet or expose
the smart key to heat or sun-light, or it will be damaged.
OUMA044427
IC WARNING
This device complies with
Industry Canada licence-
exempt RSS standard(s).
Operation is subject to the fol-
lowing two conditions: (1) this
device may not cause interfer-
ence, and (2) this device must
accept any interference, includ-
ing interference that may cause
undesired operation of the
device.
UM CAN (ENG) 4.qxp 12/1/2014 12:50 PM Page 17
Page 113 of 565
429
Features of your vehicle
Opening the liftgate (tailgate)
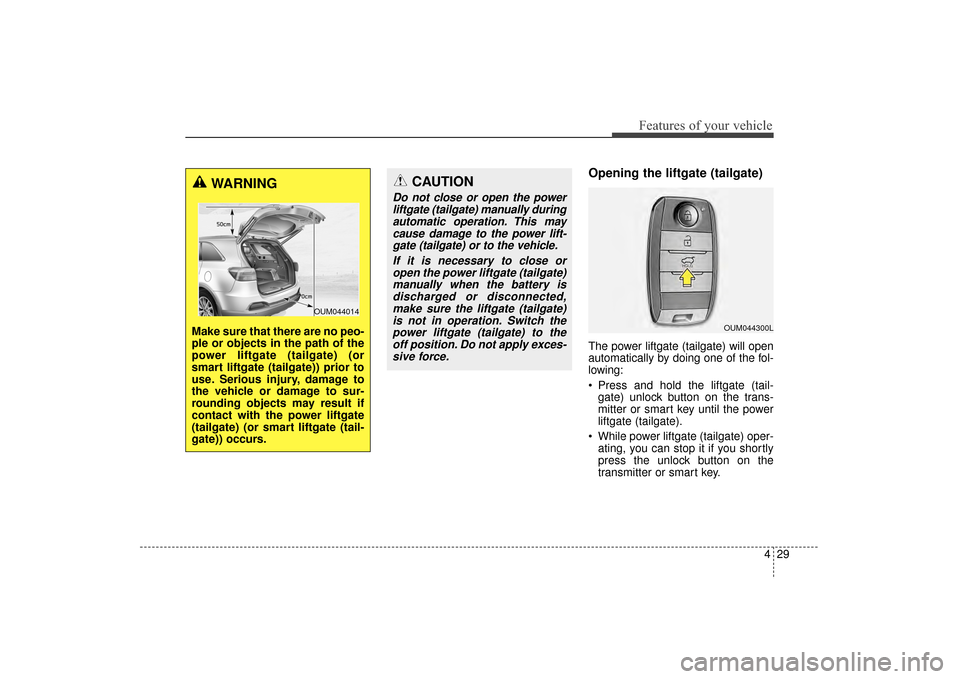
The power liftgate (tailgate) will open
automatically by doing one of the fol-
lowing:
Press and hold the liftgate (tail-gate) unlock button on the trans-
mitter or smart key until the power
liftgate (tailgate).
While power liftgate (tailgate) oper- ating, you can stop it if you shortly
press the unlock button on the
transmitter or smart key.
CAUTION
Do not close or open the powerliftgate (tailgate) manually duringautomatic operation. This maycause damage to the power lift-gate (tailgate) or to the vehicle.
If it is necessary to close oropen the power liftgate (tailgate)manually when the battery isdischarged or disconnected,make sure the liftgate (tailgate)is not in operation. Switch thepower liftgate (tailgate) to theoff position. Do not apply exces-sive force.
OUM044300L
WARNING
Make sure that there are no peo-
ple or objects in the path of the
power liftgate (tailgate) (or
smart liftgate (tailgate)) prior to
use. Serious injury, damage to
the vehicle or damage to sur-
rounding objects may result if
contact with the power liftgate
(tailgate) (or smart liftgate (tail-
gate)) occurs.
OUM044014
UM CAN (ENG) 4.qxp 12/1/2014 12:50 PM Page 29
Page 155 of 565
471
Features of your vehicle
Folding the outside rearview mirror
Electric type
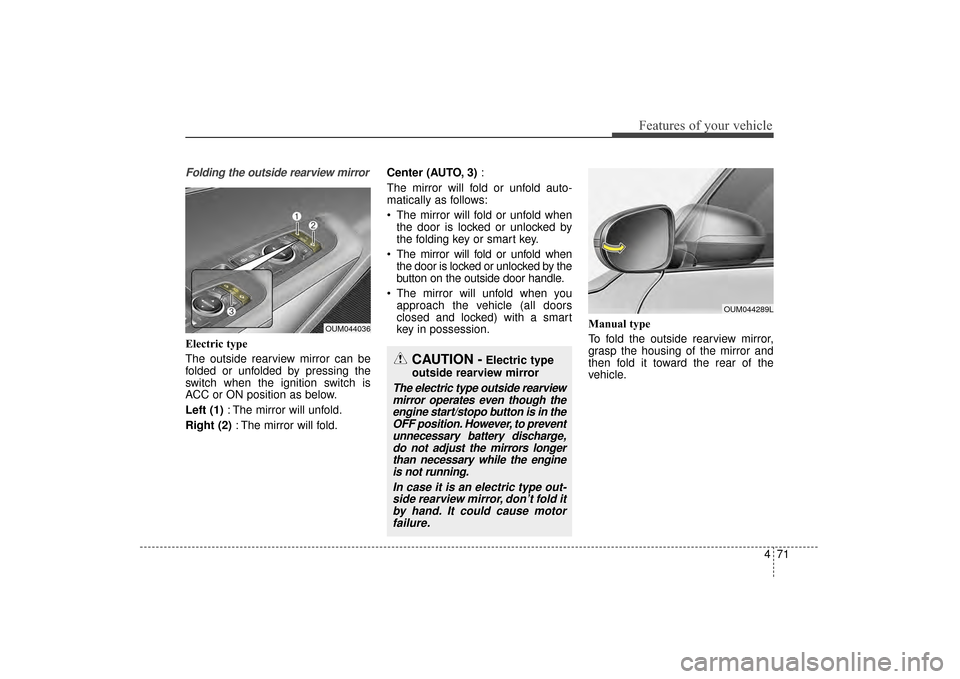
The outside rearview mirror can be
folded or unfolded by pressing the
switch when the ignition switch is
ACC or ON position as below.
Left (1): The mirror will unfold.
Right (2) : The mirror will fold. Center (AUTO, 3)
:
The mirror will fold or unfold auto-
matically as follows:
The mirror will fold or unfold when the door is locked or unlocked by
the folding key or smart key.
The mirror will fold or unfold when the door is locked or unlocked by the
button on the outside door handle.
The mirror will unfold when you approach the vehicle (all doors
closed and locked) with a smart
key in possession. Manual type
To fold the outside rearview mirror,
grasp the housing of the mirror and
then fold it toward the rear of the
vehicle.
OUM044036
CAUTION -Electric type
outside rearview mirror
The electric type outside rearview mirror operates even though theengine start/stopo button is in theOFF position. However, to preventunnecessary battery discharge,do not adjust the mirrors longerthan necessary while the engineis not running.
In case it is an electric type out-side rearview mirror, don’t fold itby hand. It could cause motorfailure.
OUM044289L
UM CAN (ENG) 4.qxp 12/1/2014 12:53 PM Page 71
Page 174 of 565
Features of your vehicle
90
4
Low Key Battery
(for smart key system)
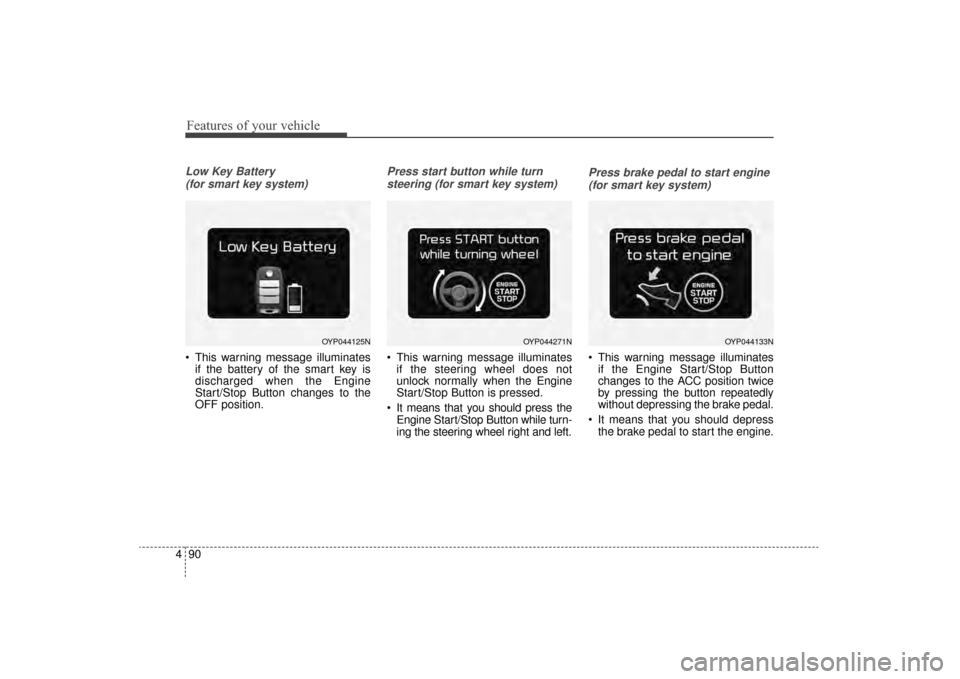
This warning message illuminates if the battery of the smart key is
discharged when the Engine
Start/Stop Button changes to the
OFF position.
Press start button while turn
steering (for smart key system)
This warning message illuminates if the steering wheel does not
unlock normally when the Engine
Start/Stop Button is pressed.
It means that you should press the Engine Start/Stop Button while turn-
ing the steering wheel right and left.
Press brake pedal to start engine
(for smart key system)
This warning message illuminates if the Engine Start/Stop Button
changes to the ACC position twice
by pressing the button repeatedly
without depressing the brake pedal.
It means that you should depress the brake pedal to start the engine.
OYP044125NOYP044271NOYP044133N
UM CAN (ENG) 4.qxp 12/1/2014 12:54 PM Page 90
Page 189 of 565
4105
Features of your vehicle
Immobilizer IndicatorLight (With Smart Key)
This indicator light illuminates for up
to 30 seconds:
When the vehicle detects the smart key in the vehicle properly
while the Engine Start/Stop Button
is ACC or ON.
- At this time, you can start theengine.
- The indicator light goes off after starting the engine.
This indicator light blinks for a few
seconds:
When the smart key is not in the vehicle.
- At this time, you can not start theengine. This indicator light illuminates for 2
seconds and goes off:
When the vehicle can not detect
the smart key which is in the vehi-
cle while the Engine Start/Stop
Button is ON.
In this case, have your vehicle
inspected by an authorized Kia
dealer.
This indicator light blinks:
When the battery of the smart key is weak.
- At this time, you can not start theengine. However, you can start
the engine if you press the Engine
Start/Stop Button with the smart
key. (For more details, refer to
“Starting the Engine” in section 5).
When there is a malfunction with the immobilizer system.
In this case, have your vehicle
inspected by an authorized Kia
dealer.
Turn Signal Indicator
Light
This indicator light blinks:
When you turn the turn signal light on.
If any of the following occurs, there
may be a malfunction with the turn
signal system. In this case, have your
vehicle inspected by an authorized
Kia dealer. - The indicator light does not blinkbut illuminates.
- The indicator light blinks more rapidly.
- The indicator light does not illumi- nate at all.
UM CAN (ENG) 4.qxp 12/1/2014 12:54 PM Page 105
Page 198 of 565
Features of your vehicle
114
4
Battery saver function
The purpose of this feature is to
prevent the battery from being dis-
charged if the lights are left in the
ON position. The system automati-
cally shuts off the parking lights 30
seconds after the ignition key is
removed and the driver’s door is
opened and closed.
With this feature, the parking lights will turn off automatically if the driver
parks on the side of the road at night
and opens the driver’s side door.
If necessary, to keep the parking
lights on when the ignition key is
removed, perform the following:
1) Open the driver-side door.
2) Turn the parking lights OFF and ON again using the light switch
on the steering column.
Daytime running light
The Daytime Running Lights (DRL)
can make it easier for others to see the
front of your vehicle during the day.
DRL can be helpful in many different
driving conditions, and it is especially
helpful after dawn and before sunset.
The DRL system will turn the dedi-
cated lamp OFF when:
1. The headlight or fog lamp switch isON.
2. The engine is OFF.
Lighting control
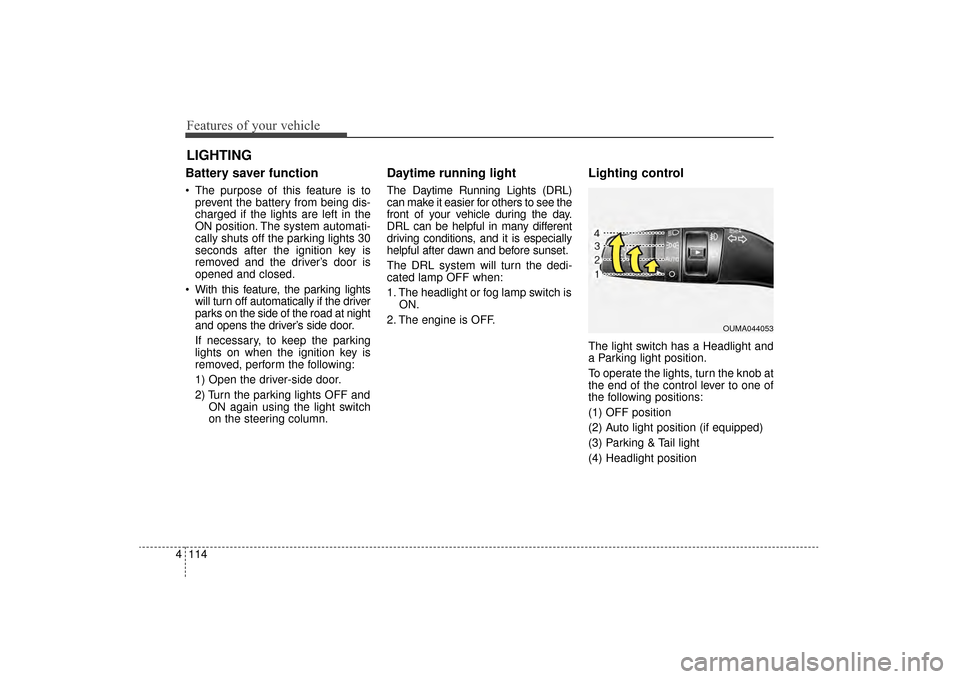
The light switch has a Headlight and
a Parking light position.
To operate the lights, turn the knob at
the end of the control lever to one of
the following positions:
(1) OFF position
(2) Auto light position (if equipped)
(3) Parking & Tail light
(4) Headlight position
LIGHTING
OUMA044053
UM CAN (ENG) 4.qxp 12/1/2014 12:55 PM Page 114