EBS KIA SORENTO 2019 Features and Functions Guide
[x] Cancel search | Manufacturer: KIA, Model Year: 2019, Model line: SORENTO, Model: KIA SORENTO 2019Pages: 54, PDF Size: 3.52 MB
Page 24 of 54
SORENTO FEATURES & FUNCTIONS GUIDE22
AUDIO SYSTEMS
*IF EQUIPPED †LEGAL DISCL AIMERS ON BACK INSIDE COVER
UVO eServices*†1 – FM/AM/SiriusXM®†21/Media (USB, iPod® †13, My Music, Aux, BT Audio)
Sound Settings: To adjust the audio control unit’s sound settings:
1 . Press the SETUP key on the audio control unit or the on-screen MENU button, when in MEDIA mode .
2 . Select the on-screen SOUND button, or SOUND SET TINGS
3 . Select the menu item (Position, Tone, Advanced, Default)
4 . Use the onscreen buttons to adjust settings .
Radio Presets: You can listen to FM, AM and SiriusXM radio and save frequently used stations .
How to Save a Preset: Press and hold the desired slot . This saves the current station in the selected slot SiriusXM®
Smart Favorites: For the first ten favorite SiriusXM channels, you may play live or repeat from the beginning of a song or a program segment .
In Radio mode, choose SiriusXM, then select any of the first six favorites . During song or program play, tap the Skip Backward icon to start from the beginning of the song or program . Tap the Play Live icon to return to the live broadcast .
Custom Button : A programmable button to provide quick access to one of several available system features .
To Program the Custom Button: Press the SETUP button, then press the Custom button . Select one of the available features you would like the Custom button to open .
•When connected to Android Auto or Apple CarPlay . on your smartphone, the smartphone’s nevigation system may also be available . •When using the voice command feature, wait for the system BEEP before speaking the command •A warning screen may appear periodically to remind users that the navigation system should be operated when the engine is running to prevent battery discharge •At any time, you can interrupt UVO eServices Command Feedback by pressing the TALK button on the steering wheel •Prolonged use of the audio control unit in ACC mode may drain the vehicle’s battery
QUICK TIPS
Your vehicle’s audio system may differ from that in the illustration. For more information, refer to the Car Multimedia System User's Manual. See your Owner’s Manual for other details. For other audio system information, see pages 21-23.
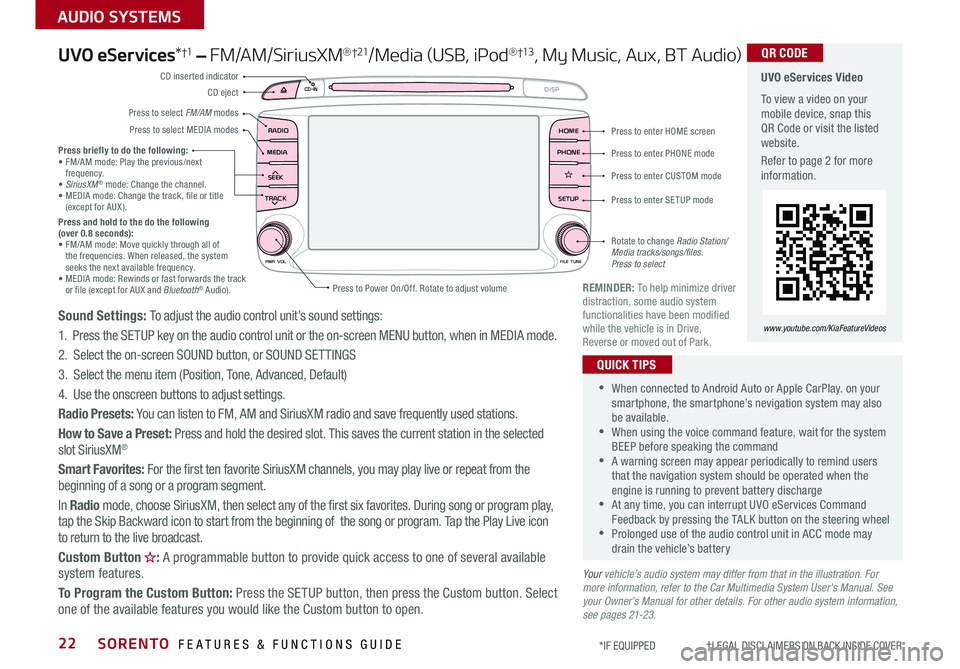
Press briefly to do the following:• FM/AM mode: Play the previous/next frequency .• SiriusXM® mode: Change the channel .• MEDIA mode: Change the track, file or title (except for AUX ) .Press and hold to the do the following (over 0.8 seconds):• FM/AM mode: Move quickly through all of the frequencies . When released, the system seeks the next available frequency .• MEDIA mode: Rewinds or fast forwards the track or file (except for AUX and Bluetooth® Audio) .REMINDER: To help minimize driver distraction, some audio system functionalities have been modified while the vehicle is in Drive, Reverse or moved out of Park .
UVO eServices Video
To view a video on your mobile device, snap this QR Code or visit the listed website .
Refer to page 2 for more information .
QR CODE
www.youtube.com/KiaFeatureVideos
RADIO
CD-IN
MEDIA
SEEK
TRACK
PWR VOL FILETUNE
PHONEHOME
DISP
SETUP
APPS
Press to enter HOME screen
Press to enter PHONE mode
Press to enter SETUP mode
Press to enter CUSTOM mode
Rotate to change Radio Station/ Media tracks/songs/files. Press to select
Press to Power On/Off
. Rotate to adjust volume
Press to select FM/AM modes
CD eject
CD inserted indicator
Press to select MEDIA modes
Page 25 of 54
23
AUDIO SYSTEMS
ALWAYS CHECK THE OWNER’S MANUAL FOR COMPLETE OPER ATING INFORMATION AND SAFET Y WARNINGS *IF EQUIPPED †LEGAL DISCL AIMERS ON BACK INSIDE COVER
Sound Settings: To adjust the sound settings (Fader/Balance, Tone, Touch-Screen Beep ON/OFF and Speed-Dependent Volume Control ON/OFF ) from any audio mode:
1 . Press the SETUP button on the Audio Control Unit
2 . Select the on-screen SOUND button
3 . Select the menu item to change settings
4 . Use the on-screen buttons to adjust settings
Radio Presets: You can listen to FM, AM and SiriusXM radio and save frequently used stations
How to Save a Preset: Press and hold the desired slot . This saves the current station in the selected slot
SiriusXM® Smart Favorites: For the first ten favorite SiriusXM channels, you may play live or repeat from the beginning of a song or a program segment . In Radio mode, choose SiriusXM, then select any of the first six favorites . During song or program play, tap the Skip Backward icon to start from the beginning of the song or program . Tap the Play Live icon to return to the live broadcast .
Custom Button : A programmable button to provide quick access to one of several available system features .
To Program the Custom Button: Press the SETUP button, then press the Custom button . Select one of the available features you would like the Custom button to open .
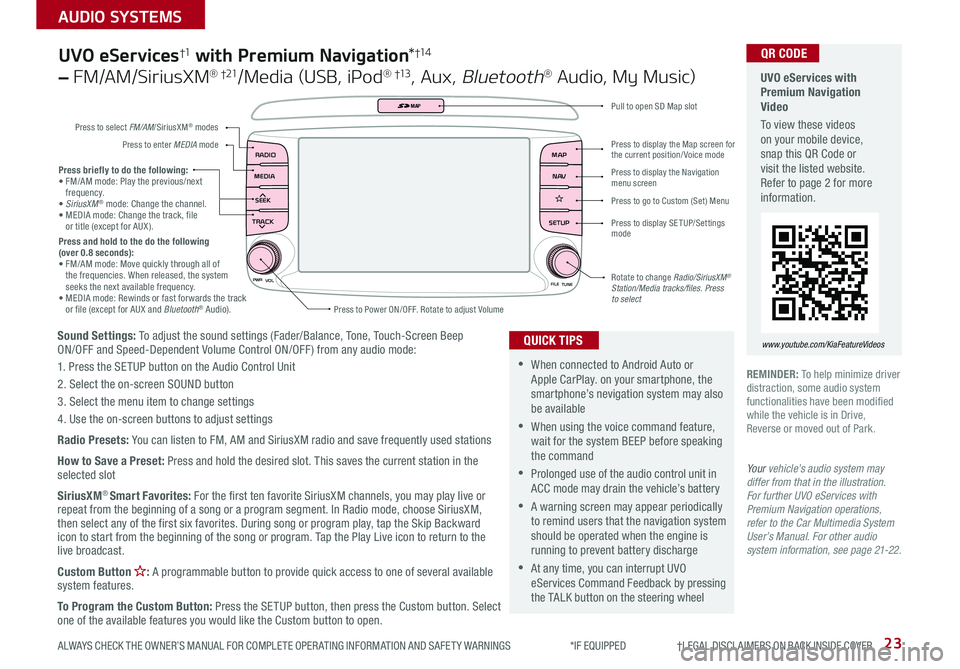
Press briefly to do the following:• FM/AM mode: Play the previous/next frequency .• SiriusXM® mode: Change the channel .• MEDIA mode: Change the track, file or title (except for AUX ) .Press and hold to the do the following (over 0.8 seconds):• FM/AM mode: Move quickly through all of the frequencies . When released, the system seeks the next available frequency .• MEDIA mode: Rewinds or fast forwards the track or file (except for AUX and Bluetooth® Audio) .
PWR
VOL
FILETUNE
N AV
MAP
SETUP
RADIO
MEDIA
SEEK
TRACK
MAP
Press to Power ON/OFF . Rotate to adjust Volume
Press to select FM/AM/SiriusXM® modes
Press to enter MEDIA mode
Press to display SE TUP/Settings mode
Press to display the Map screen for the current position/ Voice mode
Press to display the Navigation menu screen
Press to go to Custom (Set) Menu
Pull to open SD Map slot
Rotate to change Radio/SiriusXM® Station/Media tracks/files. Press to select
UVO eServices†1 with Premium Navigation*†1 4
– FM/AM/SiriusXM® †21/Media (USB, iPod® †13, Aux, Bluetooth® Audio, My Music)
•When connected to Android Auto or Apple CarPlay . on your smartphone, the smartphone’s nevigation system may also be available
•When using the voice command feature, wait for the system BEEP before speaking the command
•Prolonged use of the audio control unit in ACC mode may drain the vehicle’s battery
•A warning screen may appear periodically to remind users that the navigation system should be operated when the engine is running to prevent battery discharge
•At any time, you can interrupt UVO eServices Command Feedback by pressing the TALK button on the steering wheel
QUICK TIPS
Your vehicle’s audio system may differ from that in the illustration. For further UVO eServices with Premium Navigation operations, refer to the Car Multimedia System User’s Manual. For other audio system information, see page 21-22.
UVO eServices with Premium Navigation Video
To view these videos on your mobile device, snap this QR Code or visit the listed website . Refer to page 2 for more information .
www.youtube.com/KiaFeatureVideos
QR CODE
REMINDER: To help minimize driver distraction, some audio system functionalities have been modified while the vehicle is in Drive, Reverse or moved out of Park .
Page 26 of 54
SORENTO FEATURES & FUNCTIONS GUIDE24*IF EQUIPPED
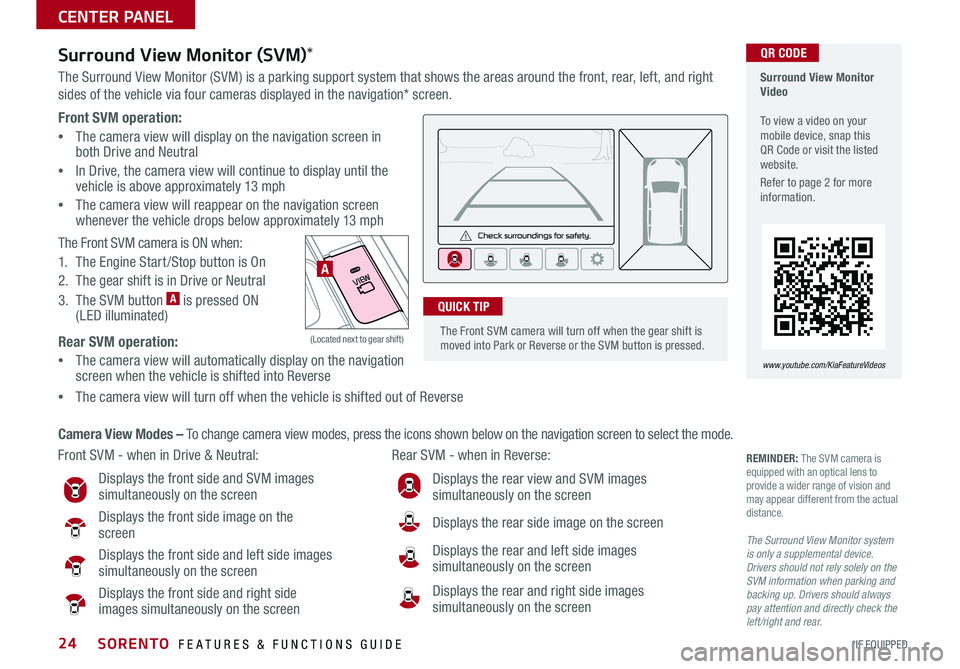
Front SVM operation:
•The camera view will display on the navigation screen in both Drive and Neutral
•In Drive, the camera view will continue to display until the vehicle is above approximately 13 mph
•
The camera view will reappear on the navigation screen whenever the vehicle drops below approximately 13 mph
The Front SVM camera is ON when:
1 . The Engine Start /Stop button is On
2 . The gear shift is in Drive or Neutral
3 . The SVM button A is pressed ON (LED illuminated)
Rear SVM operation:
•The camera view will automatically display on the navigation screen when the vehicle is shifted into Reverse
•The camera view will turn off when the vehicle is shifted out of Reverse
VIEW
OFF
Surround View Monitor (SVM)*
The Surround View Monitor (SVM) is a parking support system that shows the areas around the front, rear, left, and right
sides of the vehicle via four cameras displayed in the navigation* screen .
Surround View Monitor Video To view a video on your mobile device, snap this QR Code or visit the listed website .
Refer to page 2 for more information .
www.youtube.com/KiaFeatureVideos
Front SVM - when in Drive & Neutral: Rear SVM - when in Reverse:
Displays the front side and SVM images simultaneously on the screen
Displays the front side image on the screen
Displays the front side and left side images simultaneously on the screen
Displays the front side and right side images simultaneously on the screen
Displays the rear view and SVM images simultaneously on the screen
Displays the rear side image on the screen
Displays the rear and left side images simultaneously on the screen
Displays the rear and right side images simultaneously on the screen
REMINDER: The SVM camera is equipped with an optical lens to provide a wider range of vision and may appear different from the actual distance .
The Surround View Monitor system is only a supplemental device. Drivers should not rely solely on the SVM information when parking and backing up. Drivers should always pay attention and directly check the left/right and rear.
Camera View Modes – To change camera view modes, press the icons shown below on the navigation screen to select the mode .
A
(Located next to gear shift)
QR CODE
The Front SVM camera will turn off when the gear shift is moved into Park or Reverse or the SVM button is pressed .
QUICK TIP
CENTER PANEL
Page 27 of 54

25ALWAYS CHECK THE OWNER’S MANUAL FOR COMPLETE OPER ATING INFORMATION AND SAFET Y WARNINGS *IF EQUIPPED †LEGAL DISCL AIMERS ON BACK INSIDE COVER
P: Park
R: Reverse
N: Neutral
D: Drive
[+]: Manual Mode Upshift
[–]: Manual Mode Downshift
Automatic Gear Shift with Sportmatic®†2 2 Shifting
P
R
N
D
SHIFT LOCK
RELEASE
Sportmatic® Shifting Video To view a video on your mobile device, snap this QR Code or visit the listed website .
Refer to page 2 for more information .
www.youtube.com/KiaFeatureVideos
Manual Mode: To enter Manual mode, move shift
lever from D to left gate A .
To shift while in Manual mode, move shift lever up [+]
to upshift or down [–] to downshift A .
QR CODE
•Press brake pedal and depress release button to move gearshift from N to P, N to R or from P to any gear
•Manual mode downshifts are made automatically when the vehicle slows down . When the vehicle stops, 1st gear is automatically selected
QUICK TIPS
A
When you select AWD Lock mode by pressing the AWD LOCK button A, the AWD LOCK mode increases the drive
power when driving on wet pavement, snow covered roads and/or off-road .
•This mode is used for climbing or descending sharp grades, off-road driving, driving on sandy and muddy
roads, etc ., to maximize traction .
•This mode automatically begins to deactivate at speeds above 19 mph and is shifted to AWD AUTO mode at
speed above 25 mph . If the vehicle decelerates to speeds below approximate 25 mph, however, the transfer
mode is shifted into AWD LOCK mode again .
When the AWD LOCK mode is deactivated, a shock may be felt as the drive power is delivered entirely to the front
wheels . This shock is not a mechanical failure .
AWD (All-Wheel Drive) Lock*
(Located below gear shift)
A
CENTER PANEL
Page 32 of 54
SORENTO FEATURES & FUNCTIONS GUIDE30*IF EQUIPPED
REMINDERS:
•
Avoid placing other metal items in the bin while charging as to not impede the charging area
•
This vehicle is equipped with wireless charging technology which allows for a device to be charged using inductive charging, however, device compatibility varies . See your owner’s manual for more detailed information and the back page for legal disclaimers
•
Inductive charging systems are less ef ficient than conventional charging through cable . As a result, higher device operating temperatures may be experienced during use
•
Charging Performance – Device position on the wireless charging system can affect charging performance . Other factor that may affect the charging rate includes foreign objects, such as coins or pens, and phone case thickness
Wireless Charging Video To view a video on your mobile device, snap this QR Code or visit the listed website .
Refer to page 2 for more information .
QR CODEWireless Smartphone Charging System*
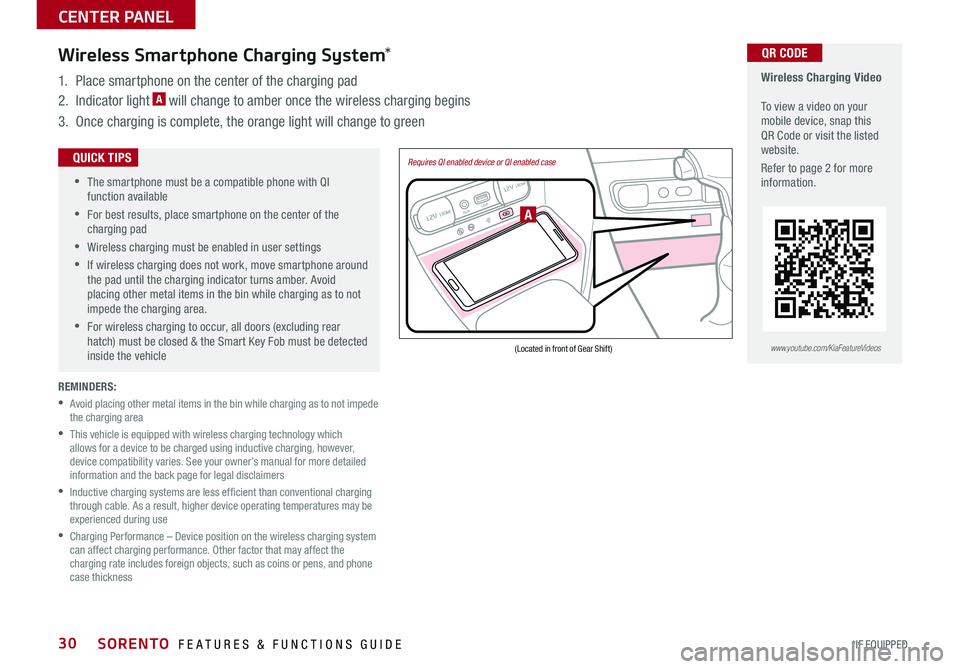
1 . Place smartphone on the center of the charging pad
2 . Indicator light A will change to amber once the wireless charging begins
3 . Once charging is complete, the orange light will change to green
12V 180WAUX USB
12V 180W
(Located in front of Gear Shift)
Requires QI enabled device or QI enabled case
A
•
•
The smartphone must be a compatible phone with QI function available
•
For best results, place smartphone on the center of the charging pad
•Wireless charging must be enabled in user settings
•
If wireless charging does not work, move smartphone around the pad until the charging indicator turns amber
. Avoid placing other metal items in the bin while charging as to not impede the charging area .
•
For wireless charging to occur, all doors (excluding rear hatch) must be closed & the Smart Key Fob must be detected inside the vehicle
QUICK TIPS
www.youtube.com/KiaFeatureVideos
CENTER PANEL
Page 33 of 54
31ALWAYS CHECK THE OWNER’S MANUAL FOR COMPLETE OPER ATING INFORMATION AND SAFET Y WARNINGS . *IF EQUIPPED
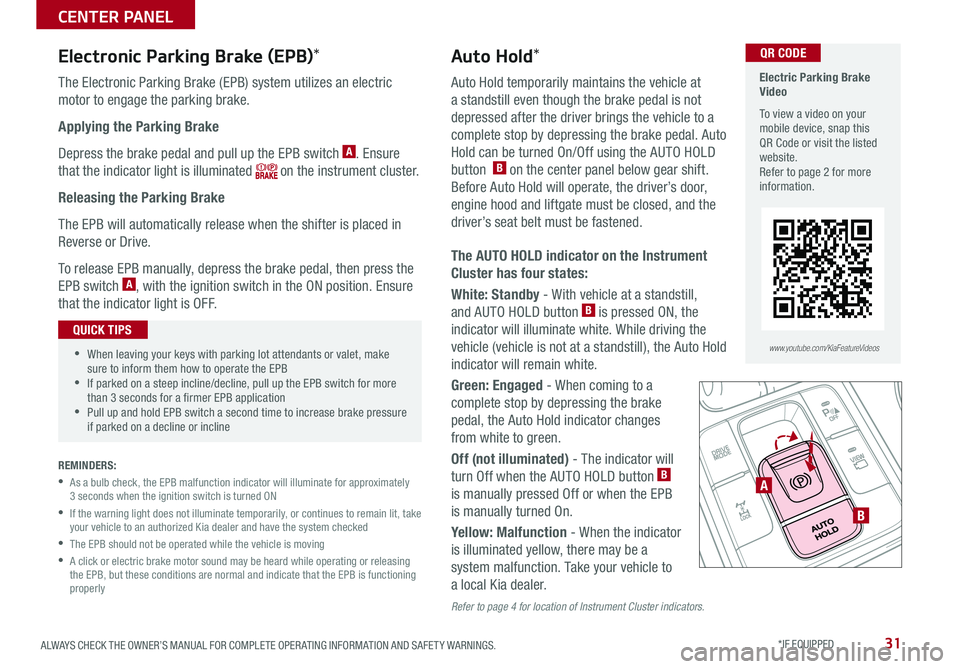
Electronic Parking Brake (EPB)*
The Electronic Parking Brake (EPB) system utilizes an electric
motor to engage the parking brake .
Applying the Parking Brake
Depress the brake pedal and pull up the EPB switch A . Ensure
that the indicator light is illuminated on the instrument cluster .
Releasing the Parking Brake
The EPB will automatically release when the shifter is placed in
Reverse or Drive .
To release EPB manually, depress the brake pedal, then press the
EPB switch A, with the ignition switch in the ON position . Ensure
that the indicator light is OFF .
REMINDERS:
•
As a bulb check, the EPB malfunction indicator will illuminate for approximately 3 seconds when the ignition switch is turned ON
•
If the warning light does not illuminate temporarily, or continues to remain lit, take your vehicle to an authorized Kia dealer and have the system checked
•The EPB should not be operated while the vehicle is moving
•
A click or electric brake motor sound may be heard while operating or releasing the EPB, but these conditions are normal and indicate that the EPB is functioning properly
A
B
Auto Hold*
Auto Hold temporarily maintains the vehicle at
a standstill even though the brake pedal is not
depressed after the driver brings the vehicle to a
complete stop by depressing the brake pedal . Auto
Hold can be turned On/Off using the AUTO HOLD
button B on the center panel below gear shift .
Before Auto Hold will operate, the driver’s door,
engine hood and liftgate must be closed, and the
driver’s seat belt must be fastened .
The AUTO HOLD indicator on the Instrument
Cluster has four states:
White: Standby - With vehicle at a standstill,
and AUTO HOLD button B is pressed ON, the
indicator will illuminate white . While driving the
vehicle (vehicle is not at a standstill), the Auto Hold
indicator will remain white .
Green: Engaged - When coming to a
complete stop by depressing the brake
pedal, the Auto Hold indicator changes
from white to green .
Off (not illuminated) - The indicator will
turn Off when the AUTO HOLD button B
is manually pressed Off or when the EPB
is manually turned On .
Yellow: Malfunction - When the indicator
is illuminated yellow, there may be a
system malfunction . Take your vehicle to
a local Kia dealer .
Refer to page 4 for location of Instrument Cluster indicators.
•When leaving your keys with parking lot attendants or valet, make sure to inform them how to operate the EPB •If parked on a steep incline/decline, pull up the EPB switch for more than 3 seconds for a firmer EPB application •Pull up and hold EPB switch a second time to increase brake pressure if parked on a decline or incline
QUICK TIPS
Electric Parking Brake Video
To view a video on your mobile device, snap this QR Code or visit the listed website .Refer to page 2 for more information .
QR CODE
www.youtube.com/KiaFeatureVideos
CENTER PANEL
Page 34 of 54

SORENTO FEATURES & FUNCTIONS GUIDE32*IF EQUIPPED †LEGAL DISCL AIMERS ON BACK INSIDE COVER
Heated Steering Wheel*
Press Heated Steering Wheel button A to turn the Steering
Wheel Heater on/off, while the Engine Start /Stop button
is in the ON position . Steering Wheel Heater will turn off
automatically in 30 minutes, or when button A is pressed
again to deactivate .
(Buttons located below Gear Shift)
Heated and Ventilated Seats Video To view a video on your mobile device, snap this QR Code or visit the listed website .
Refer to page 2 for more information .
www.youtube.com/KiaFeatureVideos
B Seat Warmers
•Press button once for high setting (3 LEDs lit)
•Press button twice for medium setting
(2 LEDs lit)
•Press a third time for low setting (1 LED lit)
and again to turn OFF
C Ventilated Seats
•Press button once for high setting (3 LEDs lit)
•Press twice for medium setting (2 LEDs lit)
•Press a third time for low setting (1 LED lit) and
again to turn OFF
Seat Warmers†2 0 / Ventilated Seats*
ACBCB
QR CODE
•With the seat warmer switch in the ON position, the heating system in the seat turns OFF or ON automatically depending on the seat temperature .
•System is OFF by default .
QUICK TIPS
•If ignition is turned OFF, then ON again within 30 minutes of Steering Wheel Heater being turned ON, the system will remain in the ON position
•System does NOT turn off when ignition is cycled . To turn off system, press the Heated Steering Wheel button A
QUICK TIPS
REMINDER: If the steering wheel becomes too warm, turn the system off . The heated steering wheel may cause burns even at low temperatures, especially if used for long periods of time
REMINDER: Use extreme caution when using the seat warmers to avoid burns . Refer to the Owner’s Manual for more information .
CENTER PANEL
Page 37 of 54
35
SEATING
ALWAYS CHECK THE OWNER’S MANUAL FOR COMPLETE OPER ATING INFORMATION AND SAFET Y WARNINGS *IF EQUIPPED †LEGAL DISCL AIMERS ON BACK INSIDE COVER
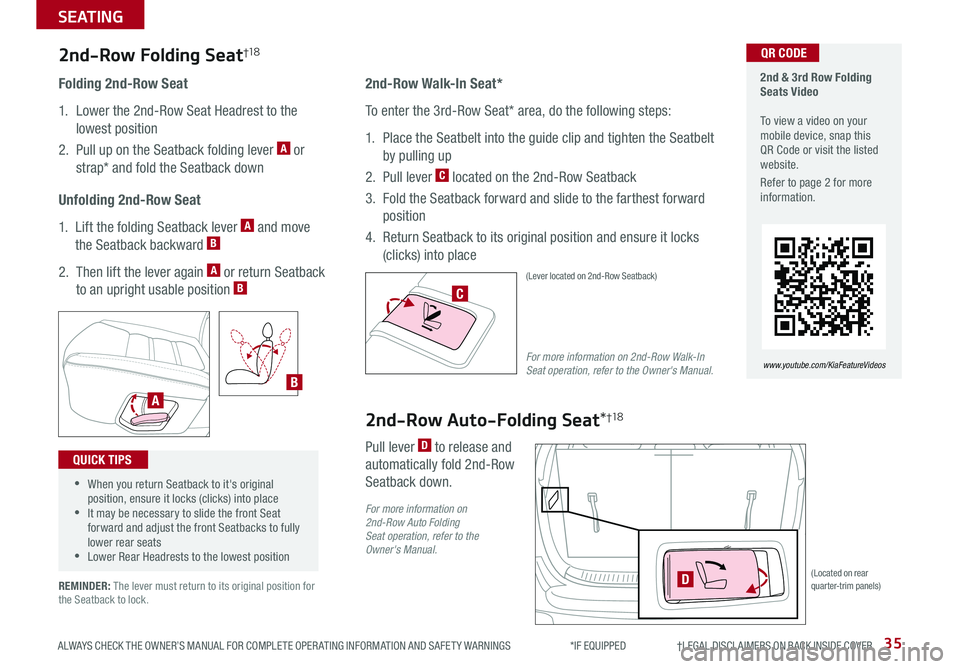
Folding 2nd-Row Seat
1 . Lower the 2nd-Row Seat Headrest to the
lowest position
2 . Pull up on the Seatback folding lever A or
strap* and fold the Seatback down
Unfolding 2nd-Row Seat
1 . Lift the folding Seatback lever A and move
the Seatback backward B
2 . Then lift the lever again A or return Seatback
to an upright usable position B
2nd-Row Walk-In Seat*
To enter the 3rd-Row Seat* area, do the following steps:
1 . Place the Seatbelt into the guide clip and tighten the Seatbelt
by pulling up
2 . Pull lever C located on the 2nd-Row Seatback
3 . Fold the Seatback forward and slide to the farthest forward
position
4 . Return Seatback to its original position and ensure it locks
(clicks) into place
2nd-Row Folding Seat†1 8
For more information on 2nd-Row Walk-In Seat operation, refer to the Owner's Manual.B
A
(Lever located on 2nd-Row Seatback)
C
•When you return Seatback to it's original position, ensure it locks (clicks) into place •It may be necessary to slide the front Seat forward and adjust the front Seatbacks to fully lower rear seats •Lower Rear Headrests to the lowest position
QUICK TIPSPull lever D to release and
automatically fold 2nd-Row
Seatback down .
2nd-Row Auto-Folding Seat*†1 8
D(Located on rear quarter-trim panels)
2nd & 3rd Row Folding Seats Video To view a video on your mobile device, snap this QR Code or visit the listed website .
Refer to page 2 for more information .
QR CODE
www.youtube.com/KiaFeatureVideos
For more information on 2nd-Row Auto Folding Seat operation, refer to the Owner's Manual.
REMINDER: The lever must return to its original position for the Seatback to lock .
Page 38 of 54
SORENTO FEATURES & FUNCTIONS GUIDE
SEATING
*IF EQUIPPED †LEGAL DISCL AIMERS ON BACK INSIDE COVER
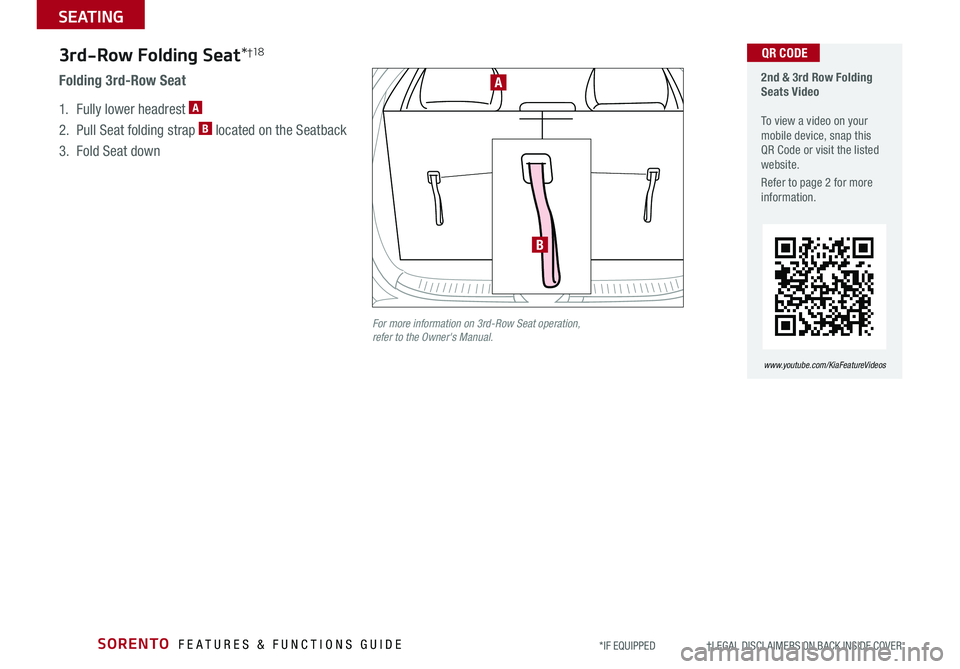
3rd-Row Folding Seat*†1 8
1 . Fully lower headrest A
2 . Pull Seat folding strap B located on the Seatback
3 . Fold Seat down
Folding 3rd-Row Seat
B
A
For more information on 3rd-Row Seat operation, refer to the Owner's Manual.
2nd & 3rd Row Folding Seats Video To view a video on your mobile device, snap this QR Code or visit the listed website .
Refer to page 2 for more information .
QR CODE
www.youtube.com/KiaFeatureVideos
Page 39 of 54
37
Remote button configuration may vary depending on vehicle options.
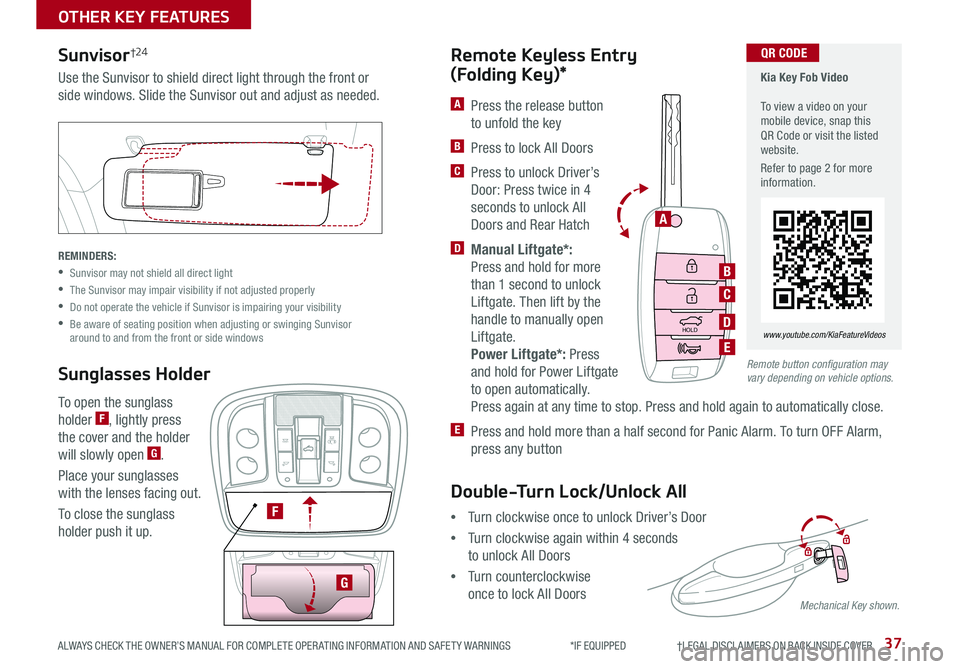
A Press the release button
to unfold the key
B Press to lock All Doors
C Press to unlock Driver’s
Door: Press twice in 4
seconds to unlock All
Doors and Rear Hatch
D Manual Liftgate*:
Press and hold for more
than 1 second to unlock
Liftgate . Then lift by the
handle to manually open
Liftgate .
Power Liftgate*: Press
and hold for Power Liftgate
to open automatically .
Press again at any time to stop . Press and hold again to automatically close .
E Press and hold more than a half second for Panic Alarm . To turn OFF Alarm,
press any button
Remote Keyless Entry
(Folding Key)*
To open the sunglass
holder F, lightly press
the cover and the holder
will slowly open G .
Place your sunglasses
with the lenses facing out .
To close the sunglass
holder push it up .
HOLD
A
B
C
D
E
Sunvisor†24
Sunglasses Holder
Use the Sunvisor to shield direct light through the front or
side windows . Slide the Sunvisor out and adjust as needed .
REMINDERS:
•Sunvisor may not shield all direct light
•The Sunvisor may impair visibility if not adjusted properly
•Do not operate the vehicle if Sunvisor is impairing your visibility
•
Be aware of seating position when adjusting or swinging Sunvisor around to and from the front or side windows
F
G
Mechanical Key shown.
OTHER KEY FEATURES
ALWAYS CHECK THE OWNER’S MANUAL FOR COMPLETE OPER ATING INFORMATION AND SAFET Y WARNINGS *IF EQUIPPED †LEGAL DISCL AIMERS ON BACK INSIDE COVER
•Turn clockwise once to unlock Driver’s Door
•Turn clockwise again within 4 seconds
to unlock All Doors
•Turn counterclockwise
once to lock All Doors
Double-Turn Lock/Unlock All
Kia Key Fob Video To view a video on your mobile device, snap this QR Code or visit the listed website .
Refer to page 2 for more information .
QR CODE
www.youtube.com/KiaFeatureVideos