EBS KIA SORENTO 2019 Features and Functions Guide
[x] Cancel search | Manufacturer: KIA, Model Year: 2019, Model line: SORENTO, Model: KIA SORENTO 2019Pages: 54, PDF Size: 3.52 MB
Page 4 of 54

SORENTO FEATURES & FUNCTIONS GUIDE2*IF EQUIPPED
VIDEOS & QR CODES - SMARTPHONES, TABLETS AND COMPUTERS
Kia provides a number of video resources to assist you with becoming familiar with the features and functions found in your
Kia vehicle . You can access these resources by snapping the QR Codes with your smartphone/
tablet (mobile devices) or by visiting the following website: www.youtube.com/KiaFeatureVideos. Continue reading
for a more in-depth look at QR Codes and for instructions on how to use them .
REMINDER: When accessing videos on your mobile device, standard cellular data rates may apply .
One-Click Fuel Cap Video To view a video on your mobile device, snap this QR Code or visit the listed website .
www.youtube.com/KiaFeatureVideos
What are QR Codes?
A QR Code is a square, 2-dimensional barcode that can
be read by mobile devices loaded with an appropriate
barcode or QR Code Reader App . The app reads the
barcode image and then launches/uploads the specific
information the code contains, such as URLs, text,
photos, videos and so much more .
How to Use QR Codes
If you have a mobile device with a QR Code Reader App,
you can snap the code with your phone and you’ll be
provided a video with additional information pertaining
to the topic . For example, in the Fuel Cap section, if you
would like additional information, just snap the code with
your mobile device to view the selected Kia Features &
Functions Video .
How to snap a QR Code
1 . With your mobile device, download a QR Code Reader
App . With many devices, you can do this through an
app store or marketplace
2 . Open the QR Code Reader App on your mobile device
3 . The app will utilize your device’s camera . Center the
code in the camera viewing area:
•
With some apps, as soon as the app recognizes
the code, it will launch the corresponding video
•
With other apps, you will have to snap or take a
picture of the code . The app will then launch the
corresponding video
•
For operation specifics, refer to the instructions
that come with the QR Code Reader App
QR CODE
1 . If you’re having trouble scanning codes, check the following: •The code should be centered and focused in your mobile device’s camera screen •Consider moving your device closer to or farther away from the code •The code should be well lit, without significant shadow
2 . After scanning, if a “connecting” message appears and then nothing happens or there’s a “connection error” message, this typically indicates that your device is having trouble connecting to the Internet
3 . When accessing videos on your mobile device, standard cellular data rates will apply
QUICK TIPS
•Avoid scanning from a significant angle •Confirm that the device’s app supports 2D QR Code scanning . •Try another QR Code Reader App; not all apps are created equal
Page 7 of 54
5ALWAYS CHECK THE OWNER’S MANUAL FOR COMPLETE OPER ATING INFORMATION AND SAFET Y WARNINGS *IF EQUIPPED †LEGAL DISCL AIMERS ON BACK INSIDE COVER
The TPMS indicator functions as both Low Tire Pressure Light
and TPMS Malfunction Indicator .
The indicator is designed to illuminate if it detects one or more tires is
significantly underinflated, the vehicle has a spare tire installed without
TPMS or the outside temperature becomes significantly lower .
Inflate tire(s) to specifications using an
accurate tire pressure gauge to turn off
Low Tire Pressure Indicator . See front
driver’s door jamb for PSI specification .
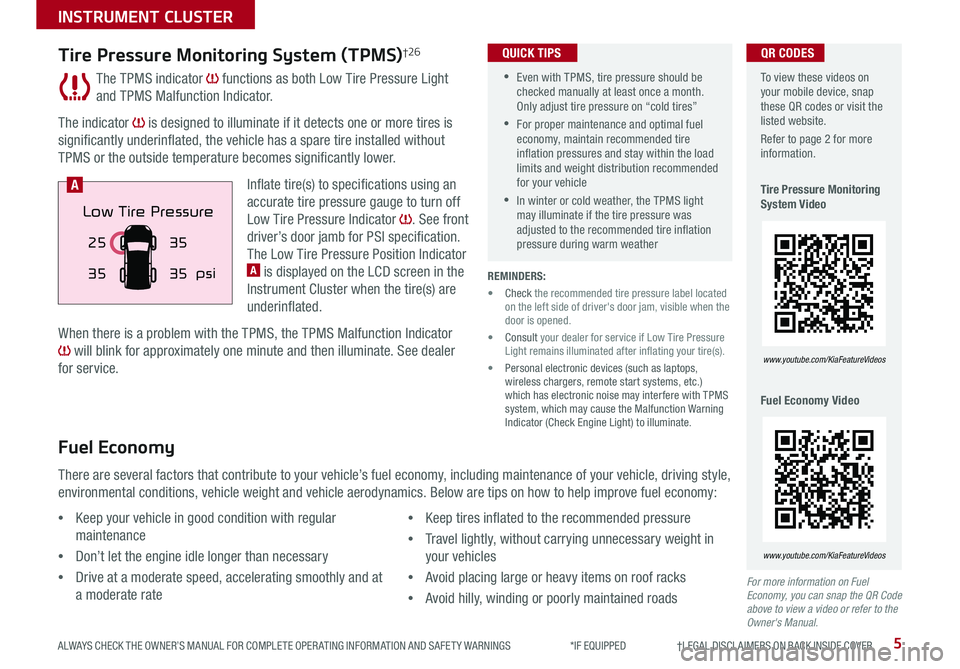
The Low Tire Pressure Position Indicator A is displayed on the LCD screen in the
Instrument Cluster when the tire(s) are
underinflated .
When there is a problem with the TPMS, the TPMS Malfunction Indicator
will blink for approximately one minute and then illuminate . See dealer
for service .
Tire Pressure Monitoring System (TPMS)†2 6
REMINDERS:
• Check the recommended tire pressure label located on the left side of driver's door jam, visible when the door is opened .
• Consult your dealer for service if Low Tire Pressure Light remains illuminated after inflating your tire(s) .
• Personal electronic devices (such as laptops, wireless chargers, remote start systems, etc .) which has electronic noise may interfere with TPMS system, which may cause the Malfunction Warning Indicator (Check Engine Light) to illuminate .
Fuel Economy
There are several factors that contribute to your vehicle’s fuel economy, including maintenance of your vehicle, driving style,
environmental conditions, vehicle weight and vehicle aerodynamics . Below are tips on how to help improve fuel economy:
For more information on Fuel Economy, you can snap the QR Code above to view a video or refer to the Owner's Manual.
•Keep your vehicle in good condition with regular
maintenance
•Don’t let the engine idle longer than necessary
•Drive at a moderate speed, accelerating smoothly and at
a moderate rate
•Keep tires inflated to the recommended pressure
•Travel lightly, without carrying unnecessary weight in
your vehicles
•Avoid placing large or heavy items on roof racks
•Avoid hilly, winding or poorly maintained roads
To view these videos on your mobile device, snap these QR codes or visit the listed website .
Refer to page 2 for more information .
Tire Pressure Monitoring System Video
Fuel Economy Video
www.youtube.com/KiaFeatureVideos
www.youtube.com/KiaFeatureVideos
25
35 35
35
psi
Low Tire Pressure
A
QR CODES
•Even with TPMS, tire pressure should be checked manually at least once a month . Only adjust tire pressure on “cold tires”
•For proper maintenance and optimal fuel economy, maintain recommended tire inflation pressures and stay within the load limits and weight distribution recommended for your vehicle
•In winter or cold weather, the TPMS light may illuminate if the tire pressure was adjusted to the recommended tire inflation pressure during warm weather
QUICK TIPS
INSTRUMENT CLUSTER
Page 9 of 54
7ALWAYS CHECK THE OWNER’S MANUAL FOR COMPLETE OPER ATING INFORMATION AND SAFET Y WARNINGS . *IF EQUIPPED
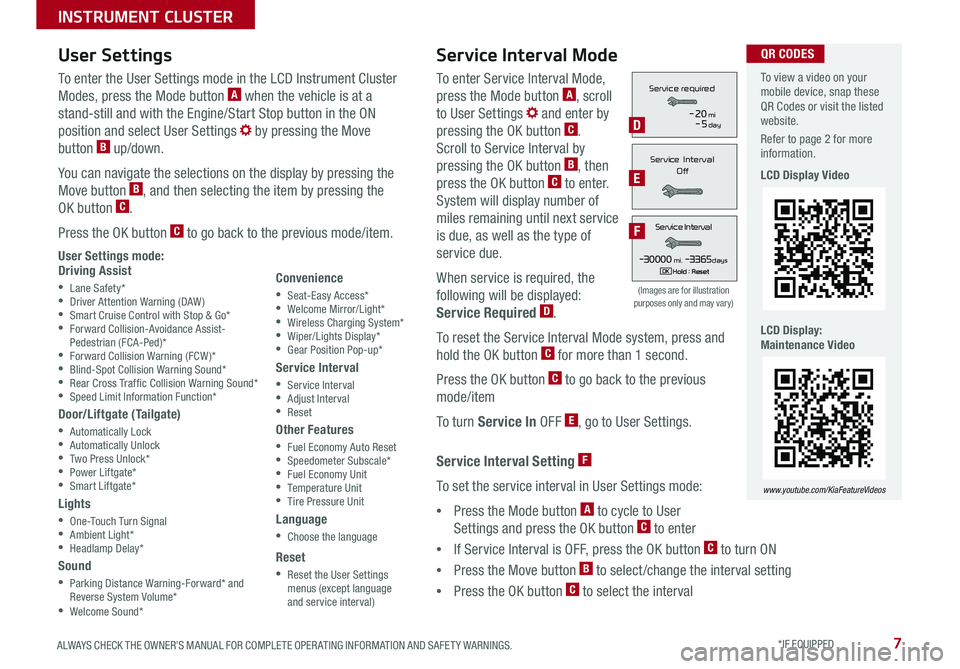
To enter Service Interval Mode,
press the Mode button A, scroll
to User Settings and enter by
pressing the OK button C .
Scroll to Service Interval by
pressing the OK button B, then
press the OK button C to enter .
System will display number of
miles remaining until next service
is due, as well as the type of
service due .
When service is required, the
following will be displayed:
Service Required D .
To reset the Service Interval Mode system, press and
hold the OK button C for more than 1 second .
Press the OK button C to go back to the previous
mode/item
To turn Service In OFF E, go to User Settings .
Service Interval Setting F
To set the service interval in User Settings mode:
•Press the Mode button A to cycle to User
Settings and press the OK button C to enter
•If Service Interval is OFF, press the OK button C to turn ON
•Press the Move button B to select/change the interval setting
•Press the OK button C to select the interval
To enter the User Settings mode in the LCD Instrument Cluster
Modes, press the Mode button A when the vehicle is at a
stand-still and with the Engine/Start Stop button in the ON
position and select User Settings by pressing the Move
button B up/down .
You can navigate the selections on the display by pressing the
Move button B, and then selecting the item by pressing the
OK button C .
Press the OK button C to go back to the previous mode/item .
User Settings mode:Driving Assist
•Lane Safety* •Driver Attention Warning (DAW) •Smart Cruise Control with Stop & Go* •Forward Collision-Avoidance Assist-Pedestrian (FCA-Ped)* •Forward Collision Warning (FCW )* •Blind-Spot Collision Warning Sound* •Rear Cross Traf fic Collision Warning Sound* •Speed Limit Information Function*
Door/Liftgate (Tailgate)
•Automatically Lock •Automatically Unlock •Two Press Unlock* •Power Liftgate* •Smart Liftgate*
Lights
•One-Touch Turn Signal •Ambient Light* •Headlamp Delay*
Sound
•Parking Distance Warning-Forward* and Reverse System Volume* •Welcome Sound*
User Settings
Convenience
•Seat-Easy Access* •Welcome Mirror/Light* •Wireless Charging System* •Wiper/Lights Display* •Gear Position Pop-up*
Service Interval
•Service Interval •Adjust Interval •Reset
Other Features
•Fuel Economy Auto Reset •Speedometer Subscale* •Fuel Economy Unit •Temperature Unit •Tire Pressure Unit
Language
•Choose the language
Reset
•Reset the User Settings menus (except language and service interval)
Service Interval Mode
(Images are for illustration purposes only and may vary)
Servic e Interval
- 3 0 00 0mi.-3 3 65daysH old : R e se tOK
Service r equired
-20mi-5day
S e rv ic e Interval
Of f
Servic e Interval
- 3 0 00 0mi.-3 3 65daysH old : R e se tOK
Service r equired
-20mi-5day
S e rv ic e Interval
Of f
Servic e Interval
- 3 0 00 0mi.-3 3 65daysH old : R e se tOK
Service r equired
-20mi-5day
S e rv ic e Interval
Of fD
E
F
To view a video on your mobile device, snap these QR Codes or visit the listed website .
Refer to page 2 for more information .
LCD Display Video
LCD Display: Maintenance Video
www.youtube.com/KiaFeatureVideos
QR CODES
INSTRUMENT CLUSTER
Page 10 of 54
SORENTO FEATURES & FUNCTIONS GUIDE8*IF EQUIPPED
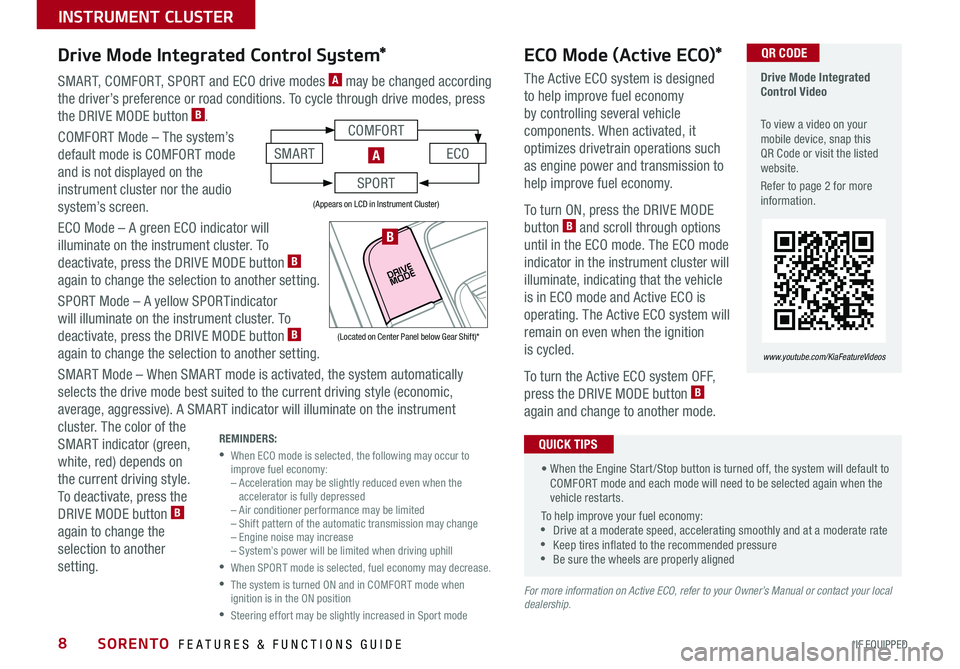
SMART, COMFORT, SPORT and ECO drive modes A may be changed according
the driver’s preference or road conditions . To cycle through drive modes, press
the DRIVE MODE button B .
COMFORT Mode – The system’s
default mode is COMFORT mode
and is not displayed on the
instrument cluster nor the audio
system’s screen .
ECO Mode – A green ECO indicator will
illuminate on the instrument cluster . To
deactivate, press the DRIVE MODE button B
again to change the selection to another setting .
SPORT Mode – A yellow SPORTindicator
will illuminate on the instrument cluster . To
deactivate, press the DRIVE MODE button B
again to change the selection to another setting .
SMART Mode – When SMART mode is activated, the system automatically
selects the drive mode best suited to the current driving style (economic,
average, aggressive) . A SMART indicator will illuminate on the instrument
cluster . The color of the
SMART indicator (green,
white, red) depends on
the current driving style .
To deactivate, press the
DRIVE MODE button B
again to change the
selection to another
setting .
Drive Mode Integrated Control Video
To view a video on your mobile device, snap this QR Code or visit the listed website .
Refer to page 2 for more information .
www.youtube.com/KiaFeatureVideos
ECO Mode (Active ECO)*
The Active ECO system is designed
to help improve fuel economy
by controlling several vehicle
components . When activated, it
optimizes drivetrain operations such
as engine power and transmission to
help improve fuel economy .
To turn ON, press the DRIVE MODE
button B and scroll through options
until in the ECO mode . The ECO mode
indicator in the instrument cluster will
illuminate, indicating that the vehicle
is in ECO mode and Active ECO is
operating . The Active ECO system will
remain on even when the ignition
is cycled .
To turn the Active ECO system OFF,
press the DRIVE MODE button B
again and change to another mode .
For more information on Active ECO, refer to your Owner’s Manual or contact your local dealership.
Drive Mode Integrated Control System*
REMINDERS:
•
When ECO mode is selected, the following may occur to improve fuel economy: – Acceleration may be slightly reduced even when the accelerator is fully depressed – Air conditioner performance may be limited – Shift pattern of the automatic transmission may change – Engine noise may increase – System’s power will be limited when driving uphill
•
When SPORT mode is selected, fuel economy may decrease .
•
The system is turned ON and in COMFORT mode when ignition is in the ON position
•
Steering effort may be slightly increased in Sport mode
(Appears on LCD in Instrument Cluster)
QR CODE
• When the Engine Start /Stop button is turned off, the system will default to COMFORT mode and each mode will need to be selected again when the vehicle restarts .
To help improve your fuel economy: •Drive at a moderate speed, accelerating smoothly and at a moderate rate •Keep tires inflated to the recommended pressure •Be sure the wheels are properly aligned
QUICK TIPS
COMFORT
ECOSMART
SPORT
A
(Located on Center Panel below Gear Shift)*
B
INSTRUMENT CLUSTER
Page 12 of 54
SORENTO FEATURES & FUNCTIONS GUIDE10*IF EQUIPPED †LEGAL DISCL AIMERS ON BACK INSIDE COVER
Blind-Spot Collision Warning (BCW)*†6
The BCW system uses radar sensors to help alert the driver if it detects an
approaching vehicle in the driver’s blind spot area before changing lanes in
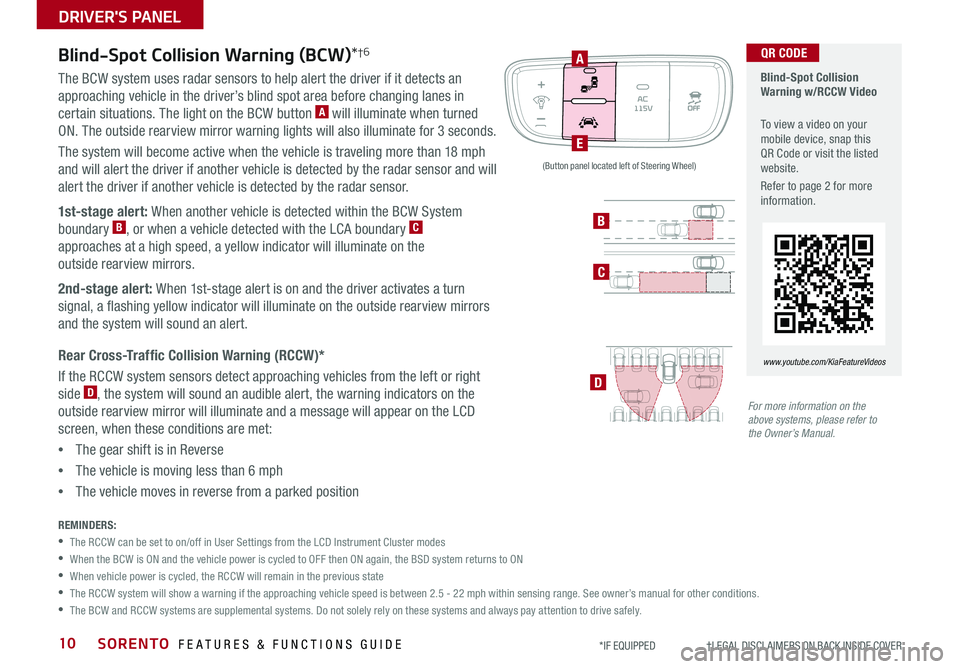
certain situations . The light on the BCW button A will illuminate when turned
ON . The outside rearview mirror warning lights will also illuminate for 3 seconds .
The system will become active when the vehicle is traveling more than 18 mph
and will alert the driver if another vehicle is detected by the radar sensor and will
alert the driver if another vehicle is detected by the radar sensor .
1st-stage alert: When another vehicle is detected within the BCW System
boundary B, or when a vehicle detected with the LCA boundary C
approaches at a high speed, a yellow indicator will illuminate on the
outside rearview mirrors .
2nd-stage alert: When 1st-stage alert is on and the driver activates a turn
signal, a flashing yellow indicator will illuminate on the outside rearview mirrors
and the system will sound an alert .
Rear Cross-Traffic Collision Warning (RCCW)*
If the RCCW system sensors detect approaching vehicles from the left or right
side D, the system will sound an audible alert, the warning indicators on the
outside rearview mirror will illuminate and a message will appear on the LCD
screen, when these conditions are met:
•The gear shift is in Reverse
•The vehicle is moving less than 6 mph
•The vehicle moves in reverse from a parked position
REMINDERS:
•The RCCW can be set to on/off in User Settings from the LCD Instrument Cluster modes
•When the BCW is ON and the vehicle power is cycled to OFF then ON again, the BSD system returns to ON
•When vehicle power is cycled, the RCCW will remain in the previous state
•
The RCCW system will show a warning if the approaching vehicle speed is between 2 .5 - 22 mph within sensing range . See owner’s manual for other conditions .
•The BCW and RCCW systems are supplemental systems . Do not solely rely on these systems and always pay attention to drive safely .
For more information on the above systems, please refer to the Owner’s Manual.
Blind-Spot Collision Warning w/RCCW Video
To view a video on your mobile device, snap this QR Code or visit the listed website .
Refer to page 2 for more information .
www.youtube.com/KiaFeatureVideos
A
E
B
C
D
(Button panel located left of Steering Wheel)
QR CODE
DRIVER'S PANEL
Page 13 of 54
11ALWAYS CHECK THE OWNER’S MANUAL FOR COMPLETE OPER ATING INFORMATION AND SAFET Y WARNINGS *IF EQUIPPED †LEGAL DISCL AIMERS ON BACK INSIDE COVER
Lane Keeping Assist (LKA)*†6Forward Collision-Avoidance
Assist-Pedestrian (FCA-Ped)*† 9 /
Forward Collision Warning (FCW)*†6With the Engine Start /Stop button in the ON position, press the LK A
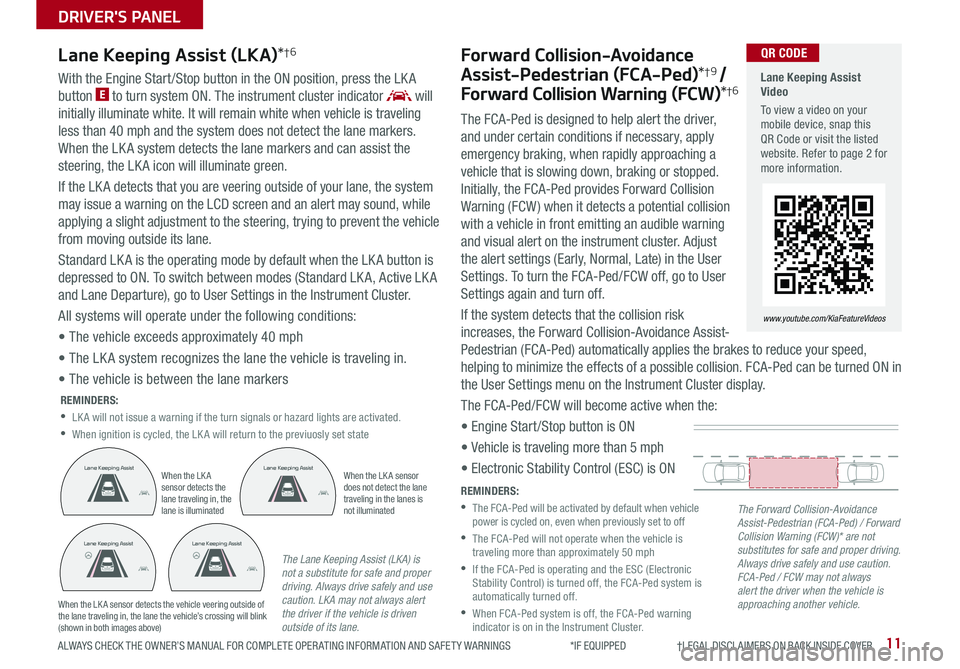
button E to turn system ON . The instrument cluster indicator will
initially illuminate white . It will remain white when vehicle is traveling
less than 40 mph and the system does not detect the lane markers .
When the LK A system detects the lane markers and can assist the
steering, the LK A icon will illuminate green .
If the LK A detects that you are veering outside of your lane, the system
may issue a warning on the LCD screen and an alert may sound, while
applying a slight adjustment to the steering, trying to prevent the vehicle
from moving outside its lane .
Standard LK A is the operating mode by default when the LK A button is
depressed to ON . To switch between modes (Standard LK A, Active LK A
and Lane Departure), go to User Settings in the Instrument Cluster .
All systems will operate under the following conditions:
• The vehicle exceeds approximately 40 mph
• The LK A system recognizes the lane the vehicle is traveling in .
• The vehicle is between the lane markers
REMINDERS:
•LK A will not issue a warning if the turn signals or hazard lights are activated .
•When ignition is cycled, the LK A will return to the previuosly set state
REMINDERS:
•
The FCA-Ped will be activated by default when vehicle power is cycled on, even when previously set to off
•
The FCA-Ped will not operate when the vehicle is traveling more than approximately 50 mph
•
If the FCA-Ped is operating and the ESC (Electronic Stability Control) is turned off, the FCA-Ped system is automatically turned off .
•
When FCA-Ped system is off, the FCA-Ped warning indicator is on in the Instrument Cluster .
The Forward Collision-Avoidance Assist-Pedestrian (FCA-Ped) / Forward Collision Warning (FCW)* are not substitutes for safe and proper driving. Always drive safely and use caution. FCA-Ped / FCW may not always alert the driver when the vehicle is approaching another vehicle.
The Lane Keeping Assist (LKA) is not a substitute for safe and proper driving. Always drive safely and use caution. LKA may not always alert the driver if the vehicle is driven outside of its lane.
When the LK A sensor detects the lane traveling in, the lane is illuminated
When the LK A sensor does not detect the lane traveling in the lanes is not illuminated
When the LK A sensor detects the vehicle veering outside of the lane traveling in, the lane the vehicle’s crossing will blink (shown in both images above)
Lane Keeping AssistLane Keeping Assist
Lane Keeping AssistLane Keeping AssistLane Keeping AssistLane Keeping Assist
Lane Keeping AssistLane Keeping Assist
Lane Keeping AssistLane Keeping Assist
Lane Keeping AssistLane Keeping AssistLane Keeping AssistLane Keeping Assist
Lane Keeping AssistLane Keeping Assist
Lane Keeping Assist Video
To view a video on your mobile device, snap this QR Code or visit the listed website . Refer to page 2 for more information .
www.youtube.com/KiaFeatureVideos
QR CODE
The FCA-Ped is designed to help alert the driver,
and under certain conditions if necessary, apply
emergency braking, when rapidly approaching a
vehicle that is slowing down, braking or stopped .
Initially, the FCA-Ped provides Forward Collision
Warning (FCW) when it detects a potential collision
with a vehicle in front emitting an audible warning
and visual alert on the instrument cluster . Adjust
the alert settings (Early, Normal, Late) in the User
Settings . To turn the FCA-Ped/FCW off, go to User
Settings again and turn off .
If the system detects that the collision risk
increases, the Forward Collision-Avoidance Assist-
Pedestrian (FCA-Ped) automatically applies the brakes to reduce your speed,
helping to minimize the effects of a possible collision . FCA-Ped can be turned ON in
the User Settings menu on the Instrument Cluster display .
The FCA-Ped/FCW will become active when the:
• Engine Start /Stop button is ON
• Vehicle is traveling more than 5 mph
• Electronic Stability Control (ESC) is ON
DRIVER'S PANEL
Page 15 of 54
13ALWAYS CHECK THE OWNER’S MANUAL FOR COMPLETE OPER ATING INFORMATION AND SAFET Y WARNINGS *IF EQUIPPED †LEGAL DISCL AIMERS ON BACK INSIDE COVER
AUTOL
R
MIRROR
Reverse Parking Aid Function*Engine Start/Stop Button*†8
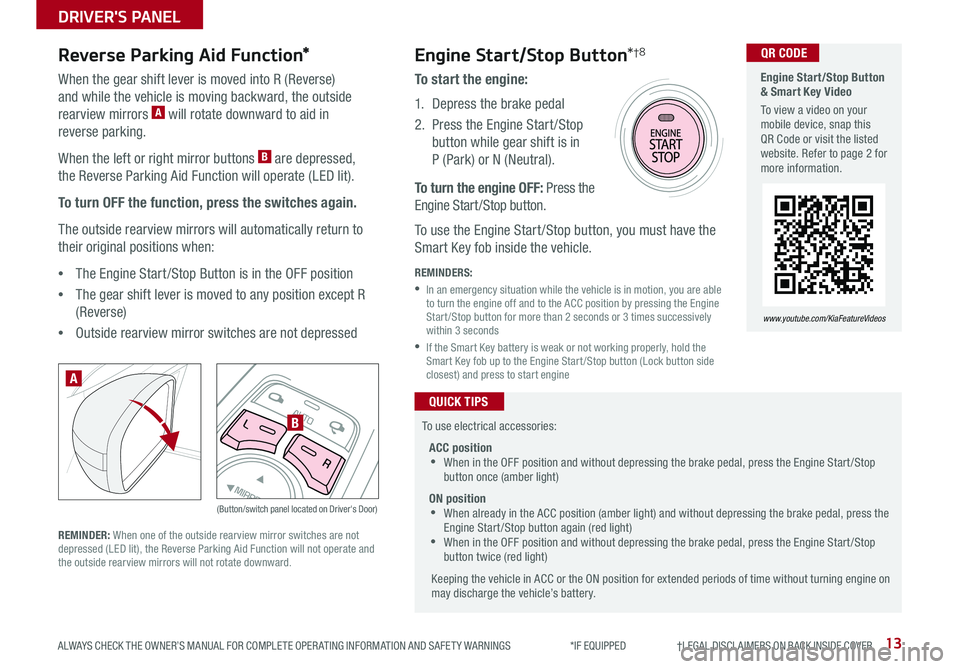
When the gear shift lever is moved into R (Reverse)
and while the vehicle is moving backward, the outside
rearview mirrors A will rotate downward to aid in
reverse parking .
When the left or right mirror buttons B are depressed,
the Reverse Parking Aid Function will operate (LED lit) .
To turn OFF the function, press the switches again.
The outside rearview mirrors will automatically return to
their original positions when:
•The Engine Start /Stop Button is in the OFF position
•The gear shift lever is moved to any position except R
(Reverse)
•
Outside rearview mirror switches are not depressed
REMINDER: When one of the outside rearview mirror switches are not depressed (LED lit), the Reverse Parking Aid Function will not operate and the outside rearview mirrors will not rotate downward .
(Button/switch panel located on Driver's Door)
A
B
To start the engine:
1 . Depress the brake pedal
2 .
Press the Engine Start /Stop
button while gear shift is in
P (Park) or N (Neutral) .
To turn the engine OFF: Press the
Engine Start /Stop button .
To use the Engine Start /Stop button, you must have the
Smart Key fob inside the vehicle .
REMINDERS:
•
In an emergency situation while the vehicle is in motion, you are able to turn the engine off and to the ACC position by pressing the Engine Start /Stop button for more than 2 seconds or 3 times successively within 3 seconds
•
If the Smart Key battery is weak or not working properly, hold the Smart Key fob up to the Engine Start /Stop button (Lock button side closest) and press to start engine
To use electrical accessories:
ACC position •When in the OFF position and without depressing the brake pedal, press the Engine Start /Stop button once (amber light)
ON position •When already in the ACC position (amber light) and without depressing the brake pedal, press the Engine Start /Stop button again (red light) •
When in the OFF position and without depressing the brake pedal, press the Engine Start /Stop button twice (red light)
Keeping the vehicle in ACC or the ON position for extended periods of time without turning engine on may discharge the vehicle’s battery .
QUICK TIPS
Engine Start/Stop Button & Smart Key Video
To view a video on your mobile device, snap this QR Code or visit the listed website . Refer to page 2 for more information .
www.youtube.com/KiaFeatureVideos
QR CODE
DRIVER'S PANEL
Page 16 of 54
SORENTO FEATURES & FUNCTIONS GUIDE14*IF EQUIPPED †LEGAL DISCL AIMERS ON BACK INSIDE COVER
Tilt/Telescoping
Steering Wheel†2 5
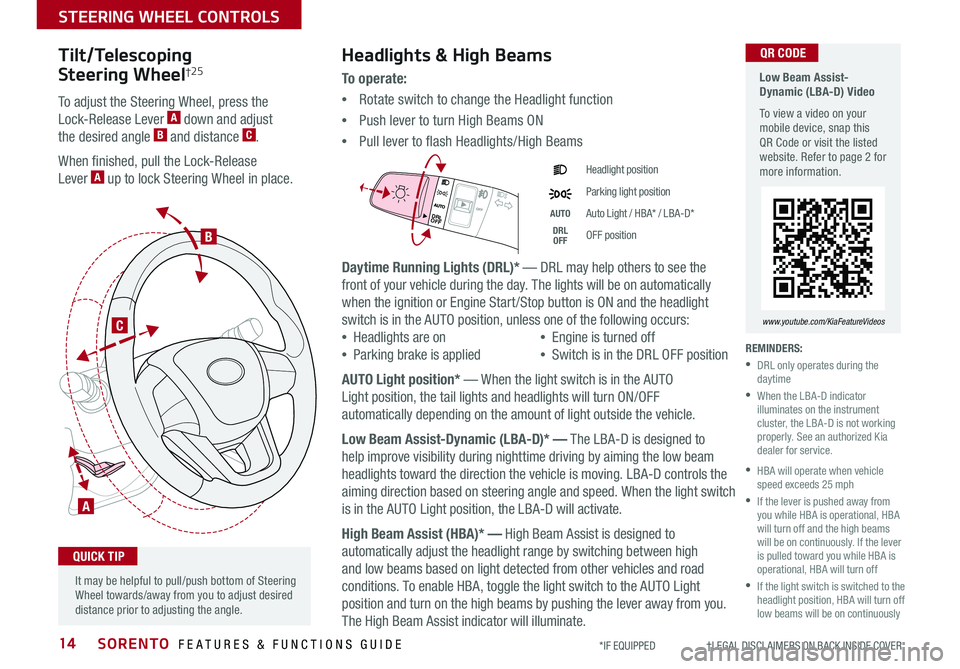
To adjust the Steering Wheel, press the
Lock-Release Lever A down and adjust
the desired angle B and distance C .
When finished, pull the Lock-Release
Lever A up to lock Steering Wheel in place .
A
C
B
Headlights & High Beams
To o p e r a t e :
•Rotate switch to change the Headlight function
•Push lever to turn High Beams ON
•Pull lever to flash Headlights/High Beams
Daytime Running Lights (DRL)* — DRL may help others to see the
front of your vehicle during the day . The lights will be on automatically
when the ignition or Engine Start /Stop button is ON and the headlight
switch is in the AUTO position, unless one of the following occurs:
•Headlights are on
•Parking brake is applied
•Engine is turned off
•Switch is in the DRL OFF position
AUTO Light position* — When the light switch is in the AUTO
Light position, the tail lights and headlights will turn ON/OFF
automatically depending on the amount of light outside the vehicle .
Low Beam Assist-Dynamic (LBA-D)* — The LBA-D is designed to
help improve visibility during nighttime driving by aiming the low beam
headlights toward the direction the vehicle is moving . LBA-D controls the
aiming direction based on steering angle and speed . When the light switch
is in the AUTO Light position, the LBA-D will activate .
High Beam Assist (HBA)* — High Beam Assist is designed to
automatically adjust the headlight range by switching between high
and low beams based on light detected from other vehicles and road
conditions . To enable HBA, toggle the light switch to the AUTO Light
position and turn on the high beams by pushing the lever away from you .
The High Beam Assist indicator will illuminate .
DRL
OFF
DRLOFF
Headlight position
Parking light position
AUTOAuto Light / HBA* / LBA-D*
DRL OFFOFF position
It may be helpful to pull/push bottom of Steering Wheel towards/away from you to adjust desired distance prior to adjusting the angle .
QUICK TIP
Low Beam Assist-Dynamic (LBA-D) Video
To view a video on your mobile device, snap this QR Code or visit the listed website . Refer to page 2 for more information .
www.youtube.com/KiaFeatureVideos
QR CODE
REMINDERS:
•
DRL only operates during the daytime
•
When the LBA-D indicator illuminates on the instrument cluster, the LBA-D is not working properly . See an authorized Kia dealer for service .
•
HBA will operate when vehicle speed exceeds 25 mph
•
If the lever is pushed away from you while HBA is operational, HBA will turn off and the high beams will be on continuously . If the lever is pulled toward you while HBA is operational, HBA will turn off
•
If the light switch is switched to the headlight position, HBA will turn off low beams will be on continuously
STEERING WHEEL CONTROLS
Page 19 of 54

17ALWAYS CHECK THE OWNER’S MANUAL FOR COMPLETE OPER ATING INFORMATION AND SAFET Y WARNINGS *IF EQUIPPED †LEGAL DISCL AIMERS ON BACK INSIDE COVER
Voice Recognition* and Phone Contact Tips
To help optimize the Bluetooth® Wireless
Technology Voice Recognition system, below
are some tips and reminders . Improve the
performance by making a few simple changes
to your phone contacts:
•Use full names (first and last names) vs .
short or single-syllable names (“John Smith”
vs . “Dad,” “Smith Residence” vs . “Home”)
•Avoid using special characters, emoji’s or
hyphenated names (@, &, #, /, -, *, +, etc . )
•Avoid using acronyms (“In Case of
Emergency” vs . “ICE”) or words with all
capital letters
•Spell words completely, no abbreviations
(“Doctor Smith” vs . “Dr . Smith”)
The system may have difficulty understanding
some accents or uncommon names . Below are other
tips to optimize using the voice recognition .
Bluetooth® Wireless Technology†5,23 (continued)
Pairing a Phone
For instructions on how to pair a phone, refer to the
Car Multimedia System User’s Manual or your vehicle’s
Quick Start Guide .
How to Place a Call
When using the voice command feature*, wait for the
system BEEP before speaking the command .
There are two options for placing a call:
•Option 1: Press the Receive/Place Call button C
(displays the phone screen with call history)
•Option 2: Press the Talk button* A . Then say the
command “Call {name}” or “Dial {number}”, followed
by contact name or number
Voice Recognition Tips Video To view a video on your mobile device, snap this QR Code or visit the listed website .
Refer to page 2 for more information .
www.youtube.com/KiaFeatureVideos
QR CODE
During the pairing process, be sure to accept the connection requests on the phone for phonebook download and to allow acceptance of all future Bluetooth® connection requests
QUICK TIP
•When placing a call, speak in a natural, moderate tone, with clear pronunciation . The system may have trouble recognizing commands if you speak too soft or too loud
•Always wait for the beep before speaking any commands
•Close windows and sunroof and turn off A /C - Open windows, sunroof, weather (wind/rain), or an A /C fan operating at higher speeds can interfere with Voice Recognition
•Press the talk button and say “Help” to get a list of available commands
QUICK TIPS
STEERING WHEEL CONTROLS
Page 21 of 54
19ALWAYS CHECK THE OWNER’S MANUAL FOR COMPLETE OPER ATING INFORMATION AND SAFET Y WARNINGS *IF EQUIPPED †LEGAL DISCL AIMERS ON BACK INSIDE COVER
The SCC system is a supplemental system and is not a substitute for safe driving. It is the responsibility of the driver to always check the speed and distance to the vehicle ahead.
Smart Cruise Control (SCC) with Stop & Go*†6
The Smart Cruise Control with Stop & Go* system is designed to maintain a predetermined
distance from vehicles detected ahead by automatically adjusting the driving speed as
needed . When traffic is encountered, the vehicle will be slowed to maintain a set
distance behind traffic without depressing the accelerator or brake pedal .
To set/adjust the SCC speed:
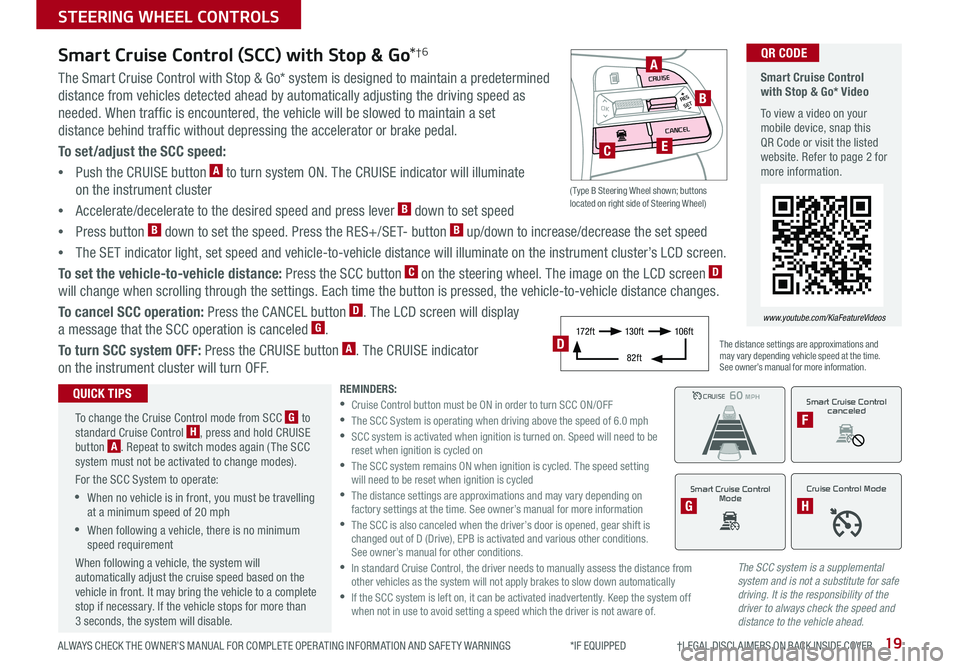
•Push the CRUISE button A to turn system ON . The CRUISE indicator will illuminate
on the instrument cluster
•Accelerate/decelerate to the desired speed and press lever B down to set speed
•Press button B down to set the speed . Press the RES+/SET- button B up/down to increase/decrease the set speed
•The SET indicator light, set speed and vehicle-to-vehicle distance will illuminate on the instrument cluster’s LCD screen .
To set the vehicle-to-vehicle distance: Press the SCC button C on the steering wheel . The image on the LCD screen D
will change when scrolling through the settings . Each time the button is pressed, the vehicle-to-vehicle distance changes .
To cancel SCC operation: Press the CANCEL button D . The LCD screen will display
a message that the SCC operation is canceled G .
To turn SCC system OFF: Press the CRUISE button A . The CRUISE indicator
on the instrument cluster will turn OFF .
REMINDERS: •
Cruise Control button must be ON in order to turn SCC ON/OFF •
The SCC System is operating when driving above the speed of 6 .0 mph •
SCC system is activated when ignition is turned on . Speed will need to be reset when ignition is cycled on •
The SCC system remains ON when ignition is cycled . The speed setting will need to be reset when ignition is cycled •
The distance settings are approximations and may vary depending on factory settings at the time . See owner’s manual for more information •
The SCC is also canceled when the driver’s door is opened, gear shift is changed out of D (Drive), EPB is activated and various other conditions . See owner’s manual for other conditions . •
In standard Cruise Control, the driver needs to manually assess the distance from other vehicles as the system will not apply brakes to slow down automatically •
If the SCC system is left on, it can be activated inadvertently . Keep the system off when not in use to avoid setting a speed which the driver is not aware of .
The distance settings are approximations and may vary depending vehicle speed at the time . See owner’s manual for more information .
CRUISE100 MPHCRUISE100 MPH
CRUISE60 MPHCRUISE100 MPH
Smart Cruise Control
Mode
G
Cruise Control Mode
H
Smart Cruise Control with Stop & Go* Video
To view a video on your mobile device, snap this QR Code or visit the listed website . Refer to page 2 for more information .
www.youtube.com/KiaFeatureVideos
QR CODE
To change the Cruise Control mode from SCC G to standard Cruise Control H, press and hold CRUISE button A . Repeat to switch modes again ( The SCC system must not be activated to change modes) .
For the SCC System to operate:
•When no vehicle is in front, you must be travelling at a minimum speed of 20 mph
•When following a vehicle, there is no minimum speed requirement
When following a vehicle, the system will automatically adjust the cruise speed based on the vehicle in front . It may bring the vehicle to a complete stop if necessary . If the vehicle stops for more than 3 seconds, the system will disable .
QUICK TIPSSmart Cruise Control
canceled
F
17 2 f t13 0 f t
82ft
10 6 f tD
( Type B Steering Wheel shown; buttons located on right side of Steering Wheel)
MODE
RESOKSET
CRUISE
CANCEL
B
CE
A
STEERING WHEEL CONTROLS