window KIA Soul 2016 2.G Owner's Manual
[x] Cancel search | Manufacturer: KIA, Model Year: 2016, Model line: Soul, Model: KIA Soul 2016 2.GPages: 556, PDF Size: 21.35 MB
Page 3 of 556
ii
1
2
3
4
5
6
7
8I
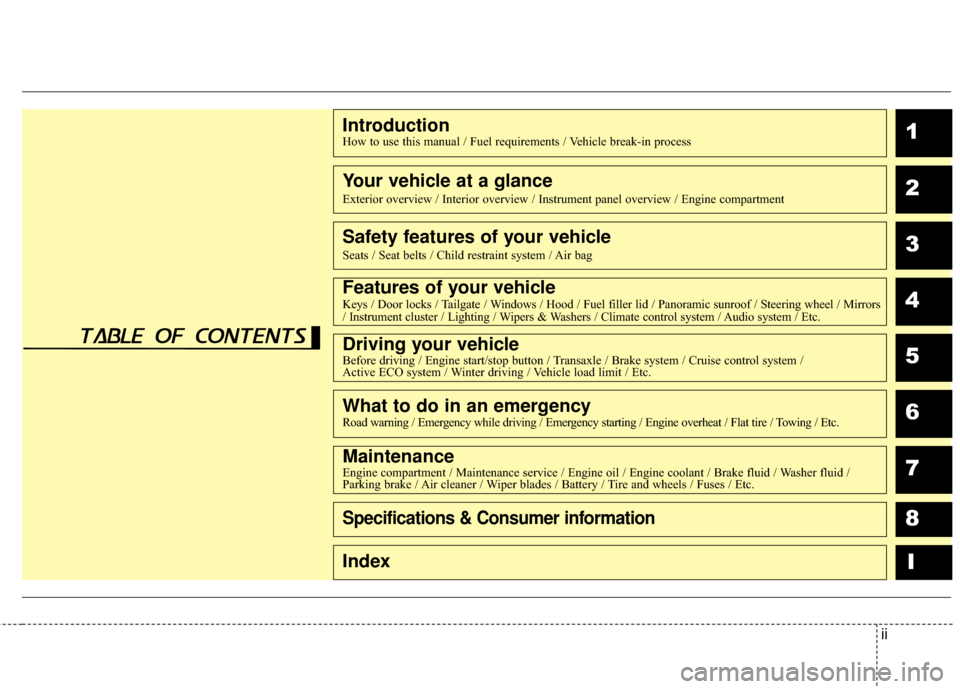
IntroductionHow to use this manual / Fuel requirements / Vehicle break-in process
Your vehicle at a glance
Exterior overview / Interior overview / Instrument panel overview / Engi\
ne compartment
Safety features of your vehicle
Seats / Seat belts / Child restraint system / Air bag
Features of your vehicleKeys / Door locks / Tailgate / Windows / Hood / Fuel filler lid / Panoramic sunroof / Steering wheel / Mirrors/ Instrument cluster / Lighting / Wipers & Washers / Climate control system / Audio system / Etc.
Driving your vehicleBefore driving / Engine start/stop button / Transaxle / Brake system / Cruise control system /
Active ECO system / Winter driving / Vehicle load limit / Etc.
What to do in an emergencyRoad warning / Emergency while driving / Emergency starting / Engine overheat / Flat tire / Towing / Etc.
MaintenanceEngine compartment / Maintenance service / Engine oil / Engine coolant /\
Brake fluid / Washer fluid /
Parking brake / Air cleaner / Wiper blades / Battery / Tire and wheels / Fuses / Etc.
Specifications & Consumer information
Index
table of contents
Page 12 of 556
Your vehicle at a glance
22
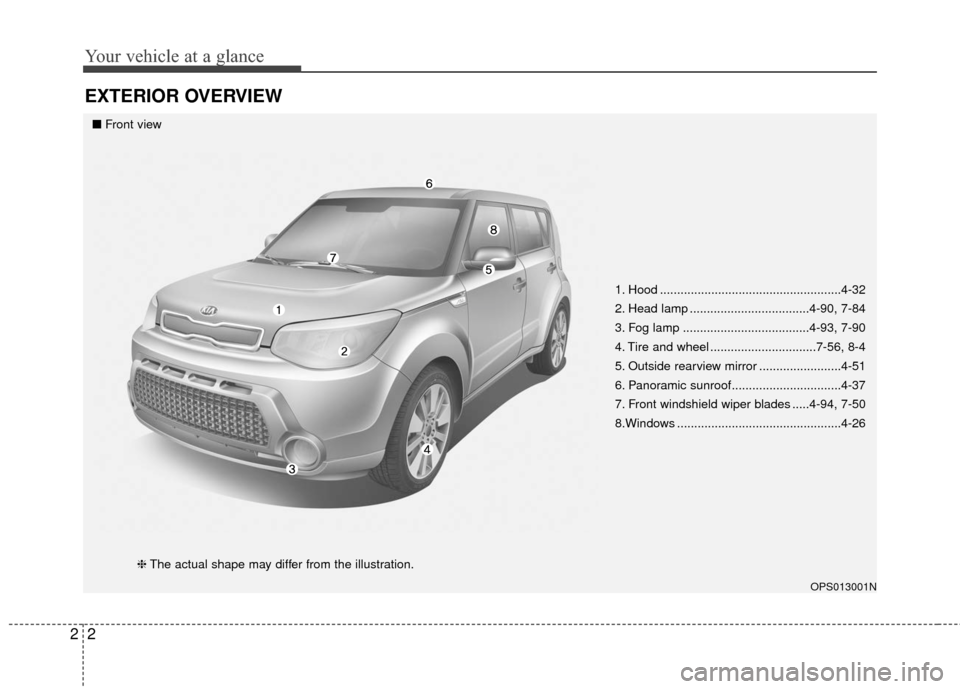
EXTERIOR OVERVIEW
1. Hood .....................................................4-32
2. Head lamp ...................................4-90, 7-84
3. Fog lamp .....................................4-93, 7-90
4. Tire and wheel ...............................7-56, 8-4
5. Outside rearview mirror ........................4-51
6. Panoramic sunroof................................4-37
7. Front windshield wiper blades .....4-94, 7-50
8.Windows ................................................4-26
OPS013001N
■Front view
❈The actual shape may differ from the illustration.
Page 13 of 556
23
Your vehicle at a glance
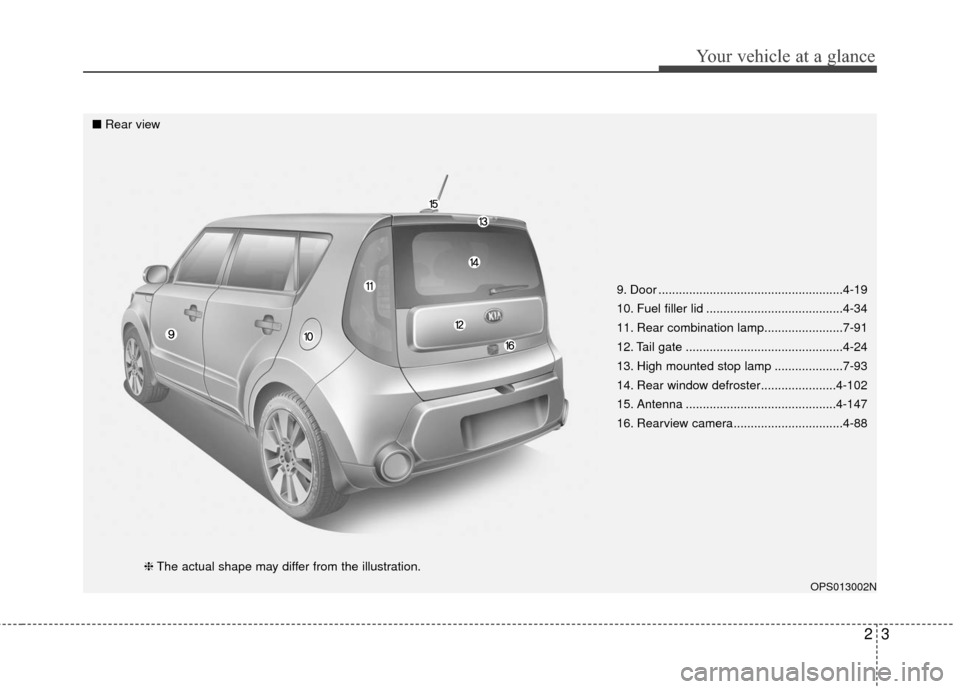
9. Door ......................................................4-19
10. Fuel filler lid ........................................4-34
11. Rear combination lamp.......................7-91
12. Tail gate ..............................................4-24
13. High mounted stop lamp ....................7-93
14. Rear window defroster......................4-102
15. Antenna ............................................4-147
16. Rearview camera................................4-88
OPS013002N
■Rear view
❈The actual shape may differ from the illustration.
Page 14 of 556
Your vehicle at a glance
42
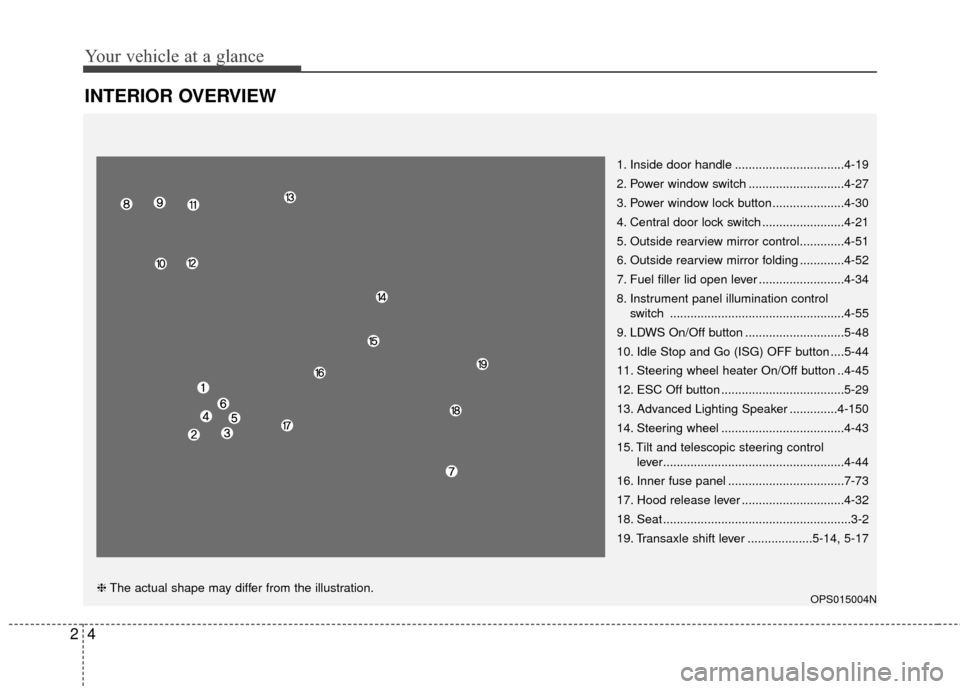
INTERIOR OVERVIEW
1. Inside door handle ................................4-19
2. Power window switch ............................4-27
3. Power window lock button .....................4-30
4. Central door lock switch ........................4-21
5. Outside rearview mirror control.............4-51
6. Outside rearview mirror folding .............4-52
7. Fuel filler lid open lever .........................4-34
8. Instrument panel illumination controlswitch ...................................................4-55
9. LDWS On/Off button .............................5-48
10. Idle Stop and Go (ISG) OFF button ....5-44
11. Steering wheel heater On/Off button ..4-45
12. ESC Off button ....................................5-29
13. Advanced Lighting Speaker ..............4-150
14. Steering wheel ....................................4-43
15. Tilt and telescopic steering control lever.....................................................4-44
16. Inner fuse panel ..................................7-73
17. Hood release lever ..............................4-32
18. Seat .......................................................3-2
19. Transaxle shift lever ...................5-14, 5-17
OPS015004N❈ The actual shape may differ from the illustration.
Page 58 of 556
341
Safety features of your vehicle
Noise and smoke
When inflated, the air bags make a
loud noise and leave smoke and
powder in the air inside the vehicle.
This is normal and is a result of the
ignition of the air bag inflator. After
the air bag inflates, you may feel sub-
stantial discomfort in breathing due
to the contact of your chest with both
the seat belt and the air bag, as well
as from breathing the smoke and
powder.Open your doors and/or
windows as soon as possible after
impact in order to reduce discom-
fort and prevent prolonged expo-
sure to the smoke and powder.
Though smoke and powder are non-
toxic, it may cause irritation to the
skin (eyes, nose and throat, etc). If
this is the case, wash and rinse with
cold water immediately and consult a
doctor if the symptom persists.WARNING
- Hot components
Do not touch the air bag storage
area's internal components
immediately after airbag infla-
tion. The air bag related parts in
the steering wheel, instrument
panel and the roof rails above
the front and rear doors are
very hot. Hot components can
result in burn injuries.
WARNING
- Airbag inflation
Sit as far back as possible from
the steering wheel while still
maintaining comfortable con-
trol of your vehicle. A distance
of at least 10" from your chest
to the steering wheel is recom-
mended. Failure to do so can
result in airbag inflation injuries
to the driver.
Page 73 of 556
Safety features of your vehicle
56
3
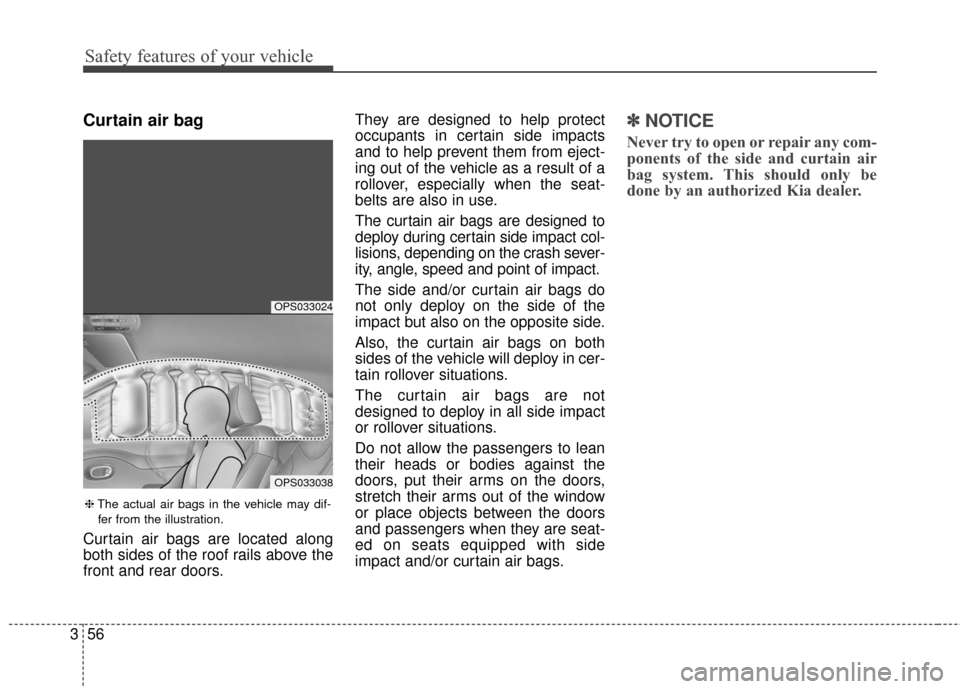
Curtain air bag
Curtain air bags are located along
both sides of the roof rails above the
front and rear doors. They are designed to help protect
occupants in certain side impacts
and to help prevent them from eject-
ing out of the vehicle as a result of a
rollover, especially when the seat-
belts are also in use.
The curtain air bags are designed to
deploy during certain side impact col-
lisions, depending on the crash sever-
ity, angle, speed and point of impact.
The side and/or curtain air bags do
not only deploy on the side of the
impact but also on the opposite side.
Also, the curtain air bags on both
sides of the vehicle will deploy in cer-
tain rollover situations.
The curtain air bags are not
designed to deploy in all side impact
or rollover situations.
Do not allow the passengers to lean
their heads or bodies against the
doors, put their arms on the doors,
stretch their arms out of the window
or place objects between the doors
and passengers when they are seat-
ed on seats equipped with side
impact and/or curtain air bags.
✽ ✽
NOTICE
Never try to open or repair any com-
ponents of the side and curtain air
bag system. This should only be
done by an authorized Kia dealer.
❈ The actual air bags in the vehicle may dif-
fer from the illustration.
OPS033024
OPS033038
Page 81 of 556
Features of your vehicle
Key . . . . . . . . . . . . . . . . . . . . . . . . . . . . . . . . . . . . \
. . . 4-4
• Record your key number . . . . . . . . . . . . . . . . . . . . . . . 4-4
. . . . . . . . . . . . . . . . . . . . . . . . . . . . . . . . 4-4
. . . . . . . . . . . . . . . . . . . . . . . . 4-6
. . . . . . . . . . . . . . . . . . . . . . . . . . . 4-7
. . . . . . . . . . . . . . . . . . . . . . . . . . . . 4-8
Smart key . . . . . . . . . . . . . . . . . . . . . . . . . . . . . . . . 4-11
. . . . . . . . . . . . . . . . . . . . . . 4-11
. . . . . . . . . . . . . . . . . . . . . . . . . . . 4-11
. . . . . . . . . . . . . . . . . . . . . . . . . 4-14
. . . . . . . . . . . . . . . . . . . . . . . . 4-15
. . . . . . . . . . . . . . . . . . 4-15
. . . . . . . . . . . . . . . . . . . . . . . . . . 4-17
Door locks . . . . . . . . . . . . . . . . . . . . . . . . . . . . . . . . 4-19
. . . . 4-19
. . . . . . . . . . . . . . 4-22
. . . . . . . . . . . . . . . . . . 4-22
. . . . . . . . . . . . . . . . . 4-22
. . . . . . . . . . . . . . . . . 4-23
Tailgate . . . . . . . . . . . . . . . . . . . . . . . . . . . . . . . . . . 4-24\
. . . . . . . . . . . . . . . . . . . . . . . . . . 4-24
. . . . . . . . . . . . . . . . . . . . . . . . . . . 4-24
. . . . . . . . . . . . . . . 4-25
Windows . . . . . . . . . . . . . . . . . . . . . . . . . . . . . . . . . 4-26
. . . . . . . . . . . . . . . . . . . . . . . . . . . . . . 4-27
Hood. . . . . . . . . . . . . . . . . . . . . . . . . . . . . . . . . . . . \
. 4-32
. . . . . . . . . . . . . . . . . . . . . . . . . . . . 4-32
. . . . . . . . . . . . . . . . . . . . . . . . . . . . . 4-32
Fuel filler lid . . . . . . . . . . . . . . . . . . . . . . . . . . . . . . 4-34
. . . . . . . . . . . . . . . . . . . . . . 4-34
. . . . . . . . . . . . . . . . . . . . . . . 4-34
Panoramic sunroof . . . . . . . . . . . . . . . . . . . . . . . . . 4-37
. . . . . . . . . . . . . . . . . . . . . . . . . . . 4-38
. . . . . . . . . . . . . . . . . . . . . . . . . . . . 4-39
. . . . . . . . . . . . . . . . . . . . . . . . . . . . . . . . . . . 4-\
40
. . . . . . . . . . . . . . . . . . . . . . . . . 4-41
Steering wheel . . . . . . . . . . . . . . . . . . . . . . . . . . . . . 4-43
. . . . . . . . . . . . . . . . . . 4-43
. . . . . . . . . . . . . . . . . . . . 4-44
. . . . . . . . . . . . . . . . . . . . . . . . . 4-45
. . . . . . . . . . . . . . . . . . . . . . . . . . . . . . . . . . . . \
. . . 4-46
. . . . . . . . . . . . . . . . . . . . . . . . . . . . . . . . . . 4-46\
Mirrors . . . . . . . . . . . . . . . . . . . . . . . . . . . . . . . . . . 4-49\
. . . . . . . . . . . . . . . . . . . . . . . . 4-49
4
Page 85 of 556
45
Features of your vehicle
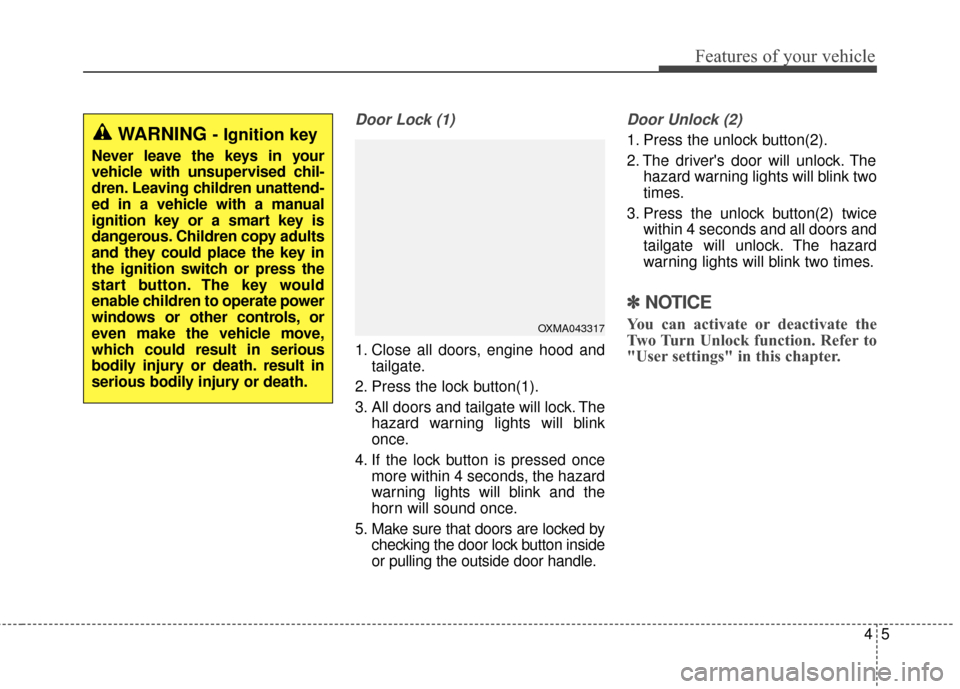
Door Lock (1)
1. Close all doors, engine hood andtailgate.
2. Press the lock button(1).
3. All doors and tailgate will lock. The hazard warning lights will blink
once.
4. If the lock button is pressed once more within 4 seconds, the hazard
warning lights will blink and the
horn will sound once.
5. Make sure that doors are locked by checking the door lock button inside
or pulling the outside door handle.
Door Unlock (2)
1. Press the unlock button(2).
2. The driver's door will unlock. Thehazard warning lights will blink two
times.
3. Press the unlock button(2) twice within 4 seconds and all doors and
tailgate will unlock. The hazard
warning lights will blink two times.
✽ ✽NOTICE
You can activate or deactivate the
Two Turn Unlock function. Refer to
"User settings" in this chapter.OXMA043317
WARNING - Ignition key
Never leave the keys in your
vehicle with unsupervised chil-
dren. Leaving children unattend-
ed in a vehicle with a manual
ignition key or a smart key is
dangerous. Children copy adults
and they could place the key in
the ignition switch or press the
start button. The key would
enable children to operate power
windows or other controls, or
even make the vehicle move,
which could result in serious
bodily injury or death. result in
serious bodily injury or death.
Page 91 of 556
411
Features of your vehicle
Record your key number
The key code num-
ber is stamped on
the key code tag
attached to the key
set. Should you
lose your keys, this number will
enable an authorized Kia dealer to
duplicate the keys easily. Remove
the key code tag and store it in a safe
place. Also, record the key code
number and keep it in a safe and
handy place, but not in the vehicle.
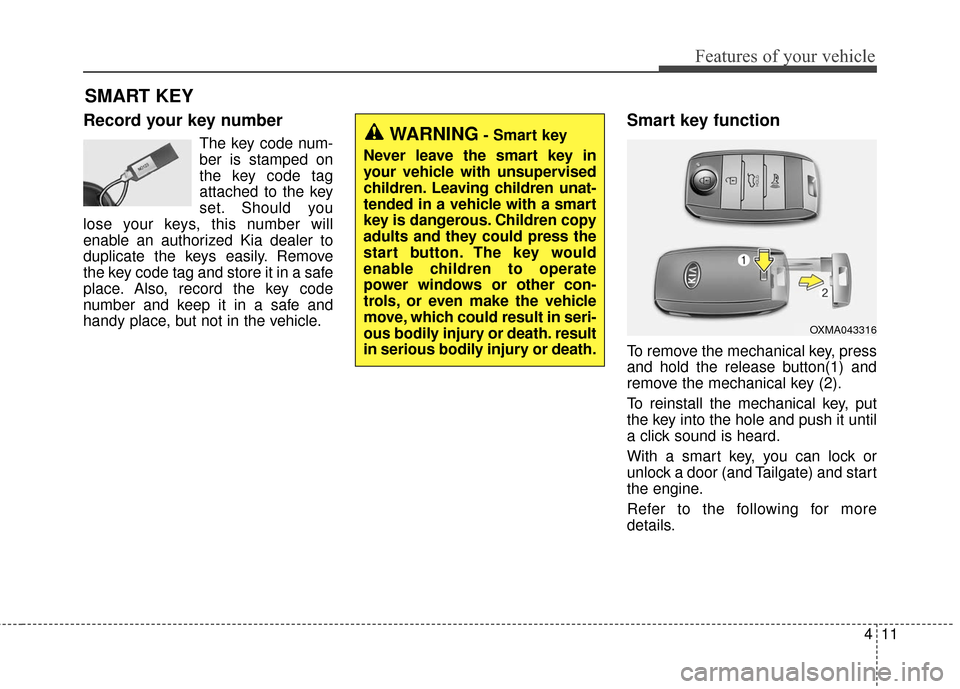
Smart key function
To remove the mechanical key, press
and hold the release button(1) and
remove the mechanical key (2).
To reinstall the mechanical key, put
the key into the hole and push it until
a click sound is heard.
With a smart key, you can lock or
unlock a door (and Tailgate) and start
the engine.
Refer to the following for more
details.
SMART KEY
OXMA043316
WARNING- Smart key
Never leave the smart key in
your vehicle with unsupervised
children. Leaving children unat-
tended in a vehicle with a smart
key is dangerous. Children copy
adults and they could press the
start button. The key would
enable children to operate
power windows or other con-
trols, or even make the vehicle
move, which could result in seri-
ous bodily injury or death. result
in serious bodily injury or death.
Page 100 of 556
Features of your vehicle
20
4
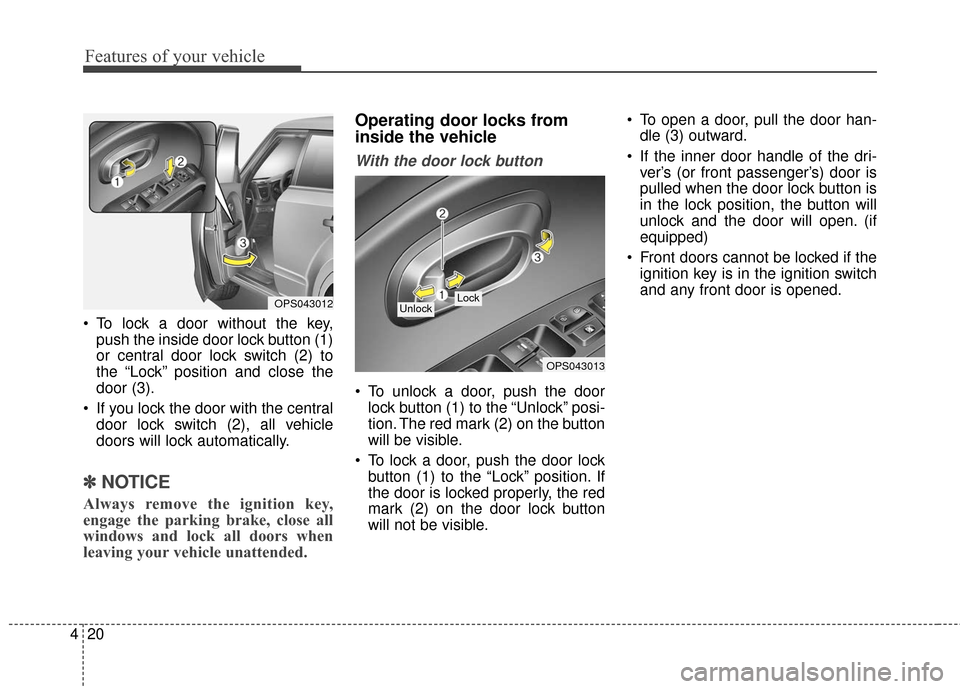
To lock a door without the key,
push the inside door lock button (1)
or central door lock switch (2) to
the “Lock” position and close the
door (3).
If you lock the door with the central door lock switch (2), all vehicle
doors will lock automatically.
✽ ✽ NOTICE
Always remove the ignition key,
engage the parking brake, close all
windows and lock all doors when
leaving your vehicle unattended.
Operating door locks from
inside the vehicle
With the door lock button
To unlock a door, push the door
lock button (1) to the “Unlock” posi-
tion. The red mark (2) on the button
will be visible.
To lock a door, push the door lock button (1) to the “Lock” position. If
the door is locked properly, the red
mark (2) on the door lock button
will not be visible. To open a door, pull the door han-
dle (3) outward.
If the inner door handle of the dri- ver’s (or front passenger’s) door is
pulled when the door lock button is
in the lock position, the button will
unlock and the door will open. (if
equipped)
Front doors cannot be locked if the ignition key is in the ignition switch
and any front door is opened.
OPS043012
OPS043013
Lock Unlock