KIA Sportage 2006 JE_ / 2.G Owner's Manual
Manufacturer: KIA, Model Year: 2006, Model line: Sportage, Model: KIA Sportage 2006 JE_ / 2.GPages: 354, PDF Size: 3.62 MB
Page 321 of 354
Maintenance32
7
1
2
3
4
5
6
7
8
9
For best battery service : Keep the battery securely mount-
ed.
Keep the battery top clean and dry.
Keep the terminals and connec- tions clean, tight, and coated with
petroleum jelly or terminal grease.
Rinse any spilled electrolyte from the battery immediately with a
solution of water and baking soda.
If the vehicle is not going to be used for an extended time, discon-
nect the battery cables.
Battery recharging Your vehicle has a maintenance-free,
calcium-based battery.
If the battery becomes dischargedin a short time (because, for exam-
ple, the headlights or interior lights
were left on while the vehicle was
not in use), recharge it by slow
charging (trickle) for 10 hours.
If the battery gradually discharges because of high electric load while
the vehicle is being used, recharge
it at 20-30A for two hours.
Items to be reset after the battery
has been discharged or the bat-
tery has been disconnected.
Clock (See page 3-98)
Sunroof (See page 3-100)
Trip computer (See page 4-42)
Compass (See page 4-54)
Climate control system (See pages 4-66)
Audio (See the audio manual)
1KMN5030
(Continued)
When lifting a plastic-cased battery, excessive pressure on
the case may cause battery
acid to leak, resulting in per-
sonal injury. Lift with a battery
carrier or with your hands on
opposite corners.
Never attempt to recharge the battery when the battery
cables are connected.
The electrical ignition system works with high voltage.
Never touch these compo-
nents with the engine running
or the ignition switched on.
Failure to follow the above
warnings can result in serious
bodily injury or death.
KM CAN (ENG) 7.qxd 7/29/05 9:41 AM Page 32
Page 322 of 354
733
Maintenance
1
2
3
4
5
6
7
8
9
✽ ✽NOTICE Before performing maintenance
or recharging the battery, turn off
all accessories and stop the engine.
The negative battery cable must be removed first and installed last
when the battery is disconnected.
WARNING
- Recharging
battery
When recharging the battery,
observe the following precau-
tions:
The battery must be removed from the vehicle and placed in
an area with good ventilation.
Do not allow cigarettes, sparks, or flame near the bat-
tery.
Watch the battery during charging, and stop or reduce
the charging rate if the battery
cells begin gassing (boiling)
violently or if the temperature
of the electrolyte of any cell
exceeds 49°C (120°F).
Wear eye protection when checking the battery during
charging.
(Continued)
(Continued)
Disconnect the battery charg-er in the following order.
1. Turn off the battery charger main switch.
2. Unhook the negative clamp from the negative battery ter-
minal.
3. Unhook the positive clamp from the positive battery ter-
minal.
KM CAN (ENG) 7.qxd 7/29/05 9:41 AM Page 33
Page 323 of 354
Maintenance34
7
1
2
3
4
5
6
7
8
9
TIRES AND WHEELSTires care For proper maintenance, safety, and
maximum fuel economy, you must
always maintain recommended tire
inflation pressures and stay within
the load limits and weight distribution
recommended for your vehicle.Inflation pressures All tire pressures (including the
spare) should be checked every day
when the tires are cold. “Cold Tires”
means the vehicle has not been driv-
en for at least three hours or driven
less than 1.6 km (one mile).
Recommended pressures must be
maintained for the best ride, top vehi-
cle handling, and minimum tire wear. All specifications (sizes and pres-
sures) can be found on a label
attached to the front driver’s door sill.
✽ ✽
NOTICE Underinflation also results in
excessive wear, poor handling and
reduced fuel economy. Wheel
deformation also is possible. Keep
your tire pressures at the proper
levels. If a tire frequently needs
refilling, have it checked by an
Authorized Kia Dealer.
Overinflation produces a harsh ride, excessive wear at the center
of the tire tread, and a greater
possibility of damage from road
hazards.
1KMN5045
WARNING -
Tire underin-
flation
Severe underinflation (10 psi (70
kPa) or more) can lead to severe
heat build-up, causing blowouts,
tread separation and other tire
failures that can result in the
loss of vehicle control leading
to severe injury or death. This
risk is much higher on hot days
and when driving for protracted
periods at high speeds.
KM CAN (ENG) 7.qxd 7/29/05 9:41 AM Page 34
Page 324 of 354
735
Maintenance
1
2
3
4
5
6
7
8
9
✽ ✽NOTICE Warm tires normally exceed rec-
ommended cold tire pressures by
28 to 41 kPa (4 to 6 psi). Do not
release air from warm tires to
adjust the pressure or the tires will
be underinflated.
Be sure to reinstall the tire infla- tion valve caps. Without the valve
cap, dirt or moisture could get into
the valve core and cause air leak-
age. If the cap have been lost,
install new one as soon as possible.
Checking tire inflation pres-
sureCheck your tires once a month or
more.
Also, check the tire pressure of the
spare tire.
How to check
Use a good quality gage to check tire
pressure. You can not tell if your tires
are properly inflated simply by look-
ing at them. Radial tires may look
properly inflated even when they're
underinflated.
Check the tire's inflation pressure
when the tires are cold. - "Cold"
means your vehicle has been sitting
for at least three hours or driven no
more than 1.6 km (1 mile).
WARNING
- Tire Inflation
Overinflation or underinflation
can reduce tire life, adversely
affect vehicle handling, and lead
to sudden tire failure. This could
result in loss of vehicle control
and potential injury..
CAUTION -
Tire pressure
Always observe the following:
• Check tire pressure when the tires are cold. (After vehicle
has been parked for at least
three hours or hasn't been
driven more than 1.6 km (one
mile) since startup.)
Check the pressure of your spare tire each time you check
the pressure of other tires.
Never overload your vehicle. Be careful not to overload a
vehicle luggage rack if your
vehicle is equipped with one.
Worn, old tires can cause acci- dents. If your tread is badly
worn, or if your tires have
been damaged, replace them.
KM CAN (ENG) 7.qxd 7/29/05 9:41 AM Page 35
Page 325 of 354
Maintenance36
7
1
2
3
4
5
6
7
8
9
Remove the valve cap from the tire
valve stem. Press the tire gage firm-
ly onto the valve to get a pressure
measurement. If the cold tire inflation
pressure matches the recommended
pressure on the tire and loading
information label, no further adjust-
ment is necessary. If the pressure is
low, add air until you reach the rec-
ommended amount.
If you overfill the tire, release air by
pushing on the metal stem in the
center of the tire valve. Recheck the
tire pressure with the tire gage. Be
sure to put the valve caps back on
the valve stems. They help prevent
leaks by keeping out dirt and mois-
ture.
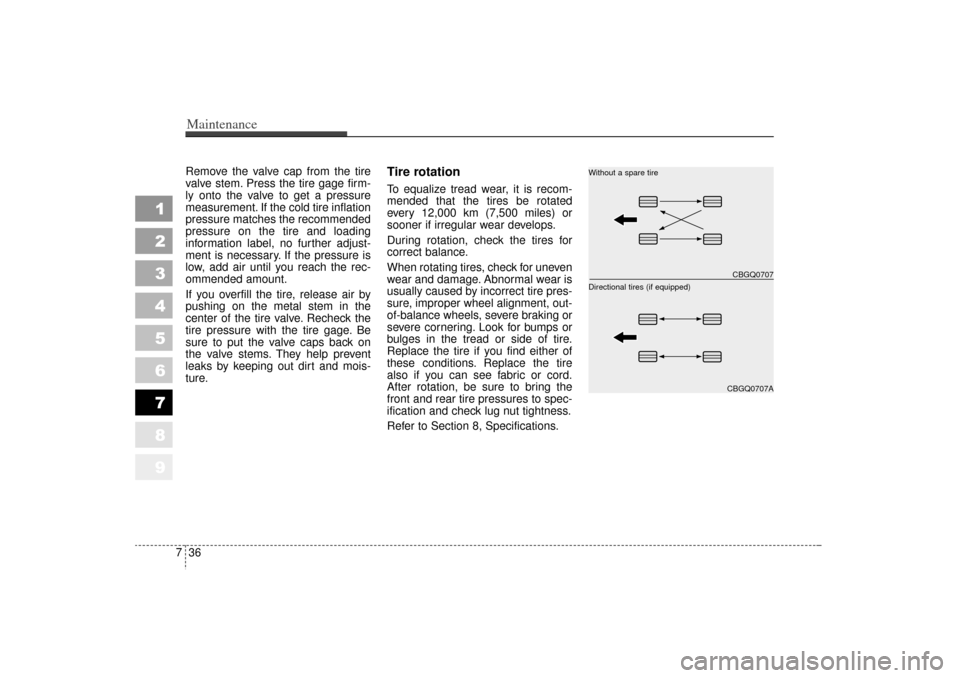
Tire rotation To equalize tread wear, it is recom-
mended that the tires be rotated
every 12,000 km (7,500 miles) or
sooner if irregular wear develops.
During rotation, check the tires for
correct balance.
When rotating tires, check for uneven
wear and damage. Abnormal wear is
usually caused by incorrect tire pres-
sure, improper wheel alignment, out-
of-balance wheels, severe braking or
severe cornering. Look for bumps or
bulges in the tread or side of tire.
Replace the tire if you find either of
these conditions. Replace the tire
also if you can see fabric or cord.
After rotation, be sure to bring the
front and rear tire pressures to spec-
ification and check lug nut tightness.
Refer to Section 8, Specifications.
CBGQ0707CBGQ0707A
Without a spare tire
Directional tires (if equipped)
KM CAN (ENG) 7.qxd 7/29/05 9:41 AM Page 36
Page 326 of 354
737
Maintenance
1
2
3
4
5
6
7
8
9
Disc brake pads should be inspected
for wear whenever tires are rotated.
Rotate radial tires that have an
asymmetric tread pattern only
from front to rear and not from
right to left.
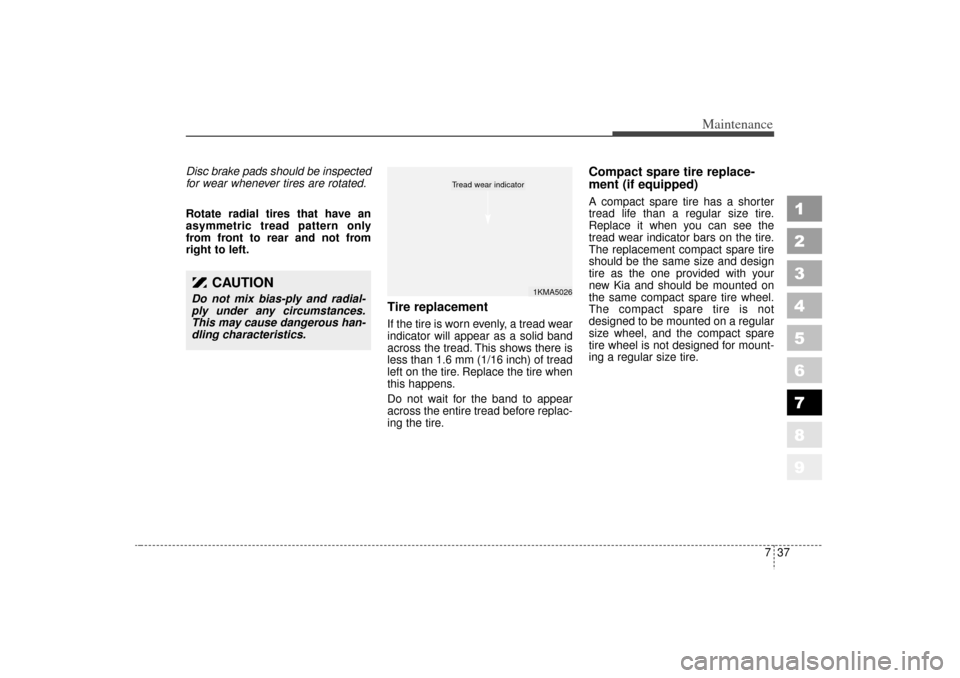
Tire replacementIf the tire is worn evenly, a tread wear
indicator will appear as a solid band
across the tread. This shows there is
less than 1.6 mm (1/16 inch) of tread
left on the tire. Replace the tire when
this happens.
Do not wait for the band to appear
across the entire tread before replac-
ing the tire.
Compact spare tire replace-
ment (if equipped)A compact spare tire has a shorter
tread life than a regular size tire.
Replace it when you can see the
tread wear indicator bars on the tire.
The replacement compact spare tire
should be the same size and design
tire as the one provided with your
new Kia and should be mounted on
the same compact spare tire wheel.
The compact spare tire is not
designed to be mounted on a regular
size wheel, and the compact spare
tire wheel is not designed for mount-
ing a regular size tire.
1KMA5026
Tread wear indicator
CAUTION
Do not mix bias-ply and radial-
ply under any circumstances.
This may cause dangerous han-
dling characteristics.
KM CAN (ENG) 7.qxd 7/29/05 9:41 AM Page 37
Page 327 of 354
Maintenance38
7
1
2
3
4
5
6
7
8
9
Wheel alignment and tire
balance The wheels on your vehicle were
aligned and balanced carefully at the
factory to give you the longest tire life
and best overall performance.
In most cases, you will not need to
have your wheels aligned again.
However, if you notice unusual tire
wear or your vehicle pulling one way
or the other, the alignment may need
to be reset.
If you notice your vehicle vibrating
when driving on a smooth road, your
wheels may need to be rebalanced.✽ ✽
NOTICEImproper wheel weights can dam-
age your vehicle's aluminum wheels.
Use only approved wheel weights.
WARNING -
Replacing
tires
Driving on worn-out tires is very hazardous and will
reduce braking effectiveness,
steering accuracy, and trac-
tion.
Your vehicle is equipped with tires designed to provide for
safe ride and handling capa-
bility. Do not use a size and
type of tire and wheel that is
different from the one that is
originally installed on your
vehicle. It can affect the safety
and performance of your vehi-
cle, which could lead to han-
dling failure or rollover and
serious injury. When replacing
the tires, be sure to equip all
four tires with the tire and
wheel of the same size, type,
tread, brand and load-carrying
capacity. If you nevertheless
decide to equip your vehicle
with any tire/wheel combina-
tion not recommended by Kia
for off road driving, you
should not use these tires for
highway driving.
(Continued)
(Continued)
The use of any other tire sizeor type may seriously affect
ride, handling, ground clear-
ance, stopping distance, body
to tire clearance, snow tire
clearance, and speedometer
reliability.
It is best to replace all four tires at the same time. If that is
not possible, or necessary,
then replace the two front or
two rear tires as a pair.
Replacing just one tire can
seriously affect your vehicle’s
handling.
KM CAN (ENG) 7.qxd 7/29/05 9:41 AM Page 38
Page 328 of 354
739
Maintenance
1
2
3
4
5
6
7
8
9
Wheel replacement When replacing the metal wheels for
any reason, make sure the new
wheels are equivalent to the original
factory units in diameter, rim width
and offset.
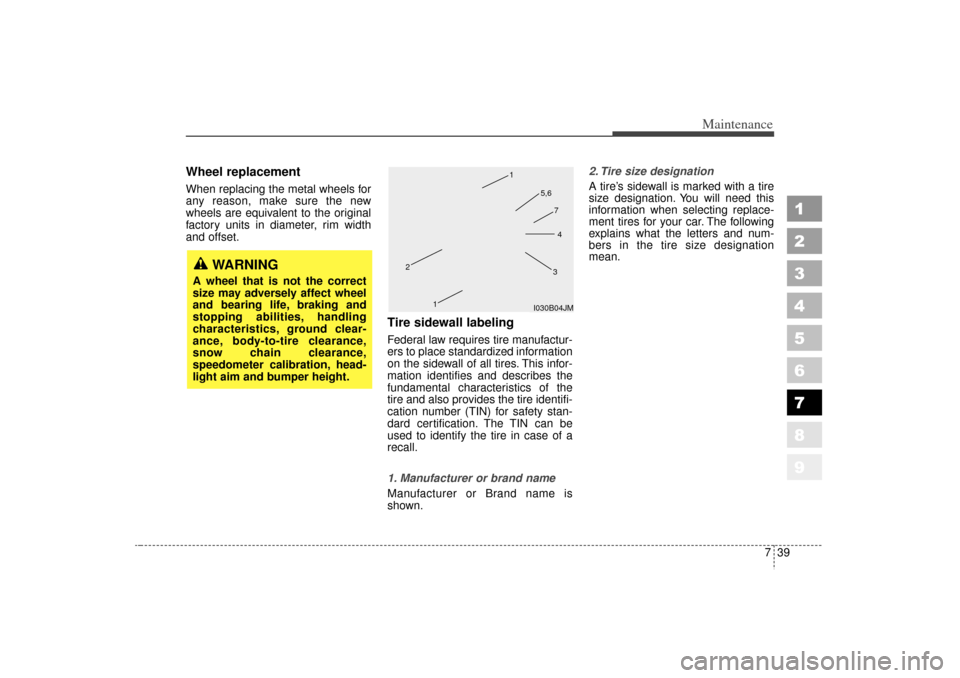
Tire sidewall labelingFederal law requires tire manufactur-
ers to place standardized information
on the sidewall of all tires. This infor-
mation identifies and describes the
fundamental characteristics of the
tire and also provides the tire identifi-
cation number (TIN) for safety stan-
dard certification. The TIN can be
used to identify the tire in case of a
recall.
1. Manufacturer or brand name
Manufacturer or Brand name is
shown.2. Tire size designation
A tire’s sidewall is marked with a tire
size designation. You will need this
information when selecting replace-
ment tires for your car. The following
explains what the letters and num-
bers in the tire size designation
mean.
WARNING
A wheel that is not the correct
size may adversely affect wheel
and bearing life, braking and
stopping abilities, handling
characteristics, ground clear-
ance, body-to-tire clearance,
snow chain clearance,
speedometer calibration, head-
light aim and bumper height.
I030B04JM
1
1
2
34
5,6
7
KM CAN (ENG) 7.qxd 7/29/05 9:41 AM Page 39
Page 329 of 354
Maintenance40
7
1
2
3
4
5
6
7
8
9
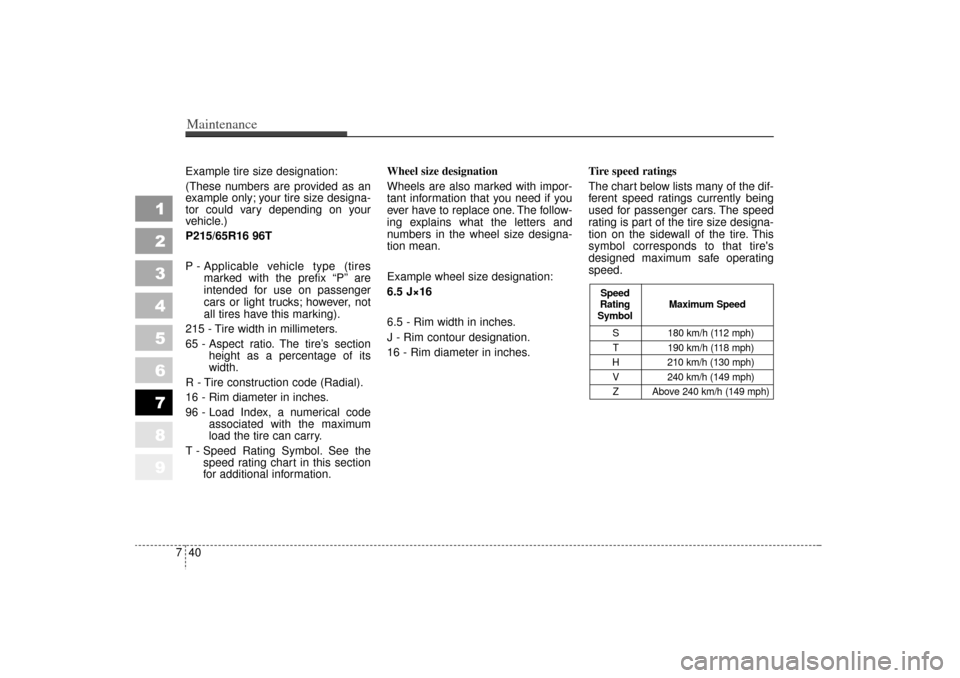
Example tire size designation:
(These numbers are provided as an
example only; your tire size designa-
tor could vary depending on your
vehicle.)
P215/65R16 96T
P - Applicable vehicle type (tires
marked with the prefix “P’’ are
intended for use on passenger
cars or light trucks; however, not
all tires have this marking).
215 - Tire width in millimeters.
65 - Aspect ratio. The tire’s section height as a percentage of its
width.
R - Tire construction code (Radial).
16 - Rim diameter in inches.
96 - Load Index, a numerical code associated with the maximum
load the tire can carry.
T - Speed Rating Symbol. See the speed rating chart in this section
for additional information. Wheel size designation
Wheels are also marked with impor-
tant information that you need if you
ever have to replace one. The follow-
ing explains what the letters and
numbers in the wheel size designa-
tion mean.
Example wheel size designation:
6.5 J×16
6.5 - Rim width in inches.
J - Rim contour designation.
16 - Rim diameter in inches.
Tire speed ratings
The chart below lists many of the dif-
ferent speed ratings currently being
used for passenger cars. The speed
rating is part of the tire size designa-
tion on the sidewall of the tire. This
symbol corresponds to that tire's
designed maximum safe operating
speed.
S 180 km/h (112 mph)
T 190 km/h (118 mph)
H 210 km/h (130 mph) V 240 km/h (149 mph)Z Above 240 km/h (149 mph)
Maximum Speed
Speed
Rating
Symbol
KM CAN (ENG) 7.qxd 7/29/05 9:41 AM Page 40
Page 330 of 354
741
Maintenance
1
2
3
4
5
6
7
8
9
3. Checking tire life (TIN : TireIdentification Number)
Any tires that are over 6 years, based
on the manufacturing date, tire
strength and performance, decline
with age naturally (even unused
spare tires). Therefore, the tires
(including the spare tire) should be
replaced by new ones. You can find
the manufacturing date on the tire
sidewall (possibly on the inside of the
wheel), displaying the DOT Code.
The DOT Code is a series of num-
bers on a tire consisting of numbers
and English letters. The manufactur-
ing date is designated by the last four
digits (characters) of the DOT code.
DOT : XXXX XXXX OOOO
The front part of the DOT means a
plant code number, tire size and
tread pattern and the last four num-
bers indicate week and year manu-
factured.
For example:
DOT XXXX XXXX 1602 represents
that the tire was produced in the 16th
week of 2002. 4. Tire ply composition and mate-
rial
The number of layers or plies of rub-
bercoated fabric in the tire. Tire man-
ufacturers also must indicate the
materials in the tire, which include
steel, nylon, polyester, and others.
The letter "R" means radial ply con-
struction; the letter "D" means diago-
nal or bias ply construction; and the
letter "B" means belted-bias ply con-
struction.
WARNING -
Tire age
A tire, more than 6 years old,
may sustain separation of cord
layers, inside the tire. Tire fail-
ure, due to separation of cord,
can cause serious accidents
and injuries.
Make sure to check the manu-
facturing date of the tire and
replace it within 6 years of that
date.
KM CAN (ENG) 7.qxd 7/29/05 9:41 AM Page 41