warning light KIA Sportage 2008 JE_ / 2.G Owner's Guide
[x] Cancel search | Manufacturer: KIA, Model Year: 2008, Model line: Sportage, Model: KIA Sportage 2008 JE_ / 2.GPages: 350, PDF Size: 6.42 MB
Page 103 of 350

Knowing your vehicle
94 3
1
2
3
4
5
6
7
8
9
Cigarette lighter
To use the cigarette lighter, pull the
assembly cover out.
To operate the cigarette lighter, press
it in and release it. When it is heated,
it automatically pops out ready for
use.
If the engine is not running, the igni-
tion switch must be in the ACC posi-
tion for the lighter to operate.
✽
NOTICE
• Do not hold the lighter in after it is
already heated because it will
overheat.
• Only a genuine Kia lighter should
be used in the cigarette lighter
socket. The use of plug-in acces-
sories (shavers, hand-held vacu-
ums, and coffee pots, for example)
may damage the socket or cause
electrical failure.
• If the lighter does not pop out
within 30 seconds, remove it to
prevent overheating.
Ashtrays
Front
To use the ashtray, pull the assembly
cover out.
To remove the ashtray to empty or
clean it, lift it upward and pull it out.
INTERIOR FEATURES
WARNING- Ashtray use
• Do not use the vehicle’s ash-
trays as waste receptacles.
• Putting lit cigarettes or match-
es in an ashtray with other
combustible materials may
cause a fire.
1KMA21591KMA2160
Page 111 of 350

Knowing your vehicle
102 3
1
2
3
4
5
6
7
8
9
Sunshade
The sunshade will be opened with
the glass panel automatically when
the glass panel is slid. You will have
to close it manually if you want it
closed.
✽
NOTICE
• Do not press any sunroof control
button longer than necessary.
Damage to the motor or system
components could occur.
• Periodically remove any dirt that
may accumulate on the guide rail.
• If you try to open the sunroof
when the temperature is below
freezing or when the sunroof is
covered with snow or ice, the glass
or the motor could be damaged.
• The sunroof is made to slide
together with sunshade. Do not
leave the sunshade closed while
the sunroof is open.
In case of an emergency
If the sunroof does not open electri-
cally:
1. Remove the interior light lens by
using a flat blade screwdriver.
1KMA20301KMA2033
WARNING - Sunroof
• Do not extend face or arms
outside through the sunroof
opening while driving.
• Make sure hand and face are
safely out of the way before
closing a sunroof.
Page 119 of 350

1
2
3
4
5
6
7
8
9Ignition switch / 4-2
Starting the engine / 4-4
Manual transaxle / 4-5
Automatic transaxle / 4-6
Four wheel drive (4WD) / 4-12
Brake system / 4-18
Steering wheel / 4-25
Cruise control system / 4-28
Traction control system / 4-33
Electronic stability control / 4-36
Instrument cluster / 4-39
Gauges / 4-40
Warnings and indicators / 4-46
Compass / 4-54
Lighting / 4-57
Wipers and washers / 4-61
Defroster / 4-64
Hazard warning flasher / 4-65
Manual climate control system / 4-66
Automatic climate control system / 4-75
Windshield defrosting and defogging / 4-88
Driving your vehicle
10
Page 120 of 350
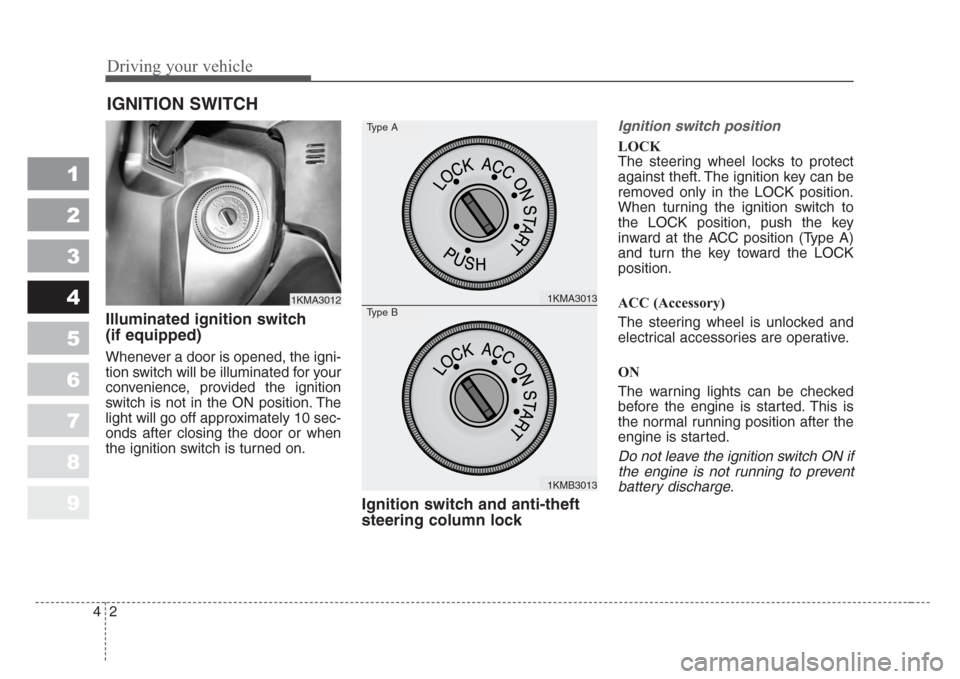
Driving your vehicle
2 4
1
2
3
4
5
6
7
8
9
Illuminated ignition switch
(if equipped)
Whenever a door is opened, the igni-
tion switch will be illuminated for your
convenience, provided the ignition
switch is not in the ON position. The
light will go off approximately 10 sec-
onds after closing the door or when
the ignition switch is turned on.
Ignition switch and anti-theft
steering column lock
Ignition switch position
LOCK
The steering wheel locks to protect
against theft. The ignition key can be
removed only in the LOCK position.
When turning the ignition switch to
the LOCK position, push the key
inward at the ACC position (Type A)
and turn the key toward the LOCK
position.
ACC (Accessory)
The steering wheel is unlocked and
electrical accessories are operative.
ON
The warning lights can be checked
before the engine is started. This is
the normal running position after the
engine is started.
Do not leave the ignition switch ON if
the engine is not running to prevent
battery discharge.
IGNITION SWITCH
1KMA30121KMA3013
1KMB3013
Type A
Type B
Page 123 of 350

Manual transaxle operation
The manual transaxle has five for-
ward gears.
Press the clutch pedal down fully
while shifting, then release it slowly.
A special safety feature prevents
inadvertent shifting from 5 (Fifth) to
R (Reverse). The gearshift lever must
be returned to the neutral position
before shifting into R (Reverse).
Make sure the vehicle is completely
stopped before shifting into R
(Reverse).
Never operate the engine with the
tachometer (rpm) in the red zone.
✽
NOTICE
To avoid premature clutch wear and
damage, do not drive with your foot
resting on the clutch pedal. Also,
don’t use the clutch to hold the vehi-
cle stopped on an upgrade, while
waiting for a traffic light, etc.
Downshifting
When you must slow down in heavy
traffic or while driving up steep hills,
downshift before the engine starts to
labor. Downshifting reduces the
chance of stalling and gives better
acceleration when you again need to
increase your speed. When the vehi-
cle is traveling down steep hills,
downshifting helps maintain safe
speed and prolongs brake life.
MANUAL TRANSAXLE (IF EQUIPPED)
1KMA3052
WARNING- Manual
transaxle
Before leaving the driver’s seat,
always set the parking brake
fully and shut the engine off.
Then make sure the transaxle is
shifted into 1
stgear when the
vehicle is parked on a level or
uphill grade, and shifted into R
(Reverse) on a downhill grade.
Unexpected and sudden vehicle
movement can occur if these
precautions are not followed in
the order identified.
45
Driving your vehicle
1
2
3
4
5
6
7
8
9
Page 132 of 350

Driving your vehicle
14 4
1
2
3
4
5
6
7
8
9
For safe four-wheel drive oper-
ation
• Do not try to drive in deep standing
water or mud since such conditions
can stall your engine and clog your
exhaust pipes. Do not drive down
steep hills since it requires extreme
skill to maintain control of the vehi-
cle.• When you are driving up or down
hills drive as close to straight up
and down the hill as possible. Use
extreme caution in going up or
down steep hills, since you may flip
your vehicle over depending on the
grade, terrain and water/mud con-
ditions.
WARNING - Hills
Driving across the contour of
steep hills can be extremely
dangerous.This danger can
come from slight changes in the
wheel angle which can destabi-
lize the vehicle or, even if the
vehicle is maintaining stability
under power,it can lose that
stability if the vehicle stops its
forward motion.Your vehicle
may roll over without warning
and without time for you to cor-
rect a mistake that could cause
serious injury or death.
WARNING - Four-wheel
driving
The conditions on-road or off-
road that demand four-wheel
drive mean all functions of your
vehicle are exposed to more
extreme stress than under nor-
mal road conditions.Slow down
and be ready for changes in the
composition and traction of the
surface under your tires.If you
have any doubt about the safety
of the conditions you are facing,
stop and consider the best way
to proceed.Do not exceed the
ability of yourself or your vehi-
cle to operate safely.
HILL1HILL2
Page 137 of 350

419
Driving your vehicle
1
2
3
4
5
6
7
8
9
Disc brakes wear indicator
Your vehicle has disc brakes.
When your brake pads are worn and
it's time for new pads, you will hear a
high-pitched warning sound from
your front brakes or rear brakes (if
equipped). You may hear this sound
come and go or it may occur when-
ever you depress the brake pedal.
Please remember that some dri-
ving conditions or climates may
cause a brake squeal when you
first apply (or lightly apply) the
brakes.This is normal and does
not indicate a problem with your
brakes.
✽
NOTICE
To avoid costly brake repairs, do not
continue to drive with worn brake
pads.
WARNING- Brake wear
This brake wear warning sound
means your vehicle needs ser-
vice.If you ignore this audible
warning, you will eventually lose
braking performance, which
could lead to a serious accident.
CAUTION
Always replace brake pads as
complete front or rear axle sets
to ensure smooth brake perfor-
mance.
(Continued)
• Wet brakes may result in the
vehicle not slowing down at
the usual rate and pulling to
one side when the brakes are
applied.After going through
water, apply the brakes lightly
to regain smooth braking per-
formance.
Page 138 of 350

Driving your vehicle
20 4
1
2
3
4
5
6
7
8
9
Parking brake
To apply the parking brake, pull the
parking brake handle fully and firmly
upward while applying the service
brake.To release the parking brake, pull the
handle up slightly and push the
release button, then lower the handle
to the released position while holding
the button in.
CAUTION
Driving with the parking brake
applied will cause excessive
brake pad and brake rotor wear.
1KMA30501KMA3051
WARNING- Parking brake
• To prevent unintentional
movement when stopped, do
not use just the gear shift
lever to hold the vehicle in
position.Set the parking
brake AND make sure the
gearshift lever is securely
positioned in 1st (First) gear
or R (Reverse) for manual
transaxle equipped vehicles
and in P (Park) for automatic
transaxle equipped vehicles.
• Never allow a person who is
unfamiliar with the vehicle or
children to touch the park
ing
brake.If the parking brake is
released unintentionally,seri-
ous injury may occur.
Page 139 of 350

421
Driving your vehicle
1
2
3
4
5
6
7
8
9
Check the brake warning light by
turning the ignition switch ON (do not
start the engine). This light will be
illuminated when the parking brake is
applied with the ignition switch in the
START or ON position.
Before driving, be sure the parking
brake is fully released and the brake
warning light is off.If the brake warning light remains on
after the parking brake is released,
there may be a malfunction in the
brake system. Immediate attention is
necessary.
If at all possible, cease driving the
vehicle immediately. If that is not pos-
sible, use extreme caution while
operating the vehicle and only con-
tinue to drive the vehicle until you
can reach a safe location or repair
shop.
Parking on curbed streets
• When parking your vehicle on an
uphill grade, park as close to the
curb as possible and turn the front
wheels away from the curb so that
the front wheels will contact the
curb if the vehicle moves back-
ward.
• When parking your vehicle on a
downhill grade, park as close to the
curb as possible and turn the front
wheels toward the curb so that the
front wheels will contact the curb if
the vehicle moves forward.
W-75
Page 141 of 350

423
Driving your vehicle
1
2
3
4
5
6
7
8
9
• Even with the anti-lock brake sys-
tem, your vehicle still requires suf-
ficient stopping distance. Always
maintain a safe distance from the
vehicle in front of you.
• Always slow down when cornering.
The anti-lock brake system cannot
prevent accidents resulting from
excessive speeds.
• On loose or uneven road surfaces,
operation of the anti-lock brake
system may result in a longer stop-
ping distance than for vehicles
equipped with a conventional
brake system.
✽
NOTICE
• If the ABS warning light is on and
stays on, you may have a problem
with the ABS system. In this case,
however, your regular brakes will
work normally.
• The ABS warning light will stay on
for approximately 3 seconds after
the ignition switch is ON. During
that time, the ABS will go through
self-diagnosis and the light will go
off if everything is normal. If the
light stays on, you may have a
problem with your ABS system.
Contact an authorized Kia dealer
as soon as possible.
✽
NOTICE
• When you drive on a road having
poor traction, such as an icy road,
and operate your brakes continu-
ously, the ABS will be active con-
tinuously and the ABS warning
light may illuminate. Pull your car
over to a safe place and stop the
engine.
• Restart the engine. If the ABS
warning light is off, then your ABS
system is normal. Otherwise, you
may have a problem with the ABS.
Contact an authorized Kia dealer
as soon as possible.
W-78