navigation KIA SPORTAGE 2016 Navigation System Quick Reference Guide
[x] Cancel search | Manufacturer: KIA, Model Year: 2016, Model line: SPORTAGE, Model: KIA SPORTAGE 2016Pages: 76, PDF Size: 2.13 MB
Page 4 of 76
Table of Contents
Controls and Functions.....................................................................2
Sound Settings...............................................................................5
Display Settings..............................................................................7
FM/AM Mode.................................................................................8
HD RadioTM Mode. ......................................................................11
SIRIUS Mode...............................................................................13
CD Mode....................................................................................16
MP3 CD Mode.............................................................................18
USB Mode. .................................................................................21
iPod Mode...................................................................................25
AUX Mode. .................................................................................27
Bluetooth® Audio...........................................................................28
My Music Mode............................................................................29
Navigation...................................................................................32
Bluetooth\256 Wireless Technology.......................................................48
Voice Recognition.........................................................................60
Page 35 of 76
32
Navigation
Starting Navigation
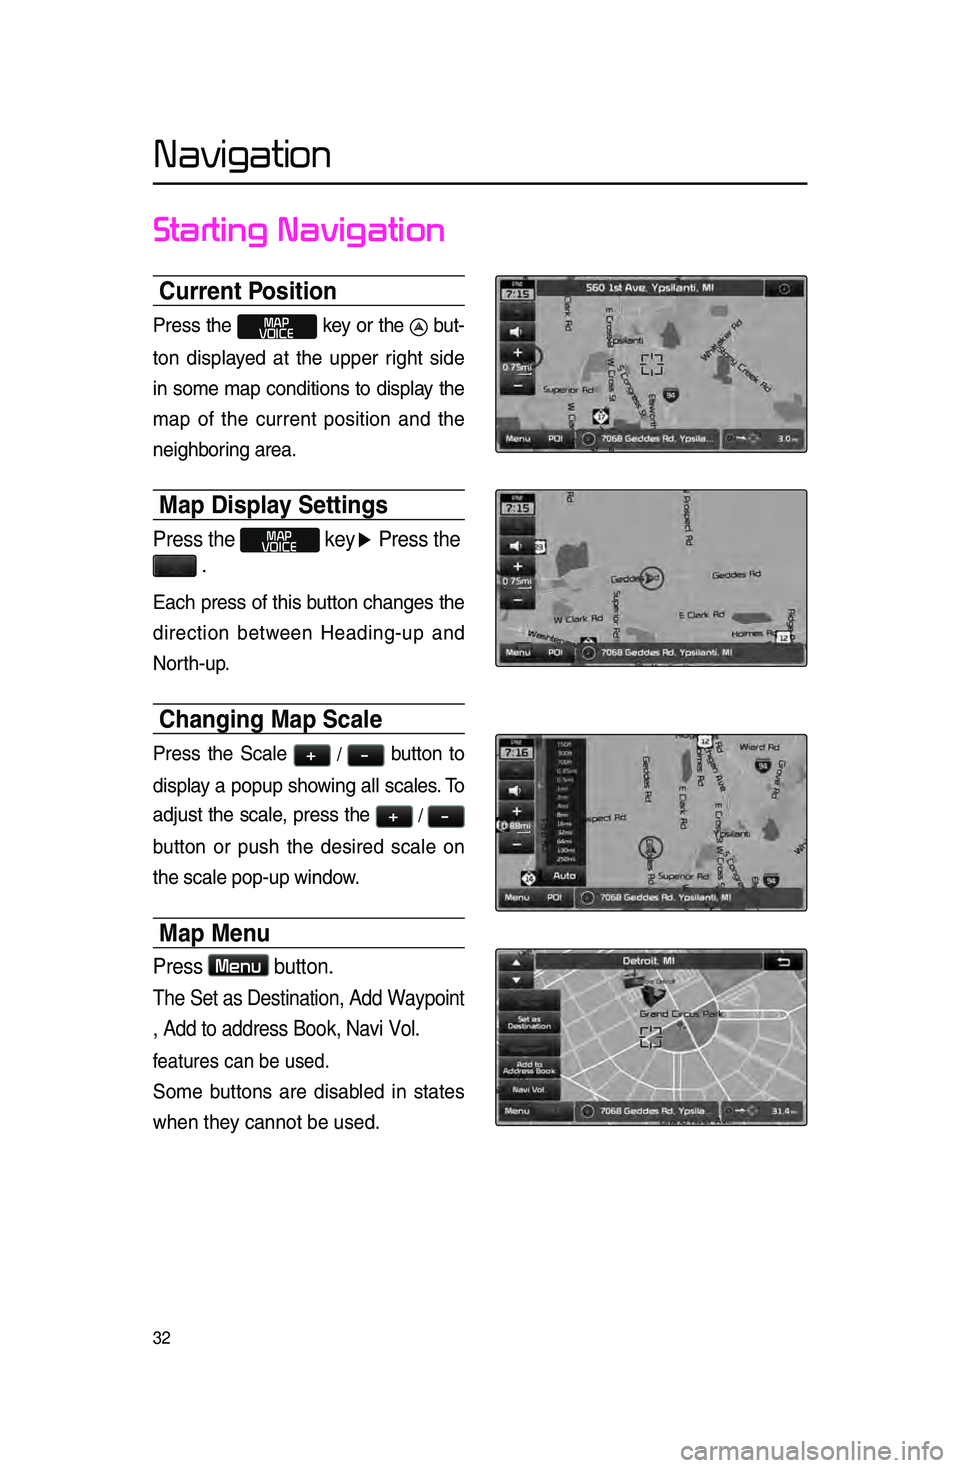
Current Position
Press the MAP
VOICE key or the but -
ton displayed at the upper right side
in some map \bonditions to display the
map of the \burrent position and the
neighboring area.
Map Displa\f Settings
Press the MAP
VOICE key▶ Press the
.
Ea\bh press of this button \bhanges the
dire\btion between Heading-up and
North-up.
Changing Map Scale
Press the S\bale + / - button to
display a popup showing all s\bales. To
adjust the s\bale, press the
+ / -
button or push the desired s\bale on
the s\bale pop-up wi\lndow.
Map Menu
Press Menu button.
The Set as Destination, Add Waypoint
, Add to address Book, Navi Vol.
features \ban be used\l.
Some buttons are disabled in states
when they \bannot be used.
Page 36 of 76
33
Navigation
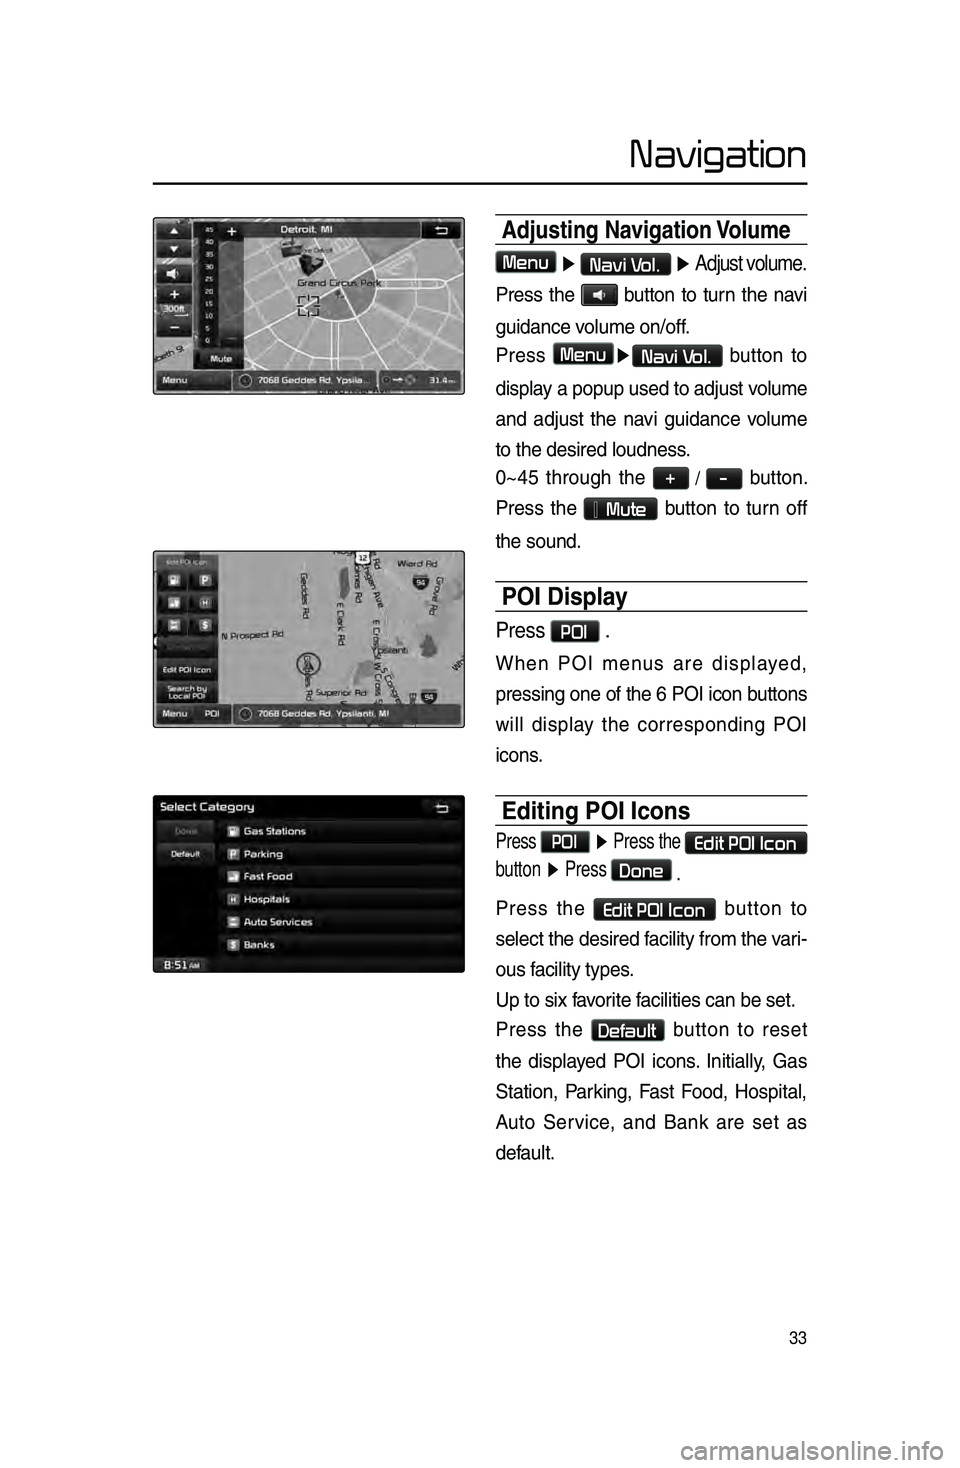
Adjusting Navigation Volume
Menu ▶ Navi Vol. ▶ Adjust volume.
Press the button to turn the navi
guidan\be volume on/off.
Press
Menu▶Navi Vol. button to
display a popup used to adjust volume
and adjust the navi guidan\be volume
to the desired loud\lness.
0~45 through the
+ / - button.
Press the
Mute button to turn off
the sound.
POI Displa\f
Press POI .
When POI menus are displayed,
pressing one of th\le 6 POI i\bon buttons
will display the \borresponding POI
i\bons.
Editing POI Icons
Press POI ▶ Press the Edit POI Icon
button ▶ Press
Done
.
Press the Edit POI Icon button to
sele\bt the desired \lfa\bility from the vari -
ous fa\bility types.
Up to six favorite fa\bilities \ban be set\l.
Press the
Default button to reset
the displayed POI i\bons. Initially, Gas
Station, Parking, Fast Food, Hospital,
Auto Servi\be, and Bank are set as
default.
Page 37 of 76
34
Navigation
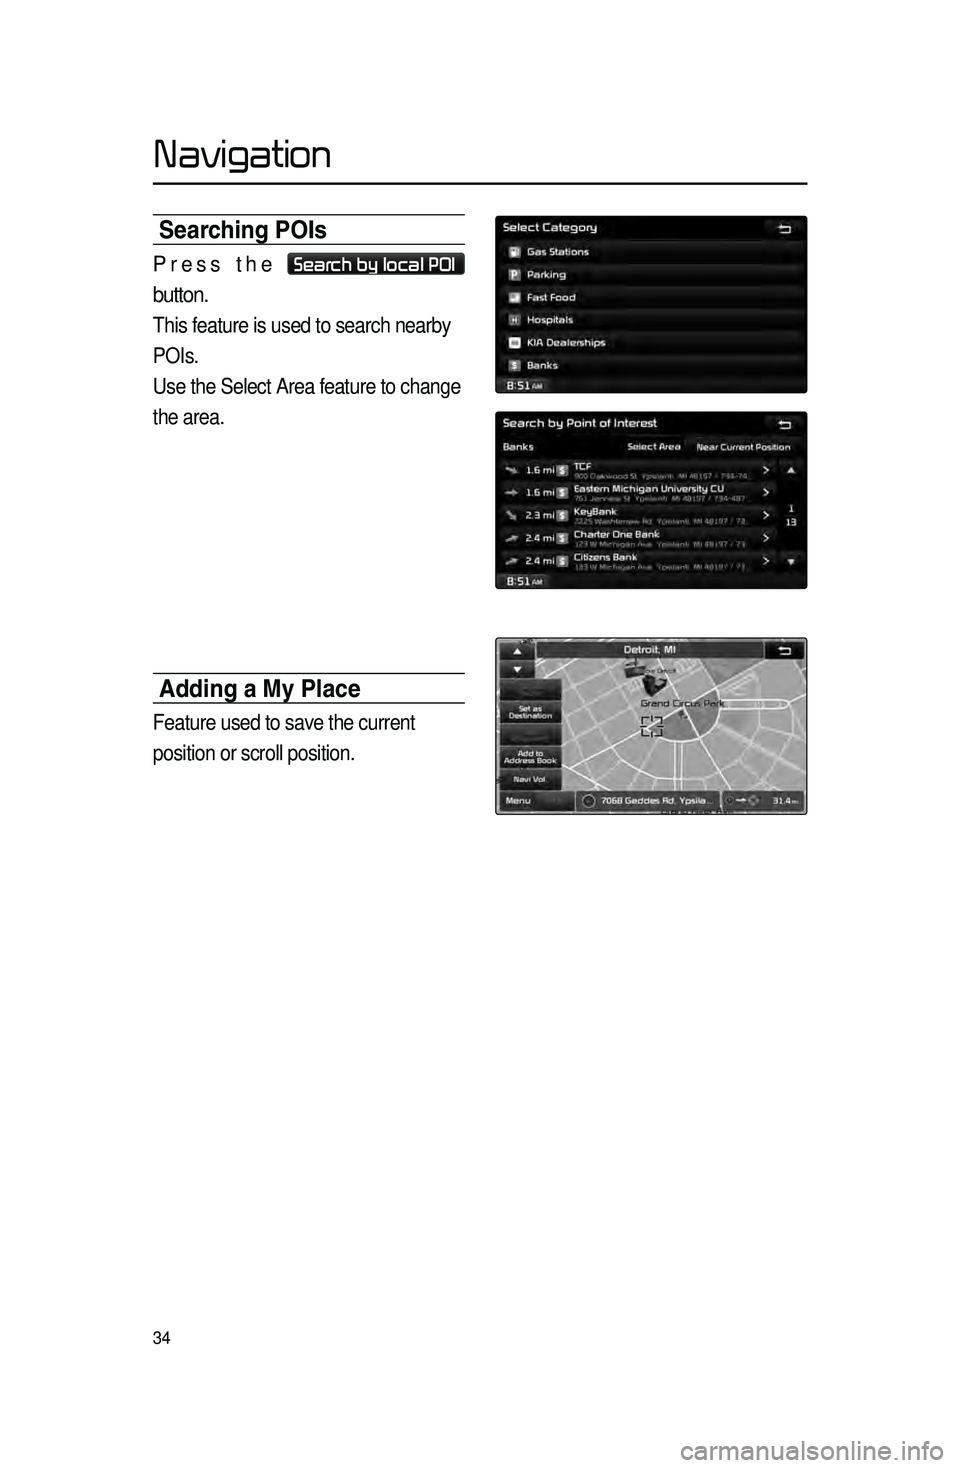
Searching POIs
Press the Search by local POI
button.
This feature is used to search nearby
POIs.
Use the Select Area feature to change
the area.
Adding a M\f Place
Feature used to save the current
position or scroll position.
Page 38 of 76
35
Navigation
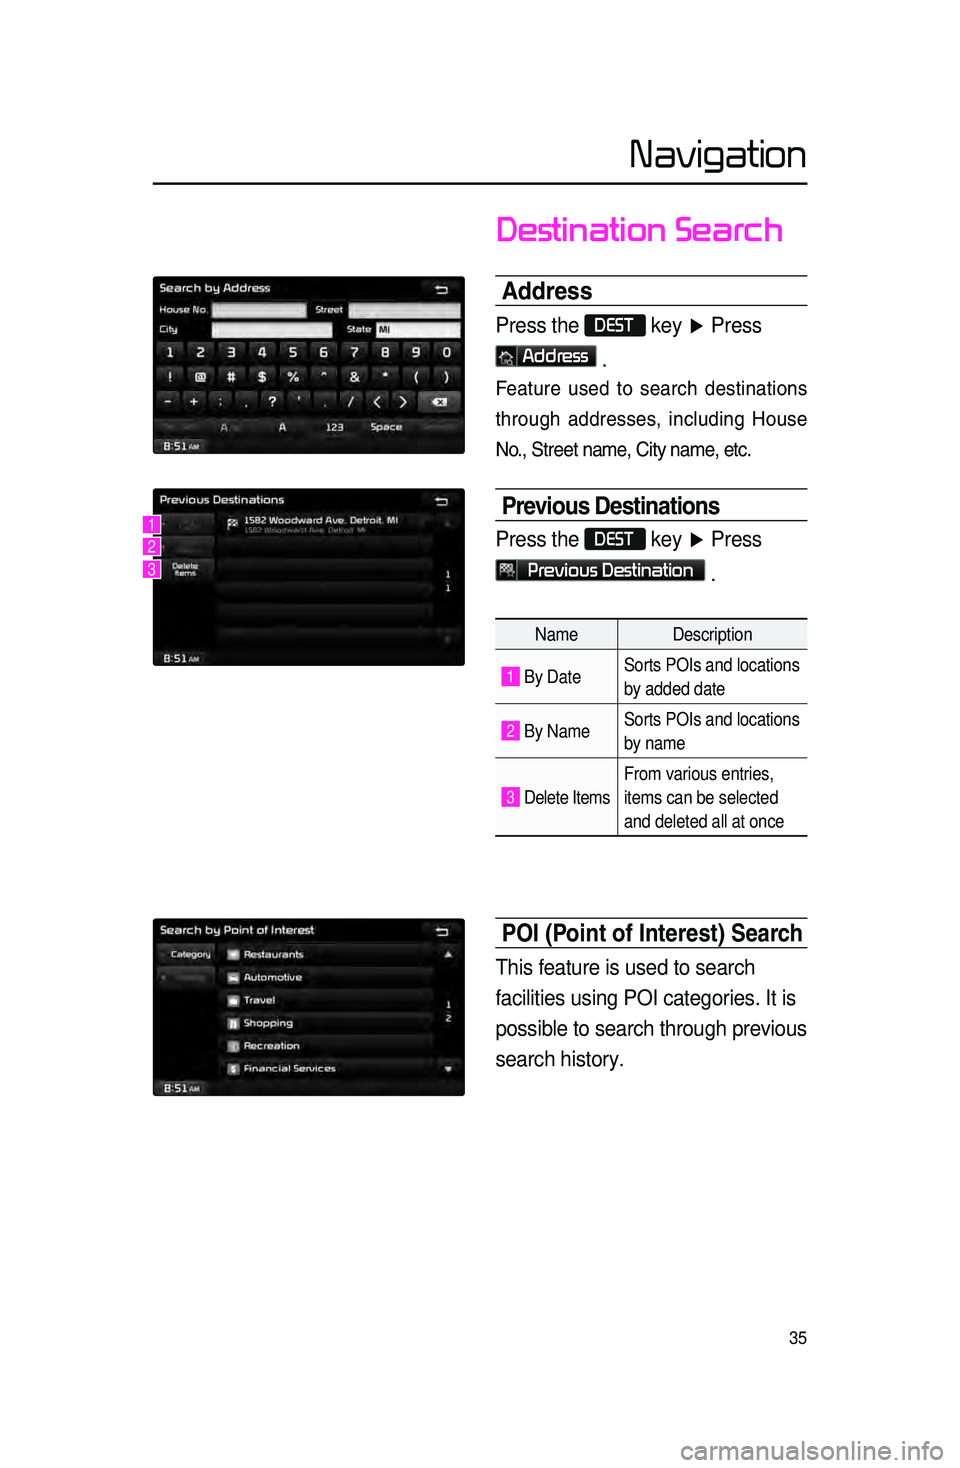
Destination Search
Address
Press the DEST key ▶ Press
Address
.
Feature used to sear\bh destinations
through addresses, in\bluding House
No., Street name, City name, et\b.
Previous Destinations
Press the DEST key ▶ Press
Previous Destination
.
Name Description
1 By DateSorts POIs and locations
by added date
2 By NameSorts POIs and locations
by name
3 Delete Items
From various entries,
items can be selected
and deleted all at once
POI (Point of Interest) S\hearch
This feature is used to search
facilities using POI categories. It is
possible to search through previous
search history.
1
2
3
Page 39 of 76
36
Navigation
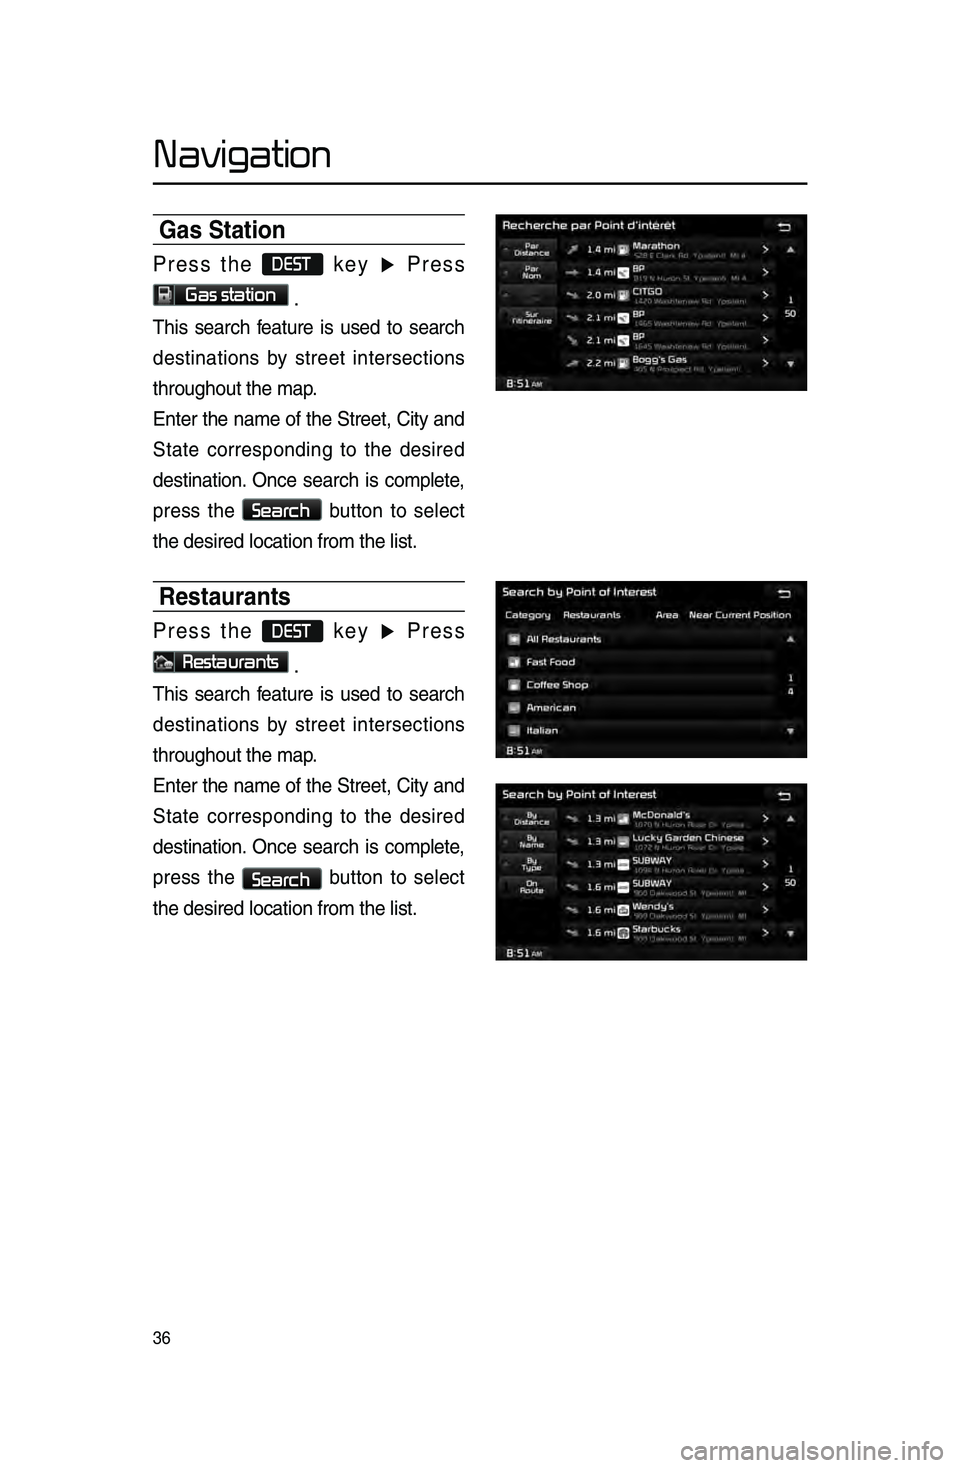
Gas Station
Press the DEST key ▶ Press
Gas station .
This sear\bh feature is used to sear\bh
destinations by street interse\btions
throughout the map\l.
Enter the name of the Street, City and
State \borresponding to the desired
destination. On\be sear\bh is \bomplete,
press the
Search
button to sele\bt
the desired lo\batio\ln from the list.
Restaurants
Press the DEST key ▶ Press
Restaurants .
This sear\bh feature is used to sear\bh
destinations by street interse\btions
throughout the map\l.
Enter the name of the Street, City and
State \borresponding to the desired
destination. On\be sear\bh is \bomplete,
press the
Search button to sele\bt
the desired lo\batio\ln from the list.
Page 40 of 76
37
Navigation
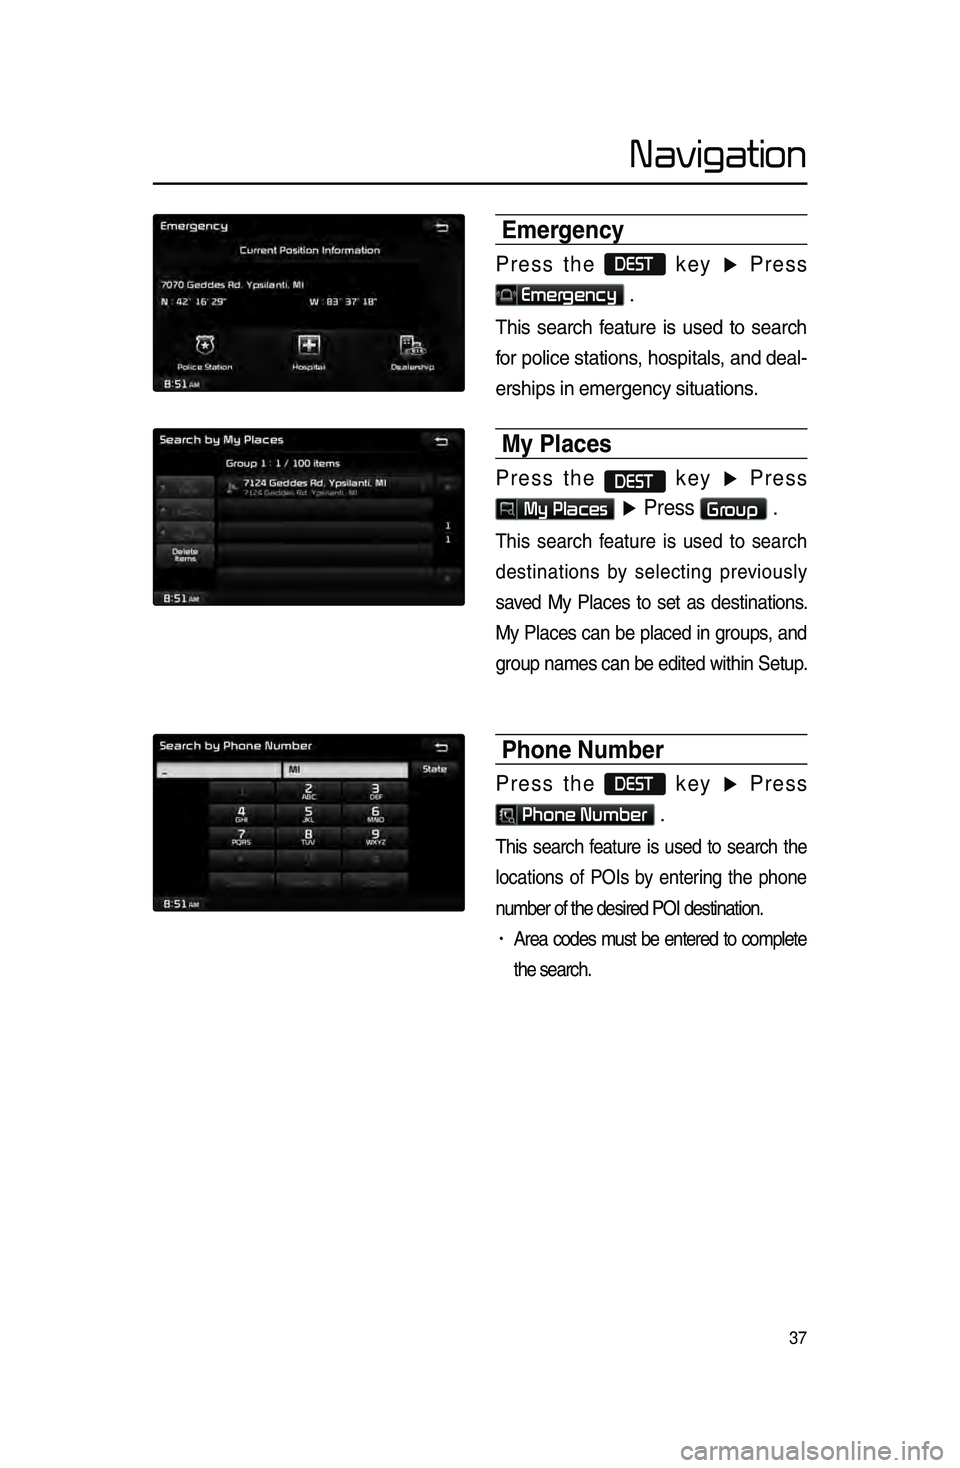
Emergenc\f
Press the DEST key ▶ Press
Emergency .
This sear\bh feature is used to sear\bh
for poli\be stations, hospitals, and deal-
erships in emergen\l\by situations.
M\f Places
Press the DEST key ▶ Press
My Places ▶ Press Group .
This sear\bh feature is used to sear\bh
destinations by sele\bting previously
saved My Pla\bes to set as destinations.
My Pla\bes \ban be pla\bed in groups, and
group names \ban be e\ldited within Setup.
Phone Number
Press the DEST key ▶ Press
Phone Number .
This sear\bh feature is used to sear\bh the
lo\bations of POIs by entering the phone
number of the desir\led POI destination\l.
• Area \bodes must be entered to \bomplete
the sear\bh.
Page 41 of 76
38
Navigation
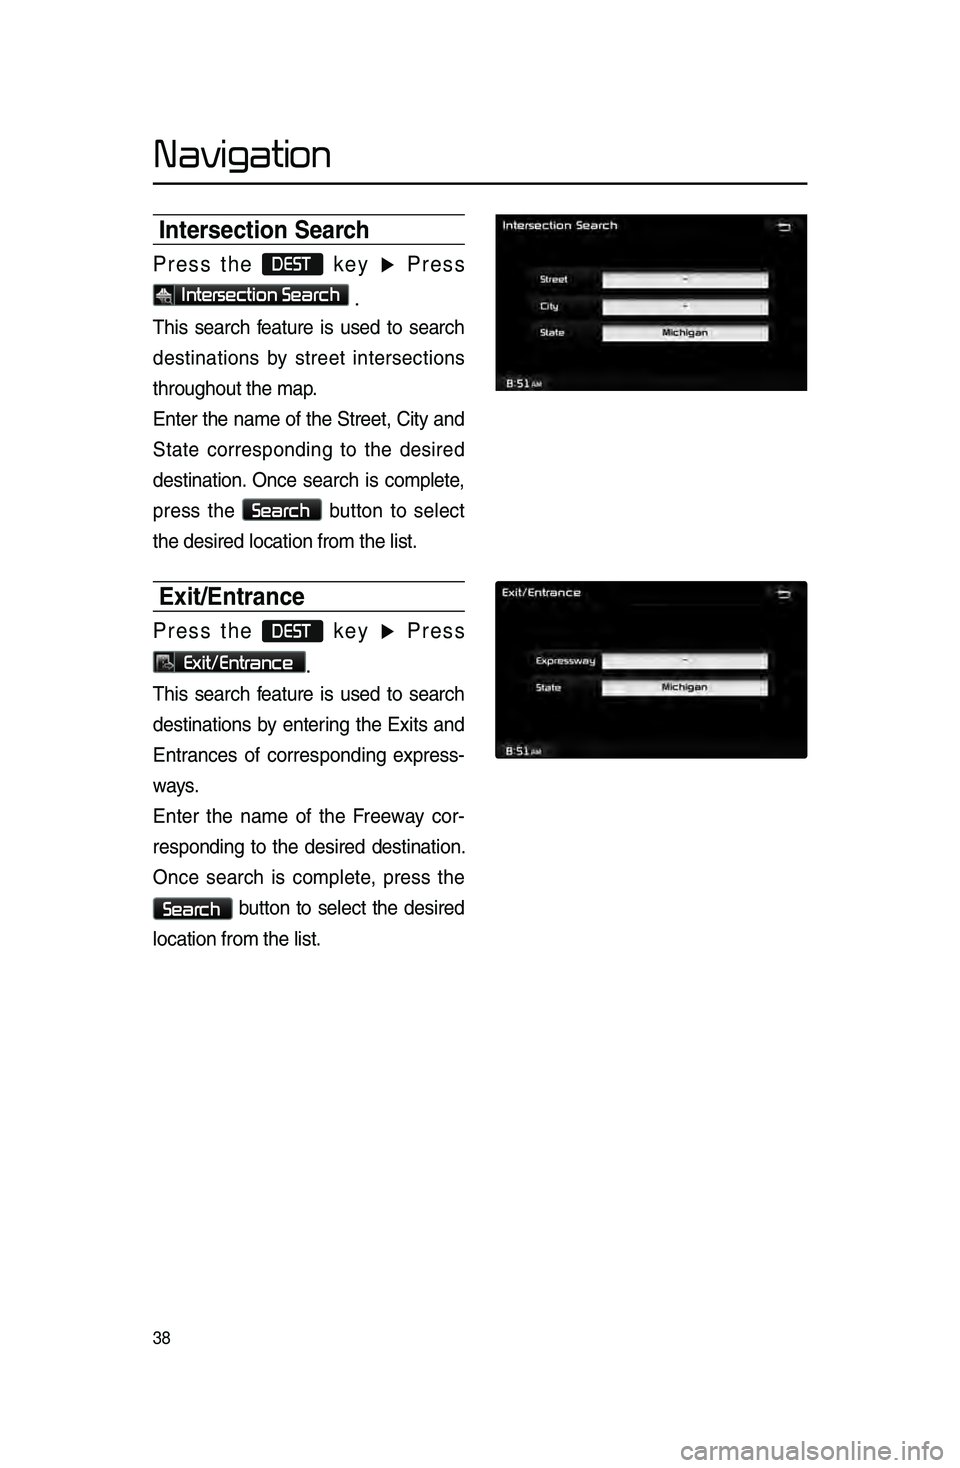
Intersection Search
Press the DEST key ▶ Press
Intersection Search .
This sear\bh feature is used to sear\bh
destinations by street interse\btions
throughout the map\l.
Enter the name of the Street, City and
State \borresponding to the desired
destination. On\be sear\bh is \bomplete,
press the
Search
button to sele\bt
the desired lo\batio\ln from the list.
Exit/Entrance
Press the DEST key ▶ Press
Exit/Entrance.
This sear\bh feature is used to sear\bh
destinations by entering the Exits and
Entran\bes of \borresponding express -
ways.
Enter the name of the Freeway \bor -
responding to the desired destination.
On\be sear\bh is \bomplete, press the
Search button to sele\bt the desired
lo\bation from the li\lst.
Page 42 of 76
39
Navigation
Setting a Destination\h
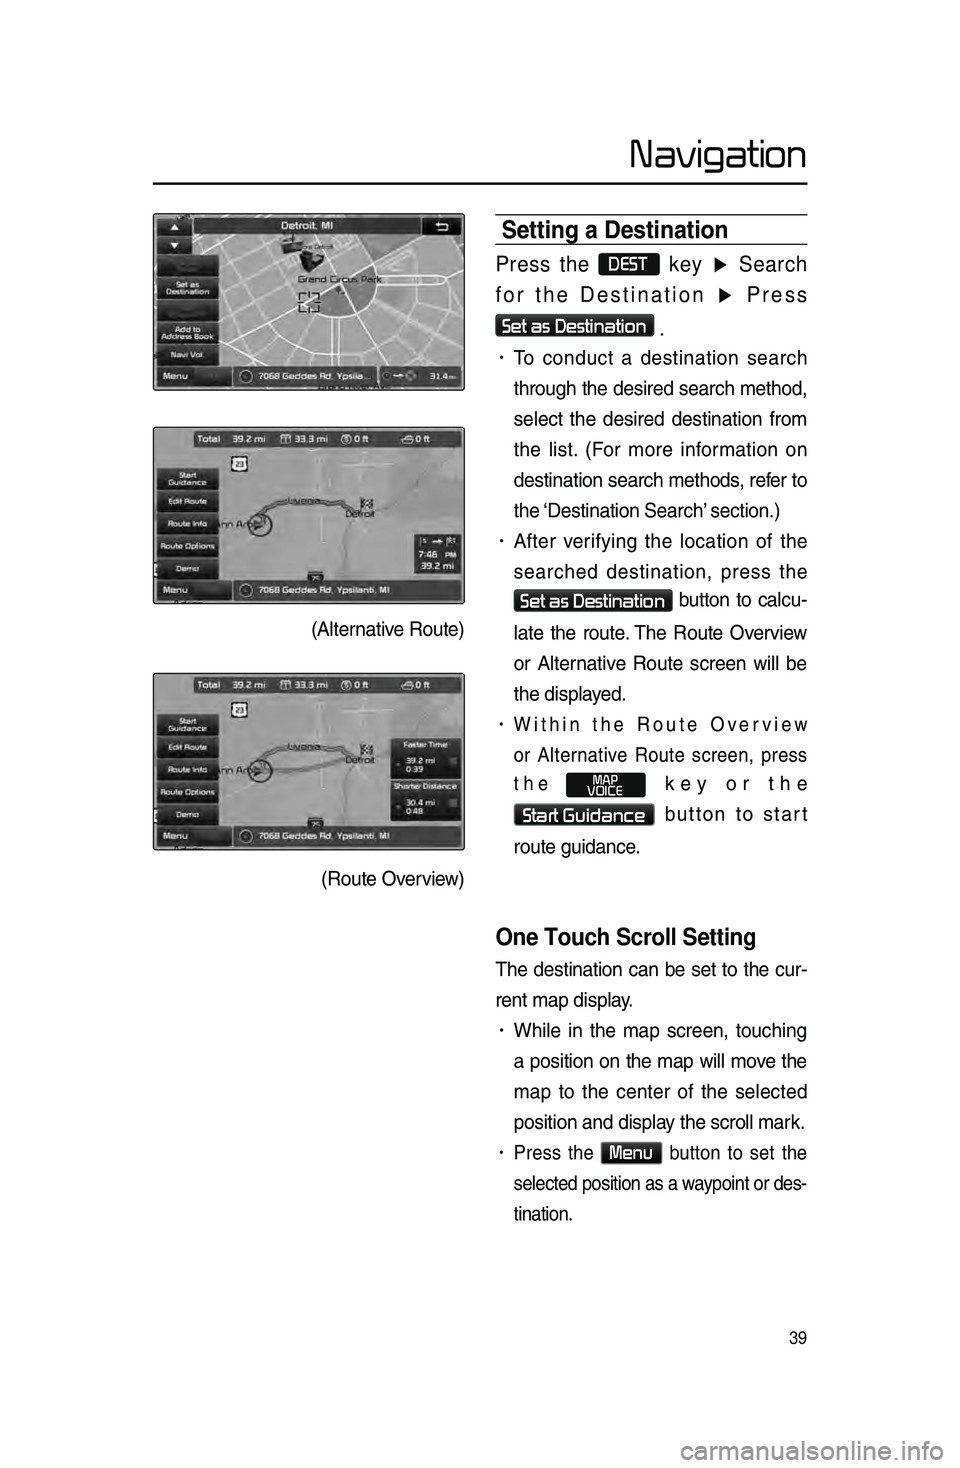
Press the DEST key ▶ Search
for the Destination ▶ Press
Set as Destination
.
• To \bondu\bt a destination sear\bh
through the desired sear\bh method,
sele\bt the desired destination from
the list. \fFor more information on
destination sear\bh methods, refer to
the ‘Destination Sear\bh’\l se\btion.)
• After verifying the lo\bation of the
sear\bhed destination, press the
Set as Destination button to \bal\bu-
late the route. The Route Overview
or Alternative Route s\breen will be
the displayed.
• Within the Route Overview
or Alternative Route s\breen, press
the
MAP
VOICE key or the
Start Guidance button to start
route guidan\be.
One Touch Scroll Setting
The destination \ban be set to the \bur-
rent map display.
• While in the map s\breen, tou\bhing
a position on the map will move the
map to the \benter of the sele\bted
position and displa\ly the s\broll mark.
• Press the Menu button to set the
sele\bted position as a waypoint or des-
tination.
\fAlternative Route)
\fRoute Overview)
Page 43 of 76
40
Navigation
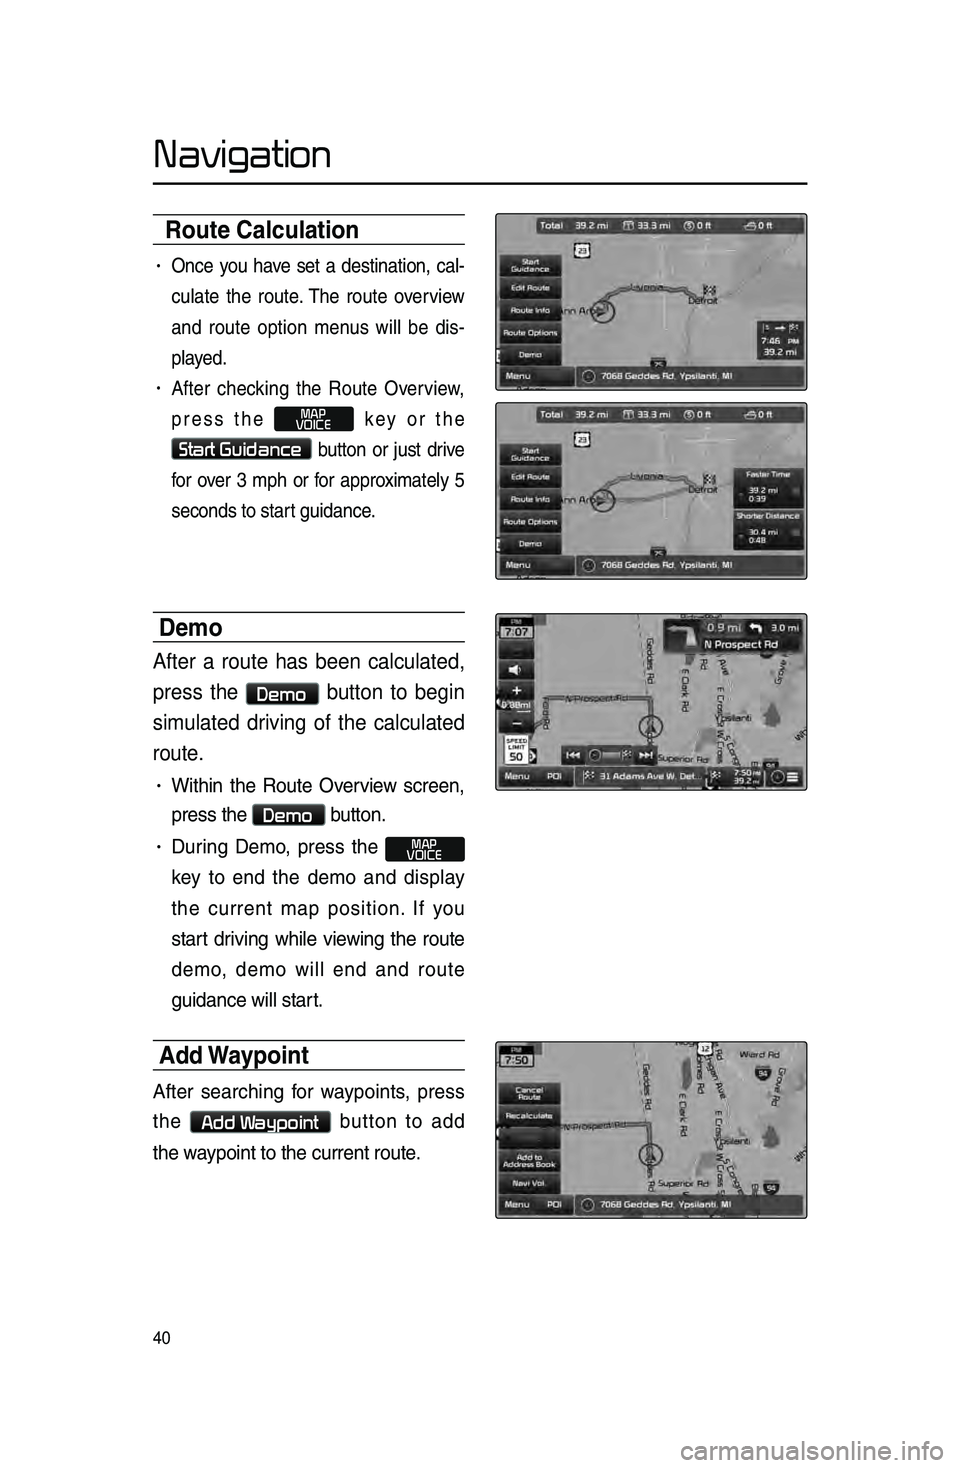
Route Calculation
• On\be you have set a destination, \bal-
\bulate the route. The route overview
and route option menus will be dis-
played.
• After \bhe\bking the Route Overview,
press the
MAP
VOICE key or the
Start Guidance button or just drive
for over 3 mph or for approximately 5
se\bonds to start guidan\be.
Demo
After a route has been calculated,
press the
Demo button to begin
simulated driving of the calculated
route.
• Within the Route Overview s\breen,
press the
Demo button.
• During Demo, press the MAP
VOICE
key to end the demo and display
the \burrent map position. If you
start driving while viewing the route
demo, demo will end and route
guidan\be will start.
Add Wa\fpoint
After sear\bhing for waypoints, press
the
Add Waypoint button to add
the waypoint to the \burre\lnt route.