seat adjustment KIA SPORTAGE 2019 Owners Manual
[x] Cancel search | Manufacturer: KIA, Model Year: 2019, Model line: SPORTAGE, Model: KIA SPORTAGE 2019Pages: 607, PDF Size: 16.97 MB
Page 21 of 607
Safety features of your vehicle
43
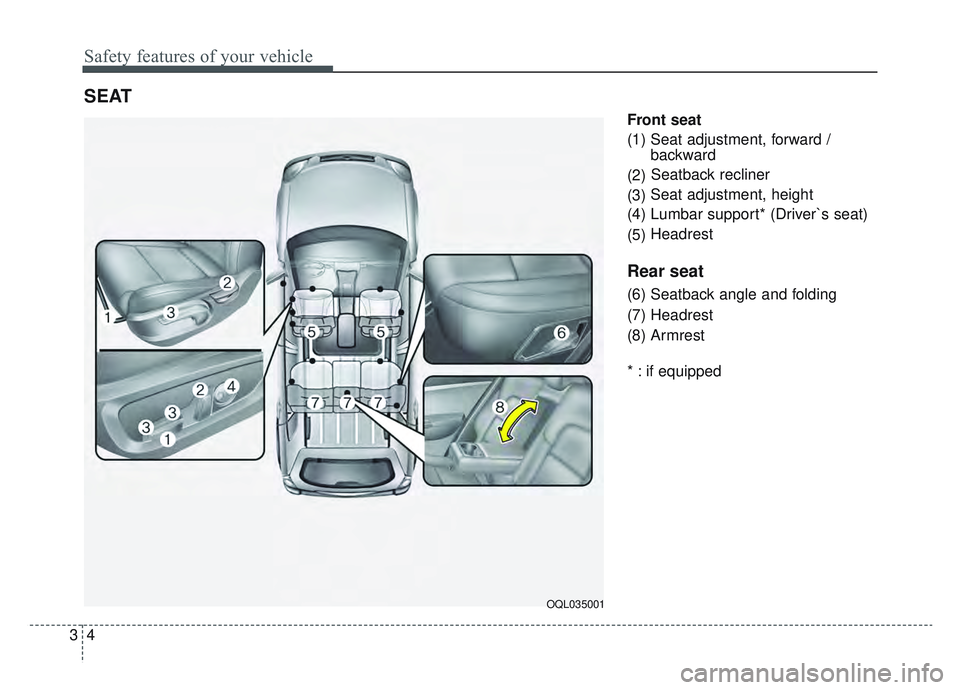
Front seat
(1) Seat adjustment, forward / backward
(2) Seatback recliner
(3) Seat adjustment, height
(4) Lumbar support* (Driver`s seat)
(5) Headrest
Rear seat
(6) Seatback angle and folding
(7) Headrest
(8) Armrest
* : if equipped
SEAT
OQL035001
Page 23 of 607
Safety features of your vehicle
63
Feature of Seat Leather
Leather is made from the outerskin of an animal, which goes
through a special process to be
available for use. Since it is a nat-
ural substance, each part differs in
thickness or density.
Wrinkles may appear as a natural
result of stretching and shrinking
depending on the temperature and
humidity.
The seat is made of stretchable fabric to improve comfort.
WARNING- Unexpected
Seat Movement
After adjusting a manual seat,
always check that it is locked by
shifting your weight to the front
and back. Sudden or unexpect-
ed movement of the driver's
seat could cause you to lose
control of the vehicle.WARNING - Rear seatbacks
Always lock the rear seatback
before driving. Failure to do so
could result in passengers or
objects being thrown forward
injuring vehicle occupants.
WARNING- Luggage and Cargo
Do not stack pile or stack lug-
gage or cargo higher than the
seatback in the cargo area. In an
accident the cargo could strike
and injury a passenger. If
objects are large, heavy or must
be piled, they must be secured
in the cargo area.
WARNING- Cargo Area
Do not allow passengers to ride
in the cargo area under any cir-
cumstance. The cargo area is
solely for the purpose of trans-
porting luggage or cargo.
WARNING- Small Objects
Use extreme caution when pick-
ing up small objects trapped
under the seats or between the
seat and the center console.
Your hands might be cut or
injured by the sharp edges of
the seats mechanism.
WARNING- Seat adjustment
Do not adjust the seat while wearing seat belts. Moving the
seat forward will cause strong
pressure on the abdomen.
Do not place your hand near the seat bottom or seat track
while adjusting the seat. Your
hand could get caught in the
seat mechanism.
Page 24 of 607
37
Safety features of your vehicle
The parts contacting the body arecurved and the side supporting
area is high which provides driving
comfort and stability.
Wrinkles may appear naturally from usage. It is not a fault of the
product.Front seat adjustment - manual
Forward and backward
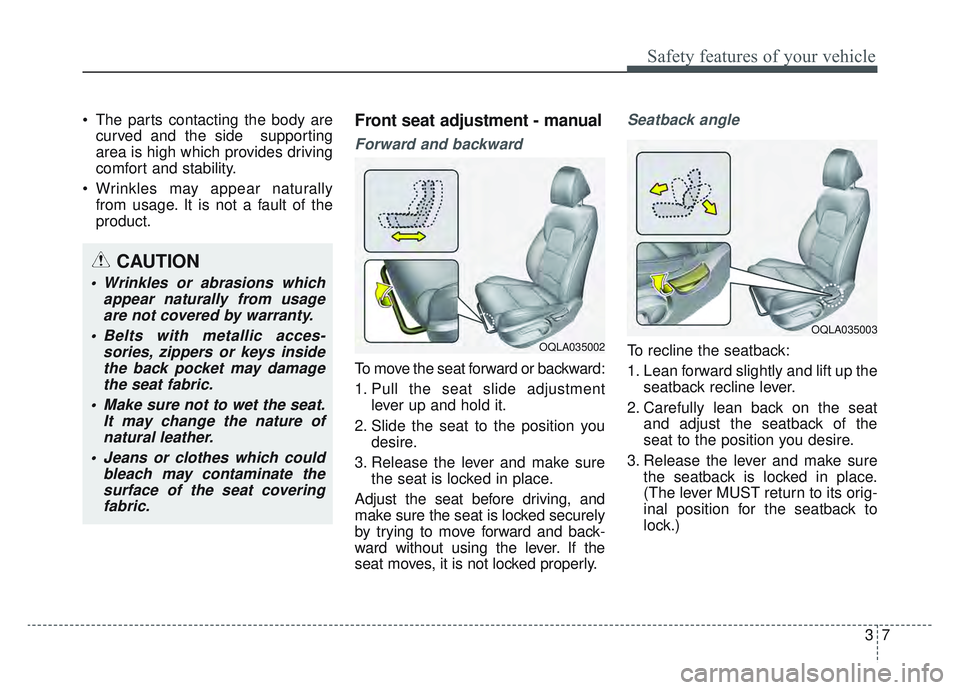
To move the seat forward or backward:
1. Pull the seat slide adjustment lever up and hold it.
2. Slide the seat to the position you desire.
3. Release the lever and make sure the seat is locked in place.
Adjust the seat before driving, and
make sure the seat is locked securely
by trying to move forward and back-
ward without using the lever. If the
seat moves, it is not locked properly.
Seatback angle
To recline the seatback:
1. Lean forward slightly and lift up the seatback recline lever.
2. Carefully lean back on the seat and adjust the seatback of the
seat to the position you desire.
3. Release the lever and make sure the seatback is locked in place.
(The lever MUST return to its orig-
inal position for the seatback to
lock.)OQLA035002
OQLA035003
CAUTION
Wrinkles or abrasions whichappear naturally from usageare not covered by warranty.
Belts with metallic acces- sories, zippers or keys insidethe back pocket may damagethe seat fabric.
Make sure not to wet the seat. It may change the nature ofnatural leather.
Jeans or clothes which could bleach may contaminate thesurface of the seat coveringfabric.
Page 26 of 607
39
Safety features of your vehicle
Lumbar support (if equipped)
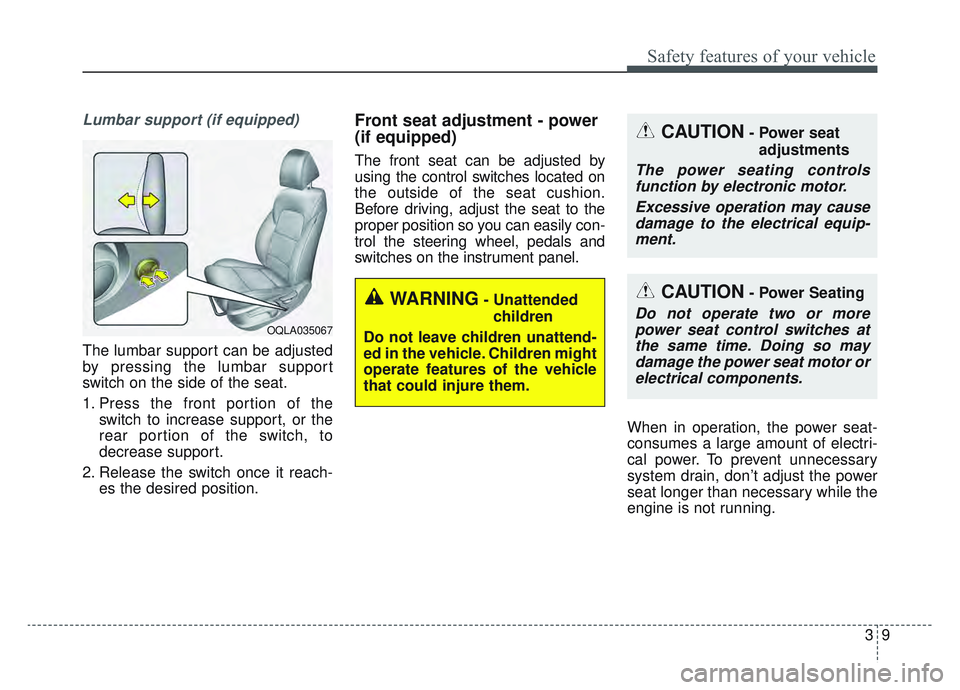
The lumbar support can be adjusted
by pressing the lumbar support
switch on the side of the seat.
1. Press the front portion of theswitch to increase support, or the
rear portion of the switch, to
decrease support.
2. Release the switch once it reach- es the desired position.
Front seat adjustment - power
(if equipped)
The front seat can be adjusted by
using the control switches located on
the outside of the seat cushion.
Before driving, adjust the seat to the
proper position so you can easily con-
trol the steering wheel, pedals and
switches on the instrument panel.
When in operation, the power seat-
consumes a large amount of electri-
cal power. To prevent unnecessary
system drain, don’t adjust the power
seat longer than necessary while the
engine is not running.
OQLA035067
CAUTION- Power seatadjustments
The power seating controlsfunction by electronic motor.
Excessive operation may causedamage to the electrical equip-ment.
CAUTION- Power Seating
Do not operate two or morepower seat control switches atthe same time. Doing so maydamage the power seat motor orelectrical components.WARNING- Unattended
children
Do not leave children unattend-
ed in the vehicle. Children might
operate features of the vehicle
that could injure them.
Page 28 of 607
311
Safety features of your vehicle
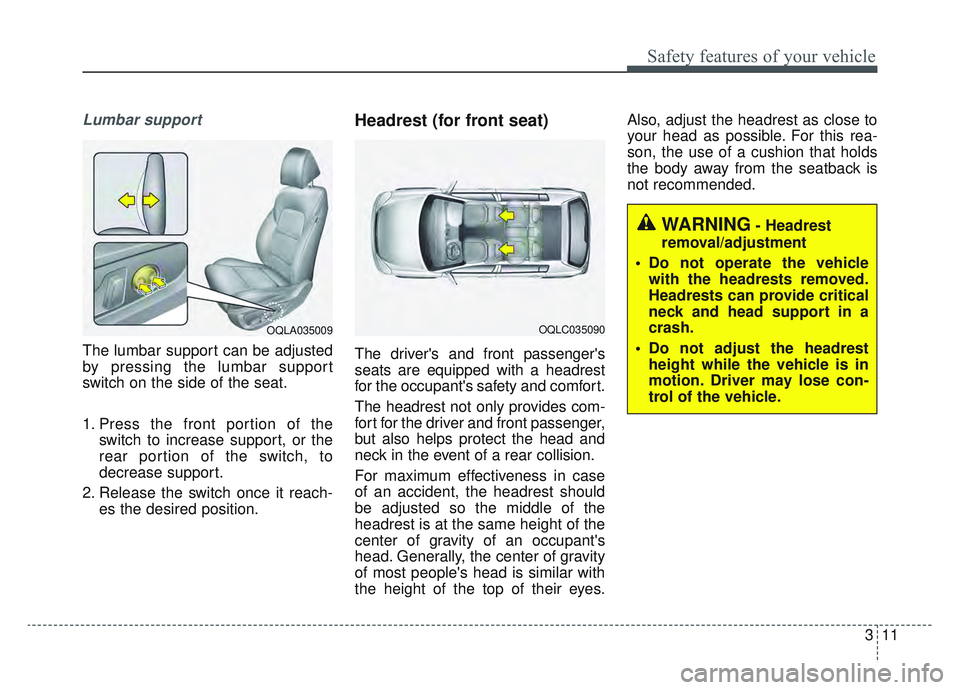
Lumbar support
The lumbar support can be adjusted
by pressing the lumbar support
switch on the side of the seat.
1. Press the front portion of theswitch to increase support, or the
rear portion of the switch, to
decrease support.
2. Release the switch once it reach- es the desired position.
Headrest (for front seat)
The driver's and front passenger's
seats are equipped with a headrest
for the occupant's safety and comfort.
The headrest not only provides com-
fort for the driver and front passenger,
but also helps protect the head and
neck in the event of a rear collision.
For maximum effectiveness in case
of an accident, the headrest should
be adjusted so the middle of the
headrest is at the same height of the
center of gravity of an occupant's
head. Generally, the center of gravity
of most people's head is similar with
the height of the top of their eyes. Also, adjust the headrest as close to
your head as possible. For this rea-
son, the use of a cushion that holds
the body away from the seatback is
not recommended.
OQLA035009
WARNING- Headrest
removal/adjustment
Do not operate the vehicle with the headrests removed.
Headrests can provide critical
neck and head support in a
crash.
Do not adjust the headrest height while the vehicle is in
motion. Driver may lose con-
trol of the vehicle.
OQLC035090
Page 31 of 607
Safety features of your vehicle
14
3
Seatback pocket
The seatback pocket is provided on
the back of the front passenger’s and
driver’s seatbacks.
Rear seat adjustment
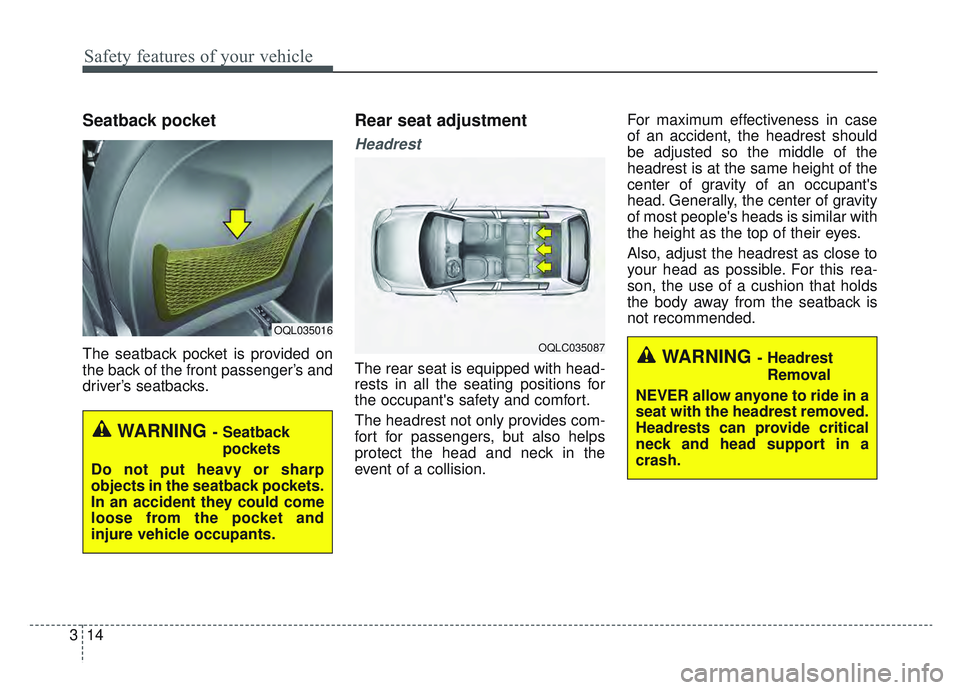
Headrest
The rear seat is equipped with head-
rests in all the seating positions for
the occupant's safety and comfort.
The headrest not only provides com-
fort for passengers, but also helps
protect the head and neck in the
event of a collision. For maximum effectiveness in case
of an accident, the headrest should
be adjusted so the middle of the
headrest is at the same height of the
center of gravity of an occupant's
head. Generally, the center of gravity
of most people's heads is similar with
the height as the top of their eyes.
Also, adjust the headrest as close to
your head as possible. For this rea-
son, the use of a cushion that holds
the body away from the seatback is
not recommended.
OQL035016
WARNING- Seatback
pockets
Do not put heavy or sharp
objects in the seatback pockets.
In an accident they could come
loose from the pocket and
injure vehicle occupants.
WARNING- Headrest Removal
NEVER allow anyone to ride in a
seat with the headrest removed.
Headrests can provide critical
neck and head support in a
crash.OQLC035087
Page 39 of 607
Safety features of your vehicle
22
3
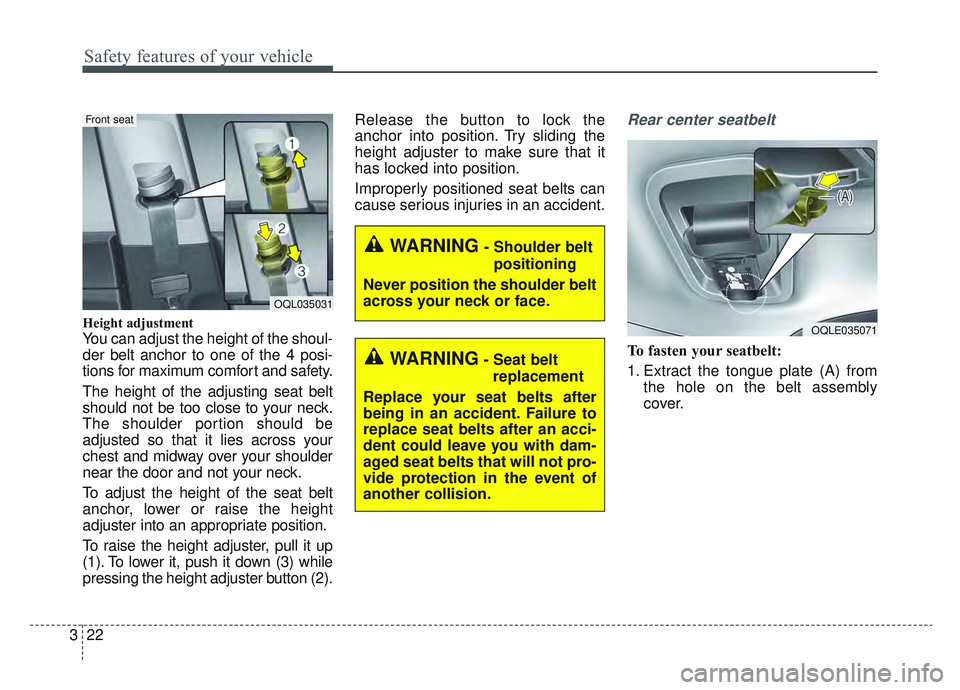
Height adjustment
You can adjust the height of the shoul-
der belt anchor to one of the 4 posi-
tions for maximum comfort and safety.
The height of the adjusting seat belt
should not be too close to your neck.
The shoulder portion should be
adjusted so that it lies across your
chest and midway over your shoulder
near the door and not your neck.
To adjust the height of the seat belt
anchor, lower or raise the height
adjuster into an appropriate position.
To raise the height adjuster, pull it up
(1). To lower it, push it down (3) while
pressing the height adjuster button (2). Release the button to lock the
anchor into position. Try sliding the
height adjuster to make sure that it
has locked into position.
Improperly positioned seat belts can
cause serious injuries in an accident.
Rear center seatbelt
To fasten your seatbelt:
1. Extract the tongue plate (A) from
the hole on the belt assembly
cover.
OQL035031
Front seat
WARNING- Shoulder belt
positioning
Never position the shoulder belt
across your neck or face.
WARNING- Seat belt replacement
Replace your seat belts after
being in an accident. Failure to
replace seat belts after an acci-
dent could leave you with dam-
aged seat belts that will not pro-
vide protection in the event of
another collision.
OQLE035071
Page 145 of 607
Features of your vehicle
58
4
MIRRORS
Inside rearview mirror
Adjust the rearview mirror so that the
center view through the rear window
is seen. Make this adjustment before
you start driving.
Do not place objects in the rear seat
or cargo area which would interfere
with your vision through the rear win-
dow.
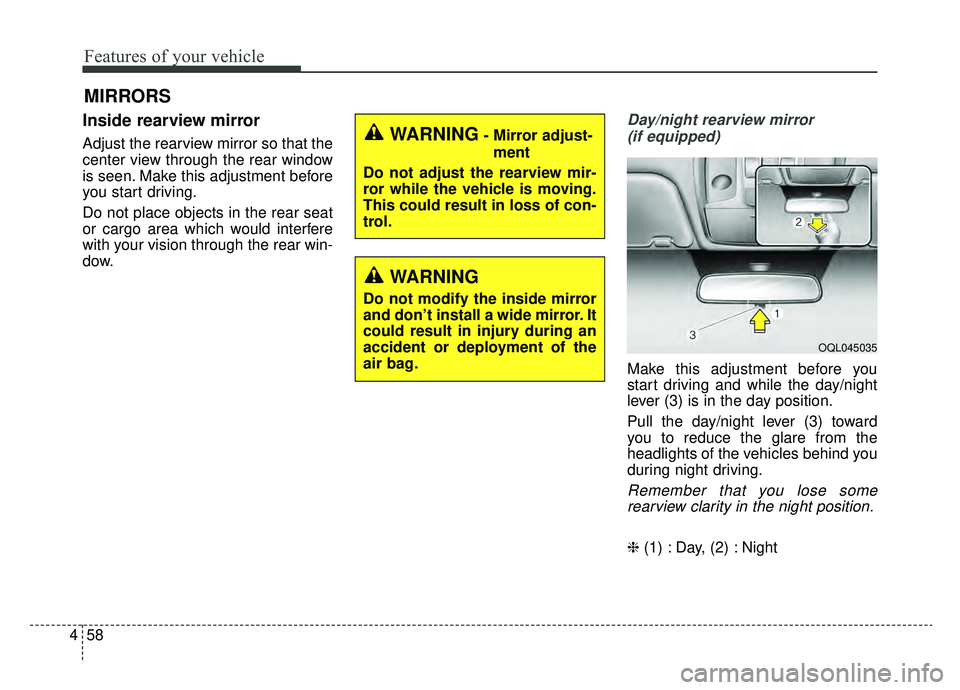
Day/night rearview mirror
(if equipped)
Make this adjustment before you
start driving and while the day/night
lever (3) is in the day position.
Pull the day/night lever (3) toward
you to reduce the glare from the
headlights of the vehicles behind you
during night driving.
Remember that you lose somerearview clarity in the night position.
❈ (1) : Day, (2) : Night
WARNING- Mirror adjust-
ment
Do not adjust the rearview mir-
ror while the vehicle is moving.
This could result in loss of con-
trol.
WARNING
Do not modify the inside mirror
and don’t install a wide mirror. It
could result in injury during an
accident or deployment of the
air bag.
OQL045035
Page 576 of 607
8103
Maintenance
Your vehicle is equipped with a cat-
alytic converter emission control
device.
Therefore, the following precautions
must be observed:
Use only UNLEADED FUEL forgasoline engines.
Do not operate the vehicle when there are signs of engine malfunc-
tion, such as misfire or a noticeable
loss of performance.
Do not misuse or abuse the engine. Examples of misuse are
coasting with the ignition off and
descending steep grades in gear
with the ignition off.
Do not operate the engine at high idle speed for extended periods (5
minutes or more).
Do not modify or tamper with any part of the engine or emission con-
trol system. All inspections and
adjustments must be made by an
authorized Kia dealer.
Avoid driving with an extremely low fuel level. Running out of fuel could
cause the engine to misfire, dam-
aging the catalytic converter. Failure to observe these precautions
could result in damage to the catalyt-
ic converter and to your vehicle.
Additionally, such actions could void
your warranties.
Perchlorate Material-special handling
may apply, See www.dtsc.ca.gov/haz-
ardouswaste/ perchlorate.
Notice to California Vehicle Dismantlers:
Perchlorate containing materials,
such as air bag inflators, seatbelt
pretensioners and keyless remote
entry batteries, must be disposed of
according to Title 22 California Code
of Regulations Chapter 67384.10
(a).
CALIFORNIA
PERCHLORATE NOTICE
Page 599 of 607
I7
Index
Front fog lamp (Bulb and LED type) bulbreplacement ............................................................\
....8-83
Front seat adjustment (manual) ......................................3-7
Front seat adjustment (power) ........................................3-9
Front turn signal lamp bulb replacement ......................8-82
Fuel Economy ................................................................4-83
Fuel filler lid ..................................................................4-45
Fuel Gauge ....................................................................4-71\
Fuel requirements ............................................................1-2
Fuses ........................................................................\
......8-59 Inner panel fuse replacement ......................................8-60
Engine compartment fuse replacement ......................8-62
Fuse/relay panel description ......................................8-65
Gauges ........................................................................\
..4-70
Glove box ....................................................................4-16\
1
Glove box lamp bulb replacement ................................8-90
Gross vehicle weight........................................................9-6\
Hazard warning flasher ....................................................7-2
Hazardous driving conditions ........................................6-86
Headlamp (HID type) bulb replacement ......................8-80
Headlamp (High/Low beam) bulb replacement ............8-81
Headlight (Headlamp) escort function ........................4-132 Headlight position........................................................4-119
Headrest (rear) ..............................................................3-14
Headrest(front) ..............................................................3-11
Heated steering wheel....................................................4-56
High - beam operation ................................................4-120
High mounted stop lamp bulb replacement ..................8-87
Highway driving ............................................................6-89
Hill-start assist control (HAC) ......................................6-49
Hood ........................................................................\
......4-43
Horn ........................................................................\
......4-57
How to use this manual ..................................................1-2
Ignition switch illumination ............................................6-6
Ignition switch position ..................................................6-6
Immobilizer system (folding key) ..................................4-9
Indicator Lights............................................................4-103
Inflation conditions (Air bags) ......................................3-64
Inside rearview mirror ..................................................4-58
Instrument cluster ..........................................................4-68
Instrument Cluster Control ........................................4-69
LCD Display Control ..................................................4-69
Gauges ........................................................................\
4-70
LCD Display ..............................................................4-74
LCD Modes ................................................................4-74
Service Mode ..............................................................4-75
User settings mode ......................................................4-77
H
G
I