change time KIA SPORTAGE PHEV 2023 Features and Functions Guide
[x] Cancel search | Manufacturer: KIA, Model Year: 2023, Model line: SPORTAGE PHEV, Model: KIA SPORTAGE PHEV 2023Pages: 78, PDF Size: 6.78 MB
Page 2 of 78
WELCOME TO THE KIA FAMILY!
Your new Kia vehicle has been designed, engineered and manufactured to provide you with years of comfortable and dependable driving. Kia is committed to quality, innovation, safety and — above all — your satisfaction.
USING THIS FEATURES & FUNCTIONS GUIDE
The information contained in this guide is a brief overview of the operation and features of your new Kia vehicle.
This Features & Functions Guide and the specific operational and safety information it provides are not a substitute for your Owner’s Manual. In the interest of your safety and that of the vehicle’s occupants, and to help you avoid risks that may result in death or serious injury, Kia reminds you to carefully read the Owner’s Manual in order to fully familiarize yourself with the important information and safety warnings it contains.
While Kia endeavors to ensure that the information contained in this guide is accurate at the time of printing, Kia may change vehicle specifications without notice in advance of or after the fact and assumes no liability in connection with such changes.
VIDEOS AND QR CODES
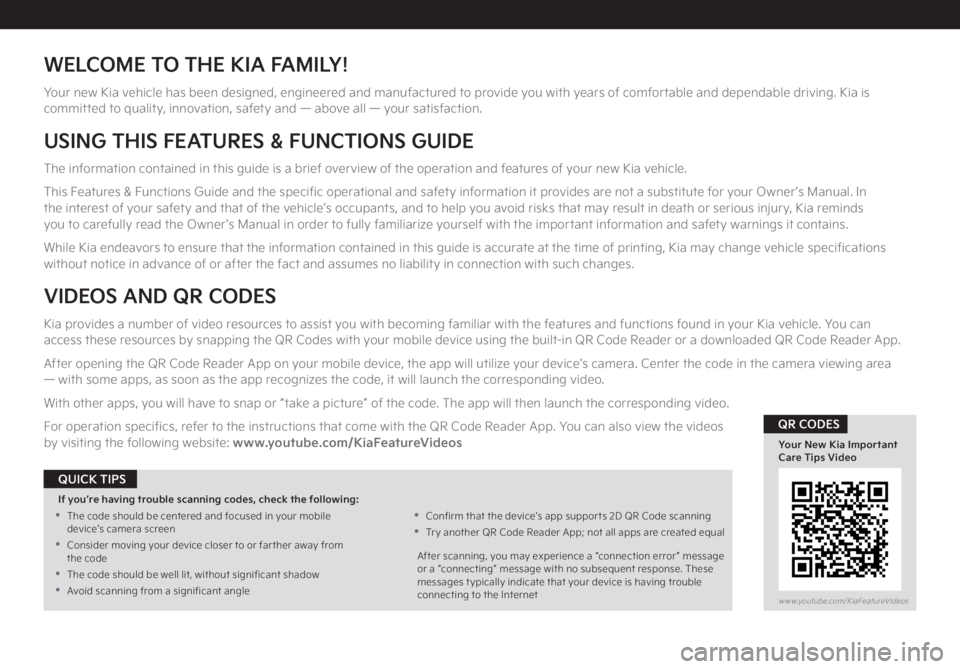
Kia provides a number of video resources to assist you with becoming familiar with the features and functions found in your Kia vehicle. You can access these resources by snapping the QR Codes with your mobile device using the built-in QR Code Reader or a downloaded QR Code Reader App.
After opening the QR Code Reader App on your mobile device, the app will utilize your device’s camera. Center the code in the camera viewing area — with some apps, as soon as the app recognizes the code, it will launch the corresponding video.
With other apps, you will have to snap or “take a picture” of the code. The app will then launch the corresponding video.
For operation specifics, refer to the instructions that come with the QR Code Reader App. You can also view the videos by visiting the following website: www.youtube.com/KiaFeatureVideos
If you’re having trouble scanning codes, check the following:
•
The code should be centered and focused in your mobile device’s camera screen
•
Consider moving your device closer to or far ther away from the code
•
The code should be well lit, without significant shadow
•Avoid scanning from a significant angle
•
Confirm that the device’s app suppor ts 2D QR Code scanning
•
Tr y another QR Code Reader App; not all apps are created equal
After scanning, you may experience a “connection error ” message or a “connecting” message with no subsequent response. These messages t ypically indicate that your device is having trouble connecting to the Internet
QUICK TIPS
www.youtube.com/KiaFeatureVideos
Your New Kia Important Care Tips Video
QR CODES
Page 9 of 78
7 *IF EQUIPPEDALWAYS CHECK THE OWNER ’S MANUAL FOR COMPLETE OPER ATING INFORMATION AND SAFET Y WARNINGS
VEHICLE SETTINGS
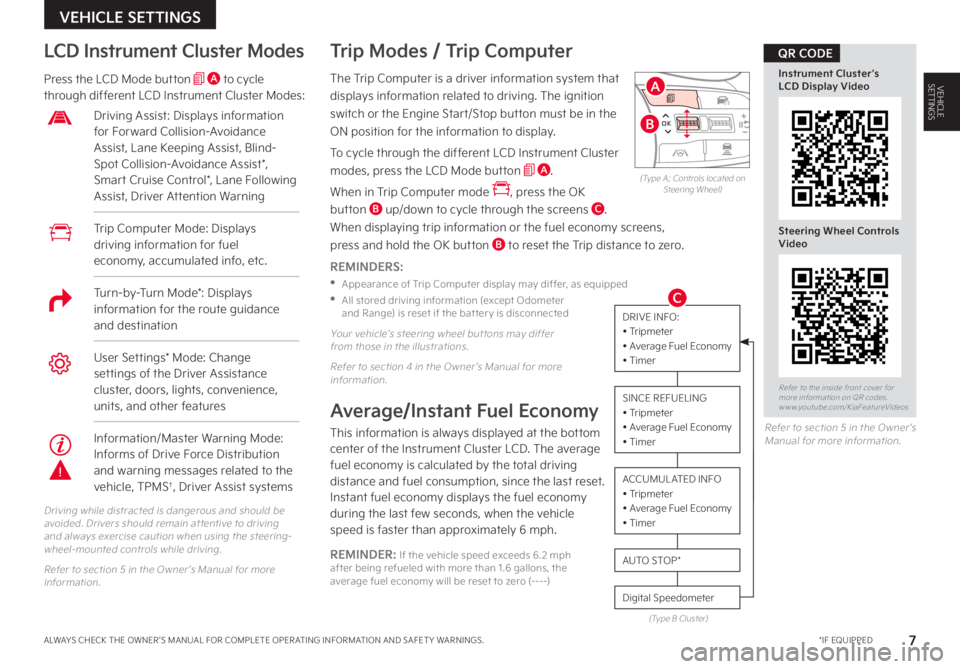
VEHICLESETTINGSThe Trip Computer is a driver information system that
displays information related to driving The ignition
switch or the Engine Start/Stop button must be in the
ON position for the information to display
To cycle through the different LCD Instrument Cluster
modes, press the LCD Mode button A
When in Trip Computer mode , press the OK
button B up/down to cycle through the screens C
When displaying trip information or the fuel economy screens,
press and hold the OK button B to reset the Trip distance to zero
REMINDERS:
•
Appearance of Trip Computer display may differ, as equipped
•
All stored driving information (except Odometer and Range) is reset if the bat ter y is disconnected
Trip Modes / Trip Computer LCD Instrument Cluster Modes
Press the LCD Mode button A to cycle through different LCD Instrument Cluster Modes:
Your vehicle’s steering wheel but tons may differ from those in the illustrations
Refer to section 4 in the Owner ’s Manual for more information
Driving while distracted is dangerous and should be avoided Drivers should remain at tentive to driving and always exercise caution when using the steering-wheel-mounted controls while driving
Refer to section 5 in the Owner ’s Manual for more information
Refer to section 5 in the Owner ’s Manual for more information
Average/Instant Fuel Economy
This information is always displayed at the bottom center of the Instrument Cluster LCD The average fuel economy is calculated by the total driving distance and fuel consumption, since the last reset Instant fuel economy displays the fuel economy during the last few seconds, when the vehicle speed is faster than approximately 6 mph
REMINDER: If the vehicle speed exceeds 6 2 mph after being refueled with more than 1 6 gallons, the average fuel economy will be reset to zero (----)
DRIVE INFO:• Tripmeter• Average Fuel Economy• Timer
SINCE REFUELING• Tripmeter• Average Fuel Economy• Timer
ACCUMUL ATED INFO• Tripmeter • Average Fuel Economy • Timer
Digital Speedometer
AUTO STOP *
(Type B Cluster)
Trip Computer Mode: Displays driving information for fuel economy, accumulated info, etc
Driving Assist: Displays information for Forward Collision-Avoidance Assist, Lane Keeping Assist, Blind-Spot Collision-Avoidance Assist*, Smart Cruise Control*, Lane Following Assist, Driver Attention Warning
User Settings* Mode: Change settings of the Driver Assistance cluster, doors, lights, convenience, units, and other features
OK
MODE
MODE
OKOK
OK
OK
OK
OK
OK
OK OK
OK
OK
(Type A; Controls located on Steering Wheel)
Refer to the inside front cover for more information on QR codes www youtube com/KiaFeatureVideos
Instrument Cluster’s LCD Display Video
Steering Wheel Controls Video
QR CODE
A
B
CTurn-by-Turn Mode*: Displays information for the route guidance and destination
Information/Master Warning Mode: Informs of Drive Force Distribution and warning messages related to the vehicle, TPMS†, Driver Assist systems
Page 19 of 78
17*IF EQUIPPEDALWAYS CHECK THE OWNER ’S MANUAL FOR COMPLETE OPER ATING INFORMATION AND SAFET Y WARNINGS.
HYBRID / PLUG-IN HYBRID SYSTEM
Charging Connector Auto/Lock Mode
(Plug-In Hybrid Only)
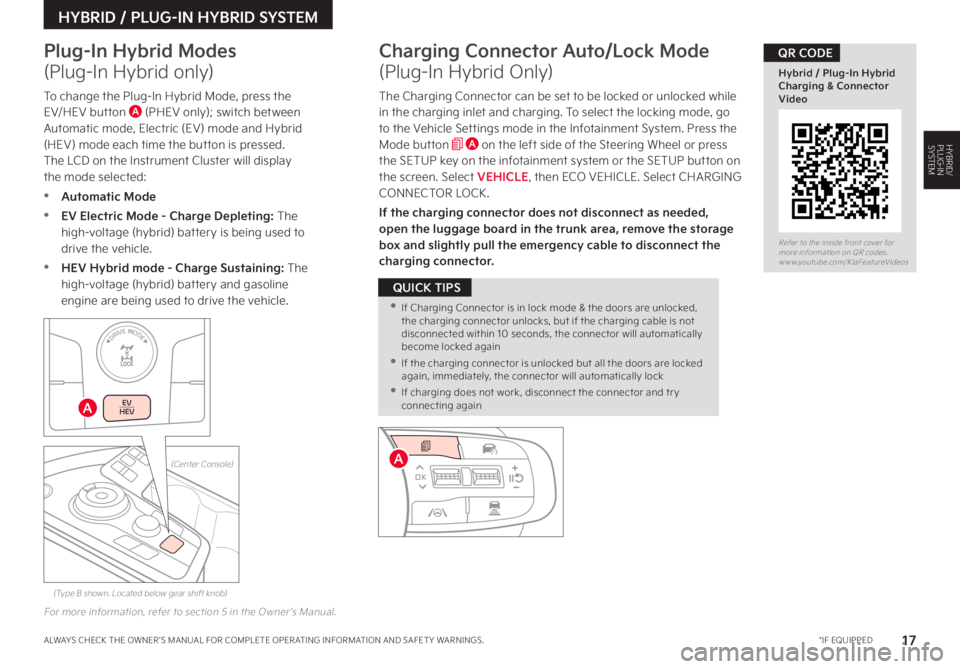
The Charging Connector can be set to be locked or unlocked while in the charging inlet and charging. To select the locking mode, go to the Vehicle Settings mode in the Infotainment System. Press the Mode button A on the left side of the Steering Wheel or press the SETUP key on the infotainment system or the SETUP button on the screen. Select VEHICLE, then ECO VEHICLE. Select CHARGING CONNECTOR LOCK.
If the charging connector does not disconnect as needed, open the luggage board in the trunk area, remove the storage box and slightly pull the emergency cable to disconnect the charging connector.
For more information, refer to section 5 in the Owner ’s Manual.
To change the Plug-In Hybrid Mode, press the EV/HEV button A (PHEV only); switch between Automatic mode, Electric (EV) mode and Hybrid (HEV) mode each time the button is pressed. The LCD on the Instrument Cluster will display the mode selected:
•Automatic Mode
•EV Electric Mode - Charge Depleting: The high-voltage (hybrid) battery is being used to drive the vehicle.
•HEV Hybrid mode - Charge Sustaining: The high-voltage (hybrid) battery and gasoline engine are being used to drive the vehicle.
Plug-In Hybrid Modes
(Plug-In Hybrid only)
HYBRID/PLUG-IN SYSTEM
OK
MODE
MODE
OKOK
OK
OK
OK
OK
OK
OK OK
OK
OK
•If Charging Connector is in lock mode & the doors are unlocked, the charging connector unlocks, but if the charging cable is not disconnected within 10 seconds, the connector will automatically become locked again
•If the charging connector is unlocked but all the doors are locked again, immediately, the connector will automatically lock
•If charging does not work, disconnect the connector and tr y connecting again
QUICK TIPS
A
(Type B shown. Located below gear shift knob)
(Center Console)
EV
HEV
DRIVE MODE
A
Refer to the inside front cover for more information on QR codes.www.youtube.com/KiaFeatureVideos
Hybrid / Plug-In Hybrid Charging & Connector Video
QR CODE
Page 21 of 78
19†LEGAL DISCL AIMERS ON BACK INSIDE COVER | *IF EQUIPPEDALWAYS CHECK THE OWNER ’S MANUAL FOR COMPLETE OPER ATING INFORMATION AND SAFET Y WARNINGS
ADVANCED DRIVER ASSISTANCE SYSTEMS (ADAS)
Refer to the inside front cover for more information on QR codes www youtube com/KiaFeatureVideos
Rear Cross-Traffic Collision-Avoidance Assist (RCCA) Video
QR CODERear Cross-Traffic Collision-Avoidance Assist (RCCA)*†3
When engaged, RCCA is a supplemental system Do not solely rely on this system and always pay at tention to the road and its conditions
Refer to section 6 in the Owner ’s Manual for more information
REMINDERS:
•
When vehicle power is turned off, then on again, RCCA will remain in the previous state
•
When a vehicle is approaching within the sensing range, and traveling faster than 3 mph, RCCA will show a warning
(But tons located on right side of steering wheel)
The Warning Volume can be adjusted in User Set tings* in the Instrument Cluster or Vehicle Set tings* in the Infotainment System
QUICK TIP
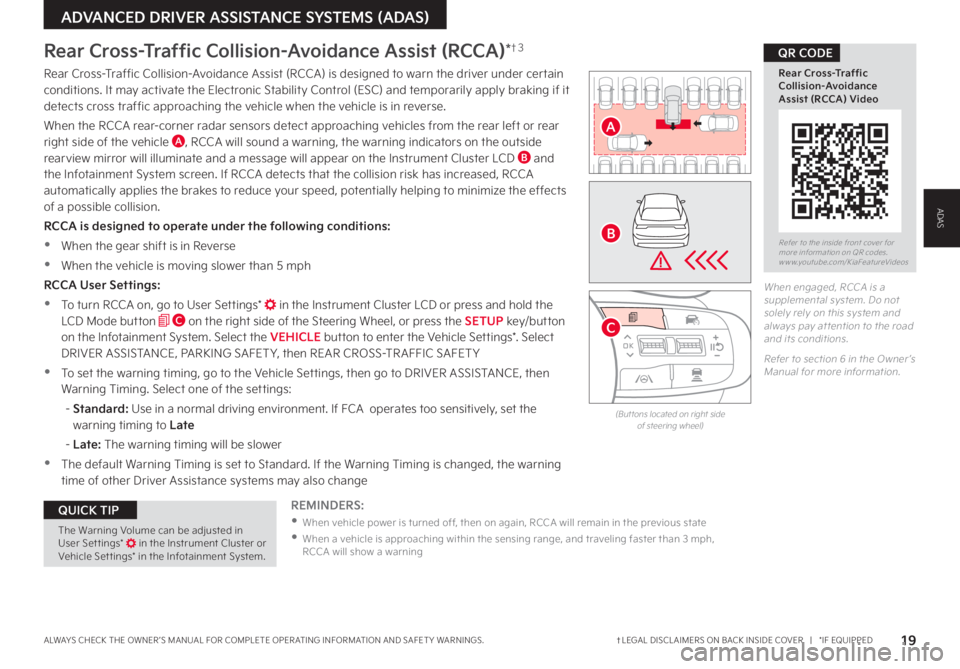
Rear Cross-Traffic Collision-Avoidance Assist (RCCA) is designed to warn the driver under certain conditions It may activate the Electronic Stability Control (ESC) and temporarily apply braking if it detects cross traffic approaching the vehicle when the vehicle is in reverse
When the RCCA rear-corner radar sensors detect approaching vehicles from the rear left or rear right side of the vehicle A, RCCA will sound a warning, the warning indicators on the outside rearview mirror will illuminate and a message will appear on the Instrument Cluster LCD B and the Infotainment System screen If RCCA detects that the collision risk has increased, RCCA automatically applies the brakes to reduce your speed, potentially helping to minimize the effects of a possible collision
RCCA is designed to operate under the following conditions:
•When the gear shift is in Reverse
•When the vehicle is moving slower than 5 mph
RCCA User Settings:
•To turn RCCA on, go to User Settings* in the Instrument Cluster LCD or press and hold the LCD Mode button C on the right side of the Steering Wheel, or press the SETUP key/button on the Infotainment System Select the VEHICLE button to enter the Vehicle Settings* Select DRIVER ASSISTANCE, PARKING SAFET Y, then REAR CROSS-TR AFFIC SAFET Y
•To set the warning timing, go to the Vehicle Settings, then go to DRIVER ASSISTANCE, then Warning Timing Select one of the settings:
- Standard: Use in a normal driving environment If FCA operates too sensitively, set the warning timing to Late
- Late: The warning timing will be slower
•The default Warning Timing is set to Standard If the Warning Timing is changed, the warning time of other Driver Assistance systems may also change
OK
MODE
MODE
OK OK
OK
OK
OK
OK
OK
OK OK
OK
OK
A
B
C
ADAS
Page 40 of 78
38 *IF EQUIPPED
STEERING WHEEL CONTROLS
SPORTAGE HYBRID / PLUG-IN HYBRID FEATURES & FUNCTIONS GUIDE
STEERING WHEEL CONTROLS
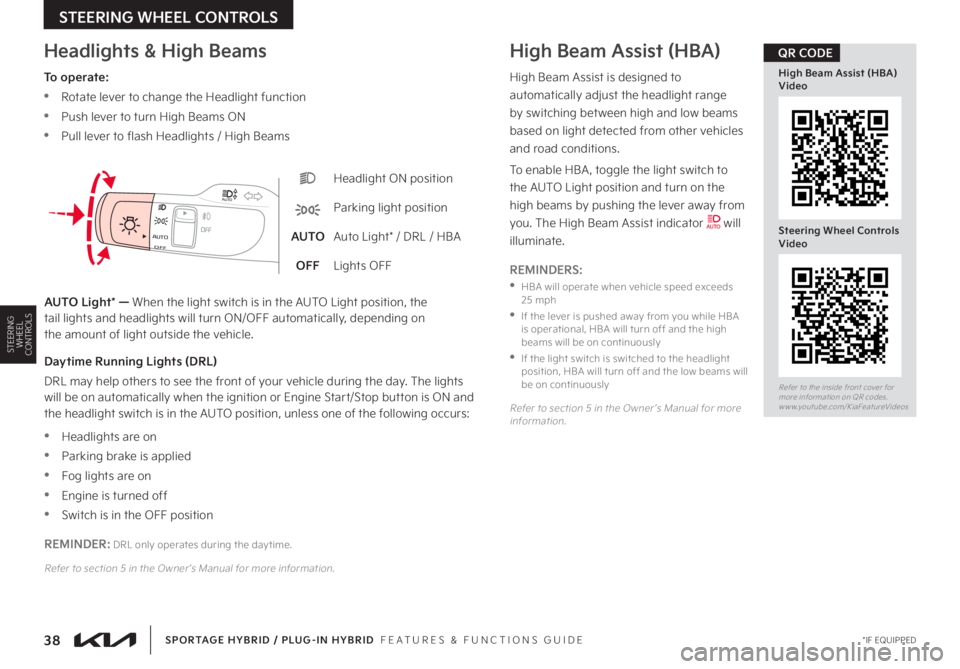
Headlight ON position
Parking light position
AUTOAuto Light* / DRL / HBA
OFFLights OFF
OFFOFFAUTO
AUTO
OFFOFFAUTO
AUTO
Headlights & High BeamsHigh Beam Assist (HBA)
To operate:
•Rotate lever to change the Headlight function
•Push lever to turn High Beams ON
•Pull lever to flash Headlights / High Beams
AUTO Light* — When the light switch is in the AUTO Light position, the tail lights and headlights will turn ON/OFF automatically, depending on the amount of light outside the vehicle
High Beam Assist is designed to
automatically adjust the headlight range
by switching between high and low beams
based on light detected from other vehicles
and road conditions
To enable HBA , toggle the light switch to
the AUTO Light position and turn on the
high beams by pushing the lever away from
you The High Beam Assist indicator will
illuminate
REMINDERS:
•
HBA will operate when vehicle speed exceeds 25 mph
•
If the lever is pushed away from you while HBA is operational, HBA will turn off and the high beams will be on continuously
•
If the light switch is switched to the headlight position, HBA will turn off and the low beams will be on continuously
Refer to section 5 in the Owner ’s Manual for more information
Daytime Running Lights (DRL)
DRL may help others to see the front of your vehicle during the day The lights will be on automatically when the ignition or Engine Start/Stop button is ON and the headlight switch is in the AUTO position, unless one of the following occurs:
•Headlights are on
•Parking brake is applied
•Fog lights are on
•Engine is turned off
•Switch is in the OFF position
REMINDER: DRL only operates during the day time
Refer to section 5 in the Owner ’s Manual for more information
Refer to the inside front cover for more information on QR codes www youtube com/KiaFeatureVideos
High Beam Assist (HBA) Video
Steering Wheel Controls Video
QR CODE
Page 41 of 78
39 *IF EQUIPPEDALWAYS CHECK THE OWNER ’S MANUAL FOR COMPLETE OPER ATING INFORMATION AND SAFET Y WARNINGS
STEERING WHEEL CONTROLS
STEERING WHEEL CONTROLSOFFOFFAUTO
AUTO
OFFOFFAUTO
AUTO
Windshield Wipers & Washers
Front Wiper & Washer
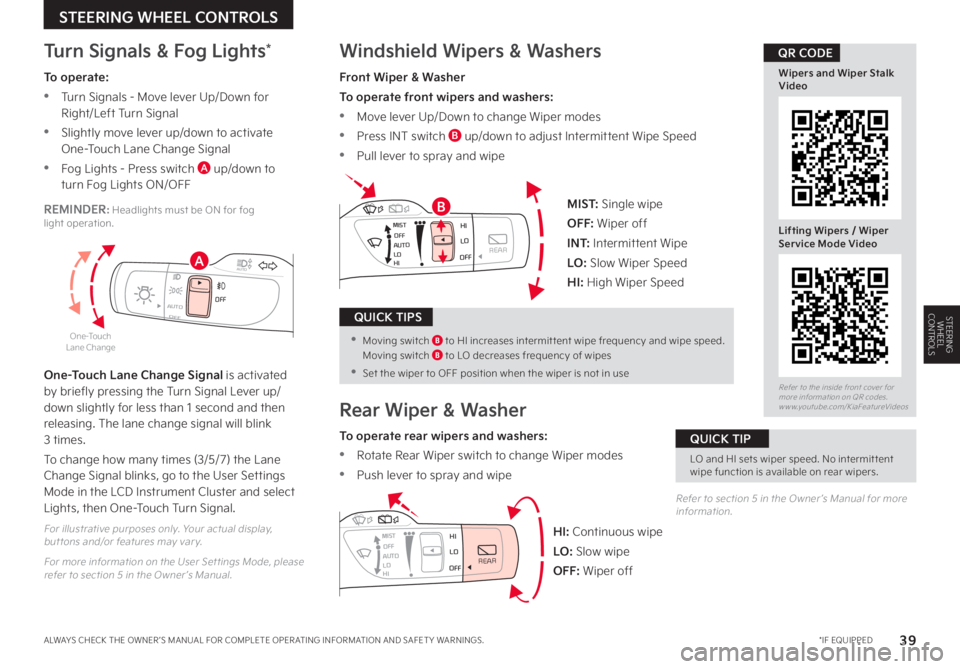
To operate front wipers and washers:
•Move lever Up/Down to change Wiper modes
•Press INT switch B up/down to adjust Intermittent Wipe Speed
•Pull lever to spray and wipe
Rear Wiper & Washer
To operate rear wipers and washers:
•Rotate Rear Wiper switch to change Wiper modes
•Push lever to spray and wipe
MIST
OFF
AUTO
LO
HIHI
REARLO
OFF
MIST OFF
AUTO
LO
HIHI
REARLO
OFF
MIST OFF
AUTO
LO
HIHI
REARLO
OFF
MIST OFF
AUTO
LO
HIHI
REARLO
OFF
MIST: Single wipe
OFF: Wiper off
I N T: Intermittent Wipe
LO: Slow Wiper Speed
HI: High Wiper Speed
HI: Continuous wipe
LO: Slow wipe
OFF: Wiper off
Turn Signals & Fog Lights*
One-Touch Lane Change Signal is activated by briefly pressing the Turn Signal Lever up/down slightly for less than 1 second and then releasing The lane change signal will blink 3 times
To change how many times (3/5/7) the Lane Change Signal blinks, go to the User Settings Mode in the LCD Instrument Cluster and select Lights, then One-Touch Turn Signal
For illustrative purposes only Your actual display, but tons and/or features may var y
For more information on the User Settings Mode, please refer to section 5 in the Owner ’s Manual
Refer to section 5 in the Owner ’s Manual for more information
One-Touch Lane Change
Refer to the inside front cover for more information on QR codes www youtube com/KiaFeatureVideos
Wipers and Wiper Stalk Video
Lifting Wipers / Wiper Service Mode Video
QR CODE
A
BREMINDER: Headlights must be ON for fog light operation
LO and HI sets wiper speed No intermit tent wipe function is available on rear wipers
QUICK TIP
• Moving switch B to HI increases intermit tent wipe frequency and wipe speed Moving switch B to LO decreases frequency of wipes
•
Set the wiper to OFF position when the wiper is not in use
QUICK TIPS
To operate:
•Turn Signals - Move lever Up/Down for Right/Left Turn Signal
•Slightly move lever up/down to activate One-Touch Lane Change Signal
•Fog Lights - Press switch A up/down to turn Fog Lights ON/OFF
Page 52 of 78
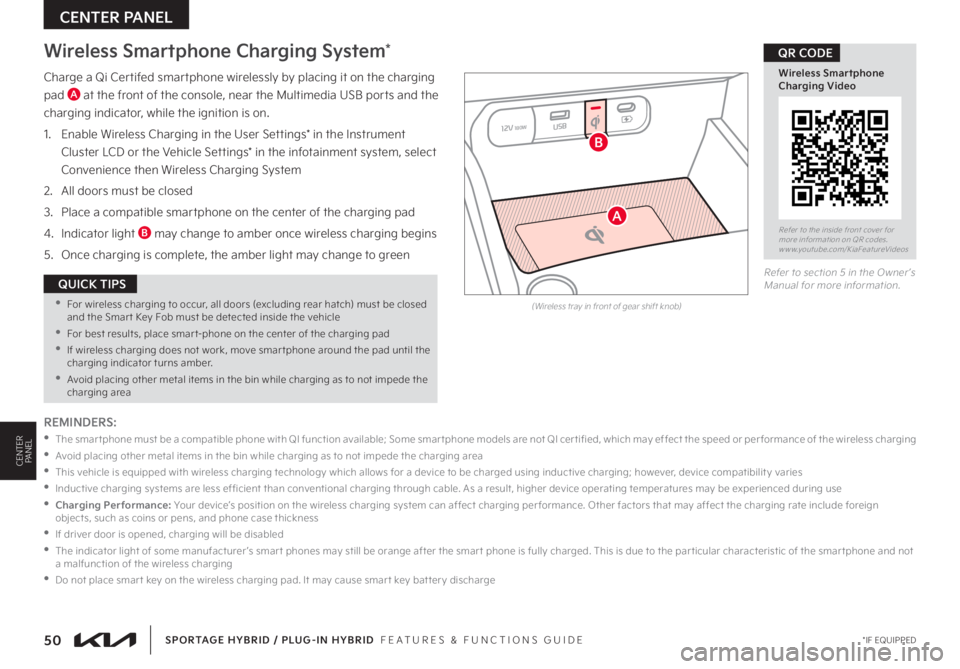
Charge a Qi Certifed smartphone wirelessly by placing it on the charging
pad A at the front of the console, near the Multimedia USB ports and the
charging indicator, while the ignition is on
1
Enable Wireless Charging in the User Settings* in the Instrument
Cluster LCD or the Vehicle Settings* in the infotainment system, select
Convenience then Wireless Charging System
2 All doors must be closed
3 Place a compatible smartphone on the center of the charging pad
4 Indicator light B may change to amber once wireless charging begins
5 Once charging is complete, the amber light may change to green
Wireless Smartphone Charging System*
50 *IF EQUIPPED
CENTER PANEL
SPORTAGE HYBRID / PLUG-IN HYBRID FEATURES & FUNCTIONS GUIDE
CENTERPANEL
(Wireless tray in front of gear shift knob)
Refer to the inside front cover for more information on QR codes www youtube com/KiaFeatureVideos
Wireless Smartphone Charging Video
QR CODE
REMINDERS:
•
T h e s m a r t p h o n e m u s t b e a c o m p a t i b l e p h o n e w i t h Q I f u n c t i o n av a i l a b l e; S o m e s m a r t p h o n e m o d e l s a r e n o t Q I c e r t i fi e d , w h i c h m ay e f f e c t t h e s p e e d o r p e r f o r m a n c e o f t h e w i r e l e s s c h a r g i n g
•
Avoid placing other metal items in the bin while charging as to not impede the charging area
•
This vehicle is equipped with wireless charging technology which allows for a device to be charged using inductive charging; however, device compatibilit y varies
•
Inductive charging systems are less ef ficient than conventional charging through cable As a result, higher device operating temperatures may be experienced during use
• Charging Performance: Your device’s position on the wireless charging system can affect charging per formance Other factors that may affect the charging rate include foreign objects, such as coins or pens, and phone case thickness
•If driver door is opened, charging will be disabled
•
The indicator light of some manufacturer ’s smar t phones may still be orange after the smar t phone is fully charged This is due to the par ticular characteristic of the smar tphone and not a malfunction of the wireless charging
•Do not place smar t key on the wireless charging pad It may cause smar t key bat ter y discharge
•For wireless charging to occur, all doors (excluding rear hatch) must be closed and the Smar t Key Fob must be detected inside the vehicle
•For best results, place smar t-phone on the center of the charging pad
•If wireless charging does not work, move smar tphone around the pad until the charging indicator turns amber
•Avoid placing other metal items in the bin while charging as to not impede the charging area
QUICK TIPS
12V180WUSB
A
B
Refer to section 5 in the Owner ’s Manual for more information
Page 54 of 78
52 *IF EQUIPPED
CENTER PANEL
SPORTAGE HYBRID / PLUG-IN HYBRID FEATURES & FUNCTIONS GUIDE
CENTERPANEL
Driver’s temperature control knobPassenger ’s temperature control knob
Automatic Climate Control but ton
Front windshield defroster but tonMode selection but tonAir conditioning but ton*
SYNC but tonRear window defroster but tonInfotainment/climate control mode switching but ton
Air intake control but ton
Fan speed control but tons
375°F76°FAUTOPWRAUTOCLIMATEA/CSYNCMEDIUMYour Automatic Climate Control system may differ from the illustration
(Type B shown; panel located above center console)
Automatic Climate Control*
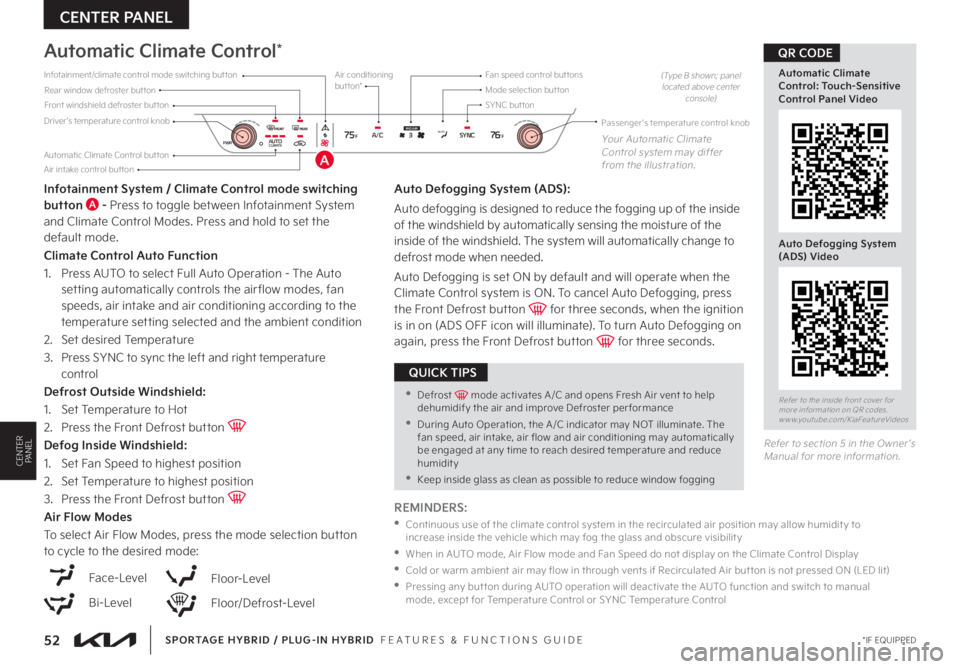
Infotainment System / Climate Control mode switching button A - Press to toggle between Infotainment System and Climate Control Modes Press and hold to set the default mode
Climate Control Auto Function
1 Press AUTO to select Full Auto Operation - The Auto setting automatically controls the air flow modes, fan speeds, air intake and air conditioning according to the temperature setting selected and the ambient condition
2 Set desired Temperature
3
Press SYNC to sync the left and right temperature control
Defrost Outside Windshield:
1
Set Temperature to Hot
2
Press the Front Defrost button Defog Inside Windshield:
1
Set Fan Speed to highest position
2
Set Temperature to highest position
3
Press the Front Defrost button Air Flow Modes
To select Air Flow Modes, press the mode selection button to cycle to the desired mode:
Auto Defogging System (ADS):
Auto defogging is designed to reduce the fogging up of the inside of the windshield by automatically sensing the moisture of the inside of the windshield The system will automatically change to
defrost mode when needed
Auto Defogging is set ON by default and will operate when the Climate Control system is ON To cancel Auto Defogging, press the Front Defrost button for three seconds, when the ignition is in on (ADS OFF icon will illuminate) To turn Auto Defogging on again, press the Front Defrost button for three seconds
Face-Level
Bi-Level
Floor-Level
Floor/Defrost-Level
Refer to the inside front cover for more information on QR codes www youtube com/KiaFeatureVideos
Automatic Climate Control: Touch-Sensitive Control Panel Video
Auto Defogging System (ADS) Video
QR CODE
REMINDERS:
•
Continuous use of the climate control system in the recirculated air position may allow humidit y to increase inside the vehicle which may fog the glass and obscure visibilit y
•
When in AUTO mode, Air Flow mode and Fan Speed do not display on the Climate Control Display
•
Cold or warm ambient air may flow in through vents if Recirculated Air but ton is not pressed ON (LED lit)
•
Pressing any but ton during AUTO operation will deactivate the AUTO function and switch to manual mode, except for Temperature Control or SYNC Temperature Control
•Defrost mode activates A /C and opens Fresh Air vent to help dehumidify the air and improve Defroster per formance
•During Auto Operation, the A /C indicator may NOT illuminate The fan speed, air intake, air flow and air conditioning may automatically be engaged at any time to reach desired temperature and reduce humidity
•Keep inside glass as clean as possible to reduce window fogging
QUICK TIPS
Refer to section 5 in the Owner ’s Manual for more information
A
Page 56 of 78
54*IF EQUIPPED
CENTER PANEL
SPORTAGE HYBRID / PLUG-IN HYBRID FEATURES & FUNCTIONS GUIDE
CENTERPANEL
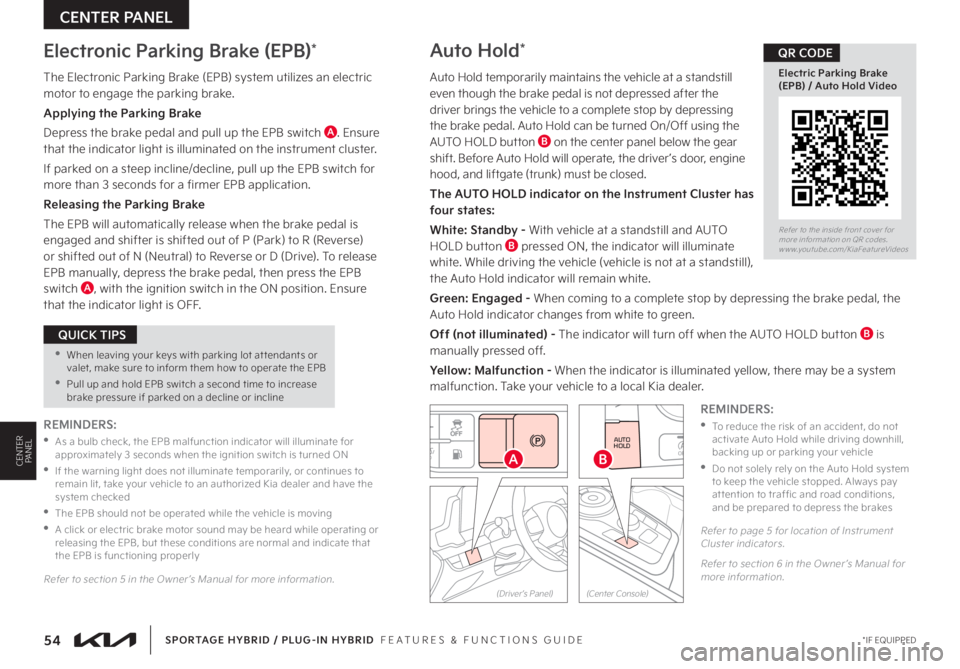
The Electronic Parking Brake (EPB) system utilizes an electric motor to engage the parking brake
Applying the Parking Brake
Depress the brake pedal and pull up the EPB switch A Ensure that the indicator light is illuminated on the instrument cluster
If parked on a steep incline/decline, pull up the EPB switch for more than 3 seconds for a firmer EPB application
Releasing the Parking Brake
The EPB will automatically release when the brake pedal is engaged and shifter is shifted out of P (Park) to R (Reverse)
or shifted out of N (Neutral) to Reverse or D (Drive) To release EPB manually, depress the brake pedal, then press the EPB switch A, with the ignition switch in the ON position Ensure that the indicator light is OFF
Auto Hold*
Auto Hold temporarily maintains the vehicle at a standstill even though the brake pedal is not depressed after the driver brings the vehicle to a complete stop by depressing the brake pedal Auto Hold can be turned On/Off using the AUTO HOLD button B on the center panel below the gear shift Before Auto Hold will operate, the driver ’s door, engine hood, and liftgate (trunk) must be closed
The AUTO HOLD indicator on the Instrument Cluster has four states:
White: Standby - With vehicle at a standstill and AUTO HOLD button B pressed ON, the indicator will illuminate white While driving the vehicle (vehicle is not at a standstill), the Auto Hold indicator will remain white
Green: Engaged - When coming to a complete stop by depressing the brake pedal, the Auto Hold indicator changes from white to green
Off (not illuminated) - The indicator will turn off when the AUTO HOLD button B is manually pressed off
Yellow: Malfunction - When the indicator is illuminated yellow, there may be a system malfunction Take your vehicle to a local Kia dealer
Electronic Parking Brake (EPB)*
Refer to the inside front cover for more information on QR codes www youtube com/KiaFeatureVideos
Electric Parking Brake (EPB) / Auto Hold Video
QR CODE
REMINDERS:
•
To reduce the risk of an accident, do not activate Auto Hold while driving downhill, backing up or parking your vehicle
•
Do not solely rely on the Auto Hold system to keep the vehicle stopped Always pay at tention to traf fic and road conditions, and be prepared to depress the brakes
REMINDERS:
•
As a bulb check, the EPB malfunction indicator will illuminate for approximately 3 seconds when the ignition switch is turned ON
•
If the warning light does not illuminate temporarily, or continues to remain lit, take your vehicle to an authorized Kia dealer and have the system checked
•The EPB should not be operated while the vehicle is moving
•
A click or electric brake motor sound may be heard while operating or releasing the EPB, but these conditions are normal and indicate that the EPB is functioning properly
Refer to section 5 in the Owner ’s Manual for more information
•When leaving your keys with parking lot at tendants or valet, make sure to inform them how to operate the EPB
•Pull up and hold EPB switch a second time to increase brake pressure if parked on a decline or incline
QUICK TIPS
Refer to page 5 for location of Instrument Cluster indicators
Refer to section 6 in the Owner ’s Manual for more information
AUTO
HOLDOFF
DRIVE MODE
B
HOLD
HOLD�"
(Center Console)(Driver ’s Panel)
Page 66 of 78
64†LEGAL DISCL AIMERS ON BACK INSIDE COVER | *IF EQUIPPED
OTHER KEY FEATURES
SPORTAGE HYBRID / PLUG-IN HYBRID FEATURES & FUNCTIONS GUIDE
OTHER KEYFEATURES
ABC
HomeLink® with Auto-Dimming Rearview Mirror*†2
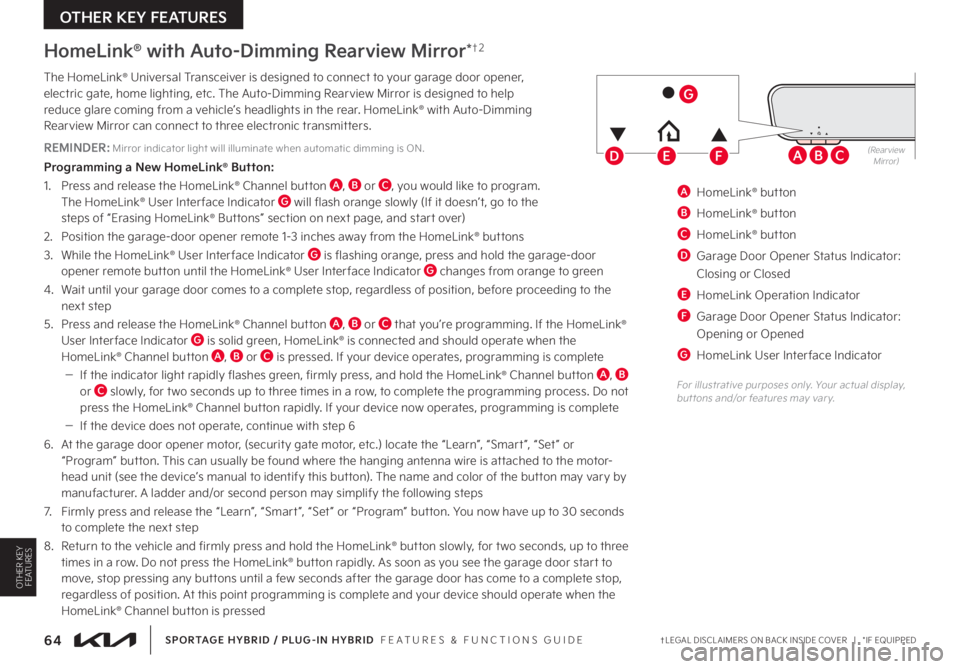
The HomeLink® Universal Transceiver is designed to connect to your garage door opener, electric gate, home lighting, etc The Auto-Dimming Rearview Mirror is designed to help reduce glare coming from a vehicle’s headlights in the rear HomeLink® with Auto-Dimming Rearview Mirror can connect to three electronic transmitters
REMINDER: Mirror indicator light will illuminate when automatic dimming is ON
Programming a New HomeLink® Button:
1 Press and release the HomeLink® Channel button A, B or C, you would like to program The HomeLink® User Inter face Indicator G will flash orange slowly (If it doesn’t, go to the steps of “Erasing HomeLink® Buttons” section on next page, and start over)
2 Position the garage-door opener remote 1-3 inches away from the HomeLink® buttons
3 While the HomeLink® User Inter face Indicator G is flashing orange, press and hold the garage-door opener remote button until the HomeLink® User Inter face Indicator G changes from orange to green
4 Wait until your garage door comes to a complete stop, regardless of position, before proceeding to the next step
5 Press and release the HomeLink® Channel button A, B or C that you’re programming If the HomeLink® User Interface Indicator G is solid green, HomeLink® is connected and should operate when the HomeLink® Channel button A, B or C is pressed If your device operates, programming is complete
–If the indicator light rapidly flashes green, firmly press, and hold the HomeLink® Channel button A, B or C slowly, for two seconds up to three times in a row, to complete the programming process Do not press the HomeLink® Channel button rapidly If your device now operates, programming is complete
–If the device does not operate, continue with step 6
6 At the garage door opener motor, (security gate motor, etc ) locate the “Learn”, “Smart ”, “Set ” or “Program” button This can usually be found where the hanging antenna wire is attached to the motor-head unit (see the device’s manual to identify this button) The name and color of the button may vary by
manufacturer A ladder and/or second person may simplify the following steps
7 Firmly press and release the “Learn”, “Smart ”, “Set ” or “Program” button You now have up to 30 seconds to complete the next step
8 Return to the vehicle and firmly press and hold the HomeLink® button slowly, for two seconds, up to three
times in a row Do not press the HomeLink® button rapidly As soon as you see the garage door start to move, stop pressing any buttons until a few seconds after the garage door has come to a complete stop, regardless of position At this point programming is complete and your device should operate when the HomeLink® Channel button is pressed
A HomeLink® button
B HomeLink® button
C HomeLink® button
D Garage Door Opener Status Indicator:
Closing or Closed
E HomeLink Operation Indicator
F Garage Door Opener Status Indicator:
Opening or Opened
G HomeLink User Inter face Indicator
EDF(RearviewMirror)
G
For illustrative purposes only Your actual display, but tons and/or features may var y