check engine KIA TELLURIDE 2021 Features and Functions Guide
[x] Cancel search | Manufacturer: KIA, Model Year: 2021, Model line: TELLURIDE, Model: KIA TELLURIDE 2021Pages: 70, PDF Size: 8.41 MB
Page 27 of 70

25
DRIVER’S PANEL
DRIVER’S PANEL
Reverse Parking Aid Function†6
When the gear shift lever is moved into R (Reverse) and the vehicle is moving backwards, the outside
rearview mirrors will rotate downward to aid in reverse parking.
To turn the Reverse Parking Aid Function ON, move switch
A to either the right or to the left. To turn OFF,
move switch to the center position.
The outside rearview mirrors will automatically return to their original positions when:
§ The Engine Start /Stop button is in the OFF position
§ The gear shift lever is moved out of R (Reverse)
§
The outside rearview mirror switch is in the center position
(Mirror shown is for illustrative purposes only)
REMINDER: When the buttons are not
pressed , the Reverse Parking Aid Function
will not operate and the outside rearview
mirrors will not rotate downward.
R
L
A
See section 4 in the Owner’s Manual for more information.
(Button located on driver’s panel, left of the steering wheel)
REMINDERS:
§ The Engine Start /Stop button needs to be on
§ The Gear Shift needs to be in (P) Park
Power Liftgate Open/Close Button *
Press and hold the Power Liftgate Open/Close button B to open or close the Liftgate automatically.
B
See
section 4 in the Owner’s Manual for more information.
ALWAYS CHECK THE OWNER’S MANUAL FOR COMPLE TE
OPERATING INFORMATION AND SAFETY WARNINGS. *IF EQUIPPED
†LEG AL DISCL AIMERS ON BACK INSIDE COVER
Page 29 of 70
27
DRIVER’S PANEL
DRIVER’S PANEL
Heated Outside Mirrors
Mirror heaters automatically turn ON/OFF at the same time the Rear Window Defroster is turned ON/OFF.
Rear Window Defroster button is located on the climate control system panel.
See section 4 in the Owner’s Manual for more information.
Auto Door Lock/Unlock
Auto Door Lock /Unlock will engage when the gear shift is moved into or out of the P (Park) position. Refer
to the User Settings on how to turn Auto Door Lock /Unlock ON/OFF.
See section 4 in the Owner’s Manual for more information.
REMINDERS:
§ If the Smart Key fob battery is dead, you can still start the engine by pressing the ENGINE START/STOP button with the Lock-button
end of the Smart Key. The Smart Key must contact the ENGINE START/STOP button directly, at a right angle
§ In an emergency situation while the vehicle is in motion, you are able to turn the engine off and to the ACC position by pressing the
ENGINE START/STOP button for more than 2 seconds or 3 times successively within 3 seconds
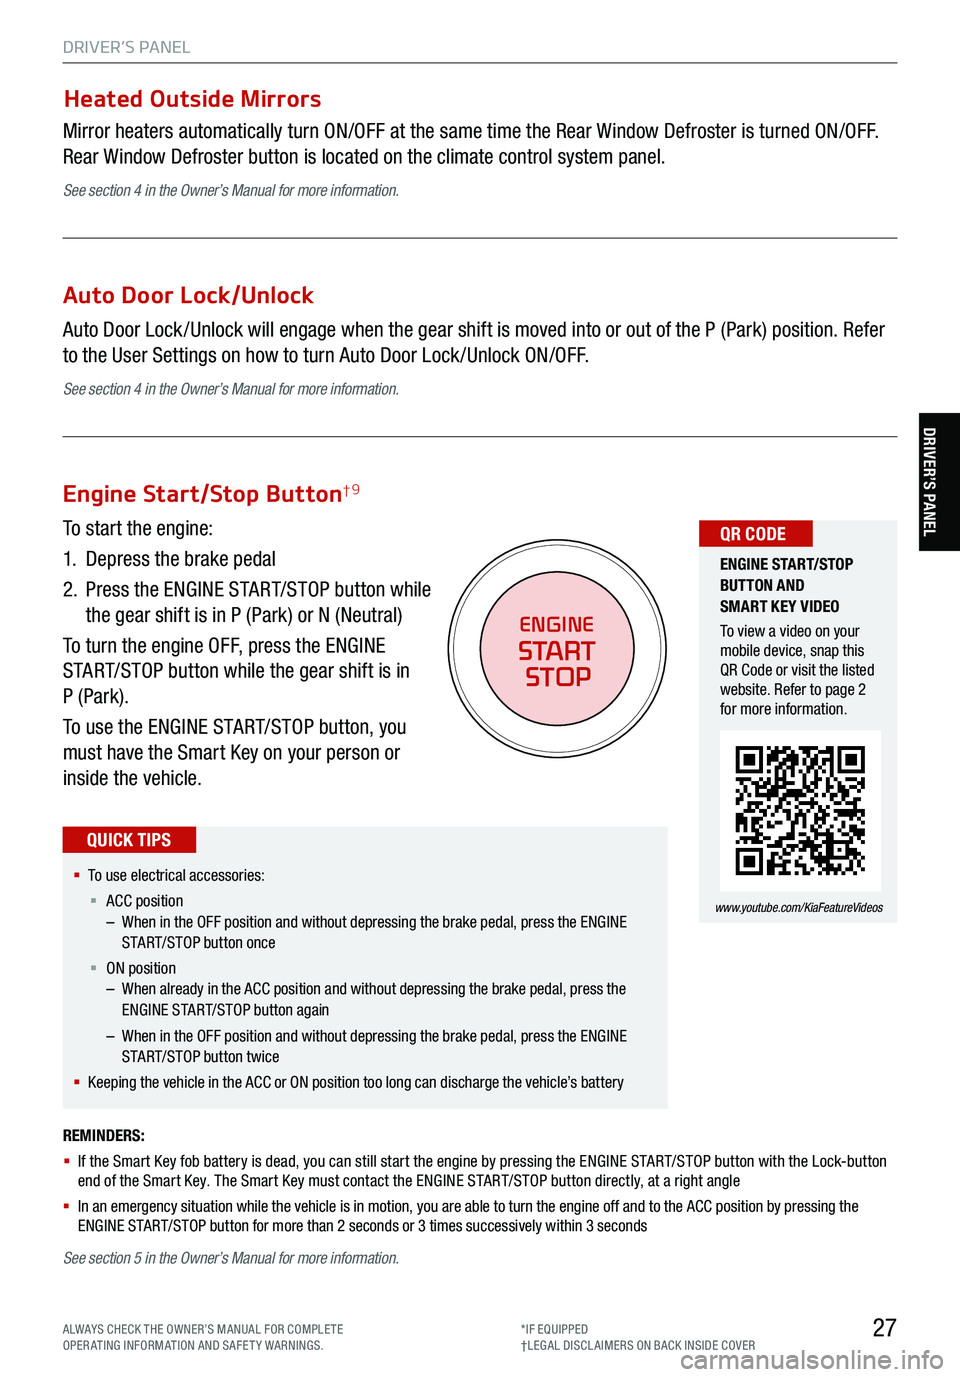
Engine Start/Stop Button†9
To start the engine:
1. Depress the brake pedal
2.
Press the ENGINE START/STOP button while
the gear shift is in P (Park) or N (Neutral)
To turn the engine OFF, press the ENGINE
START/STOP button while the gear shift is in
P (Park).
To use the ENGINE START/STOP button, you
must have the Smart Key on your person or
inside the vehicle.
§ To use electrical accessories:
§ ACC position
– When in the OFF position and without depressing the brake pedal, press the ENGINE
START/STOP button once
§ ON position
– When already in the ACC position and without depressing the brake pedal, press the
ENGINE START/STOP button again
– When in the OFF position and without depressing the brake pedal, press the ENGINE
START/STOP button twice
§ Keeping the vehicle in the ACC or ON position too long can discharge the vehicle’s battery
QUICK TIPS
ENGINE
START
STOP
ENGINE STA RT/STOP
BUTTON AND
SMART KEY VIDEO
To view a video on your
mobile device, snap this
QR Code or visit the listed
website. Refer to page 2
for more information.
www.youtube.com/KiaFeatureVideos
QR CODE
See section 5 in the Owner’s Manual for more information.
ALWAYS CHECK THE OWNER’S MANUAL FOR COMPLE TE
OPERATING INFORMATION AND SAFETY WARNINGS. *IF EQUIPPED
†LEG AL DISCL AIMERS ON BACK INSIDE COVER
Page 31 of 70
29
CENTER PANEL
CENTER PANEL
Idle, Stop & Go (ISG) System
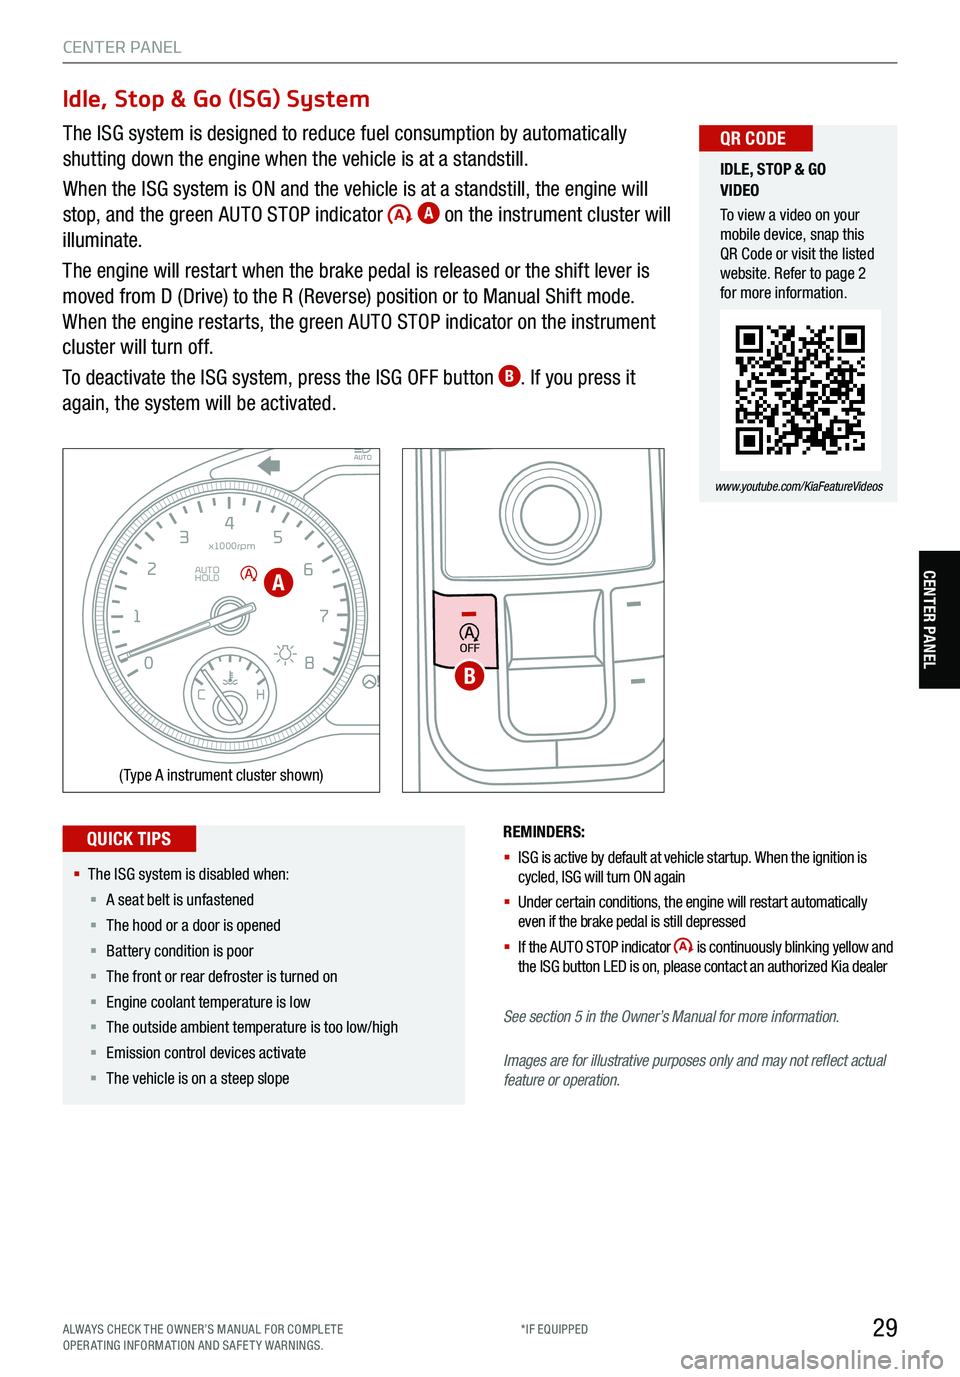
The ISG system is designed to reduce fuel consumption by automatically
shutting down the engine when the vehicle is at a standstill.
When the ISG system is ON and the vehicle is at a standstill, the engine will
stop, and the green AUTO STOP indicator
A on the instrument cluster will
illuminate.
The engine will restart when the brake pedal is released or the shift lever is
moved from D (Drive) to the R (Reverse) position or to Manual Shift mode.
When the engine restarts, the green AUTO STOP indicator on the instrument
cluster will turn off.
To deactivate the ISG system, press the ISG OFF button
B. If you press it
again, the system will be activated.
REMINDERS:
§ ISG is active by default at vehicle startup. When the ignition is
cycled, ISG will turn ON again
§ Under certain conditions, the engine will restart automatically
even if the brake pedal is still depressed
§ If the AUTO STOP indicator
is continuously blinking yellow and
the ISG button LED is on , please contact an authorized Kia dealer
See section 5 in the Owner’s Manual for more information .
Images are for illustrative purposes only and may not reflect actual
feature or operation.
EPB
AUTO
0 8
CH
12
3
4
5
6
7
x1000rpm
AUTO
HOLD
160
00
20
40
60
200
220
240
260
80
180
100
160
1
20 140
E F
2040
60
80
100
12 0
1 4 0
MPH
km/h
(Type A instrument cluster shown)
OFF
§ The ISG system is disabled when:
§ A seat belt is unfastened
§ The hood or a door is opened
§ Battery condition is poor
§ The front or rear defroster is turned on
§ Engine coolant temperature is low
§ The outside ambient temperature is too low/high
§ Emission control devices activate
§ The vehicle is on a steep slope
QUICK TIPS
IDLE, STOP & GO
VIDEO
To view a video on your
mobile device, snap this
QR Code or visit the listed
website. Refer to page 2
for more information.
www.youtube.com/KiaFeatureVideos
QR CODE
A
B
ALWAYS CHECK THE OWNER’S MANUAL FOR COMPLE TE
OPERATING INFORMATION AND SAFETY WARNINGS. *IF EQUIPPED
Page 35 of 70
33
CENTER PANEL
CENTER PANEL
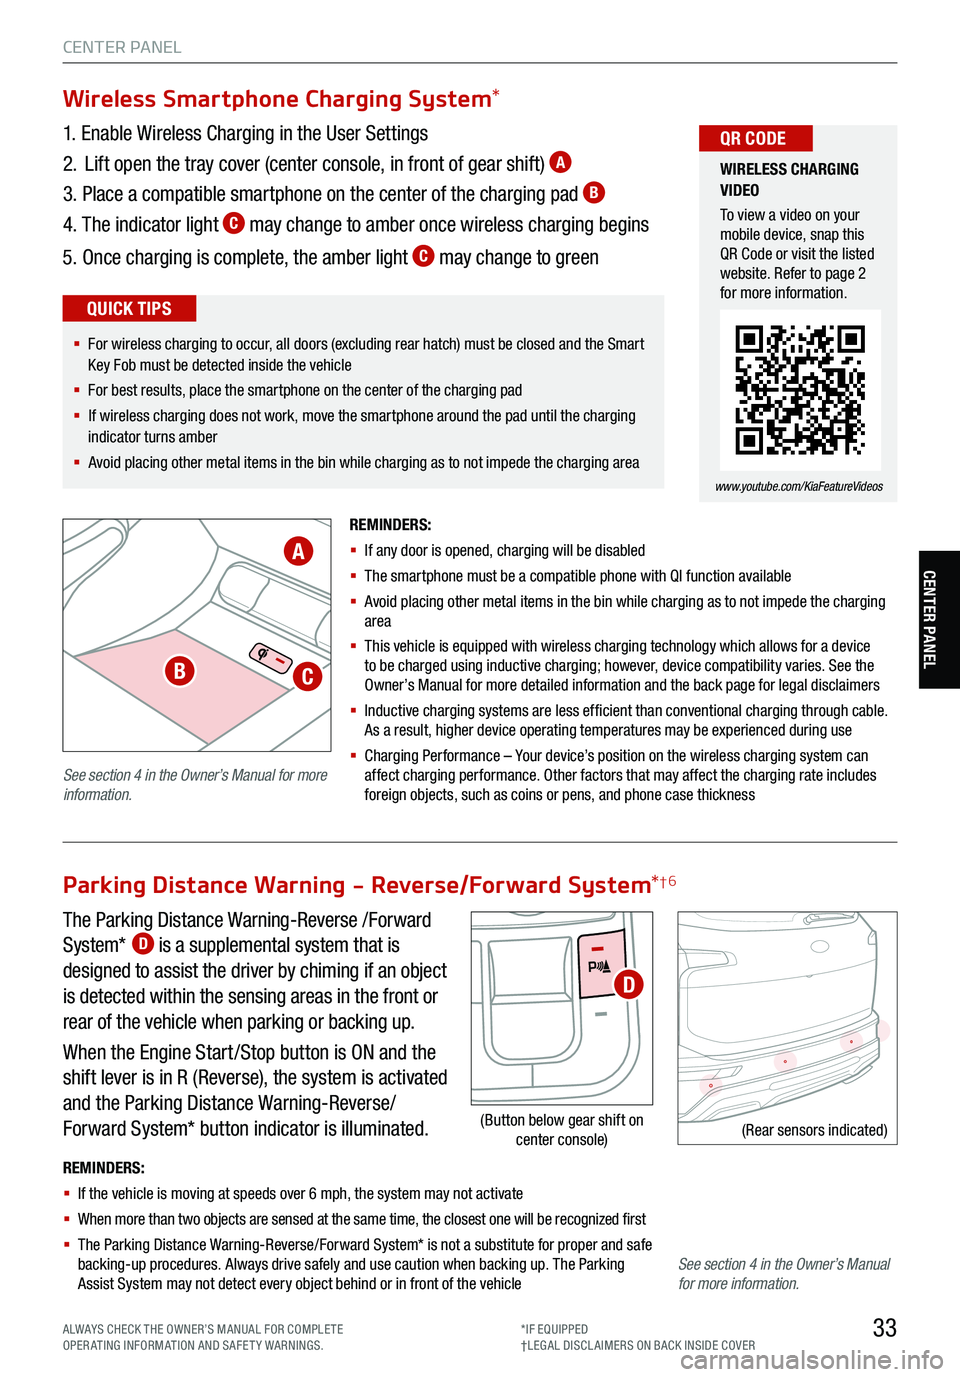
The Parking Distance Warning-Reverse /Forward
System* D is a supplemental system that is
designed to assist the driver by chiming if an object
is detected within the sensing areas in the front or
rear of the vehicle when parking or backing up.
When the Engine Start /Stop button is ON and the
shift lever is in R (Reverse), the system is activated
and the Parking Distance Warning-Reverse/
Forward System* button indicator is illuminated.
REMINDERS:
§ If the vehicle is moving at speeds over 6 mph, the system may not activate
§ When more than two objects are sensed at the same time, the closest one will be recognized first
§ The Parking Distance Warning-Reverse/Forward System* is not a substitute for proper and safe
backing-up procedures. Always drive safely and use caution when backing up. The Parking
Assist System may not detect every object behind or in front of the vehicle
(Rear sensors indicated)
Parking Distance Warning - Reverse/Forward System *†6
(Button below gear shift on
center console)
D
Wireless Smartphone Charging System *
1. Enable Wireless Charging in the User Settings
2. Lift open the tray cover (center console, in front of gear shift)
A
3. Place a compatible smartphone on the center of the charging pad B
4. The indicator light C may change to amber once wireless charging begins
5. Once charging is complete, the amber light
C may change to green
REMINDERS:
§ If any door is opened, charging will be disabled
§ The smartphone must be a compatible phone with QI function available
§ Avoid placing other metal items in the bin while charging as to not impede the charging
area
§ This vehicle is equipped with wireless charging technology which allows for a device
to be charged using inductive charging ; however , device compatibility varies. See the
O wner’s Manual for more detailed information and the back page for legal disclaimers
§ Inductive charging systems are less ef ficient than conventional charging through cable.
As a result, higher device operating temperatures may be experienced during use
§ Charging Performance – Your d evice’s position on the wireless charging system can
affect charging performance. Other factors that may affect the charging rate includes
foreign objects, such as coins or pens, and phone case thickness
WIRELESS CHARGING
VIDEO
To view a video on your
mobile device, snap this
QR Code or visit the listed
website. Refer to page 2
for more information.
www.youtube.com/KiaFeatureVideos
QR CODE
§ For wireless charging to occur, all doors (excluding rear hatch) must be closed and the Smart
Key Fob must be detected inside the vehicle
§ For best results, place the smartphone on the center of the charging pad
§ If wireless charging does not work, move the smartphone around the pad until the charging
indicator turns amber
§ Avoid placing other metal items in the bin while charging as to not impede the charging area
QUICK TIPS
A
BC
See section 4 in the Owner’s Manual for more
information.
See section 4 in the Owner’s Manual
for more information.
ALWAYS CHECK THE OWNER’S MANUAL FOR COMPLE TE
OPERATING INFORMATION AND SAFETY WARNINGS. *IF EQUIPPED
†LEG AL DISCL AIMERS ON BACK INSIDE COVER
Page 39 of 70

37
STEERING WHEEL CONTROLS
STEERING WHEEL CONTROLS
Cruise Control *
A Cruise Control ON/OFF button: Press to turn the cruise control ON/OFF
B Resume Cruising Speed button: Press up to resume or increase cruising speed
Set Cruising Speed button: Press down to set or decrease cruising speed
C Cruise Control Cancel button: To cancel cruise control setting, do one of the following:
§ Press the brake pedal
§ Press the CANCEL button
CRUISE
CANCEL
RES
OK SET
§ The standard cruise control system is designed to function a t above
approximately 20 mph only
§ The Cruise Control system will not activate until the brake pedal has been
depressed at least once after ignition ON or engine start
QUICK TIPS
A
B
C
See section 5 in the Owner’s Manual for more information.
ALWAYS CHECK THE OWNER’S MANUAL FOR COMPLE TE
OPERATING INFORMATION AND SAFETY WARNINGS. *IF EQUIPPED
Page 41 of 70
39
STEERING WHEEL CONTROLS
Headlight position
Parking Light position
AUTOAuto Light /DRL /
High Beam Assist*
OFFOFF position
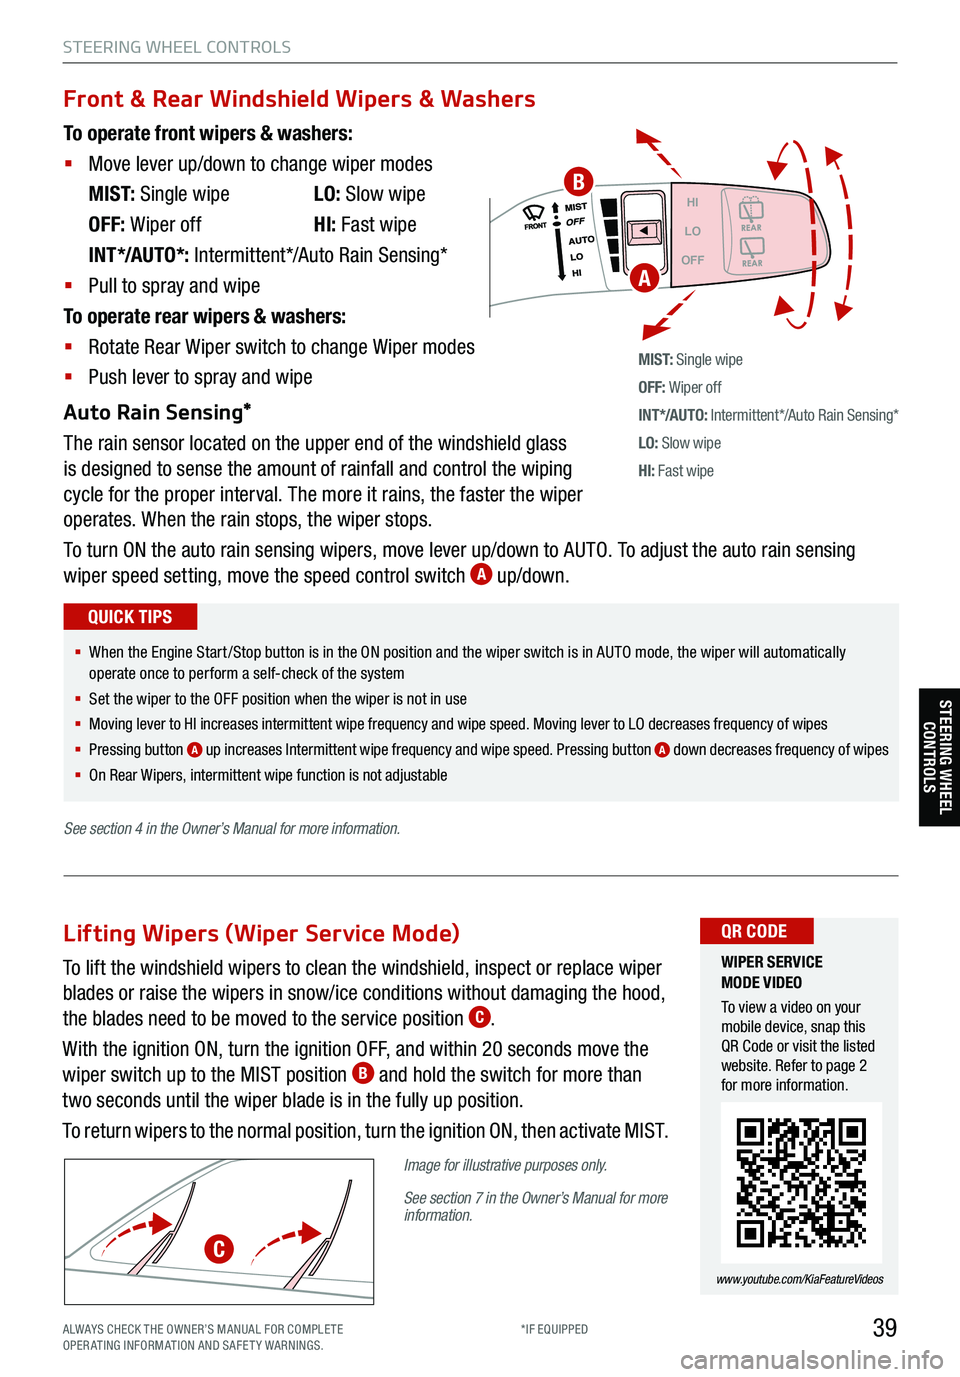
To operate front wipers & washers:
§ Move lever up/down to change wiper modes
M I S T: Single wipe LO: Slow wipe
OFF: Wiper off HI: Fast wipe
INT*/AUTO*: Intermittent*/Auto Rain Sensing*
§ Pull to spray and wipe
To operate rear wipers & washers:
§ Rotate Rear Wiper switch to change Wiper modes
§ Push lever to spray and wipe
Auto Rain Sensing*
The rain sensor located on the upper end of the windshield glass
is designed to sense the amount of rainfall and control the wiping
cycle for the proper interval. The more it rains, the faster the wiper
operates. When the rain stops, the wiper stops.
To turn ON the auto rain sensing wipers, move lever up/down to AUTO. To adjust the auto rain sensing
wiper speed setting, move the speed control switch
A up/down.
M I S T: Single wipe
OFF: Wiper off
IN T */AU TO: Intermittent*/Auto Rain Sensing*
LO: Slow wipe
HI: Fast wipe
HI
LO
OFF
Front & Rear Windshield Wipers & Washers
§ When the Engine Start /Stop button is in the ON position and the wiper switch is in AUTO mode, the wiper will automatically
operate once to perform a self-check of the system
§ Set the wiper to the OFF position when the wiper is not in use
§
Moving lever to HI increases intermittent wipe frequency and wipe speed. Moving lever to LO decreases frequency of wipes
§ Pressing button
A up increases Intermittent wipe frequency and wipe speed. Pressing button A down decreases frequency of wipes
§ On Rear Wipers, intermittent wipe function is not adjustable
QUICK TIPS
WIPER SERVICE
MODE VIDEO
To view a video on your
mobile device, snap this
QR Code or visit the listed
website. Refer to page 2
for more information.
www.youtube.com/KiaFeatureVideos
QR CODE
A
To lift the windshield wipers to clean the windshield, inspect or replace wiper
blades or raise the wipers in snow/ice conditions without damaging the hood,
the blades need to be moved to the service position
C.
With the ignition ON, turn the ignition OFF, and within 20 seconds move the
wiper switch up to the MIST position
B and hold the switch for more than
two seconds until the wiper blade is in the fully up position.
To return wipers to the normal position, turn the ignition ON, then activate MIST.
Image for illustrative purposes only.
See section 7 in the Owner’s Manual for more
information.
Lifting Wipers (Wiper Service Mode)
C
B
STEERING WHEEL CONTROLS
See section 4 in the Owner’s Manual for more information.
ALWAYS CHECK THE OWNER’S MANUAL FOR COMPLE TE
OPERATING INFORMATION AND SAFETY WARNINGS. *IF EQUIPPED
Page 49 of 70
47
AUDIO SYSTEMS
AUDIO SYSTEMS
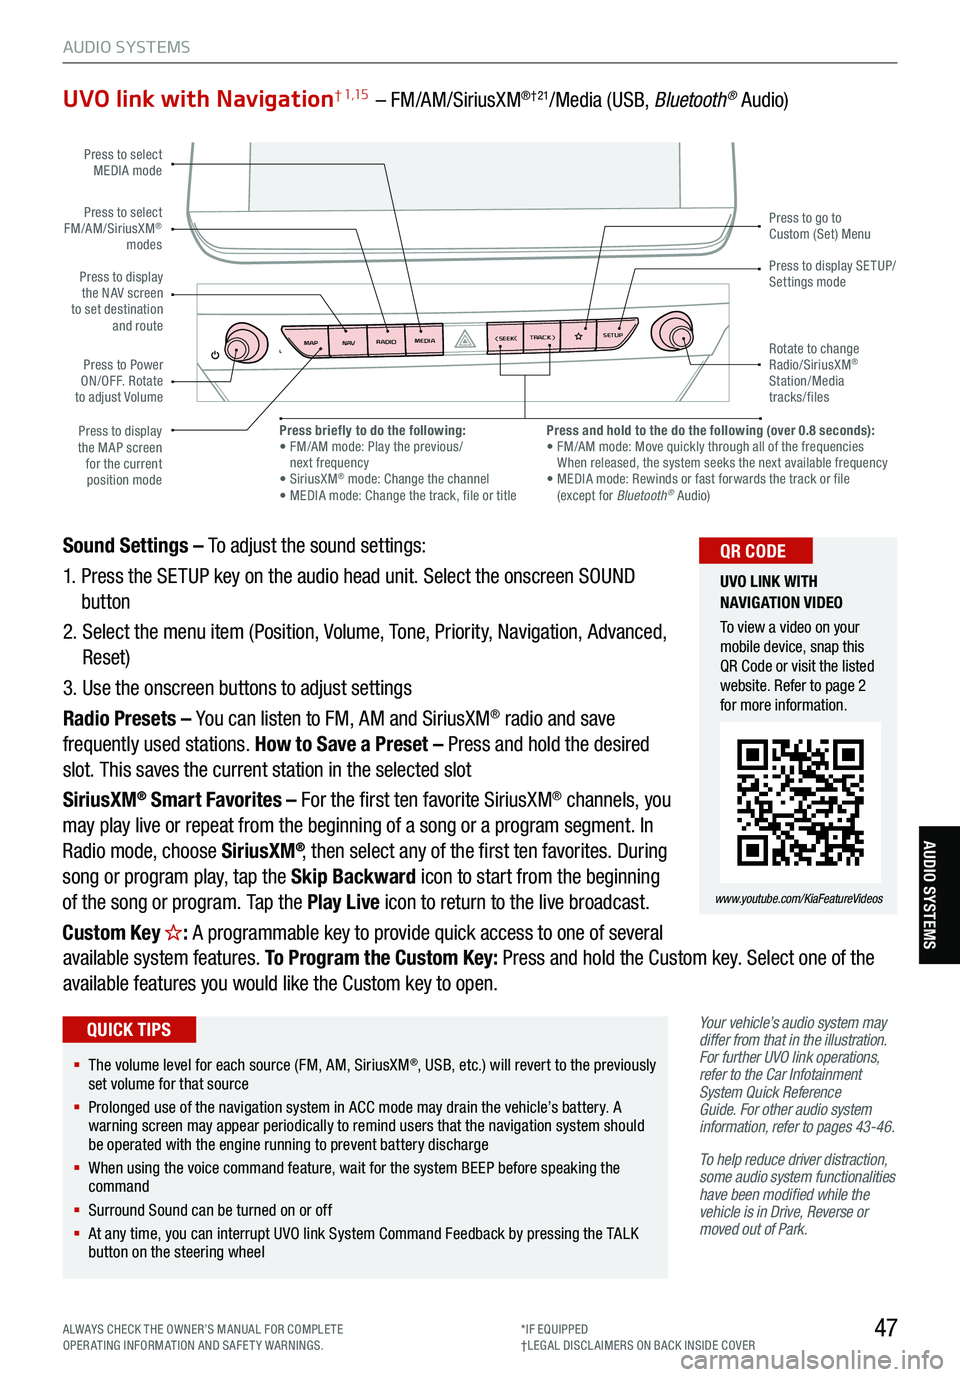
UVO link with Navigation† 1,15 – FM/AM/SiriusXM®†21/Media (USB, Bluetooth® Audio)
Your vehicle’s audio system may
differ from that in the illustration.
For further UVO link operations,
refer to the Car Infotainment
System Quick Reference
Guide. For other audio system
information, refer to pages 43-46 .
To help reduce driver distraction,
some audio system functionalities
have been modified while the
vehicle is in Drive, Reverse or
moved out of Park.
Sound Settings – To adjust the sound settings:
1. Press the SETUP key on the audio head unit. Select the onscreen SOUND
button
2. Select the menu item (Position, Volume, Tone, Priority, Navigation, Advanced,
Reset)
3. Use the onscreen buttons to adjust settings
Radio Presets – You can listen to FM, AM and SiriusXM
® radio and save
frequently used stations. How to Save a Preset – Press and hold the desired
slot. This saves the current station in the selected slot
SiriusXM
® Smart Favorites – For the first ten favorite SiriusXM® channels, you
may play live or repeat from the beginning of a song or a program segment. In
Radio mode, choose SiriusXM
®, then select any of the first ten favorites. During
song or program play, tap the Skip Backward icon to start from the beginning
of the song or program. Tap the Play Live icon to return to the live broadcast.
Custom Key
H: A programmable key to provide quick access to one of several
available system features. To Program the Custom Key: Press and hold the Custom key. Select one of the
available features you would like the Custom key to open.
MAP RADIO
N AV MEDIASEEK<
Page 57 of 70

Opening with no-touch activation:
When the Smart Key fob is on your person and you are near the back of the
vehicle, within close proximity, the hazard lights will blink and a chime will sound
for about 3 seconds as an alert that the Smart Power Liftgate* is about to open.
Then the alert system will blink and chime two additional times before opening
the Smart Power Liftgate*.
The Smart Power Liftgate* feature is OFF by default. To enable the Smart Power
Liftgate*, go to User Settings in the LCD Instrument Cluster modes.
Smart Key:
To open the Smart Power Liftgate*, press and hold the Smart Key Liftgate
button
E until the Liftgate begins opening. Press again and hold to close.
Power Liftgate Height Adjustment:
For your convenience, the liftgate opening height is adjustable. To program the
opening height, perform the following:
1. Open liftgate and manually position the liftgate to your preferred opening height
2. Depress and hold the close button on the liftgate for 3 seconds or more
3. Once the system sounds the alert that the programming
is complete, manually close the liftgate
Power Liftgate Opening/Closing Speed Setting:
Go to the User Settings
in the Instrument Cluster. Select Door, then Power
Liftgate Speed, and select Fast or Normal.
55
Smart Power Liftgate * (Continued)
REMINDERS:
§ Smart Power Liftgate may be damaged if attempting to open or close manually
§ When not in use, keep the Liftgate Lid Control button in the OFF position
§ If going through a car wash, remind the attendant to keep the vehicle in Neutral (N) and keep the engine running. Also, disable the Smart
Power Liftgate lid control using the button inside the glove compartment, turn off the auto rain-sensing wipers and fold in the mirrors
§ Ensure all obstacles are out of the way of the liftgate lid when operating the Smart Power Liftgate
§ The default liftgate opening/closing speed is set to fast
§ The liftgate opening/closing speed setting cannot be changed when the Power Liftgate function is turned off or if the liftgate is not
completely closed
HOLDHOLD
KIA KEY FOB
VIDEO
To view a video on your
mobile device, snap this
QR Code or visit the listed
website. Refer to page 2
for more information.
www.youtube.com/KiaFeatureVideos
QR CODE
§ The liftgate must be unlocked before it can be opened by the liftgate Release button
§ The liftgate unlocks automatically and then can be opened manually when the Smart Key is
within close proximity to the vehicle
QUICK TIPS
OTHER KEY FEATURES
E
OTHER KEY FE AT URE SSee section 4 in the Owner’s Manual for more information.
ALWAYS CHECK THE OWNER’S MANUAL FOR COMPLE TE
OPERATING INFORMATION AND SAFETY WARNINGS. *IF EQUIPPED
†LEG AL DISCL AIMERS ON BACK INSIDE COVER
Page 59 of 70
57
Map/Room Lamps
Automatic Turn Off Function
The interior lights automatically turn off approximately 20 seconds after the Engine Start /Stop button is
turned OFF.
Map/Room Lamp Operation
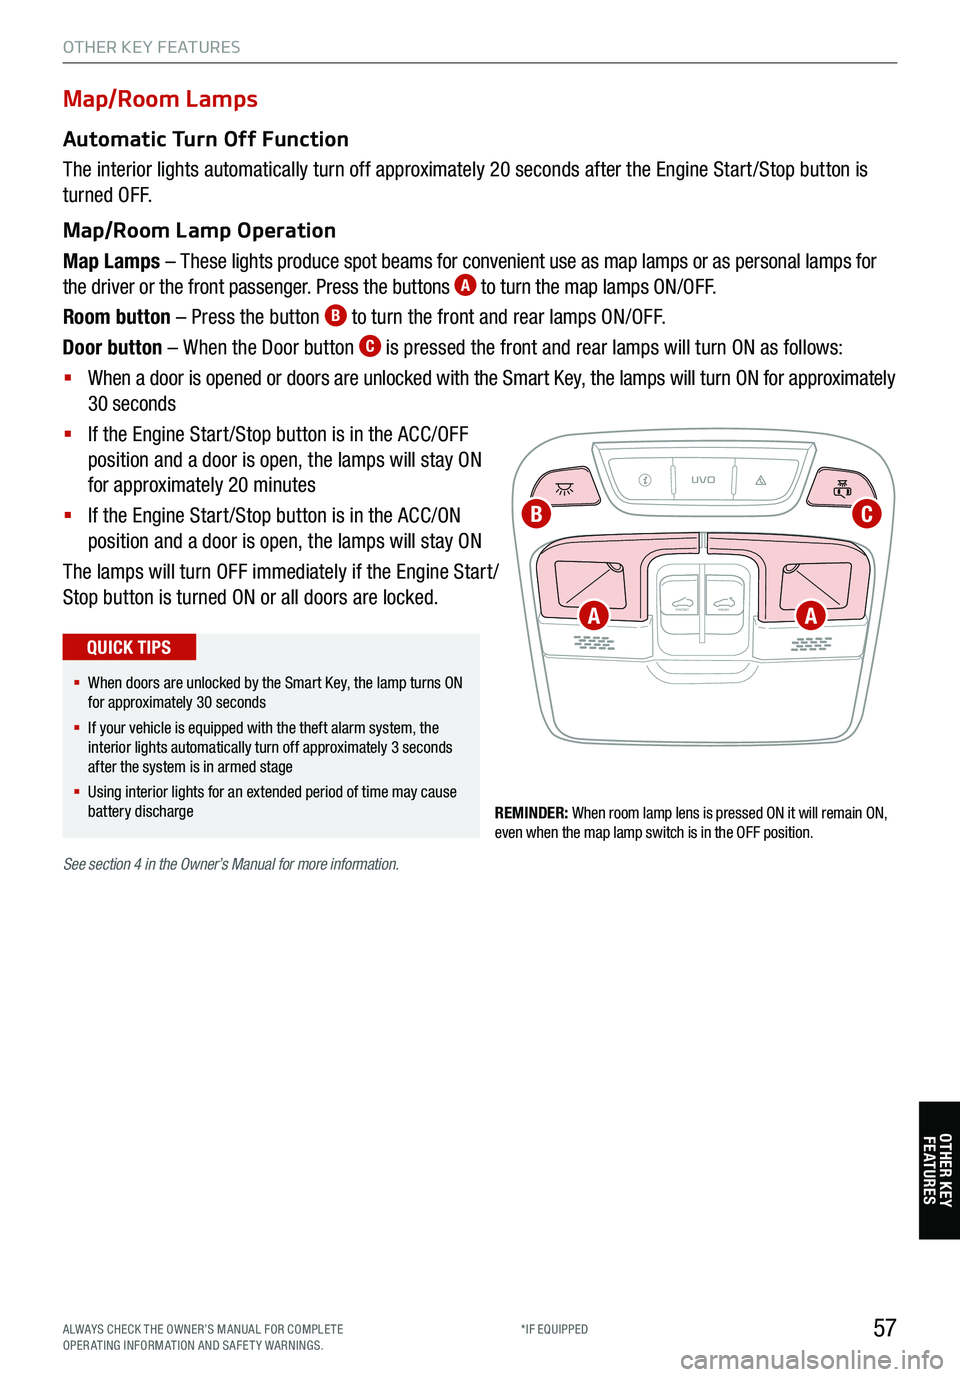
Map Lamps – These lights produce spot beams for convenient use as map lamps or as personal lamps for
the driver or the front passenger. Press the buttons
A to turn the map lamps ON/OFF.
Room button – Press the button
B to turn the front and rear lamps ON/OFF.
Door button – When the Door button
C is pressed the front and rear lamps will turn ON as follows:
§ When a door is opened or doors are unlocked with the Smart Key, the lamps will turn ON for approximately
30 seconds
§ If the Engine Start /Stop button is in the ACC/OFF
position and a door is open, the lamps will stay ON
for approximately 20 minutes
§ If the Engine Start /Stop button is in the ACC/ON
position and a door is open, the lamps will stay ON
The lamps will turn OFF immediately if the Engine Start /
Stop button is turned ON or all doors are locked.
REMINDER: When room lamp lens is pressed ON it will remain ON,
even when the map lamp switch is in the OFF position.
UVO
FRONT REAR
ONOFFDOOR
See
section 4 in the Owner’s Manual for more information.
§ When doors are unlocked by the Smart Key, the lamp turns ON
for approximately 30 seconds
§ If your vehicle is equipped with the theft alarm system, the
interior lights automatically turn off approximately 3 seconds
after the system is in armed stage
§ Using interior lights for an extended period of time may cause
battery discharge
QUICK TIPS
OTHER KEY FEATURES
A
CB
A
OTHER KEY FE AT URE S
ALWAYS CHECK THE OWNER’S MANUAL FOR COMPLE TE
OPERATING INFORMATION AND SAFETY WARNINGS. *IF EQUIPPED
Page 61 of 70
REMINDERS:
§ The Rear View Monitor is not a substitute for proper and safe backing-up procedures
§ The Rear View Monitor may not display every object behind the vehicle
§ Always drive carefully and use caution when backing up
See section 4 in the Owner’s Manual for more information. Images are for illustrative purposes only and may not reflect actual feature or
operation.
59
Rear View Monitor (RVM) System†6
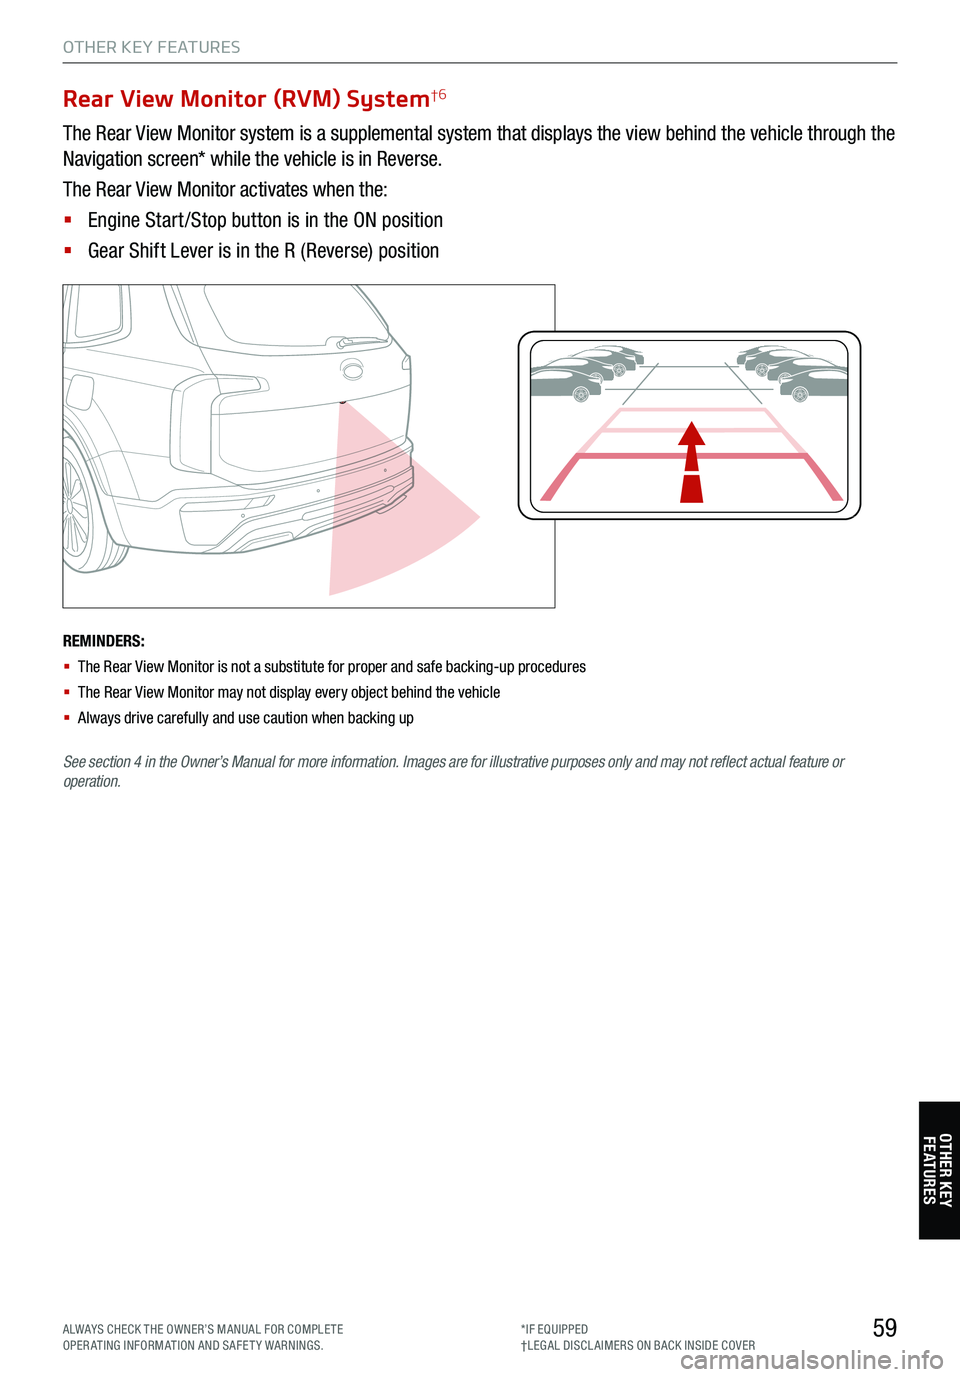
The Rear View Monitor system is a supplemental system that displays the view behind the vehicle through the
Navigation screen* while the vehicle is in Reverse.
The Rear View Monitor activates when the:
§ Engine Start /Stop button is in the ON position
§ Gear Shift Lever is in the R (Reverse) position
P
R
N
DSHIFTL OCK
RELEASE
OTHER KEY FEATURES
OTHER KEY FE AT URE S
ALWAYS CHECK THE OWNER’S MANUAL FOR COMPLE TE
OPERATING INFORMATION AND SAFETY WARNINGS. *IF EQUIPPED
†LEG AL DISCL AIMERS ON BACK INSIDE COVER