KIA VENGA 2015 Owner's Manual
Manufacturer: KIA, Model Year: 2015, Model line: VENGA, Model: KIA VENGA 2015Pages: 480, PDF Size: 23.15 MB
Page 21 of 480
21
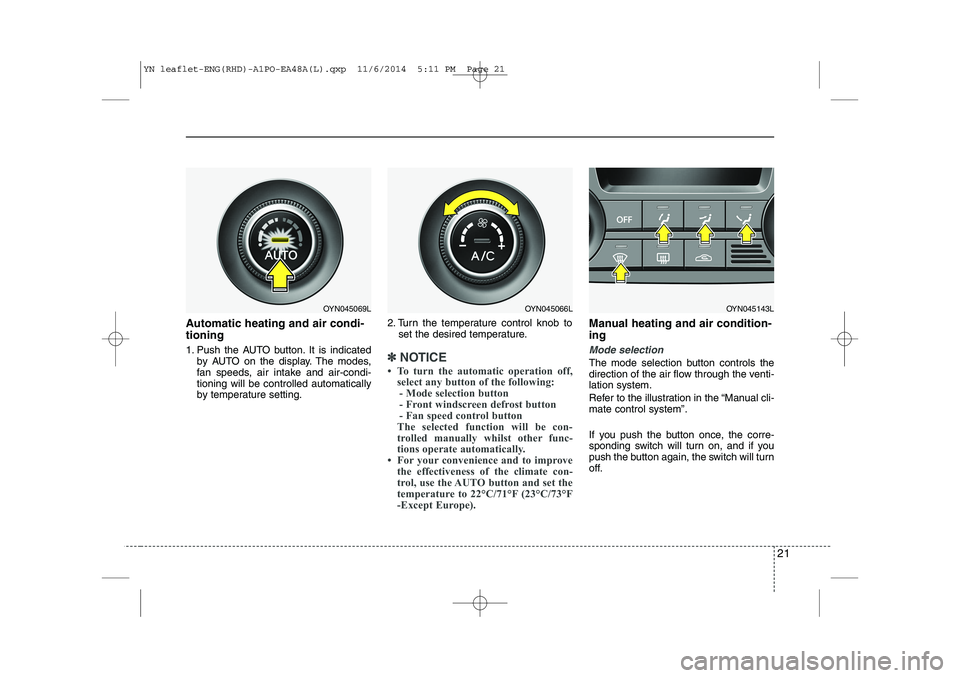
Automatic heating and air condi- tioning
1. Push the AUTO button. It is indicatedby AUTO on the display. The modes,
fan speeds, air intake and air-condi-tioning will be controlled automatically
by temperature setting. 2. Turn the temperature control knob to
set the desired temperature.
✽✽ NOTICE
To turn the automatic operation off, select any button of the following:- Mode selection button
- Front windscreen defrost button
- Fan speed control button
The selected function will be con-
trolled manually whilst other func-
tions operate automatically.
For your convenience and to improve the effectiveness of the climate con-
trol, use the AUTO button and set the
temperature to 22°C/71°F (23°C/73°F
-Except Europe).
Manual heating and air condition- ing
Mode selection
The mode selection button controls the
direction of the air flow through the venti-lation system.
Refer to the illustration in the “Manual cli- mate control system”.
If you push the button once, the corre-
sponding switch will turn on, and if you
push the button again, the switch will turn
off.
OYN045069LOYN045066LOYN045143L
YN leaflet-ENG(RHD)-A1PO-EA48A(L).qxp 11/6/2014 5:11 PM Page 21
Page 22 of 480
22
Face-Level (B, D)
Air flow is directed toward the upper body
and face. Additionally, each outlet can becontrolled to direct the air dischargedfrom the outlet.
Floor-Level (C, E, A, D)
Most of the air flow is directed to the
floor.
Defrost-Level (A, D)
Most of the air flow is directed to thewindscreen.
Also you may select 2~3 modes at the
same time for desired air flow.
- face ( ) + floor ( ) mode
- face ( ) + defrost ( ) mode
- floor ( ) + defrost ( ) mode
- face ( ) + floor ( ) + defrost ( ) mode Maximum (MAX) defrost mode
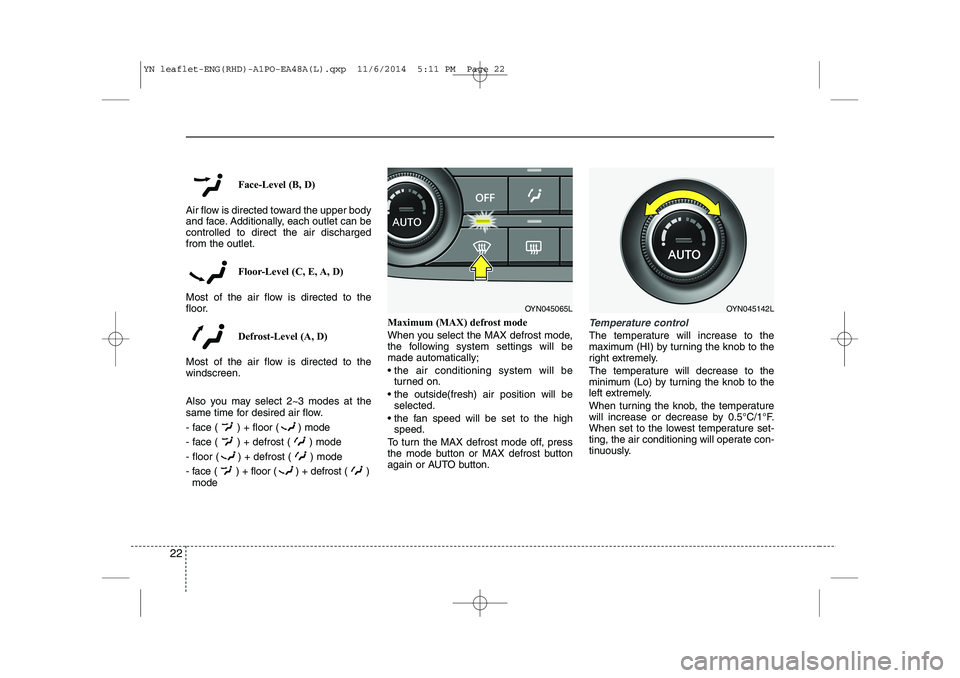
When you select the MAX defrost mode,
the following system settings will bemade automatically;
the air conditioning system will be
turned on.
the outside(fresh) air position will be selected.
the fan speed will be set to the high speed.
To turn the MAX defrost mode off, press
the mode button or MAX defrost button
again or AUTO button.
Temperature control
The temperature will increase to the
maximum (HI) by turning the knob to the
right extremely.
The temperature will decrease to the
minimum (Lo) by turning the knob to the
left extremely.
When turning the knob, the temperature
will increase or decrease by 0.5°C/1°F.
When set to the lowest temperature set-
ting, the air conditioning will operate con-
tinuously.
OYN045065LOYN045142L
YN leaflet-ENG(RHD)-A1PO-EA48A(L).qxp 11/6/2014 5:11 PM Page 22
Page 23 of 480
23
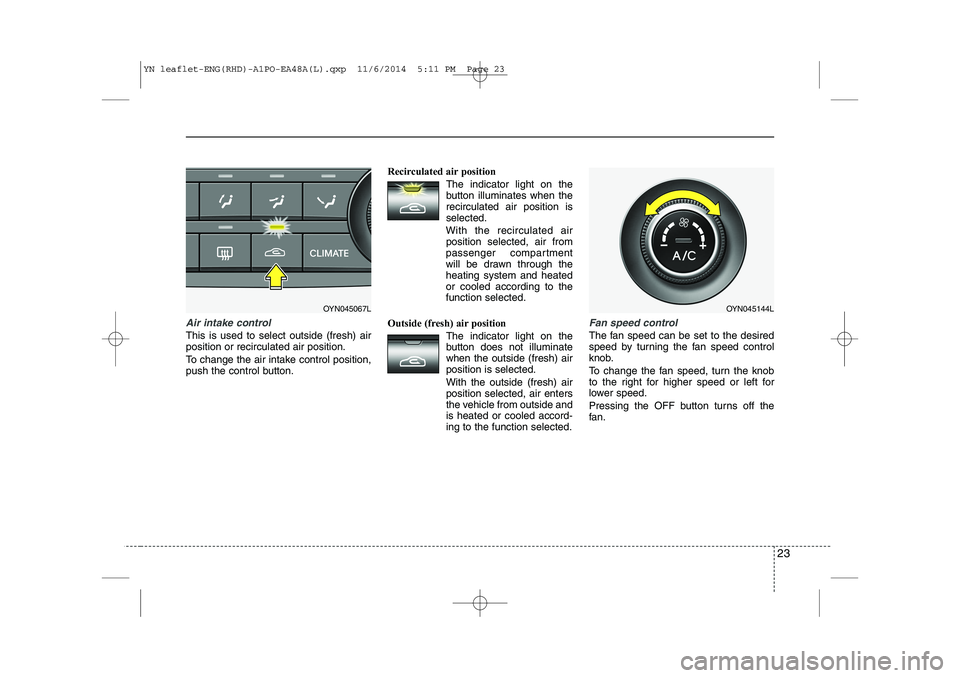
Air intake control
This is used to select outside (fresh) air position or recirculated air position.
To change the air intake control position,
push the control button.Recirculated air position
The indicator light on the
button illuminates when therecirculated air position isselected.
With the recirculated air position selected, air from
passenger compartment
will be drawn through theheating system and heatedor cooled according to thefunction selected.
Outside (fresh) air position The indicator light on the
button does not illuminatewhen the outside (fresh) airposition is selected. With the outside (fresh) air position selected, air enters
the vehicle from outside andis heated or cooled accord-ing to the function selected.
Fan speed control
The fan speed can be set to the desired
speed by turning the fan speed control
knob.
To change the fan speed, turn the knob
to the right for higher speed or left for
lower speed.
Pressing the OFF button turns off the
fan.
OYN045067LOYN045144L
YN leaflet-ENG(RHD)-A1PO-EA48A(L).qxp 11/6/2014 5:11 PM Page 23
Page 24 of 480
24
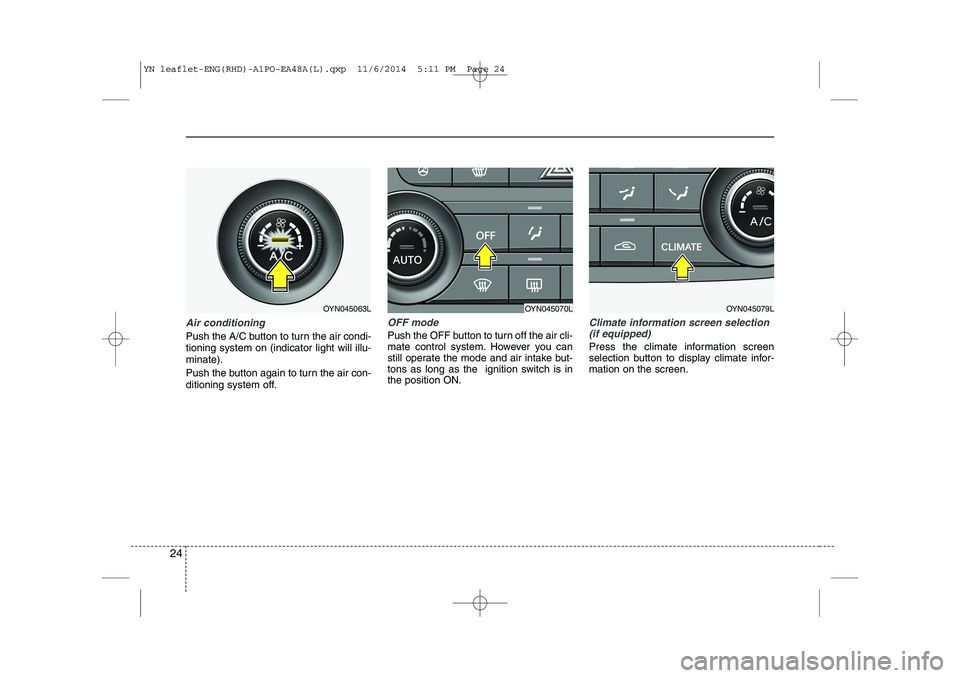
Air conditioning
Push the A/C button to turn the air condi- tioning system on (indicator light will illu-minate).
Push the button again to turn the air con-
ditioning system off.
OFF mode
Push the OFF button to turn off the air cli-
mate control system. However you can
still operate the mode and air intake but-
tons as long as the ignition switch is inthe position ON.
Climate information screen selection(if equipped)
Press the climate information screen
selection button to display climate infor-mation on the screen.
OYN045063LOYN045070LOYN045079L
YN leaflet-ENG(RHD)-A1PO-EA48A(L).qxp 11/6/2014 5:11 PM Page 24
Page 25 of 480
25
❖❖Please see this page instead of page 4-89 in owner's manual.
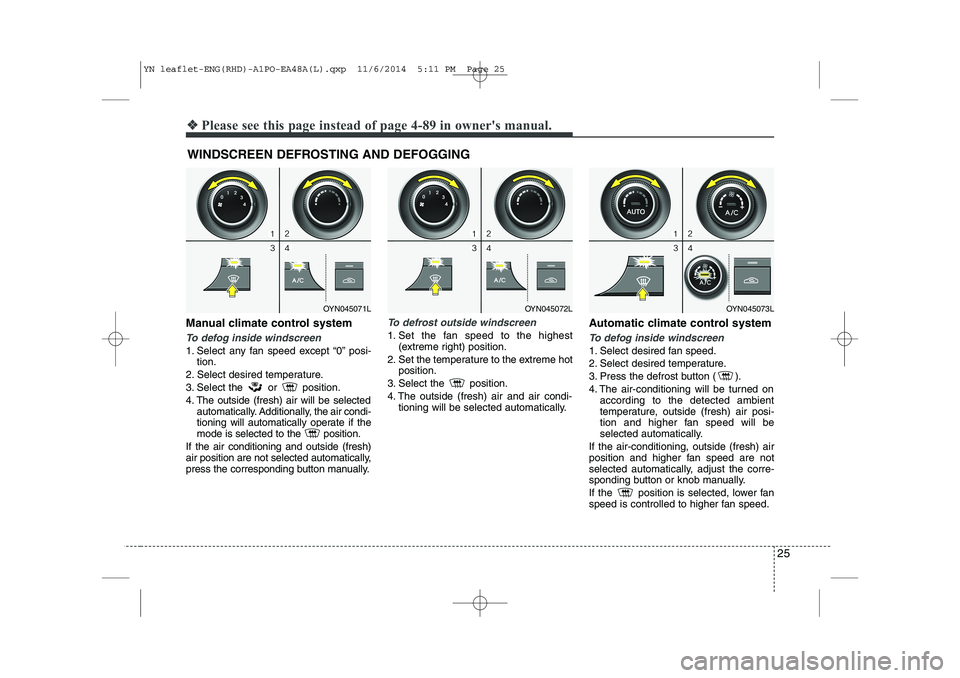
Manual climate control system
To defog inside windscreen
1. Select any fan speed except “0” posi-
tion.
2. Select desired temperature.
3. Select the or position.
4. The outside (fresh) air will be selected automatically. Additionally, the air condi-
tioning will automatically operate if the
mode is selected to the position.
If the air conditioning and outside (fresh)
air position are not selected automatically,
press the corresponding button manually.
To defrost outside windscreen
1. Set the fan speed to the highest (extreme right) position.
2. Set the temperature to the extreme hot position.
3. Select the position.
4. The outside (fresh) air and air condi- tioning will be selected automatically. Automatic climate control systemTo defog inside windscreen
1. Select desired fan speed.
2. Select desired temperature.
3. Press the defrost button ( ).
4. The air-conditioning will be turned on
according to the detected ambient
temperature, outside (fresh) air posi-
tion and higher fan speed will be
selected automatically.
If the air-conditioning, outside (fresh) air
position and higher fan speed are not
selected automatically, adjust the corre-
sponding button or knob manually.
If the position is selected, lower fan
speed is controlled to higher fan speed.
WINDSCREEN DEFROSTING AND DEFOGGING
OYN045072LOYN045073LOYN045071L
YN leaflet-ENG(RHD)-A1PO-EA48A(L).qxp 11/6/2014 5:11 PM Page 25
Page 26 of 480
26
❖❖Please see this page instead of page 4-93 in owner's manual.
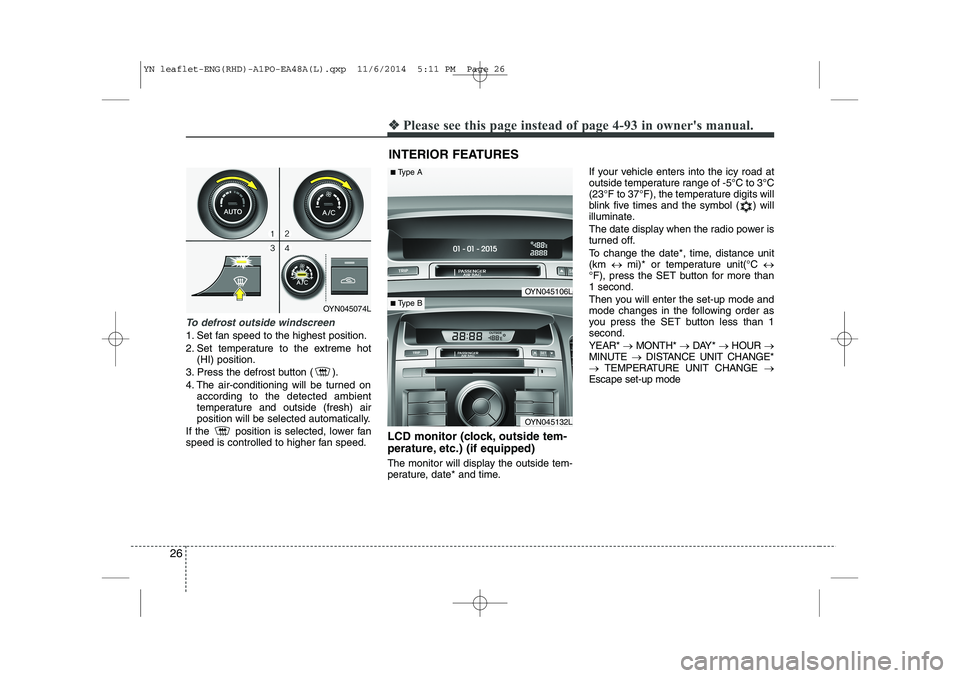
To defrost outside windscreen
1. Set fan speed to the highest position.
2. Set temperature to the extreme hot
(HI) position.
3. Press the defrost button ( ).
4. The air-conditioning will be turned on according to the detected ambient
temperature and outside (fresh) air
position will be selected automatically.
If the position is selected, lower fan
speed is controlled to higher fan speed. LCD monitor (clock, outside tem-
perature, etc.) (if equipped)
The monitor will display the outside tem-
perature, date* and time.If your vehicle enters into the icy road at
outside temperature range of -5°C to 3°C
(23°F to 37°F), the temperature digits will
blink five times and the symbol ( ) will
illuminate.
The date display when the radio power is
turned off.
To change the date*, time, distance unit (km
� mi)* or temperature unit(°C �
°F), press the SET button for more than1 second.
Then you will enter the set-up mode and
mode changes in the following order as
you press the SET button less than 1second. YEAR* �MONTH* �DAY* �HOUR �
MINUTE �DISTANCE UNIT CHANGE*
� TEMPERATURE UNIT CHANGE �
Escape set-up mode
INTERIOR FEATURES
OYN045074L
OYN045106L
OYN045132L
■ Type A
■Type B
YN leaflet-ENG(RHD)-A1PO-EA48A(L).qxp 11/6/2014 5:11 PM Page 26
Page 27 of 480
27
Press the SET button less than 1 second to select the mode and set the data usingthe UP(▲) and DOWN( ▼) button whilst
the selected setting mode blinks.
To cancel the SET UP mode, do one of
the following :
- Press the SET button less than 1 sec- ond in set-up temperature unit change mode
- Press the SET button more than 1 sec- ond in any set-up mode
- After 15 seconds without any key press
- Ignition is ON or OFF in set-up mode
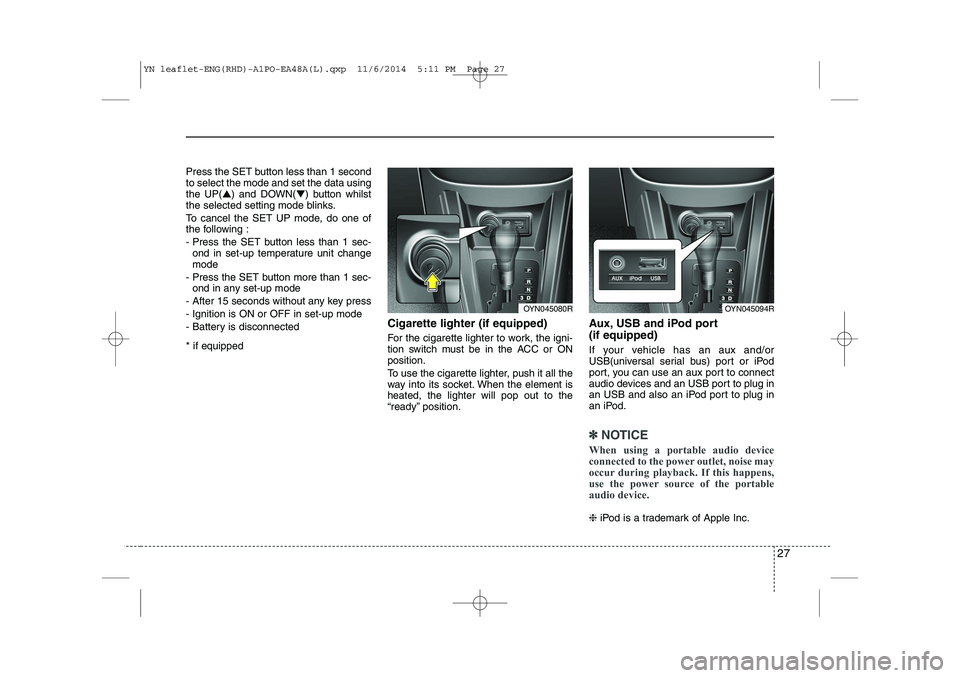
- Battery is disconnected * if equipped Cigarette lighter (if equipped)
For the cigarette lighter to work, the igni-
tion switch must be in the ACC or ONposition.
To use the cigarette lighter, push it all the
way into its socket. When the element isheated, the lighter will pop out to the
“ready” position.Aux, USB and iPod port (if equipped)
If your vehicle has an aux and/or
USB(universal serial bus) port or iPod
port, you can use an aux port to connect
audio devices and an USB port to plug in
an USB and also an iPod port to plug in
an iPod.
✽✽
NOTICE
When using a portable audio device
connected to the power outlet, noise may
occur during playback. If this happens,
use the power source of the portable
audio device.
❈ iPod is a trademark of Apple Inc.
OYN045080ROYN045094R
YN leaflet-ENG(RHD)-A1PO-EA48A(L).qxp 11/6/2014 5:11 PM Page 27
Page 28 of 480
28
❖❖Please see this page instead of page 5-14 in owner's manual.
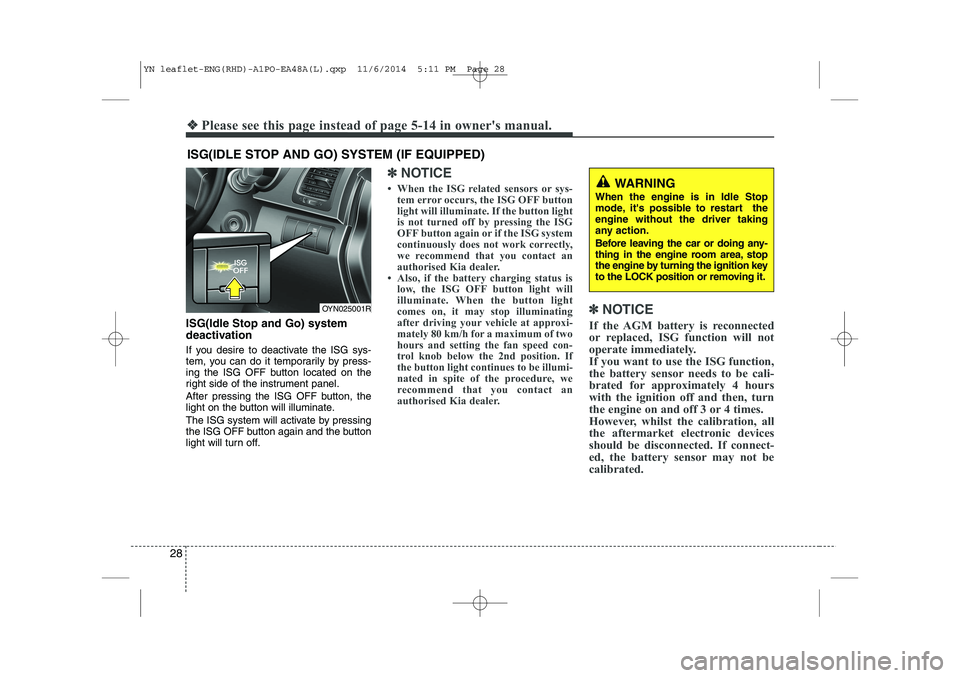
ISG(Idle Stop and Go) system
deactivation
If you desire to deactivate the ISG sys-
tem, you can do it temporarily by press-
ing the ISG OFF button located on the
right side of the instrument panel.
After pressing the ISG OFF button, the
light on the button will illuminate.
The ISG system will activate by pressing
the ISG OFF button again and the button
light will turn off.
✽✽NOTICE
When the ISG related sensors or sys- tem error occurs, the ISG OFF button
light will illuminate. If the button light
is not turned off by pressing the ISG
OFF button again or if the ISG system
continuously does not work correctly,
we recommend that you contact an
authorised Kia dealer.
Also, if the battery charging status is low, the ISG OFF button light will
illuminate. When the button light
comes on, it may stop illuminating
after driving your vehicle at approxi-
mately 80 km/h for a maximum of two
hours and setting the fan speed con-
trol knob below the 2nd position. If
the button light continues to be illumi-
nated in spite of the procedure, we
recommend that you contact an
authorised Kia dealer. ✽
✽
NOTICE
If the AGM battery is reconnected
or replaced, ISG function will not
operate immediately.
If you want to use the ISG function,
the battery sensor needs to be cali-
brated for approximately 4 hours
with the ignition off and then, turn
the engine on and off 3 or 4 times.
However, whilst the calibration, all
the aftermarket electronic devices
should be disconnected. If connect-
ed, the battery sensor may not be
calibrated.
ISG(IDLE STOP AND GO) SYSTEM (IF EQUIPPED)
OYN025001R
WARNING
When the engine is in Idle Stop
mode, it's possible to restart theengine without the driver taking
any action.
Before leaving the car or doing any-
thing in the engine room area, stop
the engine by turning the ignition key
to the LOCK position or removing it.
YN leaflet-ENG(RHD)-A1PO-EA48A(L).qxp 11/6/2014 5:11 PM Page 28
Page 29 of 480
29
❖❖Please see this page instead of page 5-16 in owner's manual.
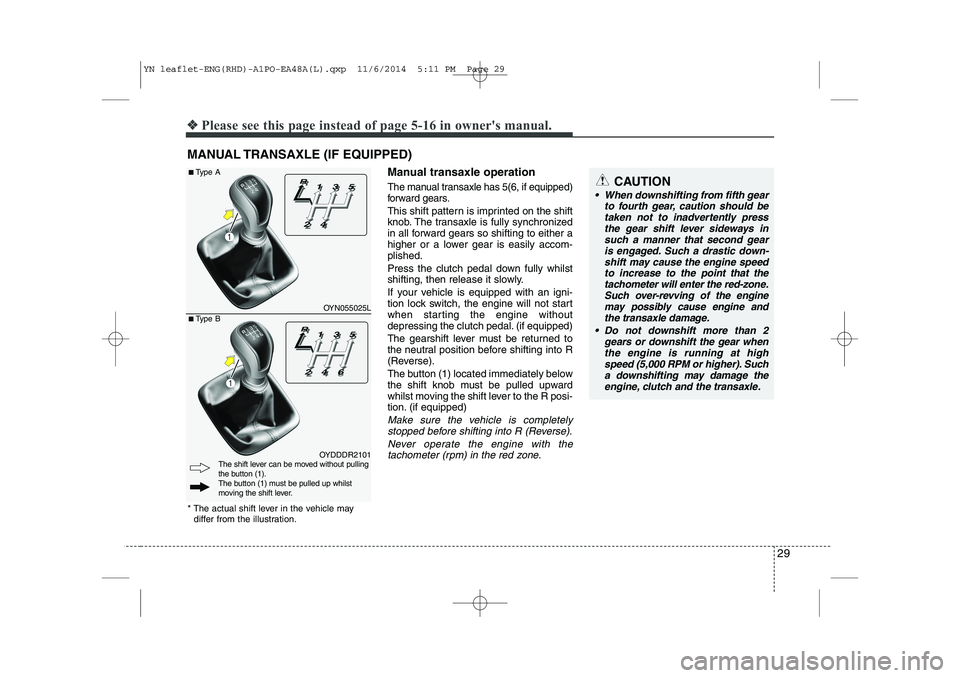
Manual transaxle operation T
he manual transaxle has 5(6, if equipped)
forward gears.
This shift pattern is imprinted on the shift
knob. The transaxle is fully synchronized
in all forward gears so shifting to either a
higher or a lower gear is easily accom-plished.
Press the clutch pedal down fully whilst
shifting, then release it slowly.
If your vehicle is equipped with an igni-
tion lock switch, the engine will not start
when starting the engine without
depressing the clutch pedal. (if equipped)
The gearshift lever must be returned to
the neutral position before shifting into R
(Reverse).
The button (1) located immediately below
the shift knob must be pulled upward
whilst moving the shift lever to the R posi-
tion. (if equipped)
Make sure the vehicle is completely
stopped before shifting into R (Reverse).
Never operate the engine with thetachometer (rpm) in the red zone.
MANUAL TRANSAXLE (IF EQUIPPED)
OYDDDR2101
OYN055025L
The shift lever can be moved without pulling
the button (1).
The button (1) must be pulled up whilst
moving the shift lever.
* The actual shift lever in the vehicle may differ from the illustration.
■ Type A
■ Type B
CAUTION
When downshifting from fifth gear
to fourth gear, caution should be
taken not to inadvertently press the gear shift lever sideways insuch a manner that second gearis engaged. Such a drastic down-
shift may cause the engine speedto increase to the p oint that the
tachometer will enter the red-zone.
Such over-revving of the enginemay possibly cause engine and the transaxle damage.
Do not downshift more than 2 gears or downshift the gear when
the engine is running at high speed (5,000 RPM or higher). Sucha downshifting may damage the
engine, clutch and the transaxle.
YN leaflet-ENG(RHD)-A1PO-EA48A(L).qxp 11/6/2014 5:11 PM Page 29
Page 30 of 480
30
❖❖Please see this page instead of pages 5-52 in owner's manual.
If you are considering towing with your
vehicle, you should first check with your
country's Department of Motor Vehicles
to determine their legal requirements.
Since laws vary the requirements for tow-
ing trailers, cars, or other types of vehi-
cles or apparatus may differ. We recom-
mend that you ask an authorised Kia
dealer.✽✽NOTICE - For Europe
The technically permissible maximum load on the rear axle(s) may be
exceeded by not more than 15% and
the technically permissible maximum
laden mass of the vehicle may be
exceeded by not more than 10% or
100kg (220.4 lbs), whichever value is
lower. In this case, do not exceed 100
km/h (62.1 mph) for vehicle of catego-
ry M1 or 80 km/h (49.7 mph) for vehi-
cle of category N1.
When towing a trailer, the additional load imposed at the trailer coupling
device may cause the rear tyre maxi-
mum load ratings to be exceeded, but
not by more than 15%. In such a case,
do not exceed 100km/h, and the rear
tyre pressure should be at least 20
kPa(0.2 bar) above the tyre pres-
sure(s) as recommended for normal
use (i.e. without a trailer attached).Your vehicle can tow a trailer. To identify
what the vehicle trailering capacity is for
your vehicle, you should read the infor-
mation in “Weight of the trailer” thatappears later in this section.
Remember that trailering is different than
just driving your vehicle by itself.
Trailering means changes in handling,
durability, and fuel economy. Successful,
safe trailering requires correct equip-
ment, and it has to be used properly.
This section contains many time-tested,
important trailering tips and safety rules.
Many of these are important for your
safety and that of your passengers.
Please read this section carefully before
you pull a trailer. Load-pulling components such as the
engine, transaxle, wheel assemblies, and
tyres are forced to work harder against
the load of the added weight. The engine
is required to operate at relatively higher
speeds and under greater loads. This
additional burden generates extra heat.
The trailer also considerably adds wind
resistance, increasing pulling require-
ments.
TRAILER TOWING (FOR EUROPE)
WARNING
- Towing a trailer
If you don't use the correct equip-
ment and drive improperly, you can
lose control when you pull a trailer.
For example, if the trailer is too
heavy, the brakes may not work
well - or even at all. You and your
passengers could be seriously or
fatally injured. Pull a trailer only if
you have followed all the steps inthis section.
WARNING - Weight limits
Before towing, make sure the total
trailer weight, gross combination
weight, gross vehicle weight, grossaxle weight and trailer tongue loadare all within the limits.CAUTION
Pulling a trailer improperly can damage your vehicle and result incostly repairs not covered by your warranty. To pull a trailer correctly,follow the advice in this section.
YN leaflet-ENG(RHD)-A1PO-EA48A(L).qxp 11/6/2014 5:11 PM Page 30