KIA VENGA 2015 Owners Manual
Manufacturer: KIA, Model Year: 2015, Model line: VENGA, Model: KIA VENGA 2015Pages: 480, PDF Size: 23.15 MB
Page 1 of 480
1
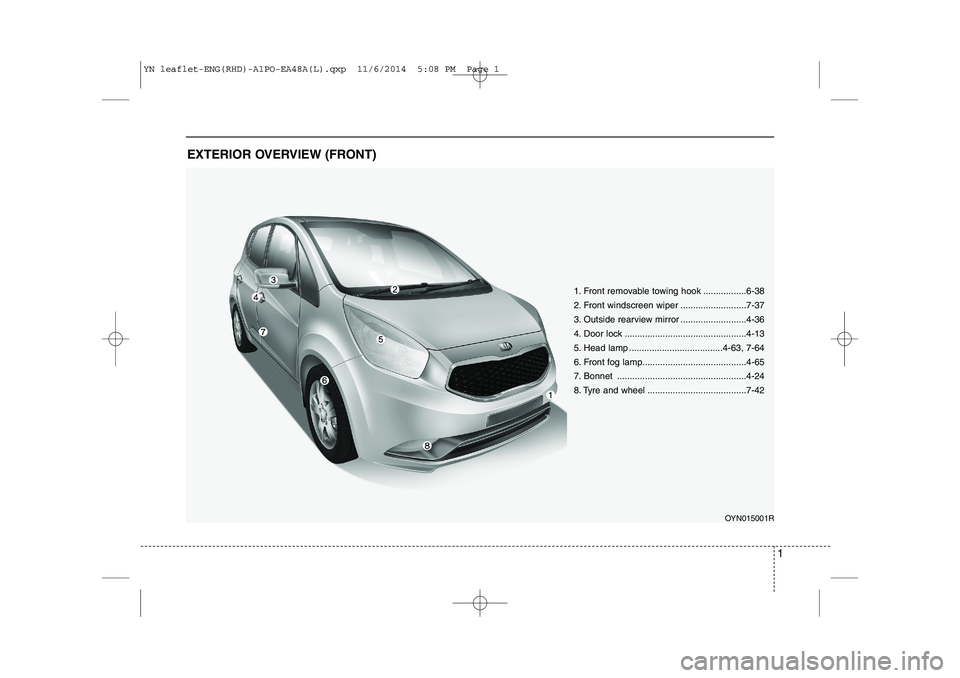
EXTERIOR OVERVIEW (FRONT)
1. Front removable towing hook .................6-38
2. Front windscreen wiper ..........................7-37
3. Outside rearview mirror ..........................4-36
4. Door lock ................................................4-13
5. Head lamp .....................................4-63, 7-64
6. Front fog lamp.........................................4-65
7. Bonnet ...................................................4-24
8. Tyre and wheel .......................................7-42
OYN015001R
YN leaflet-ENG(RHD)-A1PO-EA48A(L).qxp 11/6/2014 5:08 PM Page 1
Page 2 of 480
2
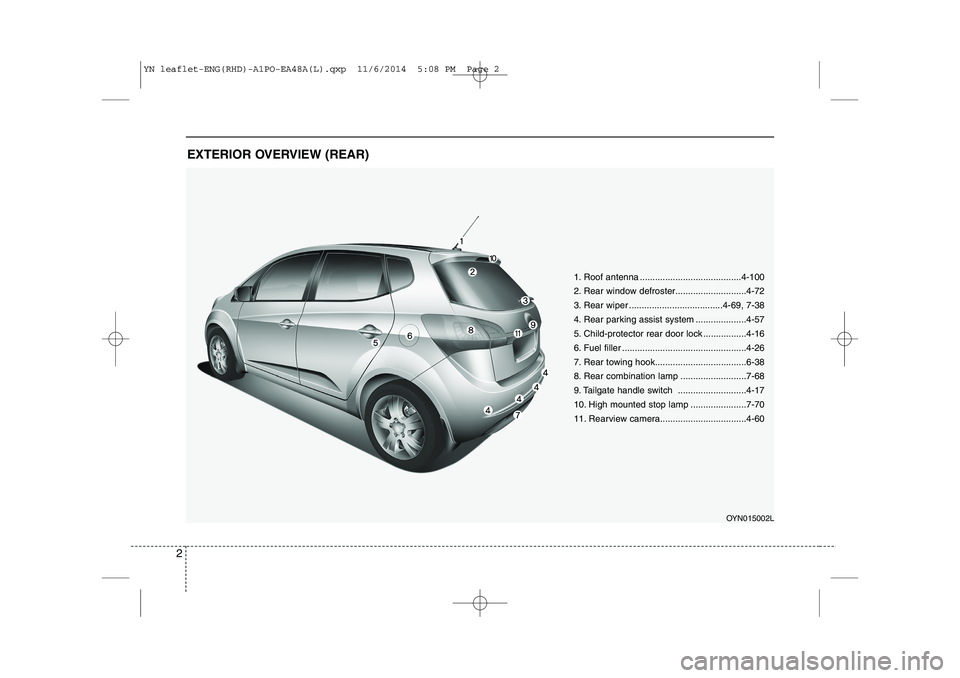
EXTERIOR OVERVIEW (REAR)
1. Roof antenna ........................................4-100
2. Rear window defroster............................4-72
3. Rear wiper .....................................4-69, 7-38
4. Rear parking assist system ....................4-57
5. Child-protector rear door lock .................4-16
6. Fuel filler .................................................4-26
7. Rear towing hook....................................6-38
8. Rear combination lamp ..........................7-68
9. Tailgate handle switch ...........................4-17
10. High mounted stop lamp ......................7-70
11. Rearview camera..................................4-60OYN015002L
YN leaflet-ENG(RHD)-A1PO-EA48A(L).qxp 11/6/2014 5:08 PM Page 2
Page 3 of 480
3
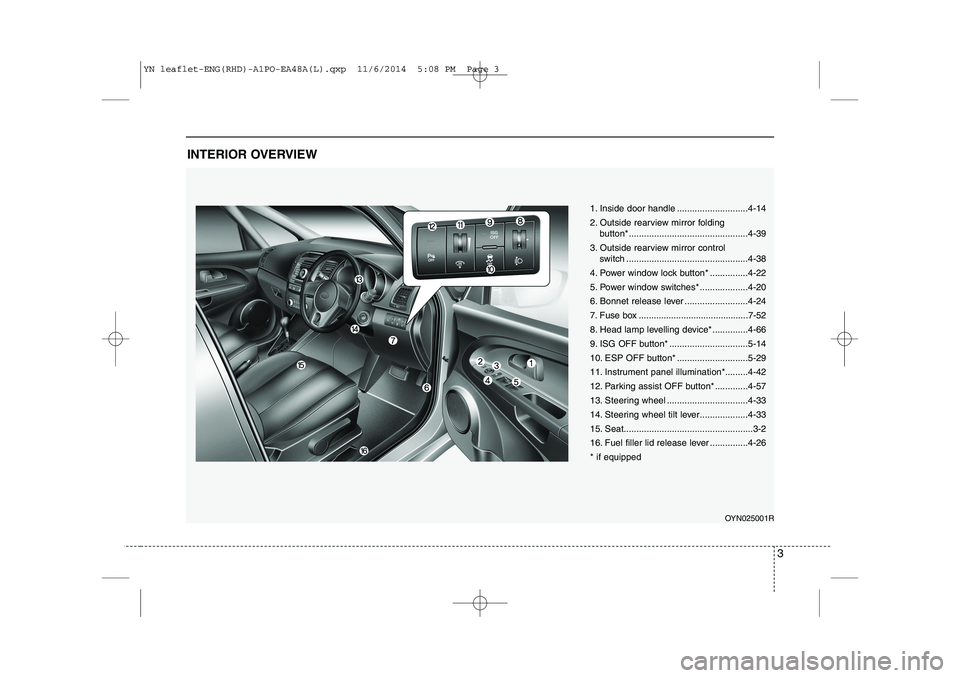
INTERIOR OVERVIEW
1. Inside door handle ............................4-14
2. Outside rearview mirror folding button*...............................................4-39
3. Outside rearview mirror control switch ................................................4-38
4. Power window lock button* ...............4-22
5. Power window switches* ...................4-20
6. Bonnet release lever .........................4-24
7. Fuse box ............................................7-52
8. Head lamp levelling device* ..............4-66
9. ISG OFF button* ...............................5-14
10. ESP OFF button* ............................5-29
11. Instrument panel illumination*.........4-42
12. Parking assist OFF button* .............4-57
13. Steering wheel ................................4-33
14. Steering wheel tilt lever...................4-33
15. Seat...................................................3-2
16. Fuel filler lid release lever ...............4-26* if equipped
OYN025001R
YN leaflet-ENG(RHD)-A1PO-EA48A(L).qxp 11/6/2014 5:08 PM Page 3
Page 4 of 480
4
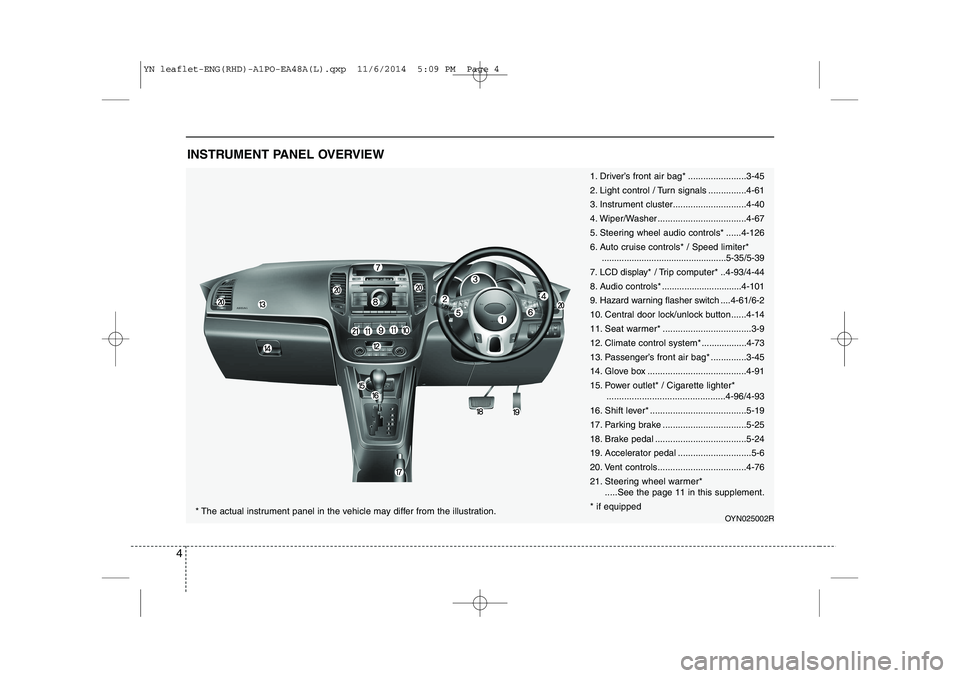
INSTRUMENT PANEL OVERVIEW
1. Driver’s front air bag* .......................3-45
2. Light control / Turn signals ...............4-61
3. Instrument cluster.............................4-40
4. Wiper/Washer ...................................4-67
5. Steering wheel audio controls* ......4-126
6. Auto cruise controls* / Speed limiter*..................................................5-35/5-39
7. LCD display* / Trip computer* ..4-93/4-44
8. Audio controls * ................................4-101
9. Hazard warning flasher switch ....4-61/6-2
10. Central door lock/unlock button......4-14
11. Seat warmer* ...................................3-9
12. Climate control system*..................4-73
13. Passenger’s front air bag* ..............3-45
14. Glove box .......................................4-91
15. Power outlet* / Cigarette lighter* ...............................................4-96/4-93
16. Shift lever* ......................................5-19
17. Parking brake .................................5-25
18. Brake pedal ....................................5-24
19. Accelerator pedal .............................5-6
20. Vent controls...................................4-7621.
Steering wheel warmer*
.....See the page 11 in this supplement.
* if equipped
OYN025002R* The actual instrument panel in the vehicle may differ from the illustration.
YN leaflet-ENG(RHD)-A1PO-EA48A(L).qxp 11/6/2014 5:09 PM Page 4
Page 5 of 480
5
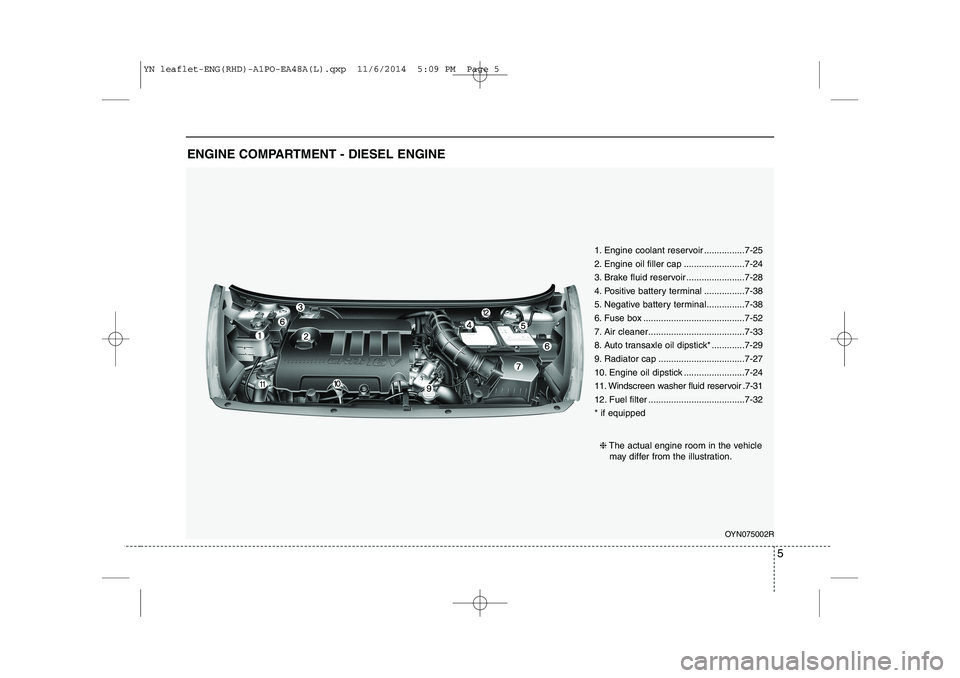
ENGINE COMPARTMENT - DIESEL ENGINE
OYN075002R
❈
The actual engine room in the vehicle
may differ from the illustration.
1. Engine coolant reservoir ................7-25
2. Engine oil filler cap ........................7-24
3. Brake fluid reservoir .......................7-28
4. Positive battery terminal ................7-38
5. Negative battery terminal...............7-38
6. Fuse box ........................................7-52
7. Air cleaner......................................7-33
8. Auto transaxle oil dipstick* .............7-29
9. Radiator cap ..................................7-27
10. Engine oil dipstick ........................7-24
11. Windscreen washer fluid reservoir .7-31
12. Fuel filter ......................................7-32 * if equipped
YN leaflet-ENG(RHD)-A1PO-EA48A(L).qxp 11/6/2014 5:09 PM Page 5
Page 6 of 480
❖❖Please see this page instead of page 3-2 in owner's manual.
6
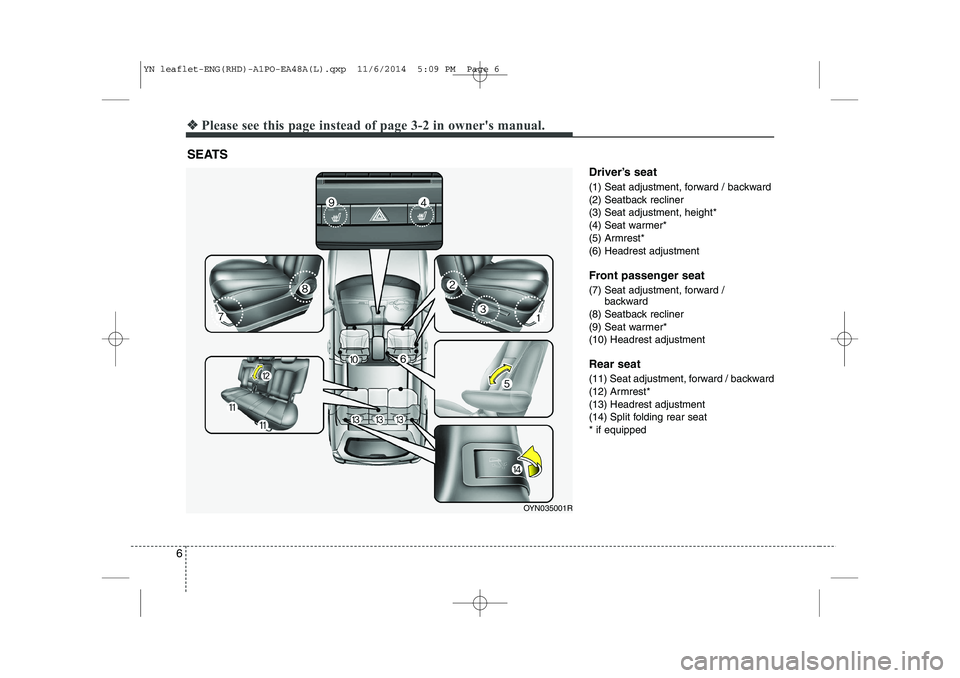
SEATS
Driver’s seat
(1) Seat adjustment, forward / backward
(2) Seatback recliner
(3) Seat adjustment, height*
(4) Seat warmer*
(5) Armrest*
(6) Headrest adjustment
Front passenger seat
(7) Seat adjustment, forward / backward
(8) Seatback recliner
(9) Seat warmer*
(10) Headrest adjustment Rear seat
(11) Seat adjustment, forward / backward
(12) Armrest*
(13) Headrest adjustment
(14) Split folding rear seat* if equipped
OYN035001R
YN leaflet-ENG(RHD)-A1PO-EA48A(L).qxp 11/6/2014 5:09 PM Page 6
Page 7 of 480
7
❖❖Please see this page instead of page 4-2 in owner's manual.
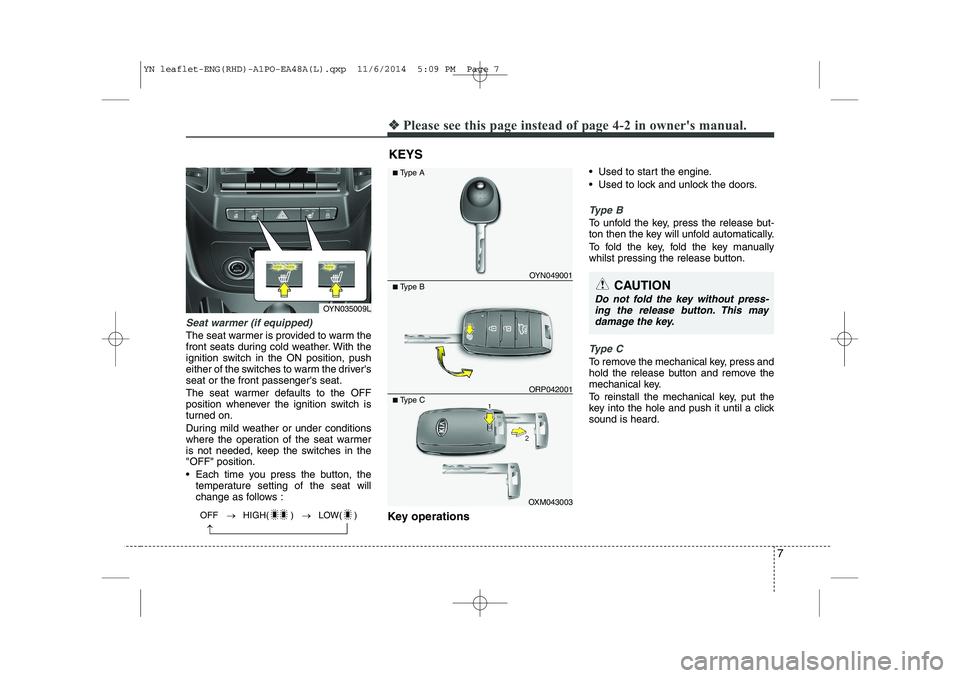
Seat warmer (if equipped)
The seat warmer is provided to warm the
front seats during cold weather. With the
ignition switch in the ON position, push
either of the switches to warm the driver'sseat or the front passenger's seat.
The seat warmer defaults to the OFF
position whenever the ignition switch is
turned on.
During mild weather or under conditions
where the operation of the seat warmer
is not needed, keep the switches in the"OFF" position.
Each time you press the button, the
temperature setting of the seat will
change as follows :
Key operations Used to start the engine.
Used to lock and unlock the doors.
Type B
To unfold the key, press the release but-
ton then the key will unfold automatically.
To fold the key, fold the key manually
whilst pressing the release button.
Type C
To remove the mechanical key, press and
hold the release button and remove the
mechanical key.
To reinstall the mechanical key, put the
key into the hole and push it until a clicksound is heard.
KEYS
CAUTION
Do not fold the key without press-
ing the release button. This may damage the key.
OYN049001
■ Type A
■ Type B
OXM043003
■
Type C
ORP042001
OYN035009L
OFF � HIGH( ) � LOW( )
�
YN leaflet-ENG(RHD)-A1PO-EA48A(L).qxp 11/6/2014 5:09 PM Page 7
Page 8 of 480
❖❖Please see this page instead of page 4-5 in owner's manual.
8
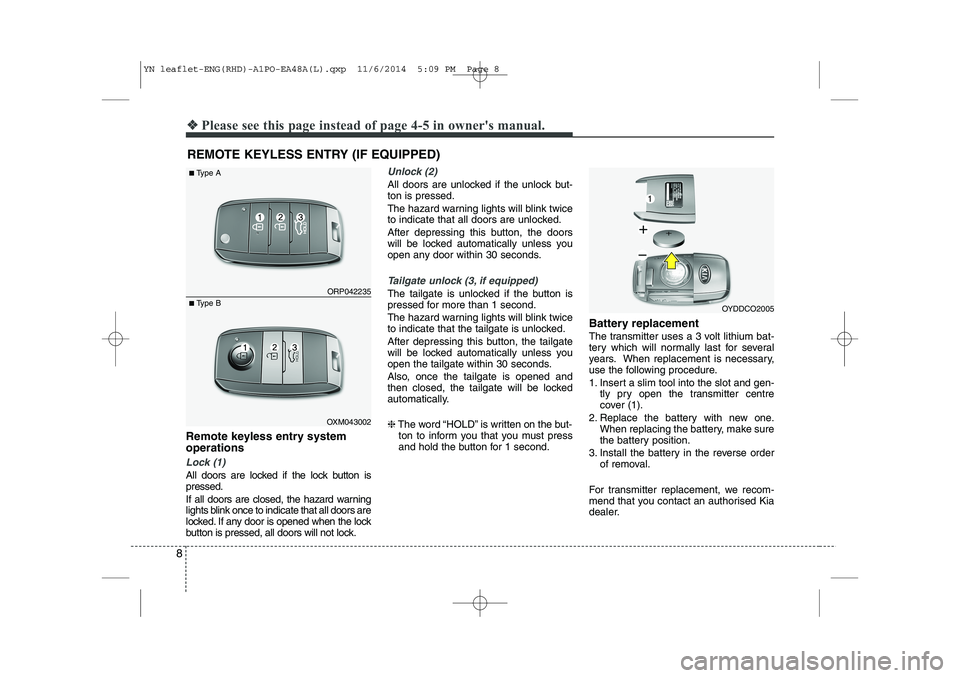
Remote keyless entry system operations
Lock (1)
All doors are locked if the lock button is pressed.
If all doors are closed, the hazard warning
lights blink once to indicate that all doors are
locked. If any door is opened when the lock
button is pressed, all doors will not lock.
Unlock (2)
All doors are unlocked if the unlock but- ton is pressed.
The hazard warning lights will blink twice
to indicate that all doors are unlocked.
After depressing this button, the doors
will be locked automatically unless you
open any door within 30 seconds.
Tailgate unlock (3, if equipped)
The tailgate is unlocked if the button is
pressed for more than 1 second.
The hazard warning lights will blink twice
to indicate that the tailgate is unlocked.
After depressing this button, the tailgate
will be locked automatically unless you
open the tailgate within 30 seconds.
Also, once the tailgate is opened and
then closed, the tailgate will be locked
automatically. ❈The word “HOLD” is written on the but-
ton to inform you that you must press
and hold the button for 1 second. Battery replacement
The transmitter uses a 3 volt lithium bat-
tery which will normally last for several
years. When replacement is necessary,
use the following procedure.
1. Insert a slim tool into the slot and gen-
tly pry open the transmitter centre
cover (1).
2. Replace the battery with new one. When replacing the battery, make sure
the battery position.
3. Install the battery in the reverse order of removal.
For transmitter replacement, we recom-
mend that you contact an authorised Kia
dealer.
REMOTE KEYLESS ENTRY (IF EQUIPPED) ORP042235
OXM043002
■
Type A
■ Type B
OYDDCO2005
YN leaflet-ENG(RHD)-A1PO-EA48A(L).qxp 11/6/2014 5:09 PM Page 8
Page 9 of 480
9
❖❖Please see this page instead of page 4-13 in owner's manual.
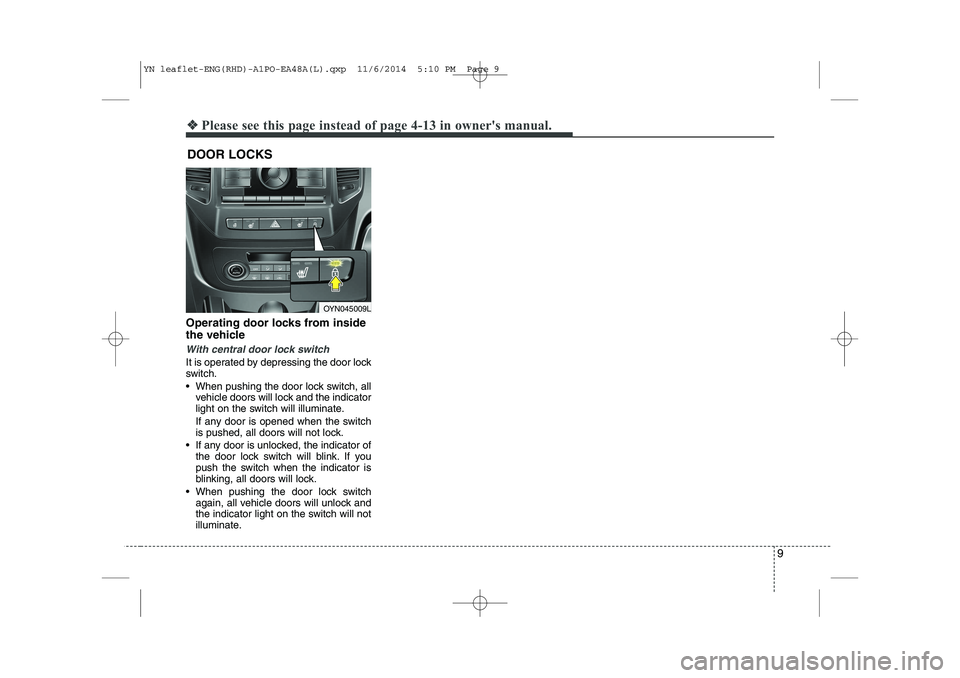
Operating door locks from inside
the vehicle
With central door lock switch
It is operated by depressing the door lock
switch.
When pushing the door lock switch, all
vehicle doors will lock and the indicator
light on the switch will illuminate.
If any door is opened when the switch
is pushed, all doors will not lock.
If any door is unlocked, the indicator of the door lock switch will blink. If you
push the switch when the indicator is
blinking, all doors will lock.
When pushing the door lock switch again, all vehicle doors will unlock and
the indicator light on the switch will not
illuminate.
DOOR LOCKS
OYN045009L
YN leaflet-ENG(RHD)-A1PO-EA48A(L).qxp 11/6/2014 5:10 PM Page 9
Page 10 of 480
10
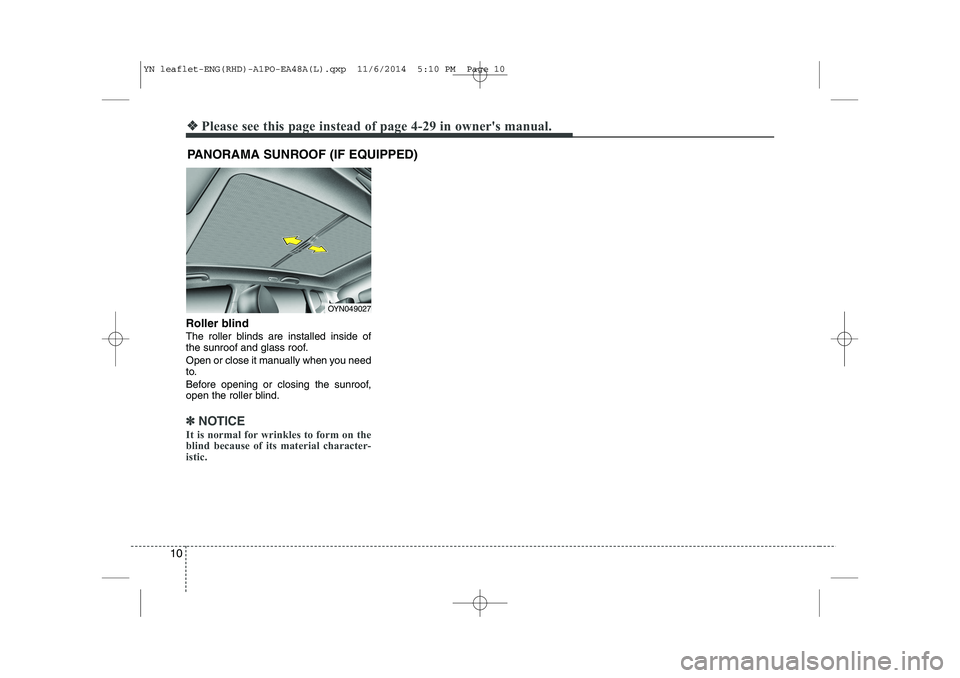
Roller blind
The roller blinds are installed inside of
the sunroof and glass roof.
Open or close it manually when you need
to.
Before opening or closing the sunroof,
open the roller blind.
✽✽NOTICE
It is normal for wrinkles to form on the
blind because of its material character-
istic.
PANORAMA SUNROOF (IF EQUIPPED)
❖❖ Please see this page instead of page 4-29 in owner's manual.
OYN049027
YN leaflet-ENG(RHD)-A1PO-EA48A(L).qxp 11/6/2014 5:10 PM Page 10