clock KIA VENGA 2016 User Guide
[x] Cancel search | Manufacturer: KIA, Model Year: 2016, Model line: VENGA, Model: KIA VENGA 2016Pages: 404, PDF Size: 21.96 MB
Page 328 of 404
725
Maintenance
Changing the engine oil and filter
We recommend that the engine oil and
filter be replaced by an authorized Kia
dealer.The high-pressure cooling system has a
reservoir filled with year-round antifreeze
coolant. The reservoir is filled at the fac-
tory.
Check the antifreeze protection and
coolant level at least once a year, at thebeginning of the winter season, and
before traveling to a colder climate.
Checking the coolant level
WARNING
Used engine oil may cause skin irri- tation or cancer if left in contact
with the skin for prolonged periods
of time. Used engine oil contains
chemicals that have caused cancer
in laboratory animals. Always pro-
tect your skin by washing your
hands thoroughly with soap and
warm water as soon as possibleafter handling used oil.
ENGINE COOLANT
WARNING
Removing radiator cap
Never attempt to remove the radi- ator cap while the engine is oper-
ating or hot. Doing so might leadto cooling system and engine
damage. Also hot coolant orsteam could cause serious per-
sonal injury.
(Continued)
(Continued)
Turn the engine off and wait untilit cools down. Use extreme care
when removing the radiator cap.
Wrap a thick towel around it, and
turn it counterclockwise slowly to
the first stop. Step back while the
pressure is released from thecooling system.
When you are sure all the pres-
sure has been released, press
down on the cap, using a thick
towel, and continue turning coun-
terclockwise to remove it.
Even if the engine is not operat- ing, do not remove the radiatorcap or the drain plug while the
engine and radiator are hot. Hot
coolant and steam may still blow
out under pressure, causing seri-
ous injury.
YN ENG 7.QXP 9/5/2016 4:35 PM Page 25
Page 342 of 404
739
Maintenance
Reset items
Items should be reset after the battery
has been discharged or the battery hasbeen disconnected.
Auto up/down window (See section 4)
Sunroof (See section 4)
Trip computer (See section 4)
Climate control system (See section 4)
Clock (See section 4)
Audio (See section 4)
WARNING
Before performing maintenance or recharging the battery, turn off all accessories and stop the
engine.
The negative battery cable must be removed first and installed
last when the battery is discon-nected.
WARNING - Recharging
battery
When recharging the battery,
observe the following precautions:
The battery must be removed from the vehicle and placed in an area with good ventilation.
Do not allow cigarettes, sparks, or flame near the battery.
Watch the battery during charg- ing, and stop or reduce the charg-
ing rate if the battery cells begin
gassing (boiling) violently or if
the temperature of the electrolyte
of any cell exceeds 49°C (120°F).
Wear eye protection when check- ing the battery during charging.
(Continued)
(Continued)
Disconnect the battery charger inthe following order.
1. Turn off the battery charger main switch.
2. Unhook the negative clamp from the negative battery terminal.
3. Unhook the positive clamp from the positive battery terminal.(Continued)
If the AGM battery is reconnected or replaced, ISG function will not
operate immediately.
If you want to use the ISG func-tion, the battery sensor needs tobe calibrated for approximately 4hours with the ignition off.
YN ENG 7.QXP 9/5/2016 4:35 PM Page 39
Page 355 of 404
Maintenance
52
7
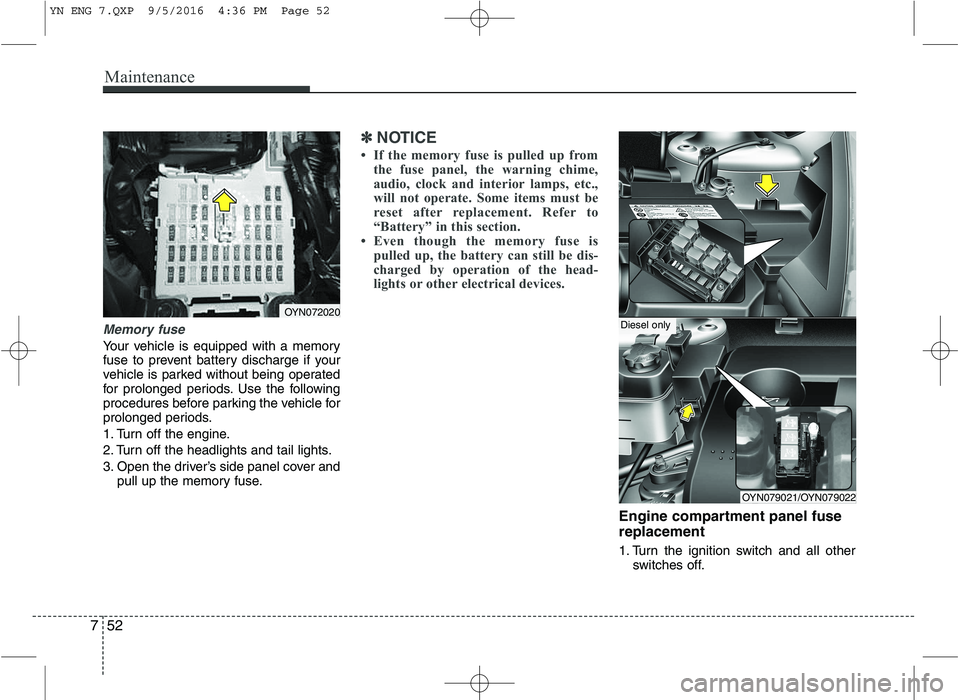
Memory fuse
Your vehicle is equipped with a memory
fuse to prevent battery discharge if your
vehicle is parked without being operated
for prolonged periods. Use the following
procedures before parking the vehicle for
prolonged periods.
1. Turn off the engine.
2. Turn off the headlights and tail lights.
3. Open the driver’s side panel cover and
pull up the memory fuse.
✽✽ NOTICE
If the memory fuse is pulled up from the fuse panel, the warning chime,
audio, clock and interior lamps, etc.,
will not operate. Some items must be
reset after replacement. Refer to
“Battery” in this section.
Even though the memory fuse is pulled up, the battery can still be dis-
charged by operation of the head-
lights or other electrical devices.
Engine compartment panel fuse replacement
1. Turn the ignition switch and all other switches off.
OYN072020
OYN079021/OYN079022
Diesel only
YN ENG 7.QXP 9/5/2016 4:36 PM Page 52
Page 367 of 404
Maintenance
64
7
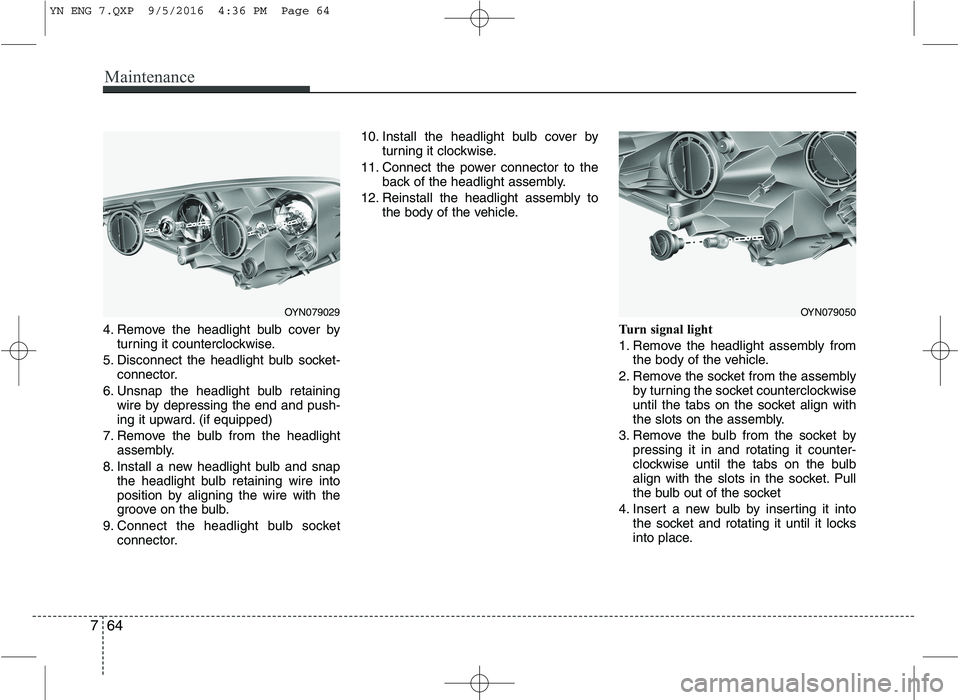
4. Remove the headlight bulb cover by
turning it counterclockwise.
5. Disconnect the headlight bulb socket- connector.
6. Unsnap the headlight bulb retaining wire by depressing the end and push-
ing it upward. (if equipped)
7. Remove the bulb from the headlight assembly.
8. Install a new headlight bulb and snap the headlight bulb retaining wire into
position by aligning the wire with the
groove on the bulb.
9. Connect the headlight bulb socket connector. 10. Install the headlight bulb cover by
turning it clockwise.
11. Connect the power connector to the back of the headlight assembly.
12. Reinstall the headlight assembly to the body of the vehicle.
Turn signal light
1. Remove the headlight assembly fromthe body of the vehicle.
2. Remove the socket from the assembly by turning the socket counterclockwise
until the tabs on the socket align with
the slots on the assembly.
3. Remove the bulb from the socket by pressing it in and rotating it counter-
clockwise until the tabs on the bulb
align with the slots in the socket. Pull
the bulb out of the socket
4. Insert a new bulb by inserting it into the socket and rotating it until it locks
into place.
OYN079029OYN079050
YN ENG 7.QXP 9/5/2016 4:36 PM Page 64
Page 368 of 404
765
Maintenance
5. Install the socket in the assembly byaligning the tabs on the socket with the
slots in the assembly. Push the socket
into the assembly and turn the socket
clockwise.
6. Reinstall the headlight assembly to the body of the vehicle.
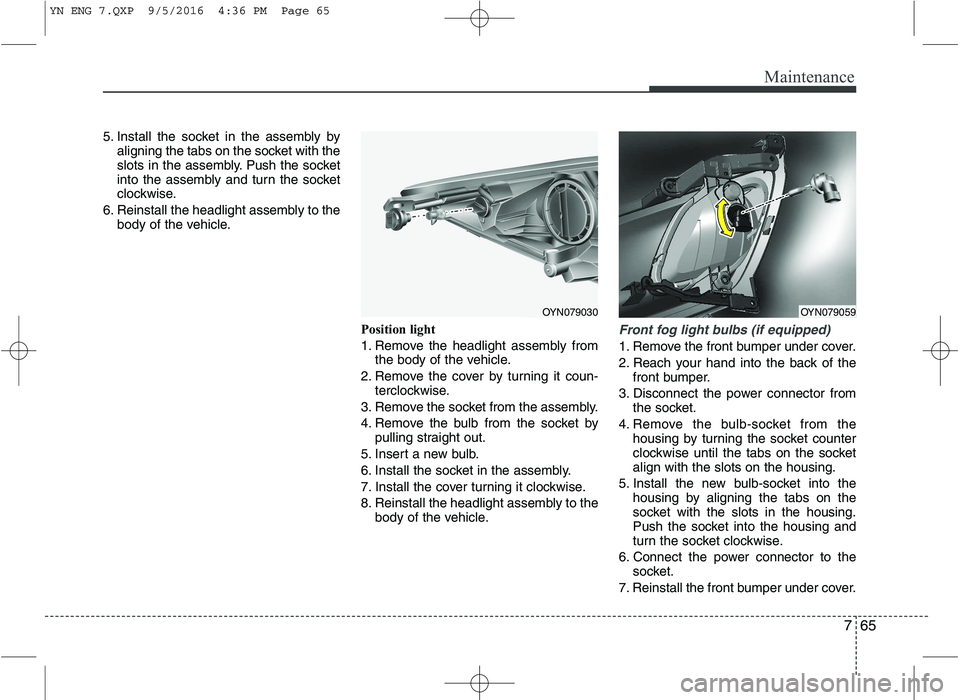
Position light
1. Remove the headlight assembly fromthe body of the vehicle.
2. Remove the cover by turning it coun- terclockwise.
3. Remove the socket from the assembly.
4. Remove the bulb from the socket by pulling straight out.
5. Insert a new bulb.
6. Install the socket in the assembly.
7. Install the cover turning it clockwise.
8. Reinstall the headlight assembly to the body of the vehicle.
Front fog light bulbs (if equipped)
1. Remove the front bumper under cover.
2. Reach your hand into the back of thefront bumper.
3. Disconnect the power connector from the socket.
4. Remove the bulb-socket from the housing by turning the socket counter
clockwise until the tabs on the socketalign with the slots on the housing.
5. Install the new bulb-socket into the housing by aligning the tabs on the
socket with the slots in the housing.
Push the socket into the housing and
turn the socket clockwise.
6. Connect the power connector to the socket.
7. Reinstall the front bumper under cover.
OYN079030OYN079059
YN ENG 7.QXP 9/5/2016 4:36 PM Page 65
Page 370 of 404
767
Maintenance
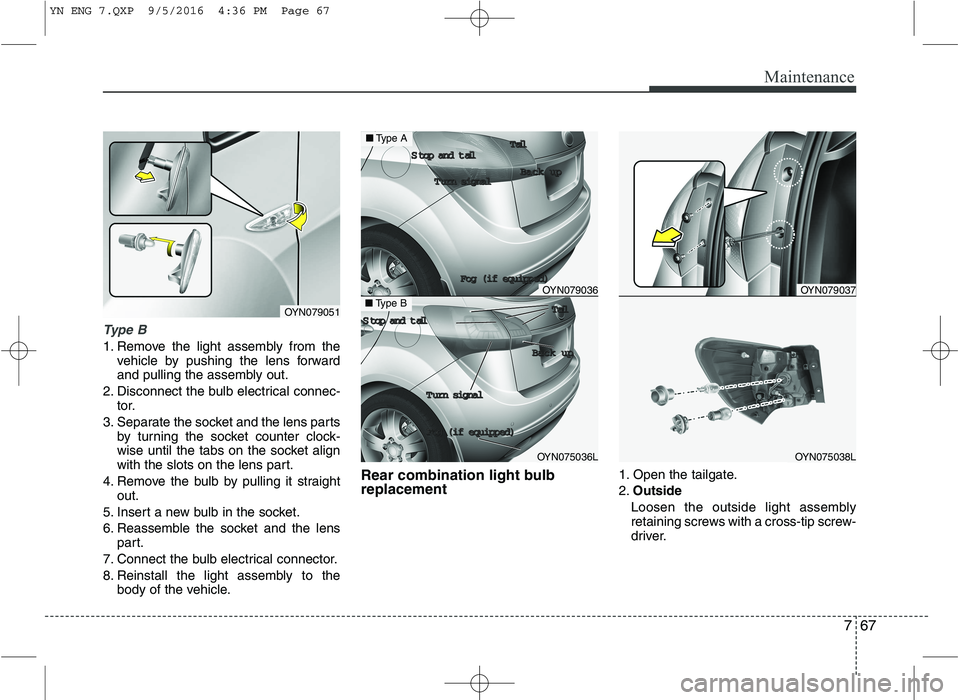
Type B
1. Remove the light assembly from thevehicle by pushing the lens forward
and pulling the assembly out.
2. Disconnect the bulb electrical connec- tor.
3. Separate the socket and the lens parts by turning the socket counter clock-
wise until the tabs on the socket align
with the slots on the lens part.
4. Remove the bulb by pulling it straight out.
5. Insert a new bulb in the socket.
6. Reassemble the socket and the lens part.
7. Connect the bulb electrical connector.
8. Reinstall the light assembly to the body of the vehicle. Rear combination light bulb replacement
1. Open the tailgate. 2.
Outside
Loosen the outside light assembly
retaining screws with a cross-tip screw-
driver.
OYN079051
OYN079037
OYN075038L
OYN079036
OYN075036L
TTTTaaaaiiiillll
TTTTaaaaiiiillll
BBBBaaaacccckkkk uuuupppp
BBBBaaaacccckkkk uuuupppp
TTTTuuuurrrrnnnn ssssiiiiggggnnnnaaaallll
TTTTuuuurrrrnnnn ssssiiiiggggnnnnaaaallll
SSSSttttoooopppp aaaannnndddd ttttaaaaiiiillll
FFFFoooogggg ((((iiiiffff eeeeqqqquuuuiiiippppppppeeeedddd))))
FFFFoooogggg ((((iiiiffff eeeeqqqquuuuiiiippppppppeeeedddd))))
■ Type A
■Type B
SSSSttttoooopppp aaaannnndddd ttttaaaaiiiillll
YN ENG 7.QXP 9/5/2016 4:36 PM Page 67
Page 371 of 404
Maintenance
68
7
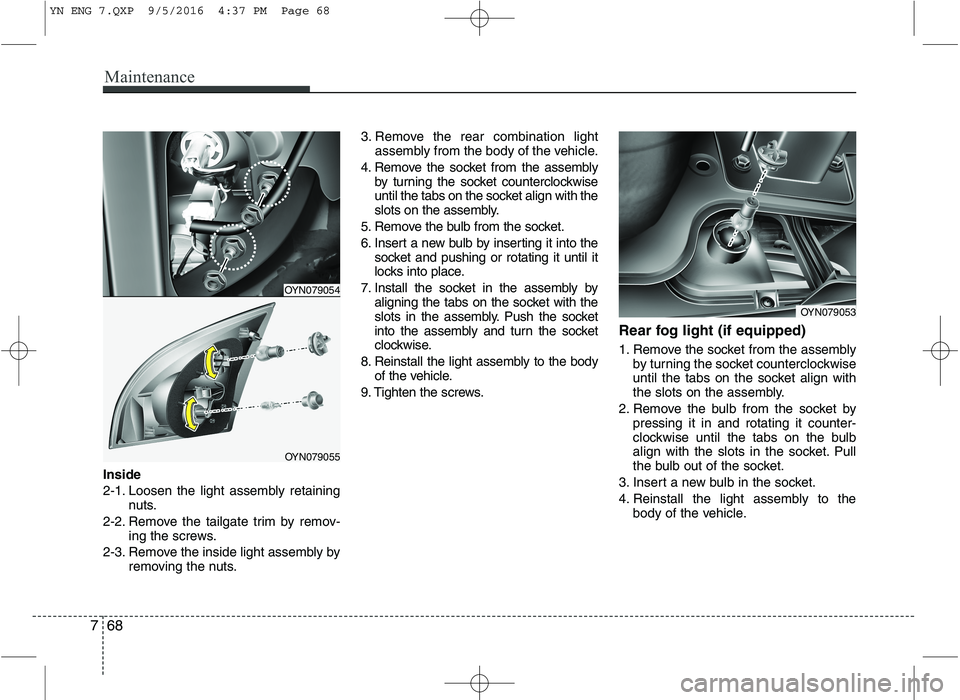
Inside
2-1. Loosen the light assembly retaining
nuts.
2-2. Remove the tailgate trim by remov- ing the screws.
2-3. Remove the inside light assembly by removing the nuts. 3. Remove the rear combination light
assembly from the body of the vehicle.
4. Remove the socket from the assembly by turning the socket counterclockwise
until the tabs on the socket align with the
slots on the assembly.
5. Remove the bulb from the socket.
6. Insert a new bulb by inserting it into the socket and pushing or rotating it until it
locks into place.
7. Install the socket in the assembly by aligning the tabs on the socket with the
slots in the assembly. Push the socket
into the assembly and turn the socket
clockwise.
8. Reinstall the light assembly to the body of the vehicle.
9. Tighten the screws. Rear fog light (if equipped)
1. Remove the socket from the assembly
by turning the socket counterclockwise
until the tabs on the socket align with
the slots on the assembly.
2. Remove the bulb from the socket by pressing it in and rotating it counter-
clockwise until the tabs on the bulb
align with the slots in the socket. Pull
the bulb out of the socket.
3. Insert a new bulb in the socket.
4. Reinstall the light assembly to the body of the vehicle.
OYN079054
OYN079055
OYN079053
YN ENG 7.QXP 9/5/2016 4:37 PM Page 68
Page 398 of 404
I3
Index
Catalytic converters . . . . . . . . . . . . . . . . . . . . . . . . . . . 7-80
Center console storage . . . . . . . . . . . . . . . . . . . . . . . . . 4-93
Central door lock switch. . . . . . . . . . . . . . . . . . . . . . . . 4-14
Certification label . . . . . . . . . . . . . . . . . . . . . . . . . . . . . . 8-9
Chains
Tire chains . . . . . . . . . . . . . . . . . . . . . . . . . . . . . . . . . 5-51
Changing tires . . . . . . . . . . . . . . . . . . . . . . . . . . . . . . . . . 6-8
Checking tire inflation pressure . . . . . . . . . . . . . . . . . . 7-41
Child restraint system . . . . . . . . . . . . . . . . . . . . . . . . . . 3-26 ISOFIX system . . . . . . . . . . . . . . . . . . . . . . . . . . . . . . 3-32
Recommended child restraint system. . . . . . . . . . . . . 3-36
Tether anchor system . . . . . . . . . . . . . . . . . . . . . . . . . 3-31
Child-protector rear door lock . . . . . . . . . . . . . . . . . . . 4-16
Cigarette lighter . . . . . . . . . . . . . . . . . . . . . . . . . . . . . . 4-96
Climate control system . . . . . . . . . . . . . . . . . . . . . . . . . 4-73 Climate control (automatic) . . . . . . . . . . . . . . . . . . . . 4-84
Climate control (manual) . . . . . . . . . . . . . . . . . . . . . . 4-78
Climate control air filter . . . . . . . . . . . . . . . . . . . . . . . 4-75
Climate control air filter (replacement) . . . . . . . . . . . . 7-32
Clock (Digital) . . . . . . . . . . . . . . . . . . . . . . . . . . . . . . . 4-95
Coat hook . . . . . . . . . . . . . . . . . . . . . . . . . . . . . . . . . . 4-100
Combined instrument, see instrument cluster . . . . . . . 4-40
Compact spare tire . . . . . . . . . . . . . . . . . . . . . . . . . . . . 6-13
Compact spare tire replacement . . . . . . . . . . . . . . . . . . 7-45
Components of the tire mobility kit . . . . . . . . . . . . . . . 6-17
Coolant . . . . . . . . . . . . . . . . . . . . . . . . . . . . . . . . . . . . . 7-25 Cool box . . . . . . . . . . . . . . . . . . . . . . . . . . . . . . . . . . . . 4-94
Cooling fluid, see engine coolant . . . . . . . . . . . . . . . . . 7-25
Crankcase emission control system . . . . . . . . . . . . . . . 7-78
Cruise control system . . . . . . . . . . . . . . . . . . . . . . . . . . 5-37
Cup holder . . . . . . . . . . . . . . . . . . . . . . . . . . . . . . . . . . 4-97
Curtain air bag . . . . . . . . . . . . . . . . . . . . . . . . . . . . . . . 3-51
Dashboard illumination, see instrument panel illumination. . 4-42
Dashboard, see instrument cluster . . . . . . . . . . . . . . . . 4-40
Declaration of conformity. . . . . . . . . . . . . . . . . . . . . . . 8-11
Defogging (Windshield) . . . . . . . . . . . . . . . . . . . . . . . . 4-91
Defroster (Rear window) . . . . . . . . . . . . . . . . . . . . . . . 4-72
Defrosting (Windshield) . . . . . . . . . . . . . . . . . . . . . . . . 4-91
Diesel particulate filter . . . . . . . . . . . . . . . . . . . . . . . . . 7-80
Digital clock . . . . . . . . . . . . . . . . . . . . . . . . . . . . . . . . . 4-94
Dimensions . . . . . . . . . . . . . . . . . . . . . . . . . . . . . . . . . . . 8-2
Display illumination, see instrument panel illumination . . 4-42
Displays, see instrument cluster . . . . . . . . . . . . . . . . . . 4-40
Door locks. . . . . . . . . . . . . . . . . . . . . . . . . . . . . . . . . . . 4-13
Central door lock switch . . . . . . . . . . . . . . . . . . . . . . 4-14
Child-protector rear door lock . . . . . . . . . . . . . . . . . . 4-16
DPF . . . . . . . . . . . . . . . . . . . . . . . . . . . . . . . . . . . . . . . . 7-80
Drinks holders, see cup holders . . . . . . . . . . . . . . . . . . 4-97
Driver's and passenger's front air bag. . . . . . . . . . . . . . 3-44
Driving at night. . . . . . . . . . . . . . . . . . . . . . . . . . . . . . . 5-47
D
YN ENG INDEX.QXP 2016.10.20. 16:45 Page 3
Page 400 of 404
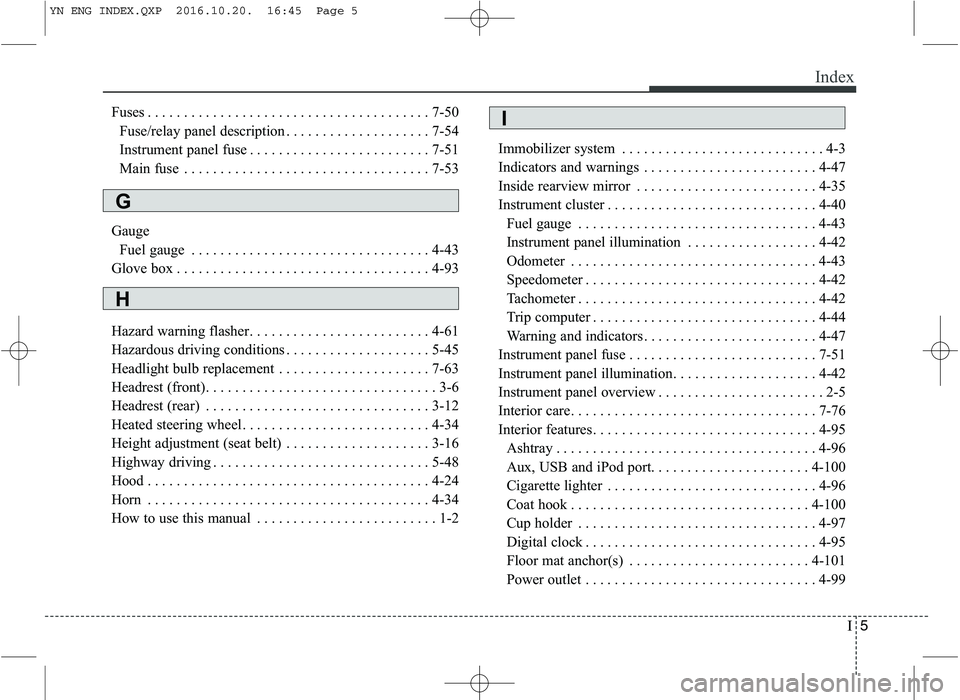
I5
Index
Fuses . . . . . . . . . . . . . . . . . . . . . . . . . . . . . . . . . . . . . . . 7-50
Fuse/relay panel description . . . . . . . . . . . . . . . . . . . . 7-54
Instrument panel fuse . . . . . . . . . . . . . . . . . . . . . . . . . 7-51
Main fuse . . . . . . . . . . . . . . . . . . . . . . . . . . . . . . . . . . 7-53
Gauge Fuel gauge . . . . . . . . . . . . . . . . . . . . . . . . . . . . . . . . . 4-43
Glove box . . . . . . . . . . . . . . . . . . . . . . . . . . . . . . . . . . . 4-93
Hazard warning flasher. . . . . . . . . . . . . . . . . . . . . . . . . 4-61
Hazardous driving conditions . . . . . . . . . . . . . . . . . . . . 5-45
Headlight bulb replacement . . . . . . . . . . . . . . . . . . . . . 7-63
Headrest (front). . . . . . . . . . . . . . . . . . . . . . . . . . . . . . . . 3-6
Headrest (rear) . . . . . . . . . . . . . . . . . . . . . . . . . . . . . . . 3-12
Heated steering wheel. . . . . . . . . . . . . . . . . . . . . . . . . . 4-34
Height adjustment (seat belt) . . . . . . . . . . . . . . . . . . . . 3-16
Highway driving . . . . . . . . . . . . . . . . . . . . . . . . . . . . . . 5-48
Hood . . . . . . . . . . . . . . . . . . . . . . . . . . . . . . . . . . . . . . . 4-24
Horn . . . . . . . . . . . . . . . . . . . . . . . . . . . . . . . . . . . . . . . 4-34
How to use this manual . . . . . . . . . . . . . . . . . . . . . . . . . 1-2 Immobilizer system . . . . . . . . . . . . . . . . . . . . . . . . . . . . 4-3
Indicators and warnings . . . . . . . . . . . . . . . . . . . . . . . . 4-47
Inside rearview mirror . . . . . . . . . . . . . . . . . . . . . . . . . 4-35
Instrument cluster . . . . . . . . . . . . . . . . . . . . . . . . . . . . . 4-40
Fuel gauge . . . . . . . . . . . . . . . . . . . . . . . . . . . . . . . . . 4-43
Instrument panel illumination . . . . . . . . . . . . . . . . . . 4-42
Odometer . . . . . . . . . . . . . . . . . . . . . . . . . . . . . . . . . . 4-43
Speedometer . . . . . . . . . . . . . . . . . . . . . . . . . . . . . . . . 4-42
Tachometer . . . . . . . . . . . . . . . . . . . . . . . . . . . . . . . . . 4-42
Trip computer . . . . . . . . . . . . . . . . . . . . . . . . . . . . . . . 4-44
Warning and indicators . . . . . . . . . . . . . . . . . . . . . . . . 4-47
Instrument panel fuse . . . . . . . . . . . . . . . . . . . . . . . . . . 7-51
Instrument panel illumination. . . . . . . . . . . . . . . . . . . . 4-42
Instrument panel overview . . . . . . . . . . . . . . . . . . . . . . . 2-5
Interior care. . . . . . . . . . . . . . . . . . . . . . . . . . . . . . . . . . 7-76
Interior features. . . . . . . . . . . . . . . . . . . . . . . . . . . . . . . 4-95 Ashtray . . . . . . . . . . . . . . . . . . . . . . . . . . . . . . . . . . . . 4-96
Aux, USB and iPod port. . . . . . . . . . . . . . . . . . . . . . 4-100
Cigarette lighter . . . . . . . . . . . . . . . . . . . . . . . . . . . . . 4-96
Coat hook . . . . . . . . . . . . . . . . . . . . . . . . . . . . . . . . . 4-100
Cup holder . . . . . . . . . . . . . . . . . . . . . . . . . . . . . . . . . 4-97
Digital clock . . . . . . . . . . . . . . . . . . . . . . . . . . . . . . . . 4-95
Floor mat anchor(s) . . . . . . . . . . . . . . . . . . . . . . . . . 4-101
Power outlet . . . . . . . . . . . . . . . . . . . . . . . . . . . . . . . . 4-99
G
H
I
YN ENG INDEX.QXP 2016.10.20. 16:45 Page 5