lights Lancia Delta 2012 Owner handbook (in English)
[x] Cancel search | Manufacturer: LANCIA, Model Year: 2012, Model line: Delta, Model: Lancia Delta 2012Pages: 295, PDF Size: 8.29 MB
Page 25 of 295
1
KNOWING YOUR CAR23
Main beam headlights (blue)
The warning light switches on when the main
beams are turned on.
1
Cruise Control (green)
(for versions/markets where provided)
When the key is turned to the MAR position
the warning light comes on but should go out af-
ter a few seconds. The warning light is lit up on the dis-
play by rotating the Cruise Control ring nut to ON.
The display will show a dedicated message.
Ü
DISPLAY
The car may be provided with a multifunction/recon -
figurable multifunction display that shows useful infor-
mation, according to the previous settings, when driving.
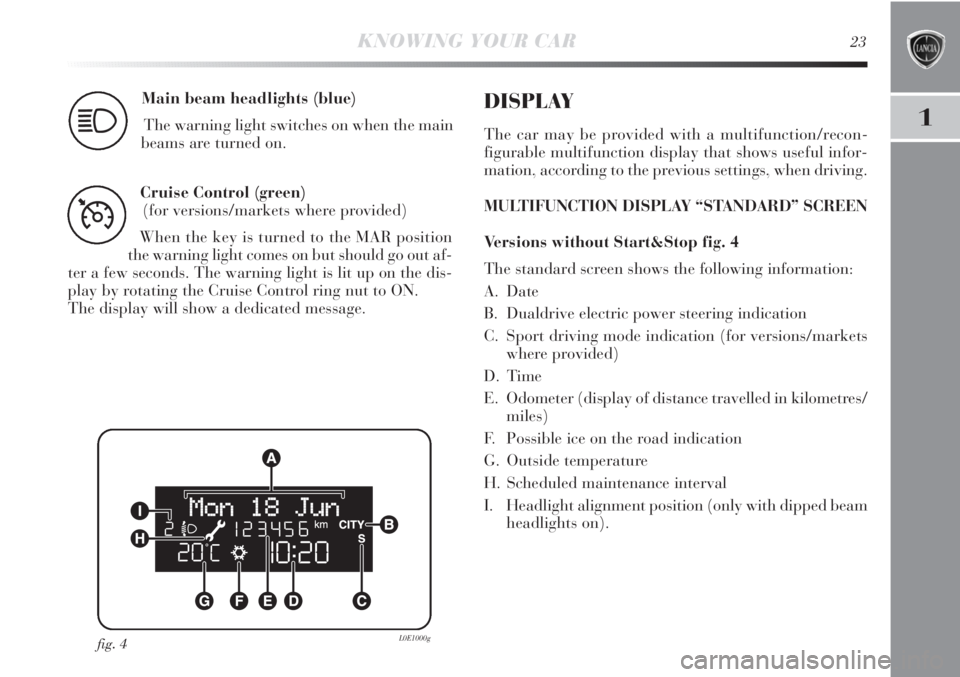
MULTIFUNCTION DISPLAY “STANDARD” SCREEN
Versions without Start&Stop fig. 4
The standard screen shows the following information:
A. Date
B. Dualdrive electric power steering indication
C. Sport driving mode indication (for versions/markets
where provided)
D. Time
E. Odometer (display of distance travelled in kilometres/
miles)
F. Possible ice on the road indication
G. Outside temperature
H. Scheduled maintenance interval
I. Headlight alignment position (only with dipped beam
headlights on).
fig. 4L0E1000g
Page 29 of 295

1
KNOWING YOUR CAR27
IMPORTANT Buttons ÕandÔactivate different func-
tions according to the following situations:
– within the menu, they allow you to scroll up and down
through the options;
– during setting operations they increase or decrease
the value.
IMPORTANT When one of the front doors is opened,
the display will switch on and show the clock and km or
miles covered for a few seconds.SETUP MENU
The menu comprises a series of items which can be selected
using the
ÕandÔbuttons to access the different selection
and setting operations (set up) described in the following
paragraphs. Some items also have a sub-menu. The Set up
Menu is activated by briefly pressing the SET button.
The menu includes the following items:
– MENU
– LIGHTING
– SPEED BEEP
– LIGHT SENSOR (for versions/markets where provided)
– CORNER LIGHTS
(for versions/markets where provided)
– TRIP B ACTIVATION/DATA
– SET TIME
– SET DATE
– FIRST PAGE (for versions/markets where provided)
– SEE RADIO
– AUTOCLOSE
– UNIT OF MEASUREMENT
– LANGUAGE
– WARNING VOLUME
– BUTTON VOLUME
– SEAT BELT BEEP/BUZZ.
– SERVICE
– AIR BAG/PASSENGER BAG
– DAYTIME RUNNING LIGHTS
– EXIT MENU
Page 30 of 295

28KNOWING YOUR CAR
Selection of an option from main menu
without submenu:
– briefly press the SET button to select the main menu
option to be set;
– press
ÕorÔ(with single presses) to select the new set-
ting;
– briefly press the SET button to store the new setting and
to go back to the main menu option selected previously.
Selecting an option from the main menu with
a submenu:
– briefly press the SET button to display the first sub-
menu option;
– press
ÕorÔ(with single presses) to scroll through all
the submenu options;
– briefly press the SET button to select the displayed sub-
menu option and to open the relevant set-up menu;
– press
ÕorÔto select the new setting for this submenu
option;
– a short press on the button SET will store the setting
and, at the same time, return to the same submenu op-
tion that was first selected.
MENU ITEMS
Lighting (Adjusting lighting inside the car)
This function is used to set the brightness of the instru-
ment panel, sound system controls and automatic climate
control system controls (for versions/markets where pro-
vided) to 8 levels.
Proceed as follows to adjust the brightness:
– press the SET button briefly to make the display flash
the previously set level;
press button
ÕorÔto adjust the brightness level;
– briefly press SET to go back to the menu screen or hold
the button down to go back to the standard screen with-
out saving.
Speed Beep (Speed limit)
This function allows the car speed limit to be set (km/h
or mph) and the driver will be notified when it is ex-
ceeded (see “Warning lights in panel section” in chapter
1). To set the desired speed limit, proceed as follows:
– press the SET button briefly, the display will show the
dedicated message;
– press the
ÕorÔbutton or to select speed limit On or
Off;
– when the function is activated (On), press the
ÕorÔ
button to select the desired speed limit and press SET
to confirm the choice.
Page 31 of 295

1
KNOWING YOUR CAR29
IMPORTANT Setting is possible between 30 and
200 km/h, or 20 and 125 mph, according to the previ-
ously set unit. See the “Unit of measurement” paragraph
described below. The setting will increase/decrease by
five units each time
Õ/Ôis pressed. Hold down button
Õ/Ôto increase/decrease the setting rapidly. Complete
the setting by briefly pressing the button when you ap-
proach the required value.
– briefly press SET to go back to the menu screen or hold
the button down to go back to the standard screen with-
out saving.
To cancel the setting, proceed as follows:
– press the SET button briefly to make the display flash
(On);
– press the
Ôbutton to make the display flash (Off); –
press the SET button briefly to return to the menu screen
or press the button for longer to return to the standard
screen without memorising.Headlight sensor (automatic/dusk sensor
headlights sensitivity adjustment)
(for versions/markets where provided)
This function is used to adjust the dusk sensor sensitiv-
ity to three levels (level 1 = minimum, level 2 = medium,
level 3 = maximum); the higher the sensitivity, the lower
the amount of external light needed to switch the head-
lights on.
Proceed as follows to set:
– press the SET button briefly to make the display flash
the previously set level;
– press
ÕorÔto make your choice;
– briefly press SET to go back to the menu screen or hold
the button down to go back to the standard screen with-
out saving.
Page 32 of 295

30KNOWING YOUR CAR
Cornering lights (activation/deactivation
of cornering lights – fog lights with cornering
function)(for versions/markets where provided)
This function activates/deactivates the cornering lights.
To activate/deactivate (ON/OFF) the lights, proceed
as follows:
– press the SET button briefly, the display will show On
or Off flashing depending on the previous setting;
press
ÕorÔto make your choice;
– briefly press SET to go back to the menu screen or hold
the button down to go back to the standard screen with-
out saving.
Trip B data/activation (Trip B enablement)
This function can be used to activate (On) or deactivate
(Off) the Trip B display (partial trip).
For further information see “Trip computer”.
Proceed as follows to switch the function on and off:
– press the SET button briefly to make the display flash
On or Off according to what was previously set;
– press
ÕorÔto make your choice;
– briefly press SET to go back to the menu screen or hold
the button down to go back to the standard screen with-
out saving.Time adjustment (Clock adjustment)
This function enables the clock to be set through two sub-
menus: “Time” and “Format”.
To carry out the adjustment, proceed as follows:
– briefly press the SET button and two submenus (Time
and Format) are displayed;
– press the
ÕorÔbutton to move between the two sub-
menus;
– once you have selected a sub-menu, press SET briefly;
– when you select “Time”, pressing SET ESC makes the
hours flash on the display;
– press
ÕorÔto adjust the value;
– briefly press the SET button, which makes the display
flash the minutes;
– press
ÕorÔto adjust the value.
Page 38 of 295

36KNOWING YOUR CAR
Daytime lights (D.R.L. – Daytime Running Lights)
With this function is possible to turn the day lights on
and off.
Proceed as follows to activate or deactivate this function:
– press the SET button briefly to display a submenu;
– press the SET button briefly to make the display flash
On or Off according to what was previously set;
– press
ÕorÔto change the setting;
– press the SET button briefly to return to the submenu
screen or hold the button down to return to the main
menu screen without saving;
– press the SET button again for a time to return to the
standard screen or to the main menu according to where
you are in the menu.
Exit Menu
This is the last function that closes the cycle of settings
listed in the menu screen. Pressing the SET button briefly
will return the display to the standard screen without
storing. Press
Ôto return to the first menu option (Speed
Beep).DISPLAY READINGS
IMPORTANT Failure indications displayed are divided
into two categories: very serious and less serious failures.
Very serious failures prompt a prolonged cycle of signals.
Less serious failures prompt a shorter cycle of signals.
The displaying cycle of both failure categories can be
stopped by pressing the button SET. The warning light
(or symbol) will stay on until the fault is eliminated.
Luggage compartment not properly shut
(red)
This symbol (for versions/markets where pro-
vided) switches on in the display when the lug-
gage compartment is not properly shut. The display
shows the dedicated message.
R
Bonnet not properly shut (red)
This symbol (for versions/markets where pro-
vided) switches on in the display when the
bonnet is not properly shut. The display will
show a dedicated message.
S
Page 39 of 295
1
KNOWING YOUR CAR37
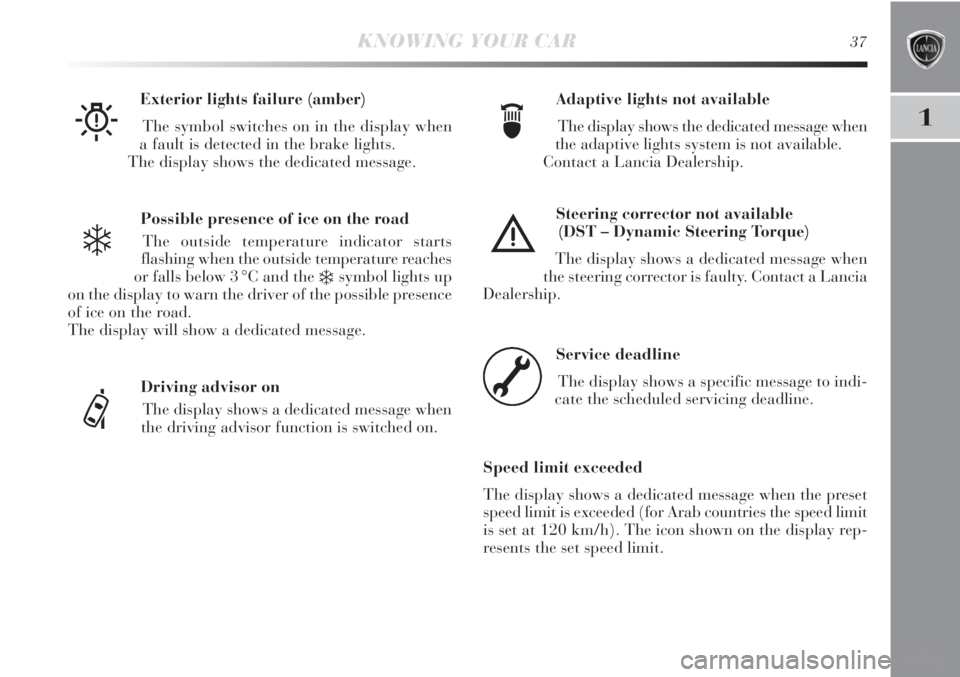
Possible presence of ice on the road
The outside temperature indicator starts
flashing when the outside temperature reaches
or falls below 3 °C and the
❄symbol lights up
on the display to warn the driver of the possible presence
of ice on the road.
The display will show a dedicated message.Adaptive lights not available
The display shows the dedicated message when
the adaptive lights system is not available.
Contact a Lancia Dealership. Exterior lights failure (amber)
The symbol switches on in the display when
a fault is detected in the brake lights.
The display shows the dedicated message.
W
❄
Driving advisor on
The display shows a dedicated message when
the driving advisor function is switched on.
ef
Steering corrector not available
(DST – Dynamic Steering Torque)
The display shows a dedicated message when
the steering corrector is faulty. Contact a Lancia
Dealership.
è
Service deadline
The display shows a specific message to indi-
cate the scheduled servicing deadline.
Speed limit exceeded
The display shows a dedicated message when the preset
speed limit is exceeded (for Arab countries the speed limit
is set at 120 km/h). The icon shown on the display rep-
resents the set speed limit.
õ
Page 45 of 295
1
KNOWING YOUR CAR43
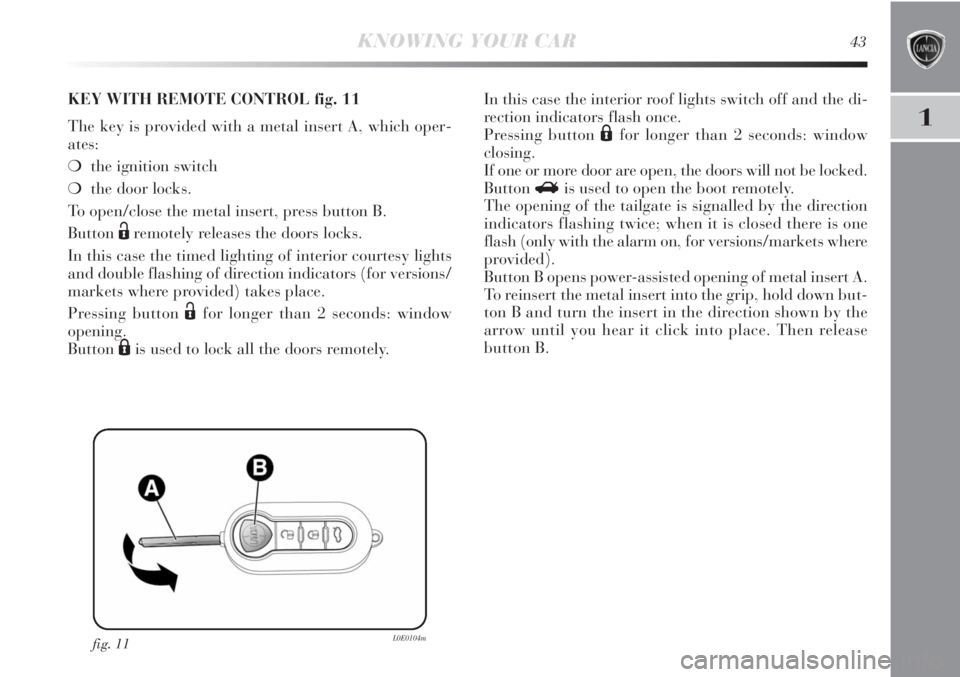
fig. 11L0E0104m
KEY WITH REMOTE CONTROL fig. 11
The key is provided with a metal insert A, which oper-
ates:
❍the ignition switch
❍the door locks.
To open/close the metal insert, press button B.
Button
Ëremotely releases the doors locks.
In this case the timed lighting of interior courtesy lights
and double flashing of direction indicators (for versions/
markets where provided) takes place.
Pressing button
Ëfor longer than 2 seconds: window
opening.
Button
Áis used to lock all the doors remotely.In this case the interior roof lights switch off and the di-
rection indicators flash once.
Pressing button
Áfor longer than 2 seconds: window
closing.
If one or more door are open, the doors will not be locked.
Button
Ris used to open the boot remotely.
The opening of the tailgate is signalled by the direction
indicators flashing twice; when it is closed there is one
flash (only with the alarm on, for versions/markets where
provided).
Button B opens power-assisted opening of metal insert A.
To reinsert the metal insert into the grip, hold down but-
ton B and turn the insert in the direction shown by the
arrow until you hear it click into place. Then release
button B.
Page 49 of 295
1
KNOWING YOUR CAR47
IMPORTANT The engine immobilizer function is guar-
anteed by the Lancia CODE, which is automatically ac-
tivated when the ignition key is extracted from the starter
device.
TURNING THE ALARM ON
With the doors and bonnet closed and the ignition key
either turned to STOP or removed, point the key with the
remote control towards the vehicle and press and release
button
Á.
Excluding some markets, the system produces an acoustic
warning (beep) and enables door locking.
The switching on of the alarm is preceded by a self-di-
agnosis stage: if a fault is detected, the system emits a new
acoustic signal together with the display of a message (see
“Panel warning lights” chapter).
In this case switch off the alarm by pressing
Ë, check that
all the doors, bonnet and tailgate are closed correctly;
then switch the alarm back on by pressing
Á.
If a door or the bonnet is not properly shut, it will be ex-
cluded from the testing by the alarm system.
If the alarm emits an acoustic signal even when the doors,
bonnet and tailgate are correctly closed, a failure has oc-
curred in system operation. Contact a Lancia Dealership.IMPORTANT Centrally locking the doors using the metal
insert on the key does not activate the alarm.
IMPORTANT The alarm is adapted to meet requirements
in various countries.
TURNING THE ALARM OFF
Press button
Ëon the key with the remote control.
The following operations are performed (excluding some
markets):
❍the direction indicators flash briefly twice;
❍two brief acoustic signals are emitted (“BEEP”);
❍the doors are unlocked.
IMPORTANT Activating the central opening using the
key’s metal insert does not turn the alarm off.
Page 50 of 295
48KNOWING YOUR CAR
VOLUMETRIC/ANTI-LIFT PROTECTION
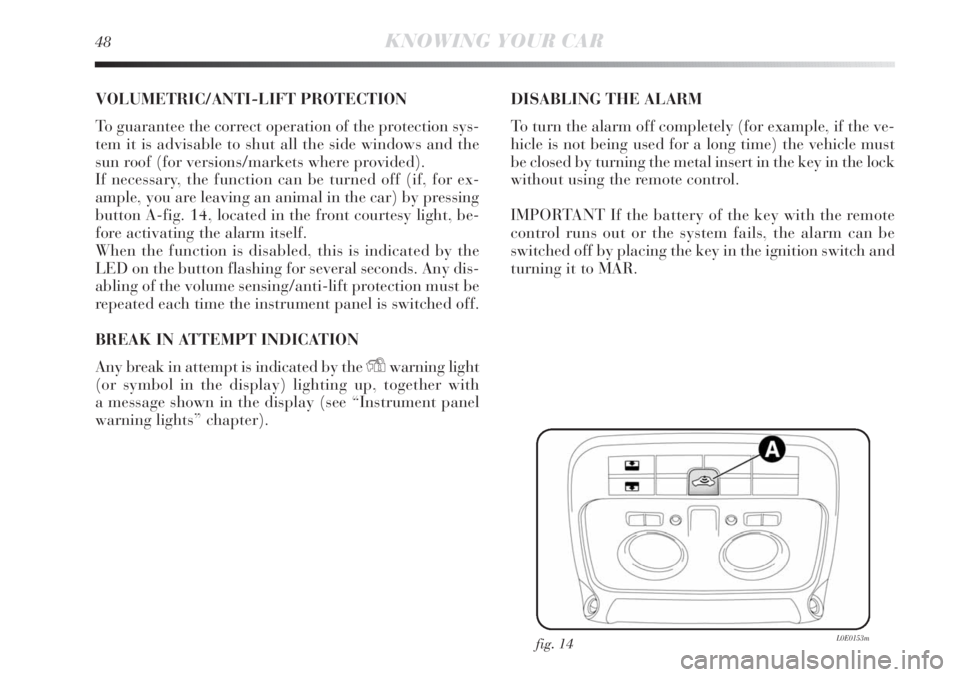
To guarantee the correct operation of the protection sys-
tem it is advisable to shut all the side windows and the
sun roof (for versions/markets where provided).
If necessary, the function can be turned off (if, for ex-
ample, you are leaving an animal in the car) by pressing
button A-fig. 14, located in the front courtesy light, be-
fore activating the alarm itself.
When the function is disabled, this is indicated by the
LED on the button flashing for several seconds. Any dis-
abling of the volume sensing/anti-lift protection must be
repeated each time the instrument panel is switched off.
BREAK IN ATTEMPT INDICATION
Any break in attempt is indicated by the
Ywarning light
(or symbol in the display) lighting up, together with
a message shown in the display (see “Instrument panel
warning lights” chapter).DISABLING THE ALARM
To turn the alarm off completely (for example, if the ve-
hicle is not being used for a long time) the vehicle must
be closed by turning the metal insert in the key in the lock
without using the remote control.
IMPORTANT If the battery of the key with the remote
control runs out or the system fails, the alarm can be
switched off by placing the key in the ignition switch and
turning it to MAR.
fig. 14L0E0153m