lights Lancia Delta 2012 Owner handbook (in English)
[x] Cancel search | Manufacturer: LANCIA, Model Year: 2012, Model line: Delta, Model: Lancia Delta 2012Pages: 295, PDF Size: 8.29 MB
Page 213 of 295

IN AN EMERGENCY211
4
With gas discharge bulbs (Xenon)
(for versions/markets where provided)
MAIN BEAM HEADLIGHTS
With incandescent bulbs
To change the bulb, proceed as follows:
❍remove the protective cover A-fig. 15;
❍release the bulb holder clip A-fig. 17;
❍disconnect the electrical connector B;
❍remove the bulb C and replace it;
❍fit the new bulb, ensuring that the outline of the metal
part coincides with the splining on the curve of the
headlight. Then reconnect the electrical connector B
and reattach the bulb holding clip A;
❍refit the protective cover A-fig. 15.
fig. 17L0E0156m
Due to the high power supply voltage, gas
discharge bulbs (Xenon) should only be re-
placed by specialised personnel: danger of
death! Go to a Lancia Dealership.
With gas discharge bulbs (Xenon)
(for versions/markets where provided)
Due to the high power supply voltage, gas
discharge bulbs (Xenon) should only be re-
placed by specialised personnel: danger of
death! Go to a Lancia Dealership.
Page 214 of 295

212IN AN EMERGENCY
SIDE LIGHTS/DAY LIGHTS
The side lights/day lights are LED-based.
Contact a Lancia dealership to have these lights replaced.
DIRECTION INDICATORS
Front
To change the bulb, proceed as follows:
❍remove the protective cover C-fig. 15;
❍press down near the bulb holder locking tabs (shown
in fig. 18 by the arrows) and simultaneously pull the
unit;
❍remove the bulb A and replace it;
❍refit the protective cover C.Side
To change the bulb, proceed as follows:
❍work on the lens cover A-fig. 19 to compress catch B,
then pull the unit outwards;
❍turn the bulb holder C, anticlockwise, extract the
press-fitted bulb D and replace it;
❍refit the bulb holder C in the lens cover and turn it
clockwise;
❍refit the unit making sure that the internal clip B
clicks into place.
fig. 18L0E0157mfig. 19L0E0158m
Page 215 of 295

IN AN EMERGENCY213
4
FOG LIGHTS fig. 20
(for versions/markets where provided)
To replace the bulbs in the front fog lights you must con-
tact a Lancia Dealership.
REAR LIGHT CLUSTERS
Contact a Lancia Dealership to replace the LED lights
in the rear light clusters.
REVERSING LIGHTS fig. 21
To replace the bulbs in the reversing lights you must con-
tact a Lancia Dealership.REAR FOG LIGHTS fig. 22
To replace the bulbs in the rear fog lights you must con-
tact a Lancia Dealership.
fig. 20L0E0159mfig. 22L0E0161m
fig. 21L0E0160m
Page 216 of 295

214IN AN EMERGENCY
THIRD BRAKE LIGHT fig. 23
Contact a Lancia Dealership to replace the LED lights
in the third brake light.
NUMBER PLATE LIGHTS
To change the bulb proceed as follows:
❍remove the lens units A-fig. 24 by acting on the points
shown by the arrows;
❍remove the bulb B and replace it.
fig. 23L0E0162mfig. 25L0E0282m
fig. 24L0E0163m
Page 225 of 295

IN AN EMERGENCY223
4
FUSE SUMMARY TABLE
F12
F12
F13
F13
F31
F33
F34
F35
F36
F37
F38
F39
F40
F417.5
15
7.5
15
5
20
20
5
20
7.5
10
10
30
7.538
38
38
38
38
38
38
38
38
38
38
38
38
38
USERS FUSE AMPS FIGURE
Right dipped beam headlight
Right dipped beam headlight (Xenon gas discharge bulb)
Left dipped beam headlight, headlight alignment corrector
Left dipped beam headlight (Xenon gas discharge bulb)
Climate control system fan relay coil, body computer
Left rear window winder
Right rear window winder
Reversing lights, engine compartment junction unit relay coils,
brake light pedal control (normally closed contact),
water in diesel sensor, air flow meter/control on clutch pedal
and brake servo pressure sensor (1.4 Turbo Multi Air versions)
Central locking system control unit, fuel flap,
dead lock, tailgate release
Third brake light, instrument panel, Adaptive Headlights Node
(1.4 Turbo Multi Air versions excluded), control unit on left hand
gas discharge headlight (1.4 Turbo Multi Air versions excluded)
Front roof lights, rear central roof light, driver side and passenger side sun
visor lights, luggage compartment roof light, glove compartment courtesy
light (Platinum trim level with optional sun roof - excluding MultiAir version)
Radio wiring/Radio/Radio Navigator (excluding MultiAir versions),
Blue&Me
TMNode, alarm siren, alarm system on roof light, climate control
unit, tyre pressure monitoring system control unit, diagnosis socket connector,
rear roof lights, voltage stabiliser (MultiAir versions without optional HI-FI)
Heated rear window
Electric door mirror demisters, demisters on windscreen jets
Page 227 of 295
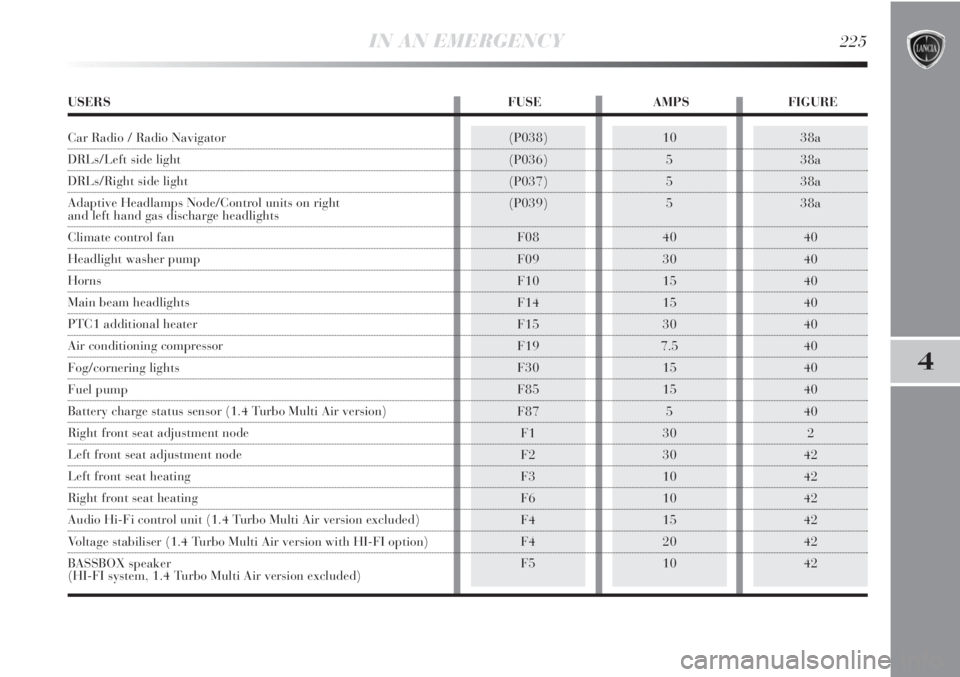
IN AN EMERGENCY225
4
38a
38a
38a
38a
40
40
40
40
40
40
40
40
40
2
42
42
42
42
42
42(P038)
(P036)
(P037)
(P039)
F08
F09
F10
F14
F15
F19
F30
F85
F87
F1
F2
F3
F6
F4
F4
F510
5
5
5
40
30
15
15
30
7.5
15
15
5
30
30
10
10
15
20
10
USERS FUSE AMPS FIGURE
Car Radio / Radio Navigator
DRLs/Left side light
DRLs/Right side light
Adaptive Headlamps Node/Control units on right
and left hand gas discharge headlights
Climate control fan
Headlight washer pump
Horns
Main beam headlights
PTC1 additional heater
Air conditioning compressor
Fog/cornering lights
Fuel pump
Battery charge status sensor (1.4 Turbo Multi Air version)
Right front seat adjustment node
Left front seat adjustment node
Left front seat heating
Right front seat heating
Audio Hi-Fi control unit (1.4 Turbo Multi Air version excluded)
Voltage stabiliser (1.4 Turbo Multi Air version with HI-FI option)
BASSBOX speaker
(HI-FI system, 1.4 Turbo Multi Air version excluded)
Page 233 of 295
18 36 54 72 90 108
30 60 90 120 150 180
24 48 72 96 120 144
●●● ●●●
●●● ●●●
●●● ●●●
●●● ●●●
●●● ●●●
●●● ●●●
●●● ●●●
●●● ●●●
●●● ●●●
●●● ●●●
●●
●●
SERVICING AND MAINTENANCE231
5
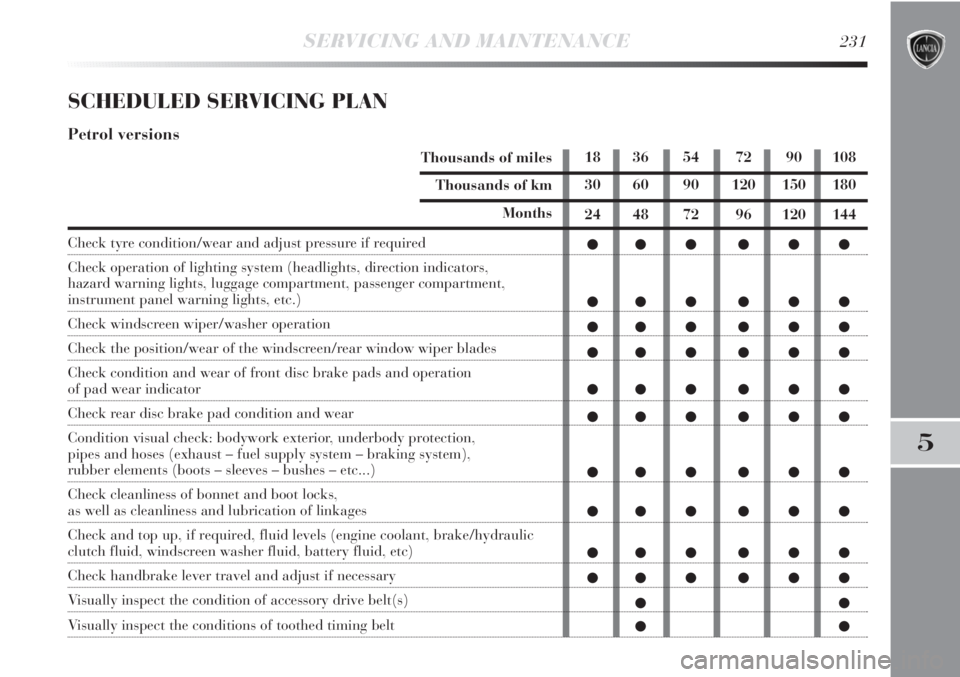
SCHEDULED SERVICING PLAN
Petrol versions
Thousands of miles
Thousands of km
Months
Check tyre condition/wear and adjust pressure if required
Check operation of lighting system (headlights, direction indicators,
hazard warning lights, luggage compartment, passenger compartment,
instrument panel warning lights, etc.)
Check windscreen wiper/washer operation
Check the position/wear of the windscreen/rear window wiper blades
Check condition and wear of front disc brake pads and operation
of pad wear indicator
Check rear disc brake pad condition and wear
Condition visual check: bodywork exterior, underbody protection,
pipes and hoses (exhaust – fuel supply system – braking system),
rubber elements (boots – sleeves – bushes – etc...)
Check cleanliness of bonnet and boot locks,
as well as cleanliness and lubrication of linkages
Check and top up, if required, fluid levels (engine coolant, brake/hydraulic
clutch fluid, windscreen washer fluid, battery fluid, etc)
Check handbrake lever travel and adjust if necessary
Visually inspect the condition of accessory drive belt(s)
Visually inspect the conditions of toothed timing belt
Page 235 of 295
SERVICING AND MAINTENANCE233
5
21 42 63 84 105
35 70 105 140 175
24 48 72 96 120
●● ● ● ●
●● ● ● ●
●● ● ● ●
●● ● ● ●
●● ● ● ●
●● ● ● ●
●● ● ● ●
●● ● ● ●
●● ● ● ●
●● ● ● ●
●●
●● ● ● ●
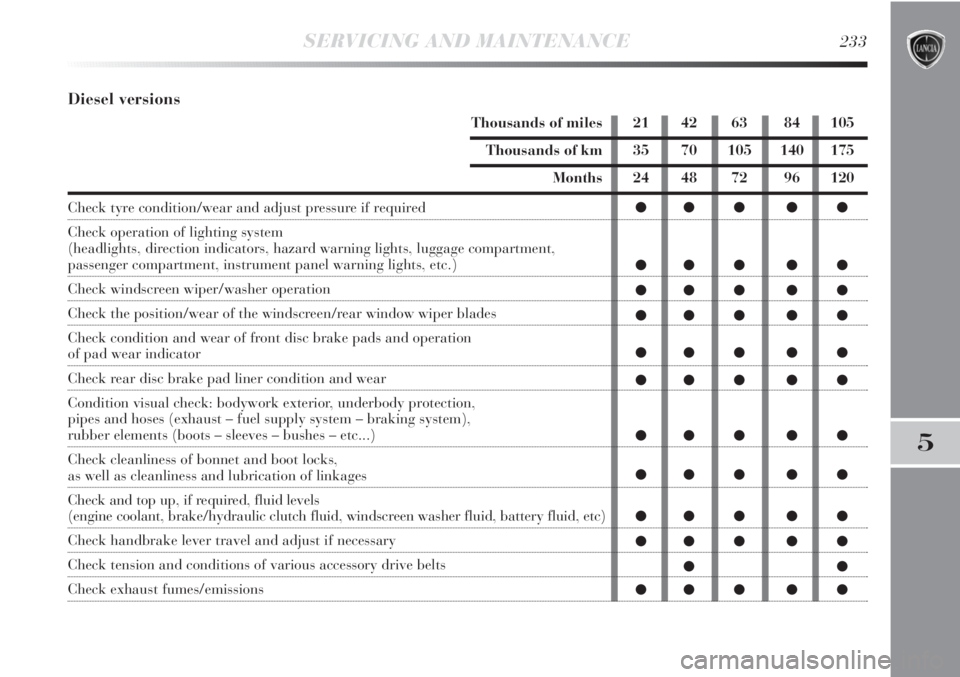
Diesel versions
Thousands of miles
Thousands of km
Months
Check tyre condition/wear and adjust pressure if required
Check operation of lighting system
(headlights, direction indicators, hazard warning lights, luggage compartment,
passenger compartment, instrument panel warning lights, etc.)
Check windscreen wiper/washer operation
Check the position/wear of the windscreen/rear window wiper blades
Check condition and wear of front disc brake pads and operation
of pad wear indicator
Check rear disc brake pad liner condition and wear
Condition visual check: bodywork exterior, underbody protection,
pipes and hoses (exhaust – fuel supply system – braking system),
rubber elements (boots – sleeves – bushes – etc...)
Check cleanliness of bonnet and boot locks,
as well as cleanliness and lubrication of linkages
Check and top up, if required, fluid levels
(engine coolant, brake/hydraulic clutch fluid, windscreen washer fluid, battery fluid, etc)
Check handbrake lever travel and adjust if necessary
Check tension and conditions of various accessory drive belts
Check exhaust fumes/emissions
Page 237 of 295
SERVICING AND MAINTENANCE235
5
REGULAR CHECKS
Every 1,000 km or before long journeys, check and, if
necessary, top-up the following:
❍engine coolant fluid level;
❍brake fluid level;
❍windscreen washer fluid level;
❍tyre pressure and condition;
❍operation of lighting system (headlights, direction in-
dicators, hazard lights, etc.);
❍operation of the windscreen wiper/washer system, po-
sition and wear of windscreen/rear window wiper
blades.
Every 3,000 km check and top up if required: engine oil
level.
HEAVY-DUTY USE OF THE CAR
Should the prevailing use of the car be under one of the
following specially demanding conditions:
❍trailer or caravan towing;
❍dusty roads;
❍short (less than 7-8 km) and repeated journeys in sub-
zero temperatures;
❍frequently idling engine or long-distance, low-speed
driving, or in the event of long-term inactivity.
Page 249 of 295
SERVICING AND MAINTENANCE247
5
USEFUL ADVICE FOR EXTENDING
THE LIFE OF YOUR BATTERY
To avoid draining your battery and make it last longer,
observe the following instructions:
❍when you park the car, ensure the doors, tailgate and
bonnet are closed properly, to prevent any light from
remaining on inside the passenger’s compartment;
❍turn off the roof lights, although the car does have an
automatic system for switching off internal lights;
❍do not leave devices (e.g. car radio, hazard lights, etc.)
switched on for a long time when the engine is not
running;
❍before performing any operation on the electrical sys-
tem, disconnect the negative battery cable;
❍battery terminals should always be perfectly tight-
ened.
IMPORTANT If the charge level remains under 50% for
a long time, the battery is damaged by sulphation, re-
ducing its capacity and starting attitude.The battery will also be more at risk of freezing (this can
happen as early as −10 °C). In the case of prolonged idle-
ness, refer to the paragraph “Car inactivity”, in chapter
“3”.
If you decide to install electrical accessories after the car
has been purchased which require a permanent electric
power supply (alarm, etc.) or accessories which have
a serious impact on the electrical balance, seek assistance
from a Lancia Dealership because their qualified staff will
suggest the most suitable Lancia Lineaccessori devices
and assess the overall electric consumption, checking
whether the car’s electrical system can cope or whether
a more powerful battery is required.
Since these devices continue to consume energy even when
the engine is off, they gradually run down the battery.