fog light Lancia Delta 2012 Owner handbook (in English)
[x] Cancel search | Manufacturer: LANCIA, Model Year: 2012, Model line: Delta, Model: Lancia Delta 2012Pages: 295, PDF Size: 8.29 MB
Page 24 of 295

22KNOWING YOUR CAR
Particularly strong radio frequency interfer-
ence may cause the T.P.M.S. system to func-
tion incorrectly. This condition is indicated
to the driver by a message (for versions/markets
where provided).
The message will disappear automatically as soon
as the interference ceases to disturb the system.
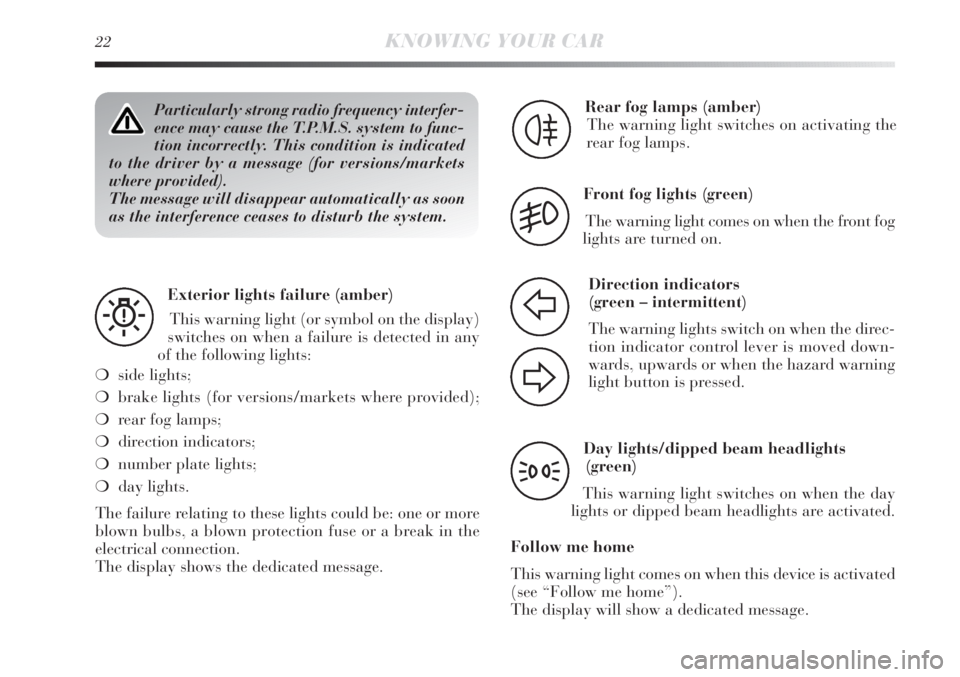
Exterior lights failure (amber)
This warning light (or symbol on the display)
switches on when a failure is detected in any
of the following lights:
❍side lights;
❍brake lights (for versions/markets where provided);
❍rear fog lamps;
❍direction indicators;
❍number plate lights;
❍day lights.
The failure relating to these lights could be: one or more
blown bulbs, a blown protection fuse or a break in the
electrical connection.
The display shows the dedicated message.
W
Rear fog lamps (amber)
The warning light switches on activating the
rear fog lamps.
4
Front fog lights (green)
The warning light comes on when the front fog
lights are turned on.
5
Direction indicators
(green – intermittent)
The warning lights switch on when the direc-
tion indicator control lever is moved down-
wards, upwards or when the hazard warning
light button is pressed.
F
D
Day lights/dipped beam headlights
(green)
This warning light switches on when the day
lights or dipped beam headlights are activated.
Follow me home
This warning light comes on when this device is activated
(see “Follow me home”).
The display will show a dedicated message.
3
Page 32 of 295

30KNOWING YOUR CAR
Cornering lights (activation/deactivation
of cornering lights – fog lights with cornering
function)(for versions/markets where provided)
This function activates/deactivates the cornering lights.
To activate/deactivate (ON/OFF) the lights, proceed
as follows:
– press the SET button briefly, the display will show On
or Off flashing depending on the previous setting;
press
ÕorÔto make your choice;
– briefly press SET to go back to the menu screen or hold
the button down to go back to the standard screen with-
out saving.
Trip B data/activation (Trip B enablement)
This function can be used to activate (On) or deactivate
(Off) the Trip B display (partial trip).
For further information see “Trip computer”.
Proceed as follows to switch the function on and off:
– press the SET button briefly to make the display flash
On or Off according to what was previously set;
– press
ÕorÔto make your choice;
– briefly press SET to go back to the menu screen or hold
the button down to go back to the standard screen with-
out saving.Time adjustment (Clock adjustment)
This function enables the clock to be set through two sub-
menus: “Time” and “Format”.
To carry out the adjustment, proceed as follows:
– briefly press the SET button and two submenus (Time
and Format) are displayed;
– press the
ÕorÔbutton to move between the two sub-
menus;
– once you have selected a sub-menu, press SET briefly;
– when you select “Time”, pressing SET ESC makes the
hours flash on the display;
– press
ÕorÔto adjust the value;
– briefly press the SET button, which makes the display
flash the minutes;
– press
ÕorÔto adjust the value.
Page 68 of 295

66KNOWING YOUR CAR
Deactivation
When the lights are switched off by the sensor, the dipped
beam headlights and side lights are switched off and the
day lights are switched on (if activated).
The sensor is not capable of detecting the presence of fog
therefore, in these circumstances, the lights have to be
turned on manually.
FRONT FOG LIGHTS WITH CORNERING LIGHTS
FUNCTION
When the dipped headlamps are on and the speed is be-
low 40 km/h, if the steering wheel rotation angle is large
or the direction indicators are on, a light (incorporated in
the fog light) will come on on the relevant side to improve
visibility at nightime. The function can be acti-
vated/deactivated via the display menu (see “Display”
paragraph in this chapter). AUTOMATIC HEADLIGHT SENSOR
(dusk sensor) fig. 27
(for versions/markets, where provided)
It detects variations in brightness outside the vehicle de-
pending on the light setting: the greater the sensitivity,
the less outside light needed to activate the exterior lights
being turned on. The sensitivity of the dusk sensor may
be adjusted, using the “Set-up menu” on the instrument
panel.
Activation
When the ring nut is turned to the AUTO position the ex-
ternal lights automatically switch on depending on the
exterior brightness.
The headlights can only be flashed with the sensor on.The daytime running lights are an alterna-
tive to the dipped beam headlights for dri-
ving during the daytime in countries where
it is compulsory to have lights on during the day,
and they are also permitted in those countries
where this not obligatory.
Daytime running lights cannot replace dipped
headlights when driving at night or through tunnels.
The use of daytime running lights is governed by
the highway code of the country in which you are
driving. Comply with legal requirements.
Page 78 of 295

76KNOWING YOUR CAR
When this function is on (see “SPORT function”), the
word SPORT is lit up in the display. Press the button
again to turn the function off and restore the normal dri-
ving setting.
fig. 36L0E0028mfig. 37L0E0029m
The use of hazard warning lights is governed by the high-
way code of the country you are in. Comply with legal re-
quirements.
Emergency braking
During emergency braking, the hazard warning lights
come on automatically and lights
Îand¥on the panel
come on at the same time. The function switches off au-
tomatically when the nature of the braking changes. This
function complies with the relevant legislations currently
in force.
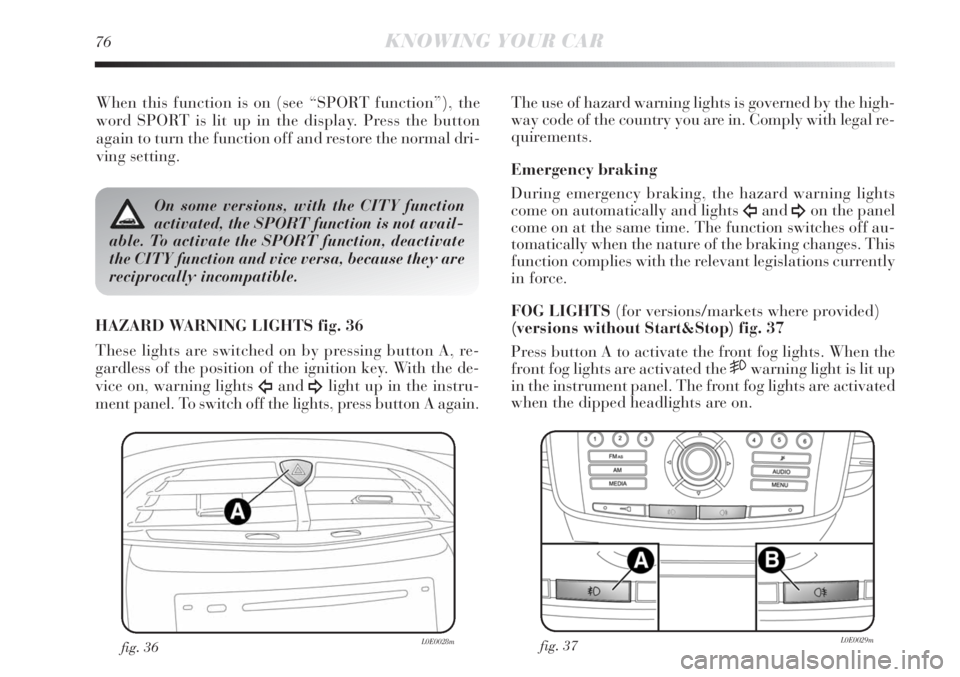
FOG LIGHTS (for versions/markets where provided)
(versions without Start&Stop) fig. 37
Press button A to activate the front fog lights. When the
front fog lights are activated the
5warning light is lit up
in the instrument panel. The front fog lights are activated
when the dipped headlights are on.
On some versions, with the CITY function
activated, the SPORT function is not avail-
able. To activate the SPORT function, deactivate
the CITY function and vice versa, because they are
reciprocally incompatible.
HAZARD WARNING LIGHTS fig. 36
These lights are switched on by pressing button A, re-
gardless of the position of the ignition key. With the de-
vice on, warning lights
Îand¥light up in the instru-
ment panel. To switch off the lights, press button A again.
Page 79 of 295

1
KNOWING YOUR CAR77
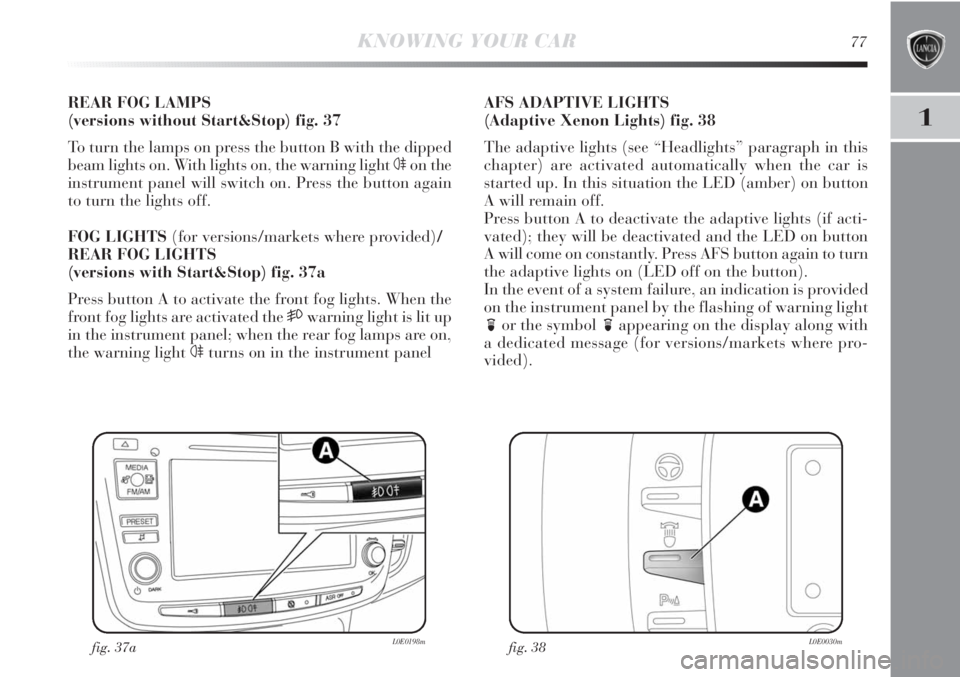
REAR FOG LAMPS
(versions without Start&Stop) fig. 37
To turn the lamps on press the button B with the dipped
beam lights on. With lights on, the warning light
4on the
instrument panel will switch on. Press the button again
to turn the lights off.
FOG LIGHTS (for versions/markets where provided)/
REAR FOG LIGHTS
(versions with Start&Stop) fig. 37a
Press button A to activate the front fog lights. When the
front fog lights are activated the 5warning light is lit up
in the instrument panel; when the rear fog lamps are on,
the warning light 4turns on in the instrument panel
fig. 38L0E0030m
AFS ADAPTIVE LIGHTS
(Adaptive Xenon Lights) fig. 38
The adaptive lights (see “Headlights” paragraph in this
chapter) are activated automatically when the car is
started up. In this situation the LED (amber) on button
A will remain off.
Press button A to deactivate the adaptive lights (if acti-
vated); they will be deactivated and the LED on button
A will come on constantly. Press AFS button again to turn
the adaptive lights on (LED off on the button).
In the event of a system failure, an indication is provided
on the instrument panel by the flashing of warning light
for the symbol
fappearing on the display along with
a dedicated message (for versions/markets where pro-
vided).
fig. 37aL0E0198m
Page 105 of 295

1
KNOWING YOUR CAR103
HEADLIGHTS
HEADLIGHT BEAM AIMING
The correct aiming of the headlights is important for the
comfort and safety of not only the driver but all other
road users. This is also covered by a specific rule of the
highway code.
The headlights must be correctly aimed to guarantee the
best visibility conditions for all drivers while travelling
with headlights on.
Contact a Lancia Dealership to have the headlights prop-
erly adjusted.
Check beam alignment every time the load or its distri-
bution changes.
ANGLE COMPENSATION fig. 64
The car is fitted with an electric headlight alignment sys-
tem. This system is operational with the ignition key
turned to MAR and the dipped beam headlights on.
When the car is loaded, it slopes backwards. This means
the headlight beam rises.
In this case, it is necessary to adjust the beams using but-
tons A and B.
The display provides a visual indication of the positions
during adjustment.Correct positions depending on the load
Position 0 – one or two people in the front seats.
Position 1 – five passengers.
Position 2 – five people + load in the boot.
Position 3 – driver + maximum permitted load stowed
in the luggage compartment.
FRONT FOG LIGHTS ALIGNMENT
(for versions/markets where provided)
Contact a Lancia Dealership to have the lights properly
adjusted.
fig. 64L0E0054m
Page 113 of 295

1
KNOWING YOUR CAR111
SYSTEM FAILURE
In the case of a malfunction, the system notifies the dri-
ver of the fault with message 3-fig. 69 in the instrument
panel display plus a buzzer.
IMPORTANT NOTES
The driving advisor is not capable of operation follow-
ing a malfunction of the following safety systems – ABS,
ESP, ASR, DST and TTC.
When the lane demarcation lines are not suf-
ficiently visible, covered or non-existent, the
driving advisor cannot help the driver and
the system will not be activated.The driving advisor is not an automatic dri-
ving system and does not replace the driver
in controlling the trajectory of the vehicle.
The driver is personally responsible for maintain-
ing a suitable level of attention to the traffic and
road conditions and for controlling the trajectory
of the vehicle safely.
The operation of the driving advisor can be adversely af-
fected by poor visibility conditions (fog, rain, snow), ex-
treme light conditions (glare of the sun, darkness), lack
of cleanliness or damage, even partial, to the windscreen
in the area behind the TV camera.
The area of the windscreen by the TV camera must not
be partly or totally obscured by objects (e.g. stickers, pro-
tective film, etc.).
Page 211 of 295

IN AN EMERGENCY209
4
LEDs
LEDs
D1S(*)/H7
H1(*)/H7
PY 24W
LEDs
WY5W
LEDs
LEDs
W5W
H11
W16W
W16W
5L/5K
12V 5W
12V 5W
W5W–
–
D
D
B
–
A
–
–
C
E
B
B
–
C
C
A–
–
55 W
55 W
24 W
–
5 W
–
–
5 W
55 W
16 W
16 W
–
5 W
5 W
5 W
(*) Xenon gas discharge bulb
Bulbs Type Power Re. figure
Front side lights/Day lights
Rear side lights
Dipped headlamps
Main beam headlamps
Front direction indicator
Rear direction indicator
Side direction indicator
Stop
3rdbrake light
Number plate
Fog lights
Rear fog lamp
Reverse gear
Front courtesy light (white LEDs)
Rear roof light
Glove compartment/luggage
compartment courtesy light
Puddle light
Page 215 of 295

IN AN EMERGENCY213
4
FOG LIGHTS fig. 20
(for versions/markets where provided)
To replace the bulbs in the front fog lights you must con-
tact a Lancia Dealership.
REAR LIGHT CLUSTERS
Contact a Lancia Dealership to replace the LED lights
in the rear light clusters.
REVERSING LIGHTS fig. 21
To replace the bulbs in the reversing lights you must con-
tact a Lancia Dealership.REAR FOG LIGHTS fig. 22
To replace the bulbs in the rear fog lights you must con-
tact a Lancia Dealership.
fig. 20L0E0159mfig. 22L0E0161m
fig. 21L0E0160m
Page 227 of 295

IN AN EMERGENCY225
4
38a
38a
38a
38a
40
40
40
40
40
40
40
40
40
2
42
42
42
42
42
42(P038)
(P036)
(P037)
(P039)
F08
F09
F10
F14
F15
F19
F30
F85
F87
F1
F2
F3
F6
F4
F4
F510
5
5
5
40
30
15
15
30
7.5
15
15
5
30
30
10
10
15
20
10
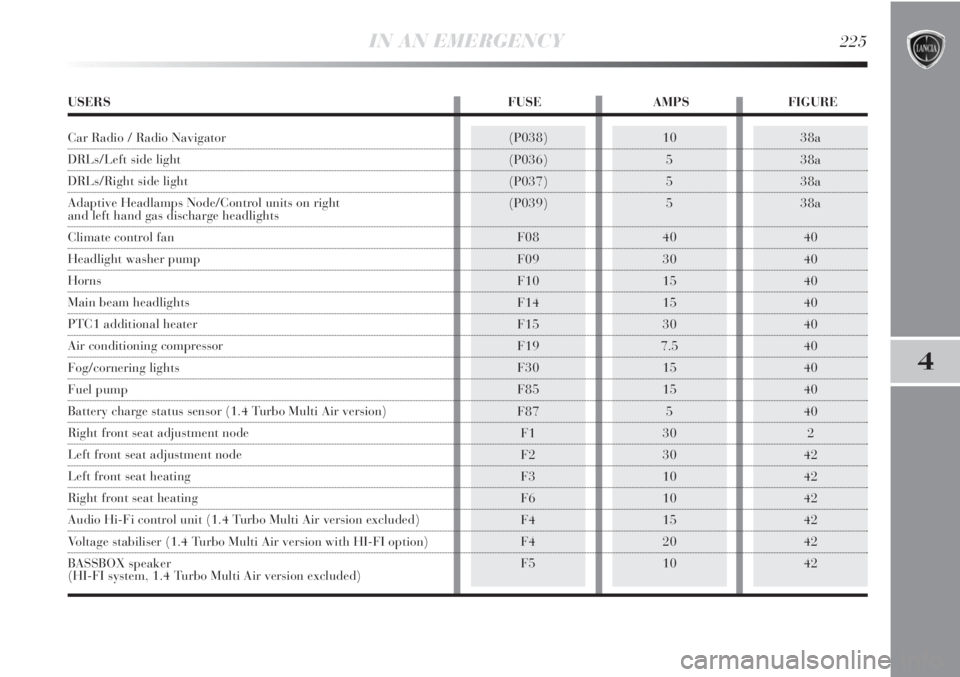
USERS FUSE AMPS FIGURE
Car Radio / Radio Navigator
DRLs/Left side light
DRLs/Right side light
Adaptive Headlamps Node/Control units on right
and left hand gas discharge headlights
Climate control fan
Headlight washer pump
Horns
Main beam headlights
PTC1 additional heater
Air conditioning compressor
Fog/cornering lights
Fuel pump
Battery charge status sensor (1.4 Turbo Multi Air version)
Right front seat adjustment node
Left front seat adjustment node
Left front seat heating
Right front seat heating
Audio Hi-Fi control unit (1.4 Turbo Multi Air version excluded)
Voltage stabiliser (1.4 Turbo Multi Air version with HI-FI option)
BASSBOX speaker
(HI-FI system, 1.4 Turbo Multi Air version excluded)