fuse Lancia Delta 2012 Owner handbook (in English)
[x] Cancel search | Manufacturer: LANCIA, Model Year: 2012, Model line: Delta, Model: Lancia Delta 2012Pages: 295, PDF Size: 8.29 MB
Page 10 of 295

8KNOWING YOUR CAR
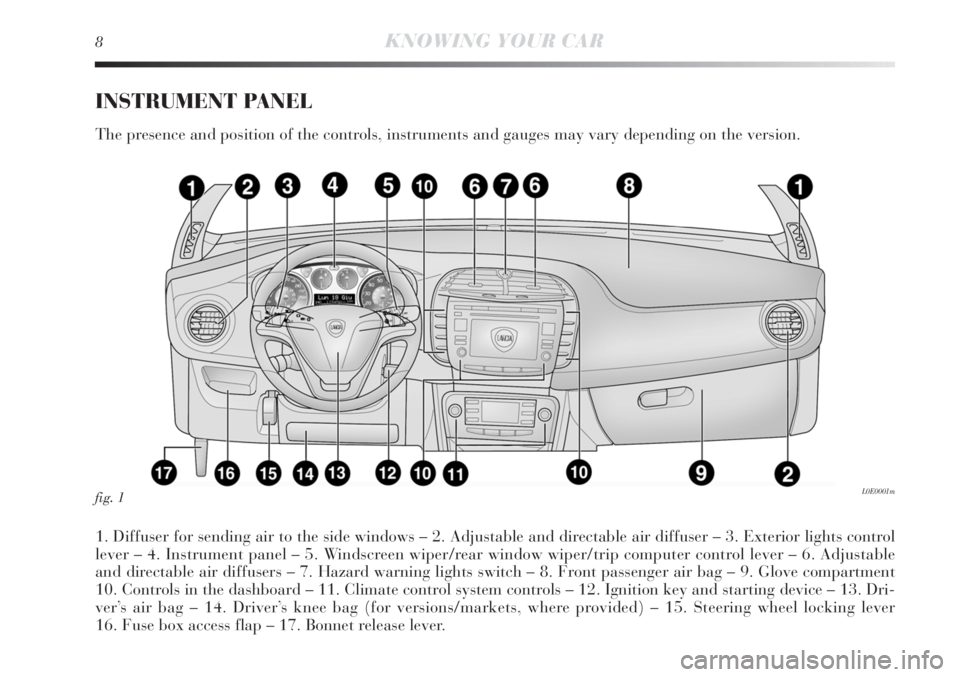
INSTRUMENT PANEL
The presence and position of the controls, instruments and gauges may vary depending on the version.
1. Diffuser for sending air to the side windows – 2. Adjustable and directable air diffuser – 3. Exterior lights control
lever – 4. Instrument panel – 5. Windscreen wiper/rear window wiper/trip computer control lever – 6. Adjustable
and directable air diffusers – 7. Hazard warning lights switch – 8. Front passenger air bag – 9. Glove compartment
10. Controls in the dashboard – 11. Climate control system controls – 12. Ignition key and starting device – 13. Dri-
ver’s air bag – 14. Driver’s knee bag (for versions/markets, where provided) – 15. Steering wheel locking lever
16. Fuse box access flap – 17. Bonnet release lever.
fig. 1L0E0001m
Page 24 of 295

22KNOWING YOUR CAR
Particularly strong radio frequency interfer-
ence may cause the T.P.M.S. system to func-
tion incorrectly. This condition is indicated
to the driver by a message (for versions/markets
where provided).
The message will disappear automatically as soon
as the interference ceases to disturb the system.
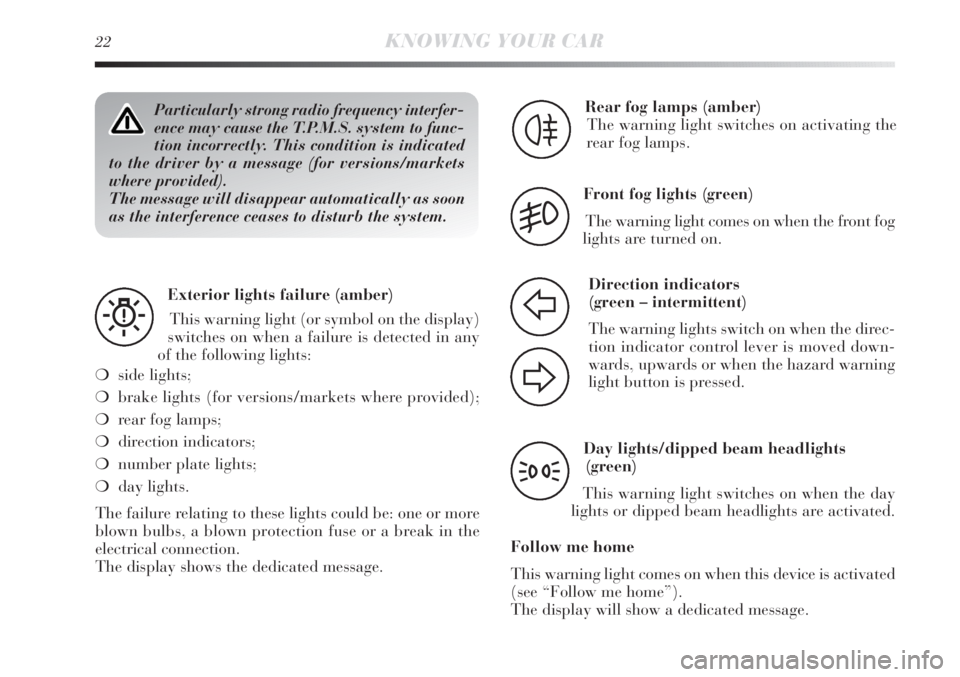
Exterior lights failure (amber)
This warning light (or symbol on the display)
switches on when a failure is detected in any
of the following lights:
❍side lights;
❍brake lights (for versions/markets where provided);
❍rear fog lamps;
❍direction indicators;
❍number plate lights;
❍day lights.
The failure relating to these lights could be: one or more
blown bulbs, a blown protection fuse or a break in the
electrical connection.
The display shows the dedicated message.
W
Rear fog lamps (amber)
The warning light switches on activating the
rear fog lamps.
4
Front fog lights (green)
The warning light comes on when the front fog
lights are turned on.
5
Direction indicators
(green – intermittent)
The warning lights switch on when the direc-
tion indicator control lever is moved down-
wards, upwards or when the hazard warning
light button is pressed.
F
D
Day lights/dipped beam headlights
(green)
This warning light switches on when the day
lights or dipped beam headlights are activated.
Follow me home
This warning light comes on when this device is activated
(see “Follow me home”).
The display will show a dedicated message.
3
Page 48 of 295

46KNOWING YOUR CAR
Switching the device off
The device disengages automatically by:
❍opening the driver’s door using the metal insert;
❍pressing the
Ëbutton on the remote control;
❍turning the ignition key to the MAR position
ALARM
(for versions/markets where provided)
The alarm, in addition to all the remote control functions
described previously, is controlled by the receiver located
under the dashboard near the fuse box.
ALARM TRIPPING
The alarm intervenes in the following cases:
❍when a door, the bonnet or the tailgate is opened il-
legally (perimeter protection);
❍when the ignition system is operated (ignition key
turned to MAR);
❍cutting of the battery cables;
❍movement inside the passenger compartment (volu-
metric protection);
❍when the vehicle is lifted or tilted.
Depending on the market, the activation of the alarm
causes the activation of the siren and the direction indi-
cators (for about 26 seconds). Alarm tripping and the
number of cycles depend on the sales market.
There is a maximum number of acoustic/visual cycles.
When this is reached the system returns to normal op-
eration.
The volume sensing and anti-lift protection can be ex-
cluded by adjusting the dedicated control on the front
roof light (see “Volumetric/anti-lift protection”).
Once the safe lock device is engaged it is im-
possible to open the doors from inside the
car. Before engaging the device, check that
there is no one left on board. If the remote control
battery is flat, the device can only be disengaged by
using the metal insert in either of the door locks.
Page 75 of 295

1
KNOWING YOUR CAR73
TURNING THE DEVICE OFF
Turn the ring nut A-fig. 31 to OFF or turn the ignition
key to STOP. The device is automatically turned off in
one of the following cases:
❍when the brake or clutch pedal is pressed;
❍if the ASR or Advanced ESP system cuts in (for ver-
sions/markets where provided).
While travelling with the device engaged, do
not place the gear lever in neutral.
In case of malfunction or if the device is
faulty, turn the control A-fig. 31 to OFF and
contact a Lancia Dealership, after checking
that the protective fuse has not blown.
ROOF LIGHTS
FRONT ROOF LIGHT WITH SPOT LIGHTS fig. 32
Switch A is used to switch on/off roof lights.
With the switch A in the middle position, the lights C and
D go on/off when front doors are opened/closed.
With switch A pressed to the left, the lights C and D are
always off. With switch A pressed to the right, the lights
C and D are always on.
Lights switch on/off progressively.
Switch B controls the spot light function; when the roof
light is off, it switches on individually:
❍the light C when pressed to the left;
❍the light D when pressed to the right.
fig. 32L0E0024m
Page 88 of 295

86KNOWING YOUR CAR
fig. 50L0E0109m
INITIALISATION PROCEDURE
After the battery has been disconnected or a fuse has
blown, the operation of the sun roof must be initialised
again.
Proceed as follows:
❍press button A-fig. 49 until the sun roof is completely
closed. Release the button;
❍press and hold down button A for at least 10 seconds
and/or until the glass panel moves forwards by one
click. Release the button at this point;
❍press button A within 5 seconds of this operation and
keep it pressed: the glass panel will complete a full
opening and closing cycle. Release the button only at
the end of this cycle.EMERGENCY OPERATION
If the switch does not work, the sunroof can be operated
manually as follows:
❍remove protective cap A-fig. 50 on the rear part of the
internal cover;
❍take the Allen key provided from the container with
the on-board documentation or from the luggage
compartment (versions with Fix&Go automatic);
❍fit the key into seat B and turn it:
– clockwise to open the roof;
– anticlockwise to close the roof.
Page 92 of 295

90KNOWING YOUR CAR
IMPORTANT If the battery is disconnected or the pro-
tection fuse blows, the luggage compartment opening/
closing mechanism must be initialised as follows:
❍shut all the doors;
❍press button
Áon the key or door lock/release but-
ton
≈in the dashboard;
❍press button
Ëon the key or door lock/release but-
ton
≈in the dashboard.
If the child lock was engaged and the previ-
ously described locking procedure carried
out, operating the internal handle will not
open the door but will only realign the door lock
knobs. To open the door, the outside handle must be
used. The door central locking/unlocking button is
not disabled by the engagement of the emergency
lock
≈.
POWER WINDOWS
These operate when the ignition key is turned to MAR and
for about 2 minutes after turning the key to STOP or re-
moving it.
The control buttons are located in the door panels (the
driver side door panel can be used to operate all the
windows).
An anti-pinch device is operated when the front windows
are lifted.
CONTROLS fig. 54
A. opening/closing left hand front window; “continuous
automatic” operation during window opening/closing
stage;
B. opening/closing right hand front window; “continu-
ous automatic” operation during window opening/
closing stage;
C. enabling/disabling of rear door electric window con-
trols;
D. opening/closing left hand rear window (for versions/
markets, where provided); “continuous automatic”
operation during window opening/closing stage;
E.opening/closing right hand rear window (where pro-
vided); “continuous automatic” operation during win-
dow opening/closing stage.
Page 95 of 295

1
KNOWING YOUR CAR93
Electric window system initialisation
The system must be re-initialised after disconnecting the
battery or if the relevant protection fuse is blown.
Initialisation procedure:
❍fully close the window to be initialised manually;
❍once fully closed, keep holding down the closing con-
trol for at least 1 second.
IMPORTANT Where provided, after there has been no
power supply for the control units (battery replaced or
disconnected or protective fuses for the electric window
control units replaced), the automatic operation of the
windows must be restored.The restoration procedure must be performed as follows
with the doors closed:
1. completely open the driver’s door window keeping the
operating button pressed for at least three seconds af-
ter the (lower) end of travel position;
2. completely raise the driver’s side window and keep the
button pressed for at least three seconds once the end
of travel position (upper end stop) has been reached;
3. repeat stages 1 and 2 for the passenger-side window
4. make sure that the initialisation is correct by check-
ing that the windows work automatically.
IMPORTANT With central locking on, operating the in-
ternal handle of one of the doors will unlock all the doors.
If there is no electric power supply (fuse blown, battery
disconnected, etc.) it is still possible to operate the door
locking manually; in this case the automatic lowering
function for the windows is not available and to open or
close the door with the window closed it is necessary to
exert pressure on the window towards the inside of the
vehicle to facilitate the movement of the window on the
moulding.
Page 108 of 295

106KNOWING YOUR CAR
Under no circumstances should aftermarket
operations be carried out involving steering
system or steering column modifications
(e.g. installation of anti-theft device). This could
negatively affect performance and safety, invali-
date the warranty, cause serious safety problems
and also result in vehicle non-compliance with
type-approval requirements.
Before servicing the car, switch off the engine
and remove the key from the ignition device
to activate the steering lock. This is espe-
cially important when the car wheels are not touch-
ing the ground. If this is not possible (e.g. if the key
must be kept in the MAR position or the engine must
be kept running), remove the electric power steering
system main fuse.
On some versions, with the CITY function
activated, the SPORT function is not avail-
able. To activate the SPORT function, deactivate
the CITY function and vice versa, because they are
reciprocally incompatible.REACTIVE SUSPENSION
SYSTEM (active shock
absorber system)
This system interacts with the Sport function (see “Sport
function” paragraph).
The SPORT button, fig. 67, allows you to choose between
two different driving settings depending on the route type
and on the road surface:
– with the button released: “normal” mode
– with the button pressed: “SPORT” mode.
fig. 67L0E0058m
Page 131 of 295

1
KNOWING YOUR CAR129
IMPORTANT The steering may become slightly stiff fol-
lowing parking manoeuvres involving a lot of steering.
This is normal and is caused by a system to prevent the
motor from overheating. No servicing is required. The
power steering system will start working normally again
the next time the car is used.T.P.M.S. SYSTEM
(Tyre Pressure Monitoring System)
(for versions/markets, where provided)
The car may be equipped with a tyre pressure monitor-
ing system. This system comprises a radio frequency
transmitter fitted to each wheel (on the wheel rim inside
the tyre), which is able to send information on the tyre
inflation pressure of each wheel to the control unit.
IMPORTANT NOTES ABOUT THE TPMS SYSTEM
The fault indications are not stored and will therefore
not be displayed after the engine has been switched off
and then on again. If the fault conditions persist, the
control unit will send the relative indications to the in-
strument panel only after the vehicle has been in motion
for a short time.
Before starting any servicing operation, stop
the engine and remove the key from the igni-
tion switch to operate the steering lock, par-
ticularly when the wheels do not touch the ground.
If this is not possible (e.g. if the key must be kept in
the MAR position or the engine must be kept run-
ning), remove the electric power steering system
main fuse.
Page 191 of 295

4
IN AN EMERGENCY189
Engine starting ....................................................................... 190
Quick tyre repair kit Fix&Go Automatic ................................. 192
Replacing a wheel ................................................................... 199
Changing a bulb ..................................................................... 206
Replacing exterior bulbs .......................................................... 210
Replacing an interior bulb ....................................................... 215
Replacing fuses ....................................................................... 219
Battery recharging .................................................................. 226
Jacking the car ........................................................................ 227
Towing the car ........................................................................ 227
In an emergency we recommend that you call the freephone number
found in the Warranty Booklet.
It is also possible to go to the www.lancia.com website
to find the closest Lancia Dealership.