fuses Lancia Delta 2012 Owner handbook (in English)
[x] Cancel search | Manufacturer: LANCIA, Model Year: 2012, Model line: Delta, Model: Lancia Delta 2012Pages: 295, PDF Size: 8.29 MB
Page 95 of 295

1
KNOWING YOUR CAR93
Electric window system initialisation
The system must be re-initialised after disconnecting the
battery or if the relevant protection fuse is blown.
Initialisation procedure:
❍fully close the window to be initialised manually;
❍once fully closed, keep holding down the closing con-
trol for at least 1 second.
IMPORTANT Where provided, after there has been no
power supply for the control units (battery replaced or
disconnected or protective fuses for the electric window
control units replaced), the automatic operation of the
windows must be restored.The restoration procedure must be performed as follows
with the doors closed:
1. completely open the driver’s door window keeping the
operating button pressed for at least three seconds af-
ter the (lower) end of travel position;
2. completely raise the driver’s side window and keep the
button pressed for at least three seconds once the end
of travel position (upper end stop) has been reached;
3. repeat stages 1 and 2 for the passenger-side window
4. make sure that the initialisation is correct by check-
ing that the windows work automatically.
IMPORTANT With central locking on, operating the in-
ternal handle of one of the doors will unlock all the doors.
If there is no electric power supply (fuse blown, battery
disconnected, etc.) it is still possible to operate the door
locking manually; in this case the automatic lowering
function for the windows is not available and to open or
close the door with the window closed it is necessary to
exert pressure on the window towards the inside of the
vehicle to facilitate the movement of the window on the
moulding.
Page 191 of 295

4
IN AN EMERGENCY189
Engine starting ....................................................................... 190
Quick tyre repair kit Fix&Go Automatic ................................. 192
Replacing a wheel ................................................................... 199
Changing a bulb ..................................................................... 206
Replacing exterior bulbs .......................................................... 210
Replacing an interior bulb ....................................................... 215
Replacing fuses ....................................................................... 219
Battery recharging .................................................................. 226
Jacking the car ........................................................................ 227
Towing the car ........................................................................ 227
In an emergency we recommend that you call the freephone number
found in the Warranty Booklet.
It is also possible to go to the www.lancia.com website
to find the closest Lancia Dealership.
Page 208 of 295

206IN AN EMERGENCY
After tyre replacement
❍Stow the space saver wheel D-fig. 10 in the space pro-
vided in the luggage compartment;
❍fit the partially open jack in its box forcing it lightly
to prevent it from vibrating when travelling;
❍put the tools back into place in the container;
❍stow the container, complete with tools, in the spare
wheel and tighten the locking device B-fig. 10;
❍reposition the boot mat correctly.
IMPORTANT Do not use inner tubes with tubeless tyres.
Check the inflation pressure of the tyres and the space-
saving wheel periodically.CHANGING A BULB
GENERAL INSTRUCTIONS
❍Before changing a bulb, check the contacts for rust-
ing;
❍burnt-out bulbs must be replaced by others of the
same type and wattage;
❍always check the alignment of the beam after chang-
ing a headlight bulb;
❍when a light is not working, check that the corre-
sponding fuse is intact before changing a bulb. For the
location of fuses, refer to the paragraph “Replacing
fuses” in this chapter.
Modifications or repairs to the electric sys-
tem that are not carried out properly or do
not take the system technical specifications
into account can cause malfunctions leading to the
risk of fire.
Various fastening bolts and space-saver
wheels, specific and differing in structural
characteristics, are used depending on the
wheel rim type (alloy or steel). Fastening bolts for
alloy rims can be identified by the presence of a per-
manent washer and a hollow side on the bolt head.
Therefore, you will need to go to a Lancia Dealer-
ship to get the correct type of fastening bolts and
space saver wheel if you change the type of wheels
fitted (alloy rims instead of steel rims, or vice
versa). Keep the bolts fitted as standard in case of
re-use of the wheels originally mounted on the car.
Page 221 of 295

IN AN EMERGENCY219
4
REPLACING FUSES
GENERAL INFORMATION
Fuses protect the electric system: they cut in (i.e. they
blow) in the event of a failure or improper action on the
system. Check the state of the corresponding fuse when
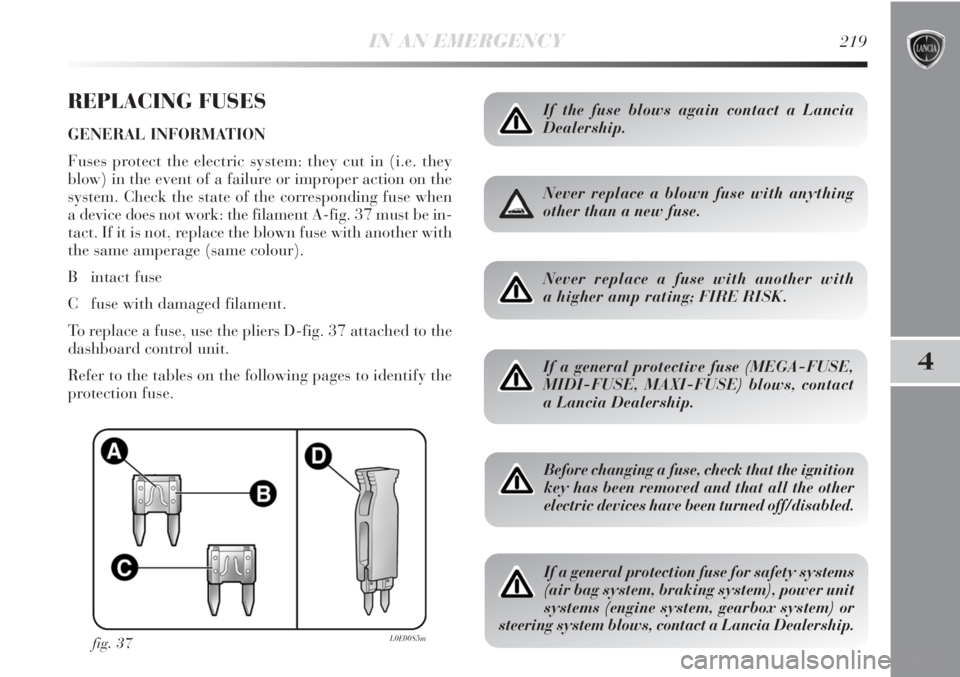
a device does not work: the filament A-fig. 37 must be in-
tact. If it is not, replace the blown fuse with another with
the same amperage (same colour).
B intact fuse
C fuse with damaged filament.
To replace a fuse, use the pliers D-fig. 37 attached to the
dashboard control unit.
Refer to the tables on the following pages to identify the
protection fuse.
fig. 37L0E0085m
If the fuse blows again contact a Lancia
Dealership.
Never replace a blown fuse with anything
other than a new fuse.
Never replace a fuse with another with
a higher amp rating; FIRE RISK.
If a general protective fuse (MEGA-FUSE,
MIDI-FUSE, MAXI-FUSE) blows, contact
a Lancia Dealership.
Before changing a fuse, check that the ignition
key has been removed and that all the other
electric devices have been turned off/disabled.
If a general protection fuse for safety systems
(air bag system, braking system), power unit
systems (engine system, gearbox system) or
steering system blows, contact a Lancia Dealership.
Page 222 of 295

220IN AN EMERGENCY
fig. 38L0E0209m
FUSE LOCATION
Dashboard fuse box
To access the fuses you must remove the press-fitted cover A. The fuse box shown in fig. 38 is located in the lower
area next to the pedal unit.
Page 223 of 295

IN AN EMERGENCY221
4
Engine compartment fuse box fig. 39 and 40
A second fuse box is located on the right side of the en-
gine compartment, next to the battery. To access this fuse
box release the side tabs and remove cover L. The ID
number of the electrical component corresponding to
each fuse can be found on the back of the cover.
fig. 39L0E0088mfig. 38aL0E0211m
If you need to wash the engine compartment,
take care not to directly hit the engine com-
partment fuse box with the jet of water.
Additional fuses (1.4 Turbo Multi Air versions)
On the 1.4 Turbo Multi Air versions there are four addi-
tional fuses (fig. 38a) next to the dashboard junction unit.
Page 290 of 295

288LIST OF CONTENTS
– emergency rear door
locking device ................. 90
DPF (particulate filter) .......154
Driving Advisor ...................108
DST (Dynamic Steering
Torque) .............................105
“Dualdrive” electric
power steering ...................127
Electric windows ................. 90
Engine codes/
bodywork versions ............260
Engine compartment
(washing) ..........................255
Engine
– identification code ..........260
– specifications ..................261
EOBD system ......................127
Exterior lights ..................... 65
Fix&Go Automatic
(device) .............................192
Flashing .............................. 67
Fluids and lubricants ..........277
Fog lights ...................... 66-77
– bulb replacement ............213
– Cornering function ......... 66
Follow Me Home (device) ... 68
Food compartment .............. 80
Front/rear armrest ......... 79-81
Fuel cap ..............................153
Fuel consumption ...............279
Fuel cut-off ......................... 78
Fuses (if a fuse blows) .........219
Getting to know your car .... 7
Glove box light
(bulb replacement) ............218 Cruise Control ..................... 71
Cup holder/oddment
compartments ................... 82
Dashboard .......................... 8
Dimensions .........................271
Dipped headlamps (control) .. 67
– bulb replacement ............210
Direction indicators
– bulb replacement ............212
– control ............................ 67
Display ............................... 23
– display readings ............. 36
– menu items ..................... 28
Display readings ................. 36
Door locking ....................... 89
Doors .................................. 87
– child safety lock ............. 88