height Lancia Delta 2012 Owner handbook (in English)
[x] Cancel search | Manufacturer: LANCIA, Model Year: 2012, Model line: Delta, Model: Lancia Delta 2012Pages: 295, PDF Size: 8.29 MB
Page 53 of 295

1
KNOWING YOUR CAR51
Height adjustment fig. 16
Operate lever C to raise or lower the rear part of the seat
cushion to improve comfort.
Lumbar adjustment (driver’s seat) fig. 16
The position of the back against the seat backrest is ad-
justed by turning knob D.
FRONT SEATS WITH ELECTRIC ADJUSTMENT
fig. 17(for versions/markets where provided
The adjustment is possible with the ignition ON or for up
to 1 minute with the ignition key turned to OFF or ex-
tracted.
When the front doors are opened the seat on the side of
the door that has been opened can be moved for about
3 minutes or until the door is closed.
The controls for seat adjustment are:
Multifunction control A:
❍seat height adjustment;
❍lengthwise seat movement.
Multifunction control B:
❍backrest angle adjustment;
❍backrest lumbar adjustment.Seat heating fig. 17
(for versions/markets where provided)
With the key turned to MAR, press buttons
Cto switch
the function on/off.
When the function is enabled, the LED on the button
turns on.
fig. 17L0E0009m
Page 55 of 295

1
KNOWING YOUR CAR53
HEADREST
FRONT HEAD RESTRAINTS fig. 19
Head restraints are height adjustable; operate as follows.
❍Upwards adjustment: lift the head restraint until it
locks.
❍Downward adjustment, press the button A and lower
the head restraint.
fig. 19L0E0011m
To extract the rear head restraints press buttons B and
C simultaneously and release them upwards.
IMPORTANT If the rear seats are used, always set the
head restraints in the “completely raised” position.
All adjustments must be carried out only
with the vehicle stationary and engine off.
Head restraints must be adjusted so that the
head, rather than the neck, rests on them. Only in
this case they can protect your head correctly. To
make the best use of the head restraint protection,
adjust the seat back to keep a straight back, with
the head as close as possible to its restraint.
REAR HEAD RESTRAINTS fig. 19
(for versions/markets where provided)
Depending on the versions, rear head restraints can be
“fixed” or height adjustable type.
Height-adjustable head restraints:
❍Upwards adjustment: press the button B and lift the
head restraint until it locks.
❍Downward adjustment, press the button B and lower
the head restraint.
Page 164 of 295

162SAFETY
All child restraint devices must bear the certification data,
together with the control mark, on a label solidly fixed to
the seat which must never be removed.
Over 1.50 m in height, from the point of view of restraint
systems, children are considered as adults and wear the
seat belts normally. Lineaccessori Lancia includes child
seats for each weight group.
These devices are recommended and have been specifi-
cally designed for Lancia cars.
GROUP 0 and 0+
Babies up to 13 kg must be carried facing backwards on
a cradle seat, which, supporting the head, does not induce
stress on the neck in the event of sharp decelerations.
The cradle is restrained by the car seat belts, as shown
in fig. 4 and, in turn, it must restrain the child with its
own belts.
GROUP 1
From 9 kg to 18 kg of weight, children may be carried
facing forwards.
fig. 4L0E0272m
Page 165 of 295

2
SAFETY163
GROUP 2
Children from 15 to 25 kg may use the car seat belts di-
rectly fig. 4.
The child seat is needed only to position the child cor-
rectly with respect to the belts so that the diagonal sec-
tion crosses the child’s chest and never the neck, and the
lower part is snug on the pelvis not the abdomen.
GROUP 3
For children from 22 kg up to 36 kg suitable risers make
fastening the seat belt easier.
Figure 4 shows correct child seat positioning on the rear
seat. Children over 1.50 m in height can wear seat belts
like adults.Below is a summary of the safety rules to be followed
when carrying children:
1) The recommended position for installing child seats
is on the rear seat, as it is the most protected area in
the event of a crash.
2) If the passenger air bag is deactivated always check
that the warning light “is lit on the instrument panel
to make sure that it has actually been deactivated.
3) Carefully follow the instructions supplied with the
child restraint system which the manufacturer must
provide. Keep the instructions in the car along with
the other documents and this handbook. Do not use
second-hand child seats without instructions.
4) Always check the seat belt is well fastened by pulling
the strap.
5) Only one child is to be strapped into each retaining
system; never carry two children using one child seat.
6) Always check that the seat belts do not rest on the
child’s neck.
7) While travelling, do not let the child sit incorrectly or
release the belts.
8) Never carry children on your lap, even newborns. No-
one, however strong, can restrain a child in the event
of an accident.
9) In the event of an accident, replace the child’s seat
with a new one.
The figures are only examples for fitting
purposes. To install the child restraint, re-
fer to the instructions supplied with the
same. Child seats with Isofix attachments are
available for a safe anchoring to the seat without
using the car seat belts.
Page 254 of 295

252SERVICING AND MAINTENANCE
SPRAY NOZZLES
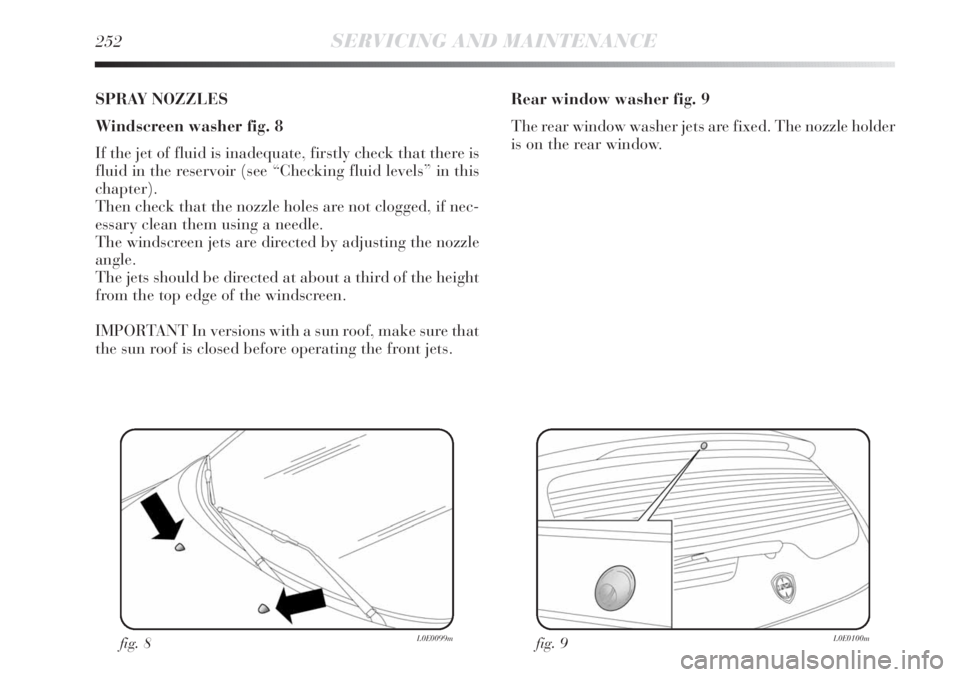
Windscreen washer fig. 8
If the jet of fluid is inadequate, firstly check that there is
fluid in the reservoir (see “Checking fluid levels” in this
chapter).
Then check that the nozzle holes are not clogged, if nec-
essary clean them using a needle.
The windscreen jets are directed by adjusting the nozzle
angle.
The jets should be directed at about a third of the height
from the top edge of the windscreen.
IMPORTANT In versions with a sun roof, make sure that
the sun roof is closed before operating the front jets.
fig. 8L0E0099m
Rear window washer fig. 9
The rear window washer jets are fixed. The nozzle holder
is on the rear window.
fig. 9L0E0100m
Page 268 of 295

266TECHNICAL SPECIFICATIONS
WHEELS
RIMS AND TYRES
Pressed steel or alloy rims. Tubeless radial carcass tyres.
All approved tyres are listed in the Vehicle Registration
Document.
IMPORTANT In the event of discrepancies between the
information provided in this “Owner’s handbook” and
the “Registration Document”, consider the specifications
shown in the log book only.
For safe driving, the car must be fitted with tyres of the
same make and type on all wheels.
IMPORTANT Do not use inner tubes with Tubeless tyres.
SPACE-SAVER WHEEL
Pressed steel wheel. Tubeless tyre.
WHEEL GEOMETRY
Total front toe in: –1
±1 mm
Total rear toe in: 2
±2 mm
The figures refer to the car in running order.UNDERSTANDING TYRE MARKING fig. 5
Example: 195/55 R 16 91 V
195 = Nominal width (S, distance in mm between
sidewalls).
55 = Height/width ratio (H/S) as a percentage.
R = Radial tyre.
16 = Rim diameter in inches (Ø).
91 = Load rating (capacity).
V = Maximum speed index.
fig. 5L0E0120m
Page 273 of 295

TECHNICAL SPECIFICATIONS271
6
fig. 6
L0E0299m
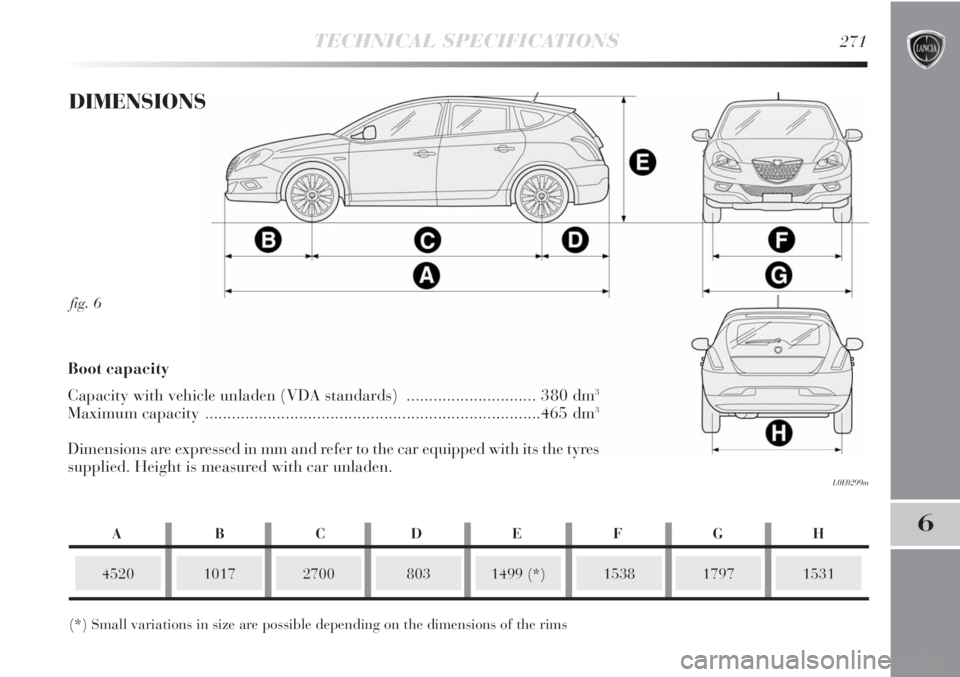
DIMENSIONS
452010172700
(*) Small variations in size are possible depending on the dimensions of the rims1499 (*)15381531
Boot capacity
Capacity with vehicle unladen (VDA standards) ............................. 380 dm
3
Maximum capacity ...........................................................................465 dm3
Dimensions are expressed in mm and refer to the car equipped with its the tyres
supplied. Height is measured with car unladen.
1797
ABCDEFGH
803